For most newbies, the concept of symbols in Flash can be pretty confusing. I've known enough designers who - even after working with Flash for years - are pretty clueless about the best way to use symbols in their work. Let's take a closer look at symbols and text.
Welcome to the second part of our Flash Tips and Best Practices series for designers. In the first part we looked at drawing, which is usually the first thing one would tackle when starting with Flash. Once you've mastered the creation tools though, it does not take too long to realize that the shapes by themselves are pretty useless. Sure, you can apply colors and strokes and manipulate them any way you want, but you're probably in there to make things move. And the best way to start with that is to convert the shapes to symbols.
Another critical aspect of design in Flash that we will cover today, is text. Over the years, Flash's ability to create and render text has taken some pretty big leaps. I still remember the days when there was no 'anti-alias for animation' setting and the thought of having blocks of text was nothing short of a nightmare. That's all gone now and with the ability to apply filters directly to text, it's a much less painful routine now. Yet, there's a lot one can do with the text tool in Flash today. We will look at some such tricks.
Although this post was written for Flash Professional CS5, most of the tips should work just fine in older versions. I will try and make it a point to highlight wherever something is very specific to the latest version of Flash.
Choose Your Symbols
For starters, there are three types of symbols you can create in Flash: graphic, button, and movie clip. Although the names should be pretty self-explanatory, it is not always obvious what the difference is between the three. Please bear with me if this sounds too basic, but I know a lot of Flash designers who are not entirely sure what's what. So here goes:
- Graphic: The most basic type of symbol in Flash, and probably the most useless. You can't have an animation inside a graphic (well, technically you can, but Flash will simply ignore it), and you can't really assign much in the name of functionality to graphic using ActionScript. For me, it's only one step above simply grouping elements.
- Button: As the name suggests, this is an interactive element. A button is automatically converted to an active element - on that you can click, like a link in an HTML page. Every button has three states - up (or normal), overand down . You can assign ActionScript to button to make it start the animation, for example.
- Movie Clip: This is by far the most used symbol type in Flash, and for good reason. To start with, you can have an animation within a Movie Clip. An instance of a Movie Clip placed on the stage will animate irrespective of the main timeline. It is also the only symbol type that you can apply blending modes and filters (more on those in a minute).
Note: You can set the behavior of an instance of any symbol individually. Placed a Movie Clip on the stage but don't want it to animate? Simply select the instance and change the behavior in the 'Properties' panel.
Blending Modes
Blending modes bring one of the much loved features from image editing applications to Flash's vector workspace. Like Photoshop, Fireworks, Illustrator and others, you can alter how elements look by overlapping them and choosing different transparency modes. For example, you might want to darken a part of an object based on what's on top of it, or maybe lighten it. One common way to use this is when you have an imported raster logo image with a white background that would like to show through. Simply change the blending mode to 'Multiply' in the 'Display' section of the Properties panel.

Note that blending modes can only be applied to Movie Clip and button symbols. For more on Blend Modes in Flash checkout this screencast.
Case study: Apply lighting effects to boring flat textures
Let's say you need a realistic wooden background for your design. There are tons of free textures available out there, but one common problem is that they all tend to look flat. Now if you're trying to re-create a tabletop, there needs to be some semblance of a light source from one of the sides, right? Let's try and re-create that effect in Flash using Blending modes.
- Import your texture on the stage and position it as required.
- Draw a rectangle on top of the image, matching its size and x & y co-ordinates. Use the Primitive Rectangle tool here; a normal rectangle shape will always appear behind the image unless you draw it on a new layer.
- Remove any strokes from the rectangle and add a default white-to-black radial gradient fill. Adjust the fill so that the white center is close to the corner you need the light source to be in, and the black edges are close to the diagonally opposite corner.
- Now convert this rectangle to a Movie Clip symbol and change its blending mode to 'Overlay'. You may need to adjust the 'Alpha' a bit to get effect just right.
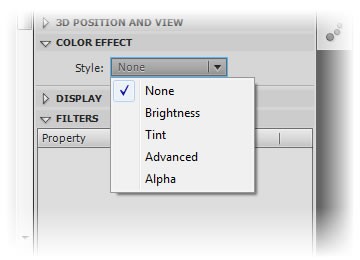
Color Effects
One of the first things one learns about animation in Flash is how to fade stuff in and out. And the default technique to do that is to change the 'Alpha' value of a symbol. But there is much more to the other items in that dropdown list, together known as Color Effects.
Although Alpha sounds like the best way to fade stuff in and out, it is not always the most suitable option. For example, if your symbol is a drawing with a bunch of overlapping shapes, Alpha reduces the transparency of each shape individually which brings up artifacts in the semi-transparent states. In such cases, if your artwork is on a white background, changing the Brightness values works much better to get the fade effect. If the background is some other flat color, you can also use Tint and fill the artwork with the background color. Unfortunately, if the background is a gradient, pattern or anything else, your only option is to go into the symbol, break apart all shapes and groups and bring them on a single layer to make a object.

Note that unlike Blending Modes, Color Effects can be applied to any symbol - movie clips, buttons, and graphics.
Case Study: Create multiple colored buttons from one symbol
When designing interfaces in Photoshop or Fireworks, one technique I use very often is to create a base interface element - like a button - and make color variations of it using the Hue-Saturation filters. Recently I figured out a way to do something similar in Flash. The idea is to create a single neutral symbol and then use the Advanced color effects to create variations of it.

To start with, create a symbol with whatever gradients, highlights, shadows and overlays you want. You can make it in any color, but I tend to prefer using only grey shades. So the result is a button that's as matte, plastic or any style you want, but in grey. Next, place a couple of instances of the symbol on the stage. Then simply select an instance, apply the 'Advanced' color effect and start playing around with the RGB color values. If you are struggling to get it right, one way is to select Tint, pick the color you need, and then go to the Advanced panel to tweak it to your satisfaction. Rinse and repeat for the other symbols.
Filters
For a very long time, Flash designers were stuck with the strictly vector creation tools in Flash. Soft shadows and motion blurs were things you hacked together using awkward gradients or raster images imported from Photoshop. Then along came the Filters in Flash 8 and everything changed. Today, pretty much any snazzy effect is possible right inside Flash with a decent amount of control over all aspects of the filter. Let's look at some ways you can use Filters to add some jazz to your designs.
Curved box shadows
Sure, there are drop shadows for when you want an element to stand out from the background or just differentiate it from everything else around it. But for occasions when a simple drop shadow is just not enough, you can play around with the fall-off a bit to add that extra bit of style. One way to do this, is to create a copy of your shape and tweak it around to get the curvature you need. Then convert it to a symbol, add a 100% black tint color effect and a gaussian blur. Then simply adjust the alpha value to get the intensity you need from the shadow. Check out a couple of samples below.

Remember to set the quality to 'High' whenever you use a filter. The effect is much much better. It totally beats me why 'Low' is set as the default quality setting. I've used filters in seriously complex animations and the impact on performance is barely noticeable.
Letterpress
When it comes to big text, the letterpress effect is pretty popular. With the ability to add multiple filters of the same type (something even Photoshop doesn't have yet), the letterpress effect is pretty easy to achieve in Flash. All you need to do is simply add two drop-shadow filters - one with a white 1px shadow at 90 degrees and one black at 270 degrees. Check out the image below for all the details.

9-Slice Scaling
Another feature that was introduced in Flash 8 is 9-slice scaling - the ability to scale an object without affecting certain parts of it. The best example where this works is rounded rectangles. If you've every tried to create rounded rectangles and then scale them, you know how the corners tend to go out of shape if the scaling is not proportionate. 9-slice scaling solves that problem. Let's see how.
- Draw the shape you want and open the "convert to symbol" dialog.
- Select Movie Clip in the Type dropdown list. 9-slice scaling can only be applied to a movie clip symbol.
- Click the 'Advanced' link at the bottom-left of the dialog box and check "Enable guides for 9-slice scaling".
- Now double-click the symbol to edit it.
- You should see two vertical and two horizontal dotted lines on top of the shape. Move these outwards so that they are just inside the curves on all four corners.

Here's how it works. I've labeled each of the 9 sections we now have, divided by the dotted lines. When you go back to the stage and scale the object - proportionately or otherwise - A, C, E & G will not scale at all. They will retain their size and shape. B & F will only scale horizontally, while D & H will only scale vertically. This way, no matter what you do, the rounded rectangle retains its core personality. This technique can work wonders when you need a bunch of similar elements at different sizes - like buttons, popups or speech bubbles.
Note that 9-slice scaling will not work in every context. If your artwork has complex shapes or very round corners with curved reflections, or even pattern fills, the scaling may not be consistent.
Text
If there was one complaint about Flash that overpowered everything else in the past, it was the way Flash handled text. In older versions, especially before the Adobe takeover, text rendering in Flash sucked, to put it nicely. So much so that it had spurned an entire cottage industry of pixel fonts that were designed to work around Flash's inability to render small text smoothly. Thankfully, with the addition of 'anti-alias for readability' things became much much more bearable. The one tip I give anyone I who has ever had anything to do with Flash is to avoid anything but 'anti-alias for readability' like plague. In fact, I don't even know why they have that option any more since text rendering in the player has now been optimized enough to smoothly render 'readable' text in any scenario.

A very new and potentially ground-breaking phenomenon is the Text Layout Framework (or TLF), Adobe's high level API for the new Flash Text Engine that was introduced in Flash Player 10. Starting with the CS5 version, you have the choice of making any block of text be 'Classic Text' or 'TLF Text'. I know, as if there already weren't too many choices to make, right!? Well, although TLF is clearly the future of text in Flash, it is not compatible with older versions of the Flash Player or with AS2 and below. So if you want backward compatibility, Classic Text is your best bet.

TLF basically adds a boatload of features to good old text in Flash. Want to maintain tight control over the leading and tracking in your text? Need vertical orientation for the text? How about multiple columns? Heck, do you just need your text to display nicely in an Indian language (or most non-latin scripts, for that matter)? TLF is the answer. There are way too many options to tweak how a block of TLF text renders, way more than what we can cover here. I would say go ahead and play around with it a bit. Just remember that this hasn't been around too long - neither in the authoring tool nor the player - and there are bound to be some issues with the way it works at the moment.
Helpful Hints
Here are some quick hints and suggested best practices to make the best use of the text tools in Flash:
- The shortcut keys for bold and italic in Flash are different than most other applications - Ctrl+Shift+B is for bold, and Ctrl+Shift+I is for italic.
- With the text tool selected, click once on the stage to create a single line text field. Click and drag to create a paragraph.
- To convert a paragraph to a single line, click anywhere inside the text block and double-click the hollow square handle at the top-right of the selection.
- To convert a single line to a paragraph, simply drag any of the four selection handles.
- A hollow square at the top-right indicates that the selected block is a paragraph, while a hollow circle represents a single line.
- A text block can be of three types:
- Static: A static block of text that is hardcoded in the FLA and nothing more.
- Dynamic: If you need to replace the contents of a text block on the fly during run time, this one is way to go.
- Input: The name says it all, really. Use this for when you need the user to enter text - like in forms, etc.
- If you need to embed a font in your Flash file and the text is going to be simple alphabets, numbers and everyday punctuations, choose 'Basic Latin' in the Embed dialog. There's a good chance you won't need anything else from that font.
- Filters can be applied directly to a block of text in Flash. You don't need to convert it to a movie clip as with everything else. Go ahead and go crazy with those 1 pixel text shadows, already!
Conclusion
And that's how you do symbols and text in Flash. Of course, there's a ton more to these than we have covered, but the attempt was to try and compile some of the best tips and best practices when working with symbols and text. Please feel free to add your own tips and shortcuts in the comments section. Or challenge anything I've said. I'll be the first to acknowledge that I don't know everything there is to know about Flash, so anything new or different is always welcome.
Next time we will get into the core functionality and unique selling point of Flash: animation. Stay tuned!

Comments