Twice a month, we revisit some of our readers’ favorite posts from throughout the history of Activetuts+. This tutorial was first published in May, 2009.
Using ActionScript 3.0, we'll create a cool Animated Background that we can use in Menu Screens or as a Music Visualizer.
Final Result Preview
Let's take a look at what we'll be working towards:
Step 1: Brief Overview
We'll create a Class that will take care of the whole effect. When you call the class, you'll be able to change the number of lights, color, alpha, size, direction, speed and the quality of the Blur filter. In this way it's possible to achieve many different results when using it. Also, you can use any background you want.
Step 2: The .fla Document
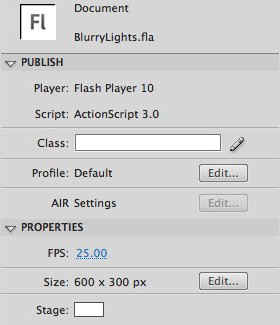
Create a new ActionScript 3.0 document (File > New...). Set the Stage size to your desired dimensions, I've used 600 x 300 px.
Step 3: Your Background
Add or draw an image to use as the background, I've used a simple blue gradient (#02C7FB, #1F63B4).

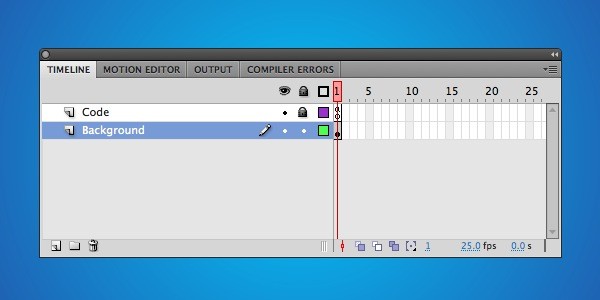
Step 4: Layers
Rename the first layer to "Background" then create another one and name it "Code". You can lock the "Code" layer to avoid placement of unwanted drawings in there.
Step 5: ActionScript
Save your work and let's get into the code!
I'm assuming you already have a basic understanding of ActionScript 3.0, if you have any keyword specific doubts please refer to the Flash Help (F1).
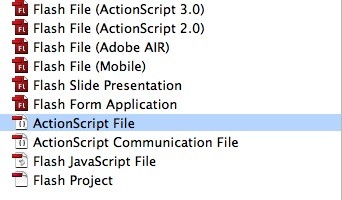
Create a new ActionScript file (File > New...).
Step 6: Importing Required Classes
package Classes
    {
/* Import required classes */

    import flash.display.MovieClip;
    import flash.filters.BitmapFilter;
    import flash.filters.BlurFilter;
    import flash.events.Event;
Here we import the Classes that we'll use, remember that the word next to "package" is the name of the folder where our Class is located.
Step 7: Extending the Class
//We need to extend the class so we can use the addChild() method.

  public class Lights extends MovieClip
{
Extending the MovieClip class will allow our class to inherit all of the methods, properties and functions that the MovieClip has, in this case we use it to get access to the addChild() method.
Step 8: The Variables
Although they have pretty much self explanatory names I'll add short comments on each var to make sure it's clear. They get their values from the parameters of the Main function.
    private var lightsNumber:int; //The number of Lights on Stage
    private var xSpeed:int; //The horizontal speed the Lights have
    private var ySpeed:int; //Vertical Speed
    private var lightsDir:String; //Direction the Lights are going, this can be Up, Down, Left or Right
    private var areaW:int; //The width of the area where the effect will take place
    private var areaH:int; //Height
    private var lights:Array = new Array(); //This array will store all the Lights MovieClips so we can use them outside the For where we are going to create them.
Step 9: Main Function
/* Main function */

   	public function init(areaWidth:int, areaHeight:int, numberOfLights:int, lightSize:int, lightColor:uint, minimumScale:Number, hSpeed:int, vSpeed:int, dir:String, quality:int):void
    {

  	areaW = areaWidth;
	areaH = areaHeight;
	lightsNumber = numberOfLights;
	lightsDir = dir;
This is the function that we need to start the effect, we also set the variable values in this code.
Step 10: Creating the Lights
for (var i:int = 0; i < numberOfLights; i++)
{
/* Create the specified number of lights */

   var light:MovieClip = new MovieClip();

   /* Set random speed to x and y based on the params */

   xSpeed = Math.floor((Math.random() * (hSpeed - -hSpeed + 1)) + -hSpeed);
    ySpeed = Math.round((Math.random() * vSpeed) + 0.5);

   light.xSpeed = xSpeed;
    light.ySpeed = ySpeed;


    /* Create lights */

    light.graphics.beginFill(lightColor);
    light.graphics.drawCircle(0, 0, lightSize / 2);
    light.graphics.endFill();
In this code we use a "For" statement to create the number of Lights the user sets in the parameter and calculate a semi-random speed for every Light.
Step 11: Position
This sets a random start position for the Lights based on the Area parameters.
light.x = Math.floor(Math.random() * areaWidth);
light.y = Math.floor(Math.random() * areaHeight);
Step 12: Blur Filter
var b:int = Math.floor(Math.random() * 10) + 5; //Calculates a random Blur between 0-9 and adds 5 to the result.

   var blur:BitmapFilter = new BlurFilter(b,b,quality); //The BlurFilter object.

   var filterArray:Array = new Array(blur); //To apply the filter we need an array of filters.

   light.filters = filterArray; //Sets the filters array to the Light
The above code applies the Blur. Remember that this code is still part of the For, so the Lights get different Blurs.
Step 13: Alpha
light.alpha = Math.random() * 0.6 + 0.1;
An easy one; this sets the alpha property between 0.1 and 0.6.
Step 14: Scale
light.scaleX = Math.round(((Math.random() * (1-minimumScale)) + minimumScale) * 100) / 100;
light.scaleY = light.scaleX;
This sets the scale of the Lights between the original size and the minimum scale parameter. We use a round method to save processor.
Step 15: Adding the Lights to the Stage
   addChild(light);

   /* Store lights in an array to use it later */

   lights.push(light);

   /* Check for lights direction */

   checkDirection();
This adds the Lights to the Stage, then we save them in an Array to use them later. It also the checkDirection function to see in which direction the Lights will go.
Step 16: Check Direction Function
private function checkDirection():void
{
for (var i:int = 0; i < lights.length; i++)
{
switch ( lightsDir )
{
case "up" :

   lights[i].addEventListener(Event.ENTER_FRAME, moveUp);

   break;
    case "down" :

   lights[i].addEventListener(Event.ENTER_FRAME, moveDown);

   break;
    case "right" :

   lights[i].addEventListener(Event.ENTER_FRAME, moveRight);

   break;
    case "left" :

   lights[i].addEventListener(Event.ENTER_FRAME, moveLeft);

   break;
    default :
    trace("Invalid Direction!");
    }
    }
    }
Here we use a for to get access to all the Lights in the Array, then check the direction variable to determine where to move the Lights. Depending on the direction we add the listener to the corresponding function.
Step 17: Move Functions
This next section may seem a little complicated, but it's easier than you think. Basically, it moves the Light depending on the speed calculated in the Main function, then checks if the Light has "left" the Area of the effect. If that is the case, it sets a random position contrary to the direction the Light is heading.
private function moveUp(e:Event):void
  {
  e.target.x += e.target.xSpeed;
  e.target.y-=e.target.ySpeed;
   /* Reset light position, Y first, then X  */

   if (e.target.y + (e.target.height / 2) < 0)
    {
    e.target.y = areaH + (e.target.height / 2);
    e.target.x=Math.floor(Math.random()*areaW);
    }
   if ((e.target.x + e.target.width / 2) < 0 || (e.target.x - e.target.width / 2) > areaW)
    {
    e.target.y = areaH + (e.target.height / 2);
    e.target.x=Math.floor(Math.random()*areaW);
    }
    }
   /* Move Down function */

   private function moveDown(e:Event):void
    {
    e.target.x+=e.target.xSpeed;
    e.target.y+=e.target.ySpeed;
   /* Reset light position, Y first, then X */

   if (e.target.y - (e.target.height / 2) > areaH)
    {
    e.target.y = 0 - (e.target.height / 2);
    e.target.x=Math.floor(Math.random()*areaW);
    }
   if ((e.target.x + e.target.width / 2) < 0 || (e.target.x - e.target.width / 2) > areaW)
    {
    e.target.y = areaH + (e.target.height / 2);
    e.target.x=Math.floor(Math.random()*areaW);
    }
    }

  /* Move Right function */
   private function moveRight(e:Event):void
    {
    e.target.x+=e.target.ySpeed;
    e.target.y+=e.target.xSpeed;

   /* Reset light position, Y first, then X */
   if (e.target.y - (e.target.height / 2) > areaH || e.target.y + (e.target.height / 2) < 0)
    {
    e.target.x = 0 - (e.target.height / 2);
    e.target.y = Math.floor(Math.random()*areaH);
    }

   if ((e.target.x - e.target.width / 2) > areaW)
    {
    e.target.x = 0 - (e.target.height / 2);
    e.target.y = Math.floor(Math.random()*areaW);
    }
    }
   /* Move Left function */

   private function moveLeft(e:Event):void
    {
    e.target.x-=e.target.ySpeed;
    e.target.y-=e.target.xSpeed;
   /* Reset light position, Y first, then X */

   if (e.target.y - (e.target.height / 2) > areaH || e.target.y + (e.target.height / 2) < 0)
    {
    e.target.x = areaW + (e.target.width / 2);
    e.target.y=Math.floor(Math.random()*areaH);
    }

   if ((e.target.x + e.target.width / 2) < 0)
    {
    e.target.x = areaW + (e.target.width / 2);
    e.target.y=Math.floor(Math.random()*areaW);
    }
    }
    }
    }
Step 18: Calling the Function
Save your class (remember that the file has to have the same name as the Class) and let's get back to the Fla. Open the Actions Panel and write:
import Classes.Lights;

  var light:Lights = new Lights();

  light.init(600, 300, 40, 60, 0xFFFFFF, 0.3, 3, 3, "up", 2);

  addChild(light);
That's it! Test your movie to see your nice animated background!
Conclusion
Playing with the parameters in the class will result in a lot of different effects, try changing the background, set slower or faster speeds, use more Lights, less Blur and so on!
I hope you learned something you can use, thanks for reading!

Comments