Ever wanted to make a manageable and beautiful photo viewer app? In this tutorial, I'll show you how to design and code a nifty Polaroid photo viewer, focusing on the design and tweening.
Final Result Preview
Let's take a look at the final result we will be working towards:
Section 1: Organization
In this section we'll discuss our folder structure, also we'll acquire our stock imagery.
Step 1: Creating Our Folders
First let's create a folder in which our project will be located. We'll name it "Polaroid Viewer".
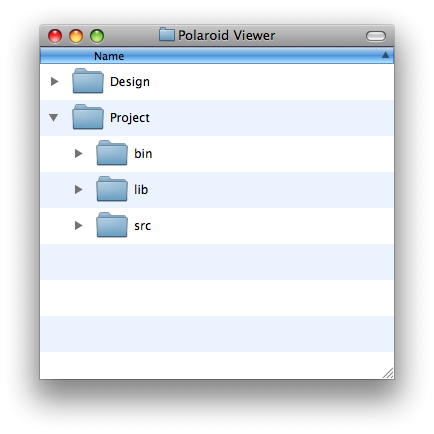
Afterwards just copy this folder structure:
Step 2: Understanding Our Folder Structure
When creating very visual projects, it's very important to first really know what you want to design. Inside the Design folder I always have my visual concepts and also in the Design folder I edit the images I'll need for a project.
After I've finished working on my concept I proceed to making a working product, I do this inside the Project folder. Inside the Project folder is the very known bin, lib and src folder structure:
- bin: Everything which is being exported and is needed to launch the final product, including data assets.
- lib: Our Flash documents.
- src: All our code, our own classes, as well as other frameworks.
Step 3: Acquire Stock Imagery
Now that we've created our folders, let's proceed to the images. In this tutorial we'll need at least two images:
You'll need a Stock Xchange account to download these images, if you don't yet have one, you should sign up! It's a website filled with free stock imagery!
Click the links to download the images, afterwards save or move them to our Design folder.
Also we'll need images to place inside the polaroid frames. Here's a list of images which I've used, but feel free to use your own images.
Section 2: Design
In this section we're going to edit our stock images. After doing so, we'll import these images inside our Flash document, which we'll create later.
We're going to edit our images with Photoshop, I'll be using CS5, however you can always use older versions. If you're not so confident in your Photoshop skills, you can download the images which I've already edited. Just download the source files from this tutorial, and you can find the images inside the Edited Images folder.
Step 4: Preparing Our Wooden Floor
In the final example all our polaroid pictures lie on a wooden floor. We're now going to create this background.
Create a New Document in Photoshop with the dimensions 600x600px.
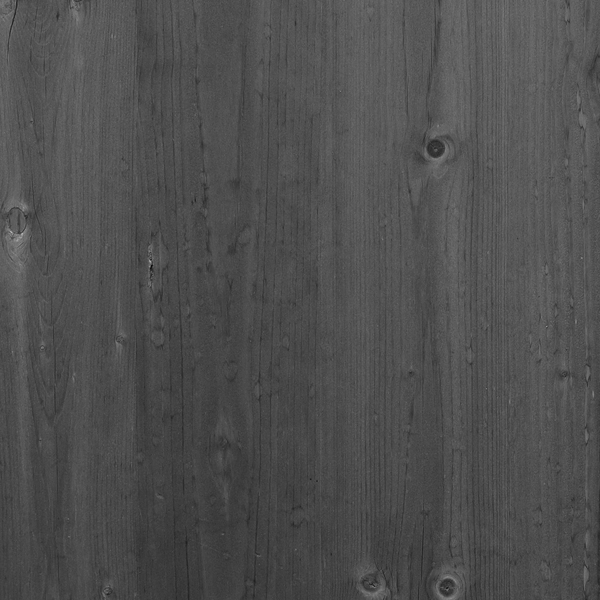
Add the wooden texture image to the document. Scale it so you're pleased with the final result.
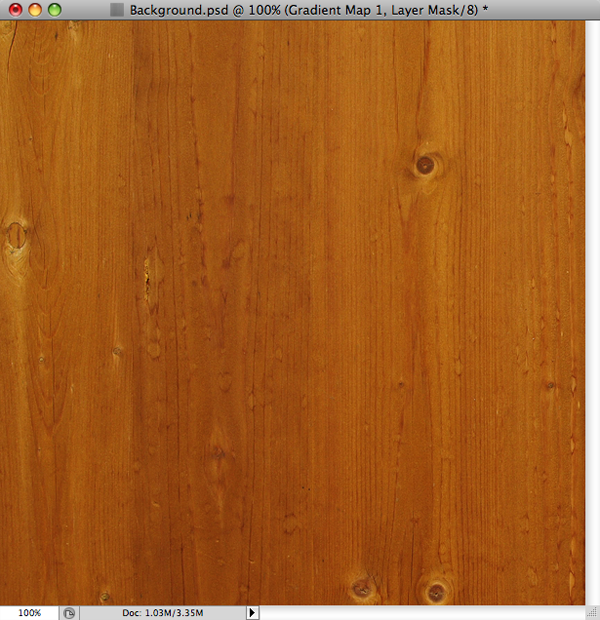
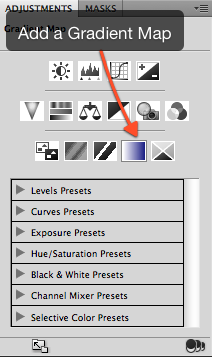
I've also added a Gradient Map, setting the colors to black and white.
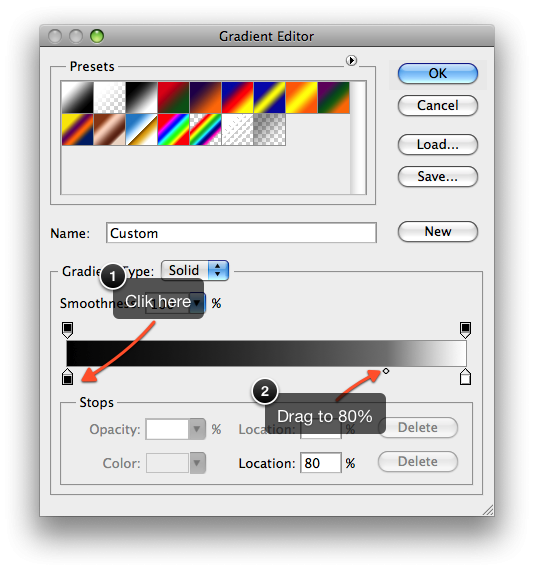
Lastly I've changed the gradient map's transition to 80%. To do so, click on one of the lower arrows, and afterwards click on the dot in the middle of the gradient. Drag this dot to 80%.
And voila! We've created our wooden background! Save it as a Photoshop Document (.psd) in our Design folder, and name it Background.psd.
Step 5: Preparing the Polaroid Frame
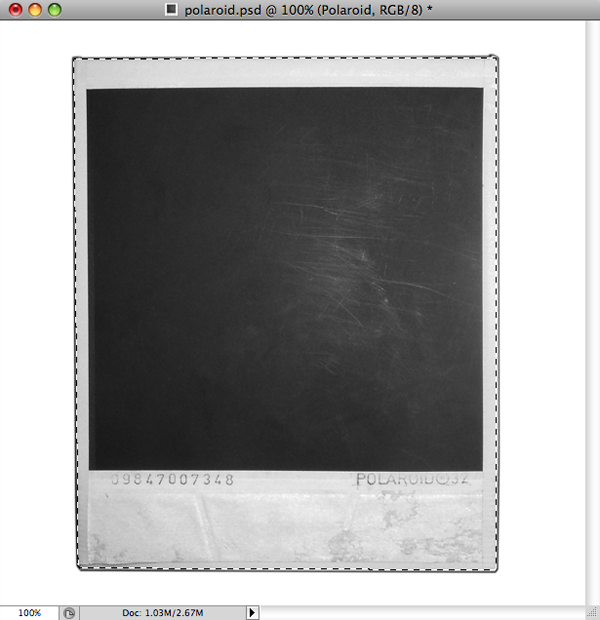
We want to place our own images inside the polaroid frame. We must do two things, we'll first need to remove the polaroid frame from its (white) background, and also we'll need to cut the "photo" part away.
To do this, we'll first create a new 600x600px Photoshop document. Paste the polaroid picture inside the document, scale it down till it fits.

Why do we scale the image down? Because we're creating a 600x600px Flash document, and it's unnecessary to have and load a huge image if we won't even scale it larger than 600 px.
Step 6: Isolating the Polaroid Frame
Select the pen tool (P) and click around the polaroid frame's outer edge. When working with the Pen tool, be sure to set the Pen tool in its Paths mode.

Press Control + Enter (Windows) or Cmd + Enter (Mac) to select your current path.
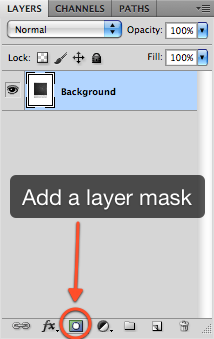
With your path selected click on the "Add Layer Mask" button. We've now isolated the polaroid from its background!
Step 7: Cutting the Photo Part Away From the Polaroid Frame
This step is very similar to Design Step 4. Again select the pen tool, and click around the inner area of the polaroid's frame. Afterwards select the current path with Ctrl + Enter/Cmd + Enter.

Now Alt-click on the mask in the Layers Panel. You're now editing the mask directly.

Select the Marquee tool (M). Right-click your selection and select Fill > Black.
Alt-click again on the mask icon, to return back to our "normal" Layer view. We've successfully edited our mask and now our polaroid is ready for use. Let's save the image as a Photoshop document (.psd), I've named my document Polaroid.psd.

Section 3: Flash
In this section we're (finally) going to use Flash. We're going to set our Flash document to use the folder bin for exporting, and the folder src for our code. Time to open Flash!
Step 8: Creating Our Flash Document
Create a new Flash Document (ActionScript 3.0) with Flash Professional. Set the dimensions to 600x600px and the framerate to 24 fps. Set the Document Class to Main. Also change the background to black (#000000). Save it as "Polaroid.fla", inside the lib folder.
Step 9: Changing Our Publish Settings
Afterwards go to File > Publish Settings, change Polaroid.swf to ../bin/Polaroid.swf, you can uncheck the HTML option. Now everything we export (only a SWF) will be in the bin folder. Do not close the Publish Settings window.

Step 10: Changing Our Source Path
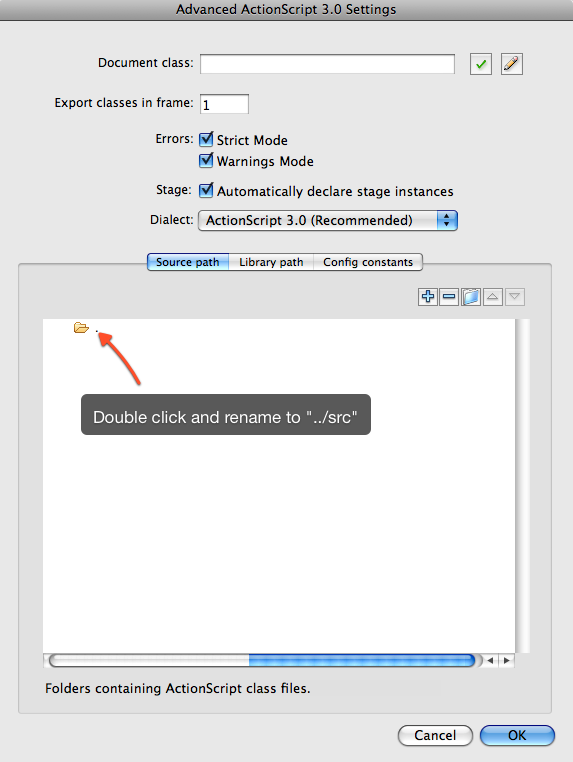
Click the Flash tab. Afterwards click on the Settings button next to Script: ActionScript 3.0.
Now we can change the source path. You'll see a folder icon with the text ".", change that to "../src".
Flash will use the src folder for all its classes.
Step 11: Importing Our Graphics to Flash
It's now time to start importing our graphics in to our Flash Document. If you had any trouble with the images, you can always download the source files from this tutorial at the top. There'll be a folder named "Edited Images", inside there'll be the edited images which you can use.
Create a new Flash Document (ActionScript 3.0) with Flash Professional. Set the dimensions to 600x600px and the framerate to 24 fps. Also change the background to black (#000000).
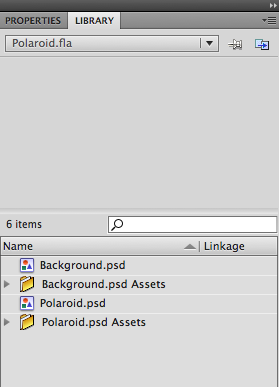
We've saved our images as .psd files because they work so greatly with other Adobe products, like Flash. After creating our document, select File > Import to Library and select Polaroid.psd and Background.psd. After doing so our library looks like this:
Step 12: Creating Our Background Sprite
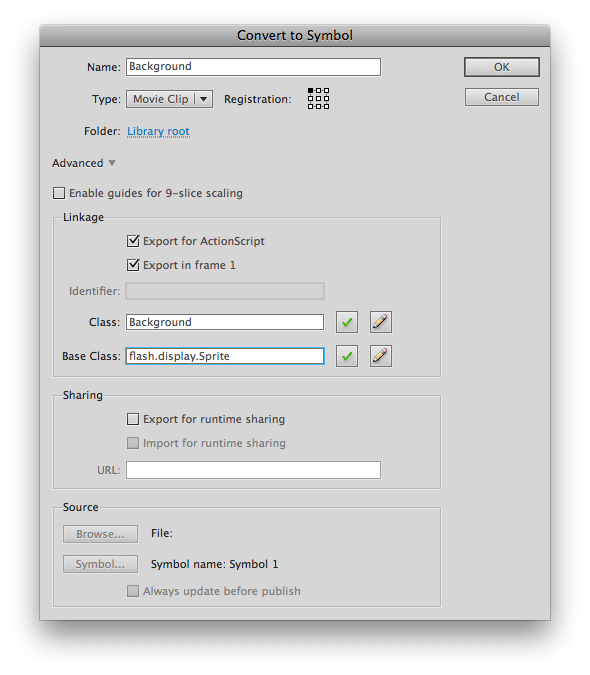
Drag Background.psd from the Library to our stage, afterwards convert it to a movie clip. Name it Background, and check the box "Export for ActionScript". Set the base class to flash.display.Sprite. After doing so, you can remove the background again from the stage.
Why did I set Background's base class to Sprite instead of the default base class MovieClip? Because the only difference between a MovieClip and a Sprite is that MovieClips can contain multiple frames, and Sprites cannot. We don't need multiple frames for our Background, so let's set the base class of Background to Sprite.
Step 13: Creating and Our Polaroid Movie Clip
Just like we did with our background, drag polaroid.psd from the Libary to our stage. Convert it to a movie clip and name it Polaroid, again check the Export for ActionScript box. Set the base class to flash.display.Sprite.
Step 14: Creating Our Polaroid's Layers
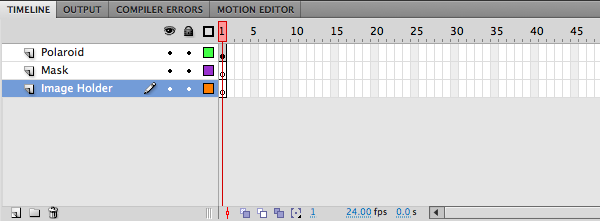
Our Polaroid is still on the stage, double-click it, so we can edit it. So far Polaroid only has one layer, rename this layer to Polaroid Frame.
Create two new Layers, naming them Mask and Image Holder.
Step 15: Creating the Image Holder
Our Polaroid will contain an image, this image must be displayed somewhere, this will be done in a movie clip named "Image Holder".
Draw a rectangle of approximately the size as the "photo area" of the polaroid, do this in the Image Holder layer. It doesn't matter which color the rectangle will be. After creating this rectangle, convert it to a movie clip, name it "Image Holder".
Give Image Holder an instance name of imageHolder.
Step 16: Adding a Mask to the Image Holder
Image Holder will contain the images which we will load. Sometimes these images are too big -- take for example a 400x100px image; this image is much too wide, and its edges would extend out of the polaroid. We want to prevent this. Therefore we must hide all imagery which extends outside of the Image Holder's area.
To do this, we must create a mask. A mask tells a layer which part should be displayed, and which part should be hidden.
If we want every image to be displayed inside Image Holder, without any edges protruding, we should set the mask's size to the same dimensions as Image Holder itself.
Copy Image Holder, and paste it in place with Ctrl + Shift + V (Windows) / Cmd + Shift + V (Mac) on the layer Mask. Afterwards break the copied Image Holder with Ctrl + B (Windows) / Cmd + B (Mac).
Lastly we must tell our Mask layer that it is a Mask. Right-click on the layer Mask and select the option Mask.
Section 4: Code
It's time to start coding, if you had any trouble with the Flash Section, you can just copy the folder Flash Section Completed. Inside that folder is everything you need to start following these steps.
Step 17: Creating an XML File
To load our images, we'll use an XML file. The XML file will tell our product where the images are located.
Open a text editor and type the following:
<images>
	<image>
		<file>IMAGE_1.jpg</file>
	</image>
	<image>
		<file>IMAGE_2.jpg</file>
	</image>
	<image>
		<file>IMAGE_3.jpg</file>
	</image>
</images>
You should change IMAGE_1.jpg, IMAGE_2.jpg, etc. to real filenames, which refer to images located inside the bin folder. If you don't have any images, download the images that I mentioned in Step 3.
Save this XML file as images.xml, inside the bin folder.
Step 18: Which Classes Do We Need?
Before we start coding, it's important to know which tasks our project must do:
- We must load our images from an XML file.
- We must display these images inside a Polaroid.
- We must prevent other Polaroids from zooming in when we are already zoomed in on a Polaroid.
To code all these functionalities in one class would make that class extremely complex, it's better to seperate each task to a different class.
-
ImageLoader: Will load the XML file and pass the images to PolaroidHolder. -
PolaroidHolder: When it receives the images, it will create a Polaroid for every image, so it also makes sure that only one Polaroid is zoomed in at a time. -
Polaroid: The image will be displayed inside this class.
Step 19: Creating Our Main Class
The Main class is the class which Polaroid.fla calls when it gets initiated.
Create a new ActionScript file and name it "Main.as", save it inside the src folder. The Main class looks as follows.
package {

	import flash.display.MovieClip;

	public class Main extends MovieClip {

		public function Main():void {

		}
	}
}
It's so empty because we first need to create our other classes, while we're busy we're going to keep on adding code to the Main class.
Step 20: Explaining Absolute and Relative File Paths
In this project we're loading several assets: an xml file and various images. We can use relative file paths or absolute paths. Let me explain the difference with an example; we have the following folder structure:
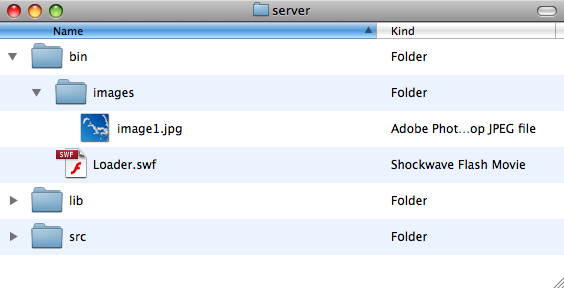
Loader.swf must load image1.jpg. From its current position Loader.swf must "open" the images directory and load image1.jpg. We tell Loader.swf to load images/image1.jpg. This type of loading is called relative file path loading, because the url is relative to Loader.swf's current position.
So how do you load image1.jpg, regardless of where Loader.swf is located? This is done with absolute file path loading. The file path starts from the upper core, from the root. If it's on a computer, its root is a hard drive. We're deploying our project online, so the root would be the site server.
Step 21: Why We Need Absolute File Paths
When our project is done, we'd like to deploy it. Most probably it would be embedded inside an HTML page. There's one small problem. If Loader.swf wants to load, it will load from its current location, from the location of the HTML page. We don't want this, and therefore we must use absolute file path loading.
Now comes the biggest problem, we won't know the location of the HTML file. We need to find the absolute path to the .swf file, and edit that path so we can load our imagery.
We can get the absolute path to the .swf file with root.loaderInfo.url.
It's time to create our ImageLoader class.
Step 22: Creating Our ImageLoader Class
Create a new ActionScript file and name it ImageLoader.as, save it inside the .src folder. The class looks like this, it has been thoroughly commented:
package  {
	//import the classes we need
	import flash.net.URLLoader;
	import flash.net.URLRequest;
	import flash.events.Event;
	import flash.display.Loader;
	import flash.display.Bitmap;
	import flash.display.Sprite;

	public class ImageLoader extends Sprite{
		//will load our xml
		private var xmlLoader:URLLoader = new URLLoader();

		//stores the xml
		private var xml:XML;

		//a list of file paths to the images
		private var imageFileList:XMLList;

		//the path to the .swf file
		private var swfPath:String;

		//the project folder path (where the folders bin, src and lib are located)
		private var projectPath:String;

		//we must know the title of our project, so we can edit the .swf url to get our projectPath
		private var projectTitle:String;

		//we need to count how many images we've already loaded
		private var count:uint = 0;

		//we must store the images, the images are Bitmaps
		public var images:Vector.<Bitmap> = new Vector.<Bitmap>;

		public function ImageLoader(_projectTitle:String) {
			//we must know when ImageLoader has been added, then we can figure out what the root's url is
			addEventListener(Event.ADDED, whenAdded);

			//store the project's title
			projectTitle = _projectTitle;

			//when imageLoader is done with loading, call xmlLoaded
			xmlLoader.addEventListener(Event.COMPLETE, xmlLoaded);
		}

		private function whenAdded(event:Event):void {
			//store the swf path
			swfPath = root.loaderInfo.url;

			//get our projectPath
			projectPath = swfPath.substr(0, swfPath.length - projectTitle.length);
		}

		//this function will load the images from an xml, and store the images
		public function load(url:String):void {
			//load the xml, which we'll need to load the images
			xmlLoader.load(new URLRequest(projectPath + url));
		}

		private function xmlLoaded(event:Event):void {
			//store the xml, which xmlLoader has loaded
			xml = new XML(event.target.data);

			//store all the file links in an XMLList
			imageFileList = new XMLList(xml.image.file);

			//now that we have the file information, we can load the images
			loadImages();
		}

		private function loadImages():void {
			for each (var imageFile:String in imageFileList){
				//create
				var imageLoader:Loader = new Loader();
				//whenever an image has been loaded, call imageLoaded
				imageLoader.contentLoaderInfo.addEventListener(Event.COMPLETE, imageLoaded, false, 0, true);
				imageLoader.load(new URLRequest(projectPath + imageFile));
			}
		}

		private function imageLoaded(event:Event):void {
			//we're counting how many images we've already loaded, we've just loaded (another) one
			count++;

			//get the image Bitmap
			var image:Bitmap = Bitmap(event.target.loader.content);

			//store the image in our images Vector
			images.push(image);

			//if this is the last image we needed to load
			if(count == imageFileList.length()){
				//we're done, dispatch an event
				dispatchEvent(new Event('imagesLoaded'));
			}

			//--cleanup
			//unload the loader
			event.target.loader.unload();
		}

		public function cleanUp():void {
			xmlLoader.data = null;
			xmlLoader = null;
			xml = null;
			imageFileList = null;
			count = 0;
			images = null;
		}
	}

}
Step 23: Improving Our Main Class
Now that we have our ImageLoader class, we can improve our Main class.
package {

	import flash.display.MovieClip;
	import flash.events.Event;

	public class Main extends MovieClip {
		//a custom class we've made which will load all images from an xml file as Bitmaps
		private var imageLoader:ImageLoader;

		//this class will hold and display all our Polaroids
		private var polaroidHolder:PolaroidHolder;

		public function Main():void {
			//load our images, give imageLoader the name of the .swf file, so it can load using absolute paths
			imageLoader = new ImageLoader('Polaroid.swf');
			addChild(imageLoader);
			imageLoader.addEventListener('imagesLoaded', displayImages, false, 0, true);
			imageLoader.load('pictures.xml');
		}

		private function displayImages(event:Event):void {
			//we've loaded all our images
			polaroidHolder = new PolaroidHolder(imageLoader.images);
			addChild(polaroidHolder);

			//also clean up the imageLoader
			imageLoader.cleanUp();
			imageLoader = null;
		}
	}
}
Step 24: Creating Our PolaroidHolder Class
The PolaroidHolder will receive the images as a Vector. After receiving the images, it will create a Polaroid for each image. Let's create our PolaroidHolder class:
package {
	import flash.display.MovieClip;
	import flash.display.Bitmap;
	import flash.events.MouseEvent;

	public class PolaroidHolder extends MovieClip {

		//this vector will hold all our Polaroids
		public var polaroids:Vector.<Polaroid>  = new Vector.<Polaroid>;
		//with this variable we no
		private var zoomedIn:Boolean;
		//the Polaroid we're zoomed in on
		private var currentPolaroid:Polaroid;

		public function PolaroidHolder(images:Vector.<Bitmap>) {
			// constructor code
			for each (var image:Bitmap in images) {
				//create a new Polaroid
				var polaroid:Polaroid = new Polaroid(image);

				//position and rotate it
				polaroid.x = Math.random() * 200 + 100;
				polaroid.y = Math.random() * 200;
				polaroid.rotation = Math.random() * 60 - 30;

				//add a clicking eventListener
				polaroid.addEventListener(MouseEvent.CLICK, onPolaroidClick);
				addChild(polaroid);

				//add it to the polaroids vector
				polaroids.push(polaroid);
			}
		}

		private function onPolaroidClick(event:MouseEvent):void {
			//there's been a click on a Polaroid!
			if (currentPolaroid == null) {
				//no currentPolaroid has been set, we're zooming in
				//set the clicked Polaroid as the current Polaroid
				currentPolaroid = event.currentTarget as Polaroid;

				//mute all other Polaroids (the ones which aren't zoomed in)
				for each (var polaroid:Polaroid in polaroids) {
					if (polaroid != currentPolaroid) {
						polaroid.mute();
					}
				}
			} else {
				//check if the click was on the current polaroid
				if (event.currentTarget == currentPolaroid) {
					//the same polaroid has been clicked (again), time to zoom out

					//unmute all other Polaroids, they can respond again to events
					for each (var polaroid:Polaroid in polaroids) {
						if (polaroid != currentPolaroid) {
							polaroid.unmute();
						}
					}

					//now we're not zoomed in, so we don't have a current polaroid
					currentPolaroid = null;
				}
			}
		}

	}

}
In lines 50 and 62, we call the functions mute() and unmute(). Mute makes the Polaroid numb to all events, it won't respond to mouse overs, or clicks. This is precisely what we want when we're zoomed in. We don't want other Polaroids to do anything. After we're zooming out, we want the Polaroids to respond to events; by calling unmute, the Polaroids will respond again to mouse overs and clicks.
Step 25: Creating Our Polaroid Class
Now it's time to create our most interesting class, our Polaroid class! For this class we'll need the popular tweening library tweener. Download it, and save the library inside the src folder (see this guide for more details).
package {
	import flash.display.MovieClip;
	import flash.events.MouseEvent;

	import caurina.transitions.*;
	import caurina.transitions.properties.*;
	import flash.display.Bitmap;
	import flash.events.Event;

	public class Polaroid extends MovieClip {

		//the scale at which the Polaroid is zoomed in
		private static const ZOOMED_IN_SCALE:Number = 1;
		//the scale at which the Polaroid is zoomed out
		private static const ZOOMED_OUT_SCALE:Number = .6;

		//the max height an image can be
		private var IMAGE_MAX_HEIGHT:Number;
		//the max width an image can be
		private var IMAGE_MAX_WIDTH:Number;

		//we must scale the loaded images, remember the scale
		private var scale:Number;

		//when we zoom out, we zoom out back to the Polaroid's original position and rotation
		//the Polaroid's original x coordinate.
		private var origX:Number;
		//we also need the original y coordinate
		private var origY:Number;
		//store the Polaroid's original rotation
		private var origRotation:Number;
		//when this Boolean becomes true, the Polaroid will not respond to mouse events
		private var muted:Boolean;
		//we need to know if the Polaroid has been clicked
		public var clicked:Boolean;

		public function Polaroid(image:Bitmap) {
			//make the Polaroid a button
			buttonMode = true;

			//the maximum dimensions for an image are limited by the dimensions of imageHolder
			IMAGE_MAX_HEIGHT = imageHolder.height;
			IMAGE_MAX_WIDTH = imageHolder.width;

			//scale the Polaroid down
			scaleX = ZOOMED_OUT_SCALE;
			scaleY = ZOOMED_OUT_SCALE;


			//we'll need to resize the image to make it fit
			//first check if it is a portrait or landscape
			if (image.width > image.height) {
				//it is a landscape
				//the scale is limited by the image's height
				scale = IMAGE_MAX_HEIGHT / image.height;
			} else {
				//it is a portrait
				//the scale is limited by the image's width
				scale = IMAGE_MAX_WIDTH / image.width;
			}

			//scale the image
			image.scaleX = scale;
			image.scaleY = scale;

			//add the scaled image
			imageHolder.addChild(image);

			//add event listeners to the Polaroid;
			addEventListener(MouseEvent.MOUSE_OVER, onMouseOver);
			addEventListener(MouseEvent.MOUSE_OUT, onMouseOut);
			addEventListener(MouseEvent.CLICK, onClick);
			addEventListener(Event.ADDED, whenAdded);
		}

		public function mute():void {
			//calling this function will make the Polaroid not respond to events
			buttonMode = false;
			muted = true;
		}

		public function unmute():void {
			//calling this function will make the Polaroid respond to events
			buttonMode = true;
			muted = false;
		}

		private function whenAdded(event:Event):void {
			//store the Polaroid's original coordinates and rotation
			origX = x;
			origY = y;
			origRotation = rotation;

			//we won't need this event listener anymore, remove it
			removeEventListener(Event.ADDED, whenAdded);
		}

		private function onMouseOver(event:MouseEvent):void {
			//only respond if the Polaroid has not been muted
			if (! muted) {
				//only respond if the Polaroid has not been clicked, clicked Polaroids should not respond to mouse overs.
				if (! clicked) {
					//move the polaroid to the front
					parent.setChildIndex(this, parent.numChildren - 1);
					//move and turn the polaroid in a random direction
					Tweener.addTween(this, {x: origX + Math.random() * 30 - 15, y: origY + Math.random() * 30 -15, rotation:origRotation + Math.random() * 20 - 10, time:1});
				}
			}
		}

		private function onMouseOut(event:MouseEvent):void {
			//only respond if the Polaroid has not been muted
			if (! muted) {
				//only respond if the Polaroid has not been clicked
				if (! clicked) {
					//move the polaroid back to it's original position and rotation
					Tweener.addTween(this, {x: origX, y:origY, rotation:origRotation, time:1});
				}
			}
		}

		private function onClick(event:MouseEvent):void {
			//only respond if the Polaroid has not been muted
			if (! muted) {
				//if it hasn't been clicked before
				if (! clicked) {
					//we've been clicked, let's make that true
					clicked = true;

					//we're zooming in, let's dispatch an event (Main will pick this up)
					dispatchEvent(new Event('zoomIn'));

					//zoom the Polaroid in to the center of the stage
					Tweener.addTween(this, {x:stage.stageWidth/2 - width/2, y:stage.stageHeight/2 - height/2, rotation:0, scaleX:ZOOMED_IN_SCALE, scaleY:ZOOMED_IN_SCALE, time: 1});
				} else {
					//we've already been clicked, so make clicked false
					clicked = false;

					//we're zooming out, let's dispatch an event (Main will pick this up)
					dispatchEvent(new Event('zoomOut'));

					//zoom the polaroid out, back to its original position
					Tweener.addTween(this, {x: origX, y:origY, rotation:origRotation, scaleX: ZOOMED_OUT_SCALE, scaleY:ZOOMED_OUT_SCALE, time:1});
				}
			}
		}
	}
}
Step 26: Adding Our PolaroidHolder to Our Main Class
Make the changes as seen in the code below.
package {

	import flash.display.MovieClip;

	public class Main extends MovieClip {

		//a custom class we've made which will load all images from an xml file as Bitmaps
		private var imageLoader:ImageLoader;

		private var polaroidHolder:PolaroidHolder;

		public function Main():void {
			//load our imagges
			imageLoader = new ImageLoader();
			imageLoader.addEventListener('imagesLoaded', displayImages, false, 0, true);
			imageLoader.load('pictures.xml');
		}

		private function displayImages(event:Event):void {
			//we've loaded all our images
			polaroidHolder = new PolaroidHolder(imageLoader.polaroids);
			addChild(polaroidHolder);

			//also clean up the imageLoader
			imageLoader.cleanUp();
			imageLoader = null;
		}
	}
}
Step 27: The Result So Far
It seems to work, but it's not very interesting. When zooming in, the user is not "pulled in", our product is not immersive enough. What we need is a background! By chance we created one in Step 4. Time to add our background!
Step 28: Adding Our Background
We had exported our background with the class Background.
Not only will we add Background as a child of Main, we'll also make Background darken when we're zoomed in, and lighten when we're zoomed out. How do we do this? Whenever a Polaroid is clicked, it dispatches a custom event, zoomIn or zoomOut. We can trace this event, just add event listeners to our Main class, they'll pick up the zoomIn and zoomOut events, and whenever they're picked up, we can tell our Background to lighten or darken:
package {

	import flash.display.MovieClip;
	import flash.events.Event;

	import caurina.transitions.*;
	import caurina.transitions.properties.*;

	public class Main extends MovieClip {

		//a custom class we've made which will load all images from an xml file as Bitmaps
		private var imageLoader:ImageLoader;

		//this class will display all our Polaroids, by receiving a Vector of Bitmaps
		private var polaroidHolder:PolaroidHolder;

		//the wooden background, bg is an abbrivation for background
		private var bg:Background

		public function Main():void {
			//load our images
			imageLoader = new ImageLoader('Polaroid.swf');
			imageLoader.addEventListener('imagesLoaded', displayImages, false, 0, true);
			addChild(imageLoader);
			imageLoader.load('pictures.xml');

			//add our bg as a child
			bg = new Background();
			addChild(bg);

			//add event listener, so we know when we're zoomed in or out
			//3rd parameter of addEventListener is true, so we can capture the event, when it "bubbles" up from the Polaroid
			addEventListener('zoomIn', onZoomIn, true);
			addEventListener('zoomOut', onZoomOut, true);
		}

		private function displayImages(event:Event):void {
			//we've loaded all our images
			polaroidHolder = new PolaroidHolder(imageLoader.images);
			addChild(polaroidHolder);

			//also clean up the imageLoader
			imageLoader.cleanUp();
			imageLoader = null;
		}

		private function onZoomIn(event:Event):void {
			//upon zooming in, we'll darken the bg
			Tweener.addTween(bg, {alpha:.6, time:1});
		}

		private function onZoomOut(event:Event):void {
			//upon zooming out, we'll lighten the bg
			Tweener.addTween(bg, {alpha:1, time:1});
		}
	}
}
Step 29: Looking Back
Tada! We're done, this was quite a tutorial! I hope you guys had fun following this tutorial, and also learnt something from it. Why not play around with the code? You could try adding text fields and somehow display the title of the image. Or use several types of Polaroids. Thanks, and feel free to comment if you have any questions or comments. Keep an eye out for my next tutorial!

Comments