TestFlight has been around for many years, solving a common problem, distributing iOS applications for beta testing. Earlier this year, Apple acquired Burstly, TestFlight's parent company. During this year's WWDC, Apple showed us what that acquisition meant for iOS developers. Good news, that's for sure.
TestFlight has been integrated into iTunes Connect and is now available as a native iOS application on devices running iOS 8. If you plan to make use of Apple's beta distribution platform, then you'll quickly notice that a few things have changed. In this tutorial, you'll learn how easy it is to get started with TestFlight.
1. TestFlight
Apple's acquisition of TestFlight isn't just an integration of TestFlight in the iOS development workflow. A number of key aspects of beta distribution have changed for the better.
Device Identifiers and Provisioning Profiles
For example, it's no longer necessary to juggle device identifiers and provisioning profiles. To test an application with TestFlight there's no need to add the devices of your testers and it's no longer necessary to generate a provisioning profile for ad hoc distribution.
Internal Testers
Apple makes a distinction between internal and beta testers. Internal testers are members of your development team that have an iTunes Connect account. Internal testers are managed in iTunes Connect and you can have up to twenty five of them per application. Making a build available to internal testers is as easy as flipping a switch in iTunes Connect.
Beta Testers
A beta or external tester can be anyone as long as they have an email address to which iTunes Connect can send an invite. You can have up to 1,000 beta testers per application. Wait, there's more. Every beta tester can have multiple test devices, which is fantastic news for larger companies that used to struggle with Apple's 100 devices limit.
Beta App Review
There's one caveat though. Every build you upload for distribution to beta testers needs to go through Apple's review process. Fortunately, this isn't true for internal testing. The moment you upload a build to iTunes Connect, it immediately becomes available to every internal tester.
Sandbox Accounts
The moment a tester opens your application, a sandbox account is created for them. This means it's no longer necessary to create test accounts in iTunes Connect. Testing In-App Purchases was never easier.
TestFlight for iOS
Apple also released TestFlight for iOS in which testers can download, install, and update test builds. It's a very convenient way to manage test builds and send feedback to the developer of the application.
2. First Things First
Step 1: Project Setup
Let's first create a sample application in Xcode 6 to get us started. Open Xcode 6, create a new project based on the Single View Application template in the iOS > Application section.
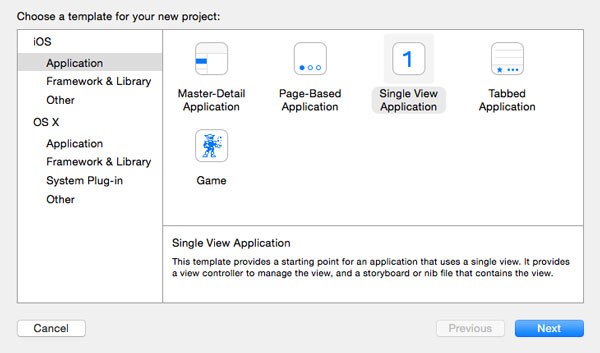
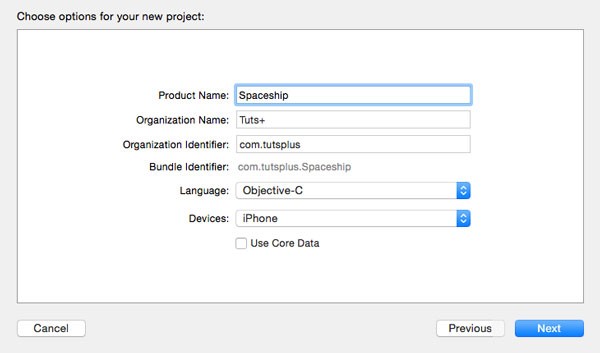
Give your application a name and organization identifier, and click Next. Tell Xcode where you'd like to save the project and click Create.
Step 2: App ID
Navigate to Apple's iOS Dev Center and create an App ID for the application. To use TestFlight, we need to create an application in iTunes Connect and that's what the App ID is for.
I've set the App ID suffix to an explicit App ID, but it should also work with a wildcard App ID.
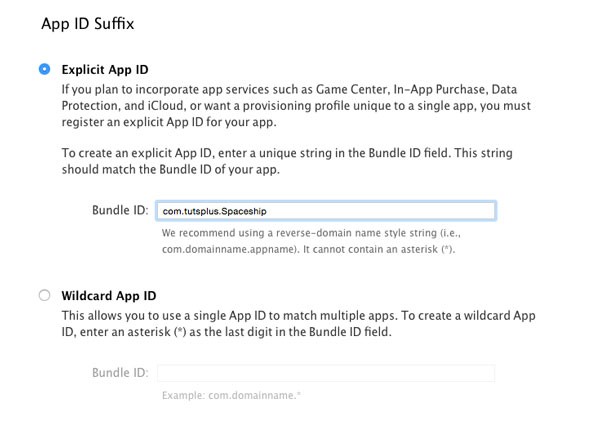
As I mentioned a few minutes ago, Apple's implementation of TestFlight has a number of advantages. You no longer have to create a provisioning profile for ad hoc distribution, which also means that you don't need to specify which devices are allowed to run the test builds. We'll see how this works in a moment.
Step 3: iTunes Connect
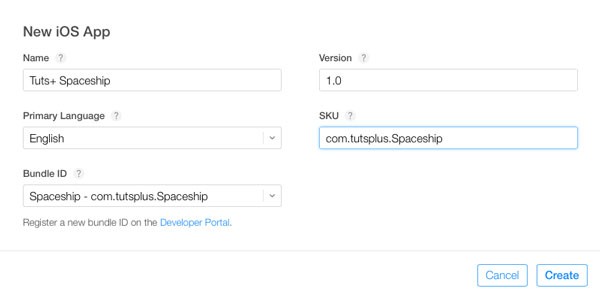
Sign into iTunes Connect and create a new application. Select the correct App ID from the drop-down menu and set the version number to 1.0. If you don't see the App ID in the drop-down menu, then wait five minutes and try again. It can take a few minutes before the changes you make in the iOS Dev Center are available in iTunes Connect.
Fortunately, there's no need to populate the application's metadata for testing. Select the second tab, Prerelease, to see a list of the available test or prerelease builds. The list is currently empty. Let's prepare a test build to fix that.

3. Uploading a Test Build
Uploading a test build is very easy with Xcode 6. Open your project in Xcode, navigate to the target's build settings, and make sure the Code Signing Identity for release builds is set to iOS Developer for Any iOS SDK. The Provisioning Profile for release builds should be set to Automatic. These are the default settings when creating a new project in Xcode 6.
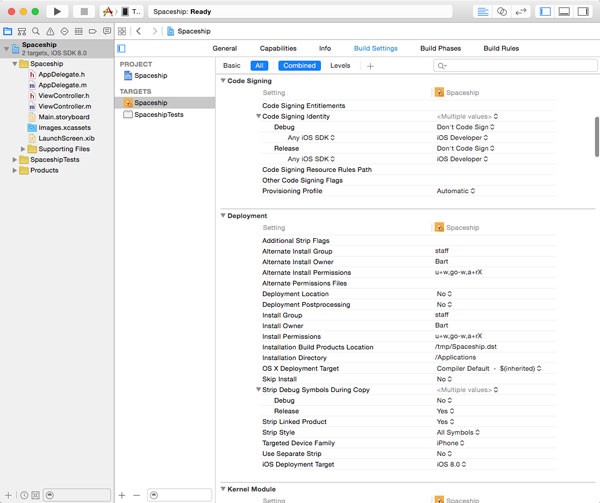
Before we can create an archive an upload it to iTunes Connect, we need to add the required application icons. If we don't, Xcode will complain and refuse to upload the test build to iTunes Connect.
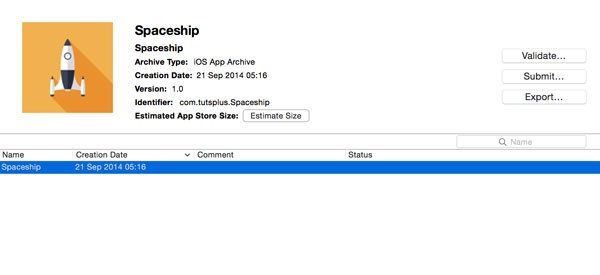
The default build scheme archives the project with the release configuration and that is exactly what we want. Connect a test device running iOS 8 to your development machine and choose Archive from Xcode's Product menu to create an archive.
If you didn't run into any issues, Xcode automatically opens the Organizer, showing you the resulting archive. Select it from the list and click Submit on the right.
When you try to submit the test build to iTunes Connect, Xcode might display a warning similar to the one shown below. It tells you that it couldn't find a provisioning profile that matches your application's configuration. Luckily, there's a button labeled Try Again in the bottom right. Click it to resolve this issue.
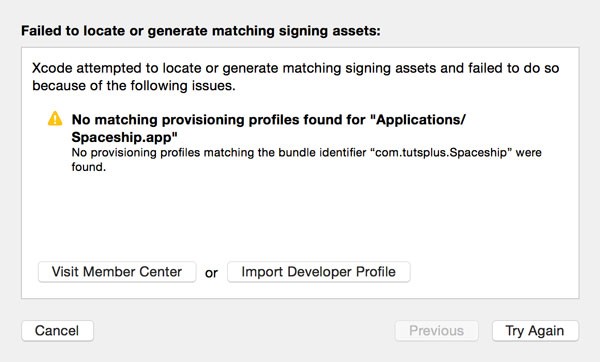
Behind the scenes, Xcode talks to iTunes Connect and creates an ad hoc distribution provisioning profile for you. The name of this provisioning profile starts with XC: indicating Xcode created this provisioning profile on your behalf.
Make sure the checkbox at the bottom of the dialog is checked to ensure that crash logs can be automatically symbolicated by iTunes Connect. This is very similar to how Crashlytics works.
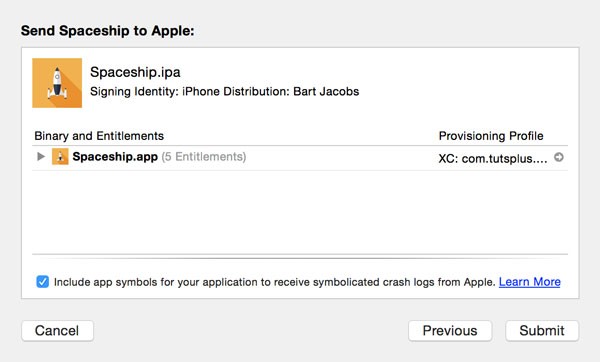
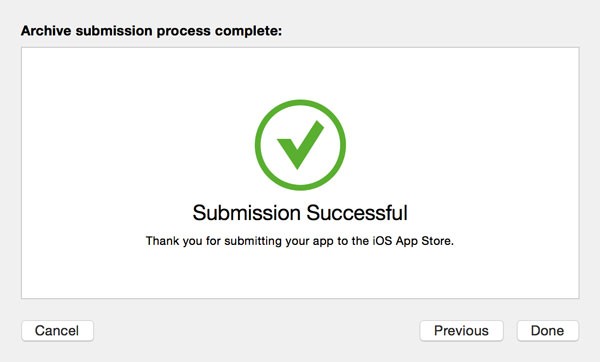
When you click Submit, Xcode starts uploading the test build to iTunes Connect. It performs a number of validations during this process, such as checking if the test build contains the required application icons.
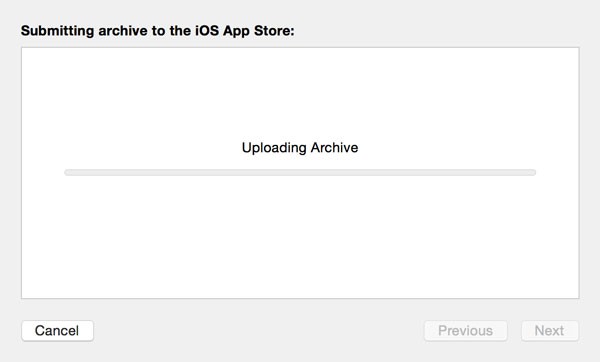
If your test build passes the validations, Xcode tells you that you've successfully uploaded the test build to iTunes Connect.
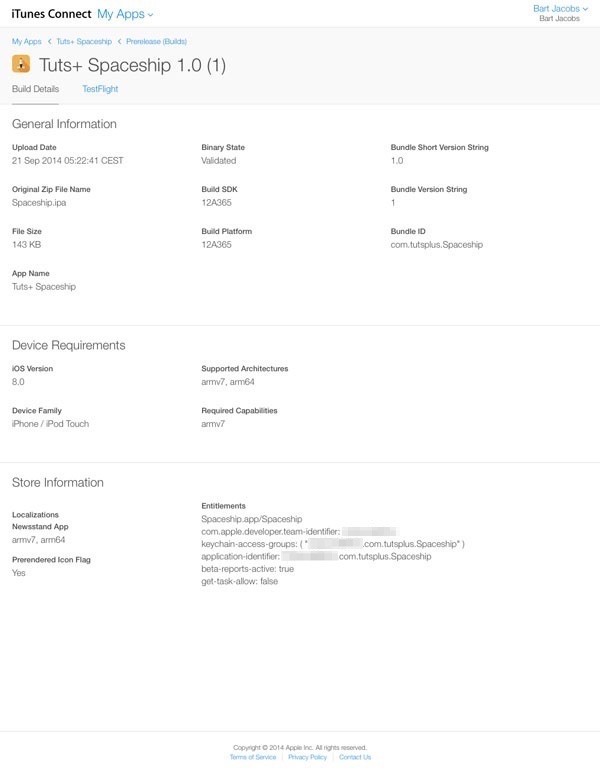
4. Build Details
Head back to iTunes Connect and click the Builds tab in the Prerelease section. Your build should now be visible. Click the test build to show the build's metadata. If you click the tab Build Details, you'll see a technical summary of the selected build.
Click the tab TestFlight to see the build's metadata. On this page, you can add information for your testers and Apple's review team.
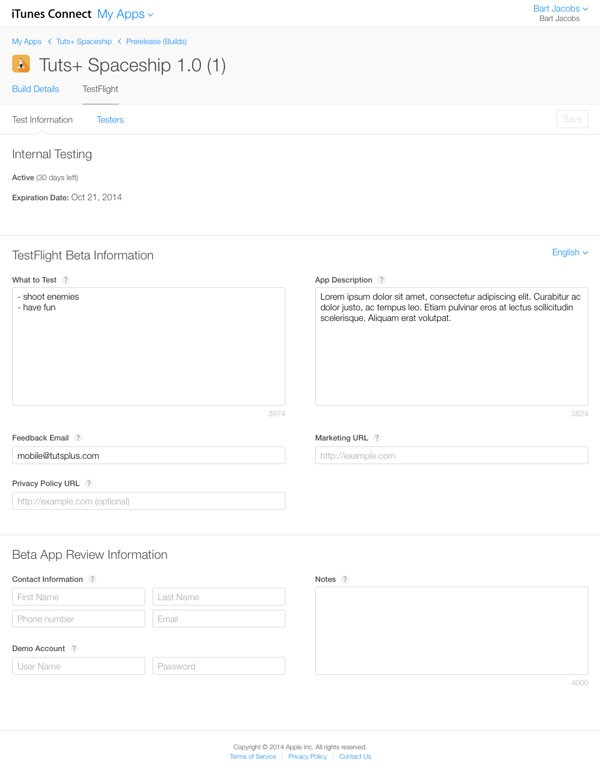
The first section shows you when the test build is going to expire. Each test build is active for a maximum of thirty days.
In the second section, you can add information the tester sees when they install the test build. You can specify what you'd like them to test, add a description of the application, and include an email address to which testers can send their feedback.
The third section includes information for Apple's review team. Every build you release to external testers needs to pass through Apple's review process.
5. Adding Testers
To enable TestFlight for this application, toggle the switch labeled TestFlight Beta Testing on the right.

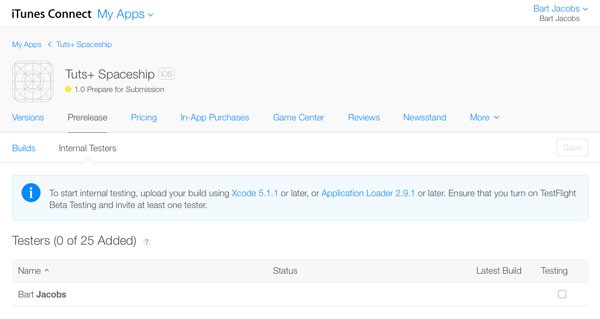
At the time of writing, TestFlight is only available for internal testing. Apple announced that it will open up TestFlight to external testers in the coming weeks or months. If you click the tab Internal Testers, you'll see an empty list. To add testers to this list, you need to mark team members as internal testers. Let's start with yourself.
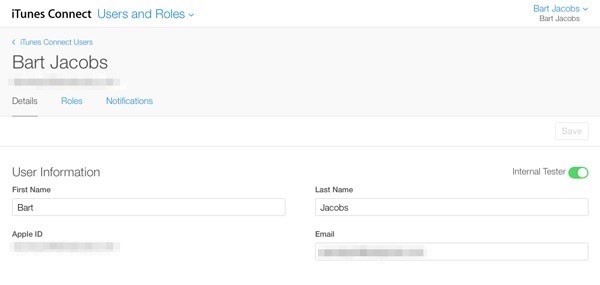
In iTunes Connect, navigate to Users and Roles and select your profile form the list of users. To mark yourself as an internal tester, toggle the switch labeled Internal Tester on the right. Click Save and navigate back to the list of internal testers of your application.
As you can see, internal testers need to be invited as testers of a particular application. Select the testers you wish to invite from the list and click Save. The testers you've selected should receive an email, inviting them to test the application.
6. TestFlight for iOS
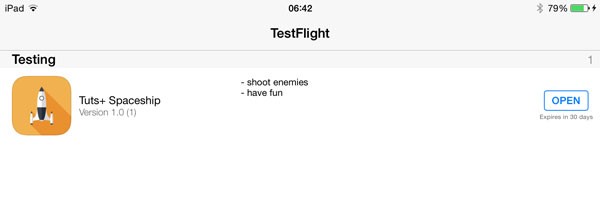
Download Apple's TestFlight application from the App Store on a device running iOS 8. Check your email and look for the TestFlight invitation. It looks similar to the one shown below.
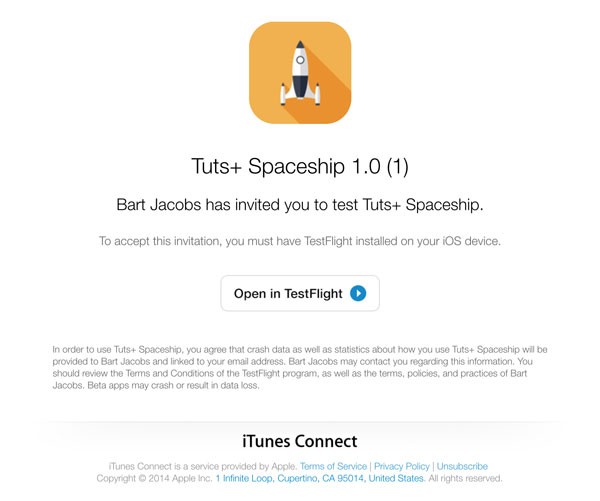
By tapping the Open in TestFlight button you accept the invitation. This opens the TestFlight application, giving you the option to download and install the test build we uploaded to iTunes Connect. Tap Install to install the application on your device.
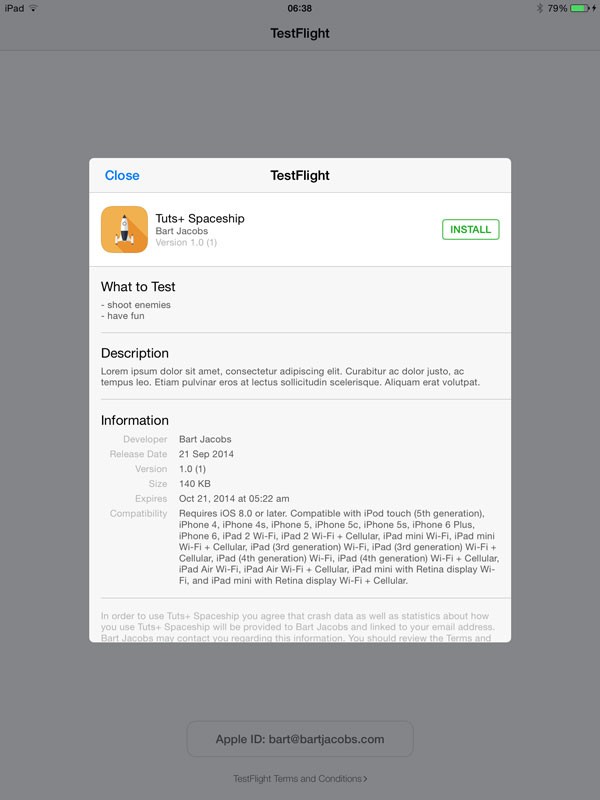
The TestFlight application shows you a list of applications you are invited to test, which is very similar to how the web version of TestFlight works. The main difference is that Apple's TestFlight client is native and allows you to download, update, and open applications from within the application.
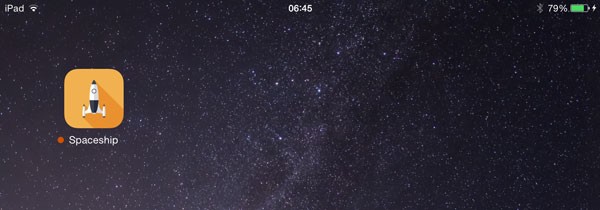
You'll also notice that a test build is preceded by an orange dot on your device's home screen to indicate it's a test build.
Conclusion
The acquisition of TestFlight is definitely a step forward for iOS developers. What I've shown you in this tutorial is only the first step towards integrating TestFlight into the iOS development workflow. I'm sure there's more to come in the coming months.
If you're looking for more ways to improve your iOS development workflow, have a look at the iOS app templates on Envato Market. With more than 1,000 items to choose from, you're sure to find something there that can help you.
Or browse the app development services on Envato Studio to have an app created for you from start to finish!

Comments