When we design our blogs, we tend to forget our visitors/users who're following us with their feed readers. In this tutorial, we're going to learn to "hack" our blog's feed for a better feed reading experience for our users.
We're going to work on 10 great tips to customize our feeds. We will redesign our feed content, maybe shorten it, create functions for feed-only and blog-only content, add useful post lists like "related posts" and "more from this author", take precautions against content thieves, learn to make money with our feeds and so on.
Note: Many of these tips require skills to edit the functions.php file. Be careful while editing this file – you should be comfortable editing and debugging PHP code. Remember, always make a backup.
Tip #1 Using the Media RSS Specification
First things first: We have to use this specification to help search engines and social networks get our "featured image" (or at least the first image we used) and show it as a thumbnail.
For this very first tip, we don't have to write any code or hack our theme files. We just need to install the MediaRSS WordPress plugin. Done.
Introduced by Yahoo! in 2004, this spec allows us to state the media file(s) that we want to bring out: Podcast files, videos, and in our case the featured image. This plugin automatically adds the featured image to our feed with the MRSS-valid XML tags. If the post doesn't have a featured image, it'll scan the post for images and add the first image to our feed.
Tip #2 Placing Custom Text or Images
An incredibly useful thing to do is adding custom content to our feeds. We could place banners, copyright notices, a link to the original post... and it's easy to do, too.
Take a look at the function below:
<?php
function custom_feed_content($content) {
	if(is_feed()) {
		// Our code... Don't forget to store the output to a variable - $output is our variable in this example.
		$content = $content.$output;
	}
	return $content;
}
add_filter('the_content','custom_feed_content');
?>
Please take note that nearly every feed reader service will omit potentially harmful HTML tags like <script>, <embed> or <iframe>.
Adding Banners
Placing banners of your advertisers or images for your announcements could be nice since your subscribers don't see your custom ads if they don't visit your website. To add banners like these, all you have to do is place the appropriate HTML code at the top or at the bottom of your content:
<?php
function feed_banners($content) {
	if(is_feed()) {
		$output = '<div><a href="#" title="This title will show up if the reader rolls over the image"><img src="..." alt="Alternate text if the image link doesn\'t show up" /></a></div>';
		$content = $output.$content;
	}
	return $content;
}
add_filter('the_content','feed_banners');
?>
Take note that we placed the $output variable before the $content variable. That means that we're placing the banners at the top of the content – according to Captain Obvious.
Adding a Copyright Notice With a Link to the Original Post
Automatic content scrapers would definitely hate this code:
<?php
function feed_copyright_disclaimer($content) {
	if(is_feed()) {
		$permalink = get_permalink();
		$author = get_the_author();
		$title = get_bloginfo('name');
		$output = '<p>This post is originally written by ' . $author . ' at <a href="' . $title . '">' . $permalink . '</a>. Please respect his authoritah.</p>';
		$content = $content.$output;
	}
	return $content;
}
add_filter('the_content','feed_copyright_disclaimer');
?>
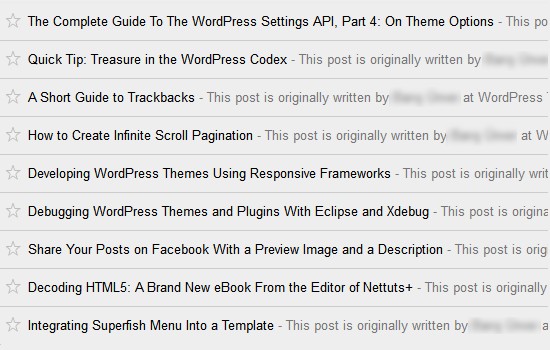
It's always tempting to put these kinds of notices before the actual content but you must keep in mind that feed reader apps like Google Reader show the beginning of the feed items' text content in the list of a feed's posts. (Placing images before the content is safe, though.) This could be annoying for your subscribers:

If you don't want this to happen, you should place your notices after the content.
Tip #3 Including Custom Field Values
Let's say that you're writing a book review blog and you want to include some custom fields – that you use to store the details of the books – below the feed content. This code would be helpful:
<?php
function custom_fields_in_feed($content) {
	if(is_feed()) {
		$post_id = get_the_ID();
		$output = '<div><h3>Details of the Book</h3>';
		$output .= '<p><strong>Author of the book:</strong> ' . get_post_meta($post_id, 'book_author', true) . '</p>';
		$output .= '<p><strong>ISBN:</strong> ' . get_post_meta($post_id, 'book_isbn', true) . '</p>';
		$output .= '<p><strong>Published in:</strong> ' . get_post_meta($post_id, 'book_year', true) . '</p>';
		$output .= '</div>';
		$content = $content.$output;
	}
	return $content;
}
add_filter('the_content','custom_fields_in_feed');
?>
Edit the code however you like and use it – don't forget to edit the custom field key names inside the get_post_meta functions.
Tip #4 Adding a "Related Posts" Section
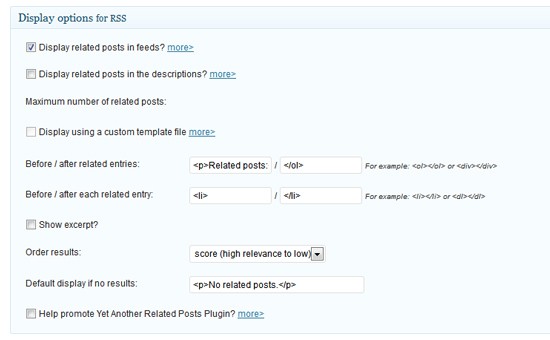
There are several custom-made functions to create a related post list without using plugins but I personally like "Yet Another Related Posts Plugin (YARPP) which can automatically add a "Related Posts" section to our feed. Install the plugin, head over to its options page (Options » Related Posts (YARPP)) and adjust your settings:

Easy as that.
Tip #5 Adding a "More From This Author" Section
This could come in handy in multi-author blogs. And again, it's easy to implement:
<?php
function authors_post_list_in_feed($content) {
	if(is_feed()) {
		global $post;
		$author = get_the_author();
		$author_id = $post->post_author;
		$the_posts = get_posts('author=' . $author_id . '&numberposts=5');
		$output = '<h3>More From ' . $author . '</h3>';
		$output .= '<ul>';
		foreach($the_posts as $post) {
			$permalink = get_permalink();
			$title = get_the_title();
			$output .= '<li><a href="' . $permalink . '">' . $title . '</a></li>';
		}
		wp_reset_query();
		$output .= '</ul>';
		$content = $content.$output;
	}
	return $content;
}
add_filter('the_content','authors_post_list_in_feed');
?>
This piece of code in our functions.php file adds a "More from John Doe" section below the post content.
Tip #6 Adding Buttons for Sharing on Social Networks

If you publish full posts in your feeds (instead of excerpts), a sensible thing would be providing your subscribers with the social sharing buttons. As we mentioned before, feed reader services omit the <script>s and <iframe>s, so we can only insert <a> links which look like share buttons.
Facebook, Twitter, Google+, and Pinterest are the hot social networks these days. So, we'll insert these networks' share buttons in our feeds:
<?php
function feed_share($content) {
if(is_feed()) {
$permalink = get_permalink();
$title = get_the_title();
$get_thumbnail = wp_get_attachment_image_src(get_post_thumbnail_id($post->ID), 'thumbnail');
$thumbnail = $get_thumb[0];
$blogname = get_bloginfo('name');
$button_facebook = '<a href="http://www.facebook.com/sharer.php?u=' . $permalink . '&t=' . $title . '"><img src="http://i.imgur.com/NoudJ.png" alt="Share this post on Facebook" /></a> ';
$button_twitter = '<a href="http://twitter.com/home?status=' . $permalink . ' - ' . $title . '"><img src="http://i.imgur.com/x5VsF.png" alt="Share this post on Twitter" /></a> ';
$button_gplus = '<a href="https://plusone.google.com/_/+1/confirm?url=' . $permalink . '"><img src="http://i.imgur.com/DRhjW.png" alt="Share this post on Google+" /></a> ';
$button_pinterest = '<a href="http://pinterest.com/pin/create/button/?url=' . $permalink . '&media=' . $thumbnail . '&description=' . $title . ' » ' . $blogname . '"><img src="http://i.imgur.com/WL45z.png" alt="Share this post on Pinterest" /></a> ';
$output = $button_facebook . $button_twitter . $button_gplus . $button_pinterest; // You can sort or remove the buttons from here. Just play with the variables.
$content = $content.$output;
}
return $content;
}
add_filter('the_content','feed_share');
?>
I designed some share buttons for this tutorial but of course, you can use your own images. Just change the http://i.imgur.com/XXXXX.png links.
Please note that the "thumbnails" feature of WordPress has to be enabled in order to make this code work. If this feature isn't enabled in your theme, you'll encounter a "fatal error" in your feed. Make sure that the line below exists in your theme's functions.php file:
<?php
add_theme_support('post-thumbnails');
?>
Tip #7 Thumbnail and Excerpt... and Nothing Else
Less is more, right?
<?php
function feed_less($content) {
	if(is_feed()) {
		$permalink = get_permalink();
		$post_id = get_the_ID();
		$click = '<br /><br /><a href="'.$permalink.'">Click here to see the full content.</a>';
		if(has_post_thumbnail($post_id)) {
			$get_thumbnail = wp_get_attachment_image_src(get_post_thumbnail_id($post->ID), 'thumbnail');
			$thumbnail = '<img src="'.$get_thumbnail[0].'" style="float:left;margin:0 10px 10px 0;" alt=" " />';
			$excerpt = get_the_excerpt();
			$content = '<div>'.$thumbnail.$excerpt.$click.'<div style="clear:both;height:0;line-height:0;"></div></div>';
		}
		else {
			$content = the_excerpt_rss().$click;
		}
	}
	return $content;
} add_filter('the_content','feed_less');
?>
This is my favourite function! With this code, your feed items will only consist of three elements: A left-aligned thumbnail image, the excerpt of the post and a link to the post. Nothing more.
Tip #8 Feed-Only Content and Blog-Only Content
Another simple but handy function – actually there are two functions this time:
<?php
function feedonly_sc($atts,$content) {
	if(is_feed()) {
		return $content;
	}
	else {
		return '';
	}
}
add_shortcode('feedonly','feedonly_sc');

function blogonly_sc($atts,$content) {
	if(!is_feed()) {
		return $content;
	}
	else {
		return '';
	}
}
add_shortcode('blogonly','blogonly_sc');
?>
Simply add this chunk of code to your functions.php file and you can use them like this:

Tip #9 Adding a Secret Tracking Device to Your Feeds
If you have a successful and content-rich blog and you update it regularly, chances are there will be some "content vultures" who take your feeds and update their splogs with your content automatically. You can find them when you search specific phrases of your content but it would be a lot easier if you had a unique keycode, right?
In this case, the unique code we'll use will be the hashed string of our posts' shortlinks (e.g. myblog.com/?p=1234). We'll also link it to our post and make it white so most splogs won't know that it's there. (Of course, we could link an empty image and set the alt text to the hashed string but it would be harder to track it.)
<?php
function secret_feed_tracker($content) {
if(is_feed()) {
$hash = md5(wp_get_shortlink());
$permalink = get_permalink();
$content = $content . ' <a href="' . $permalink . '" style="color:white">' . $hash . '</a>';
}
return $content;
}
add_filter('the_content','secret_feed_tracker');
?>
After adding this code to your functions.php file, simply subscribe to your own feed, find the hidden text at the end of your posts and search it on your favourite search engine.
Tip #10 Placing AdSense Ad Units in Your Feeds
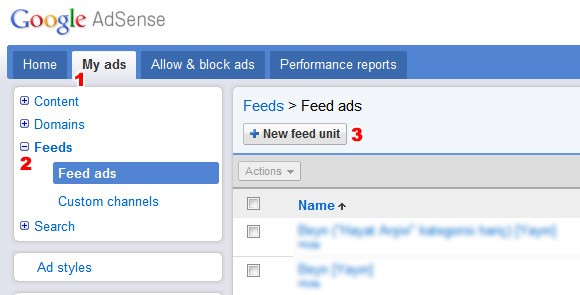
If you have a Google AdSense account (which you should totally have) and burned your feed with Google FeedBurner (which you totally should), you might as well monetize your feeds by placing Google AdSense ads at the top or at the bottom of your feed items. When you log in to your AdSense account, it's easy as 1-2-3:

After you click on the "New feed unit" button (3), you can select your feed (which must be burned with the Google account that you're using AdSense with) and choose the ad unit type, customize the position, colors and frequency of your ads.
Anything Else?
Hope you enjoyed reading these tips. If you have your own tactics for customizing and optimizing WordPress feeds, please share them with us by leaving a comment.


Comments