In this tutorial we will cover what post formats are, how to use them, what they can do for you.
Overview
Post formats were introduced in WordPress 3.1 to create a standardization of creating and displaying different types of posts. These formats allow a developer to decide how to show different kinds of posts in appropriate fashions. New formats cannot be introduced, nor does every format have to be supported by a theme. Using post formats allows post compatibility across multiple themes and has many more advantages.
Post formats are really easy to understand once you dive into them. Let's take a closer look.
Step 1 Getting Started
We'll be implementing post formats into the Twenty-Ten theme which already supports post formats. We'll look at what they've done and implement our own changes to see their effect. Twenty-Ten is one of the default themes that comes with WordPress and can be downloaded from WordPress' website. Yes, the existing "default theme" is "Twenty Eleven", but Twenty-Ten is a little bit more applicable to what we'll be doing today.
Open functions.php in the /wordpressdirectory/wp-content/themes/twenty-ten/ folder. Notice on line 81 we see the following:
add_theme_support( 'post-formats', array( 'aside', 'gallery' ) );
By default, the twenty-ten theme has support for the post formats Aside and Gallery. As mentioned in the overview, you can't define any post format apart from what WordPress allows. Let's look at what we're able to add. These are taken straight from WordPress' Codex on Post Formats:
- aside - Typically styled without a title. Similar to a Facebook note update.
- gallery - A gallery of images. Post will likely contain a gallery short code and will have image attachments.
- link - A link to another site. Themes may wish to use the first <a href=""> tag in the post content as the external link for that post. An alternative approach could be if the post consists only of a URL, then that will be the URL and the title (post_title) will be the name attached to the anchor for it.
- image - A single image. The first <img /> tag in the post could be considered the image. Alternatively, if the post consists only of a URL, that will be the image URL and the title of the post (post_title) will be the title attribute for the image.
- quote - A quotation. Probably will contain a block quote holding the quote content. Alternatively, the quote may be just the content, with the source/author being the title.
- status - A short status update, similar to a Twitter status update.
- video - A single video. The first <video /> tag or object/embed in the post content could be considered the video. Alternatively, if the post consists only of a URL, that will be the video URL. May also contain the video as an attachment to the post, if video support is enabled on the blog (like via a plugin).
- audio - An audio file. Could be used for Podcasting.
- chat - A chat transcript.
For the sake of the tutorial, we'll be adding support for a video and a link. So let's update line 81 in that code to reflect those formats. We'll simply add them to the array.
add_theme_support( 'post-formats', array( 'aside', 'gallery', 'link', 'video' ) );
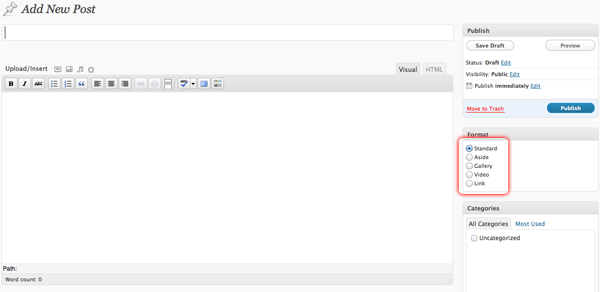
Once we add that we can go to add a post and we'll notice radio buttons on the right column that reflect "Link" and "Video".
Step 2 Displaying the Links
Let's create a new post that we'll use for links. Our title will be the title of the link while the body will be the link itself.

Open up loop.php in the same directory functions.php was in. Up until about line 126 the code is defining format for the gallery and the aside; after line 126 it's defining what all other posts should look like. So if you open your website now, your link will be formatted like all other posts with a post title that takes it to a permalink and a body that contains our link. We're going to add the following code on line 126 to change that:
	<?php elseif ( ( function_exists( 'get_post_format' ) && 'link' == get_post_format( $post->ID ) )  ) : ?>

		<div id="post-<?php the_ID(); ?>" <?php post_class(); ?>>
			<h2 class="entry-title"><a href="<?php echo get_the_content(); ?>" title="<?php printf( esc_attr__( 'Permalink to %s', 'twentyten' ), the_title_attribute( 'echo=0' ) ); ?>" rel="bookmark"><?php the_title(); ?></a></h2>
		</div>
Basically we're adding another if statement before it reaches the "Everything Else" statement. We're saying if it's a Link, display it like this. And the way we're wanting it to display is by making the content the link portion, while retaining the title and removing the content below it. Note that I used get_the content instead of just the_content here. the_content will add paragraph tags automatically, get_the_content gives me unformatted text. So it's an easy work around.
Now, if we look at our website - the link behaves as expected! Very cool!
Step 3 Displaying the Videos
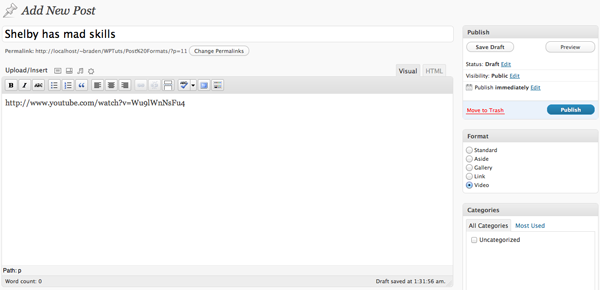
Let's create a new post containing a YouTube video. We can fill in a title if we'd like - it won't be necessary for this post. I will in this instance. My YouTube video is of a friend of mine playing "Almost Lover" by Fine Frenzy. So my post is going to look like this:
We'll be adding on to the end of the code we produced in step 2. So we're going to refer back to loop.php and add the following code:
	<?php elseif ( ( function_exists( 'get_post_format' ) && 'video' == get_post_format( $post->ID ) )  ) : ?>
		<div id="post-<?php the_ID(); ?>" <?php post_class(); ?>>
			<?php if(strlen( get_the_title() ) >0 ): ?><h2 class="entry-title"><?php the_title(); ?></h2><?php endif; ?>

			<div class="entry-content">
					<?php
					$parsedUrl 	= parse_url(get_the_content());
					$embed 		= $parsedUrl['query'];
					parse_str($embed, $out);
					$embedUrl	= $out['v'];
					?>
				<iframe width="560" height="349" src="http://www.youtube.com/embed/<?php echo $embedUrl; ?>" frameborder="0" allowfullscreen></iframe>
			</div>
		</div>

		<?php /* How to display all other posts. */ ?>
We're creating another if statement for the videos and then saying that if it has a title, display it. Then there's some helpful code snippets you might want to hold on to in your own library. I have parsed the content to find the YouTube ID and make the embed code. Notice how you were able to put the YouTube link http://www.youtube.com/watch?v=Wu9lWnNsFu4 instead of the embed code. This will add convenience to end users so that all video players will look the same. and they won't have to decipher embed codes. Basically, I'm able to find the ID of the video with the code and then build the embed code off of it using the $embedURL variable.
Now if you go to your website you'll see the YouTube video embedded. Such an easy trick!
Step 4 Linking to the Archives
Once you implement custom post types, you'll probably end up wanting to link to the archive of a particular post type. For example, let's add a link to our sidebar that will take us to our Videos page.
Open sidebar.php and on line 11 add:
			<li id="archives" class="widget-container">
				<h3 class="widget-title">Post Formats</h3>
				<ul>
					<li><a href="<?php echo get_post_format_link('video'); ?>">Videos</a></li>
				</ul>
			</li>
Look in your sidebar, you now will see a link that goes to Videos. get_post_format_link() function will build a link to the archive of post formats that are supported by the theme and are specified within the function. Replace video with link, aside, or gallery and it will create a link to the respective archive.
Wrapping Up: Another Cool Trick
We used get_post_format($post_id) function in our examples to determine how the post should be displayed. Something else similiar to this would be if you wanted to have the generic way to display all posts, but add certain elements if it was a particular post format So if I wanted to add a disclaimer to all my links, I could create a generic loop that would show all my posts, no matter what post format they are, then use the has_post_format() function to determine it within my loop:
	<?php if(has_post_format('link',$post_id)): ?>
	<blockquote>
	I have no idea what will be on the site by the time you get there. It's not my website, and I don't own any of the content. Proceed at your own risk!
	</blockquote>
	<?php endif; ?>
Conclusion
Post formats are really easy to use and understand. From our hard work above you can see how quick it can be to set it up in your own theme and get it running. It's such a wonderful cross-theme standardization to free users from the evil grasp of proprietary theming.

Comments