
In this tutorial, I'll show you how to install your own open source, PHP-based URL shortener, called YOURLS.
The Benefit of URL Shorteners
URL shorteners reached their peak in usefulness just before Twitter began encoding all links with its t.co URL shortener. Up to that point, URL shorteners helped people tweet multiple links without using up their 140 characters. Today, every link in a tweet takes up a fixed number of characters regardless of length; using your own link shortener is now less important. Back then, Bit.ly was a popular choice.
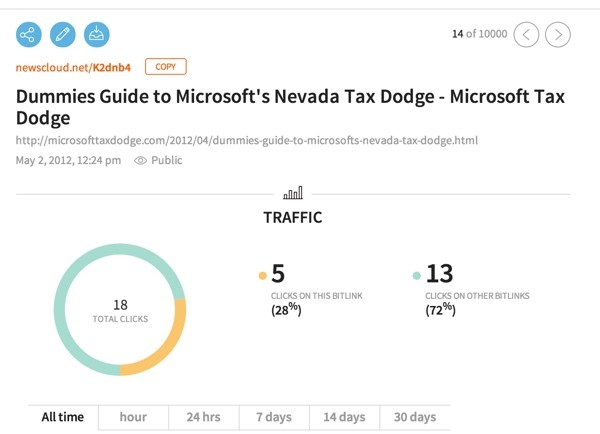
However, there's still a benefit to using third-party link shorteners. For example, Google shows you statistics and traffic, and even generates a QR code for you to drive traffic to your link:
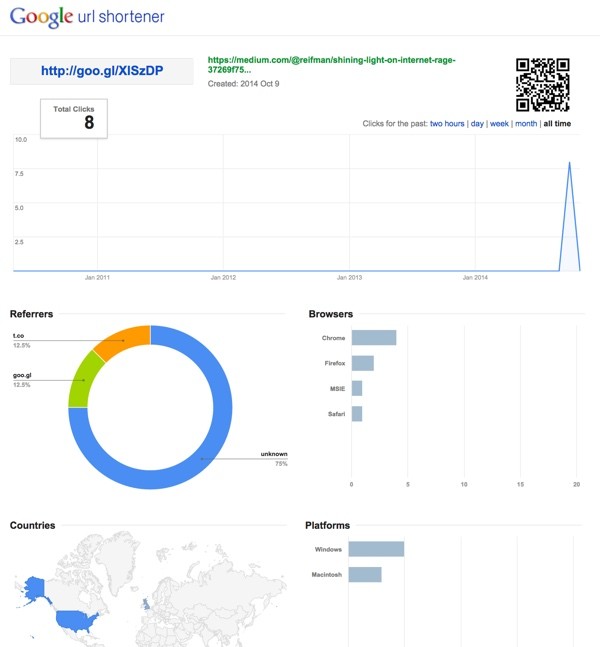
If you want enhanced statistical tracking, running your own URL shortener can be very useful. For example, I wanted to better track which of my blog entries were driving referral traffic to specific affiliates. To do this, I needed my own solution.
Drawbacks of Hosting Your Own URL Shortener
There are a few caveats to hosting your own URL shortener:
- You will be eternally responsible for keeping the service up and running it, so that past links will continue to redirect properly.
- If your server goes down or times out, your links will break.
- If social media or web traffic for a shortcut URL spikes, your server will face heavy traffic requests.
- If you leave the service open to the public—which I don't recommend—there's a possibility of spammers and hackers abusing your service.
- There's a cost for having a domain to run your shortener, e.g. a dedicated .ly domain (optional, because of course you can use an existing sub-domain).
Open Source or Do It Yourself
I was initially tempted to write my own solution. However, a bit of searching turned up YOURLS. YOURLS is a PHP-based URL shortening service with decent statistical tracking and a variety of plugins. For this tutorial, I decided to write about using YOURLS rather than building from scratch.
By the way, if you're looking for a short domain, try using Domainr to find useful domains with two-letter extensions.
Installing YOURLS
Configure Your Server
I'm running YOURLS at Digital Ocean because it's inexpensive and offers fast SSD drives for hosting, but any LAMP-based server or cloud hosting provider will suffice. You can find my visual guide to installing a LAMP instance at Digital Ocean here.
Once you've got a server instance running, you can download the code for YOURLS here, or you can clone it from the public Git archive.
Installing the Code
Let's create a directory, download and unpack the code:
mkdir /var/www/yourls
cd /var/www/yourls
git clone https://github.com/YOURLS/YOURLS/archive/1.7.tar.gz
tar -zxvf 1.7.tar.gz
mv YOURLS-1.7/ yourls
Create an Apache site configuration file:
sudo nano /etc/apache2/sites-available/yourls.conf
Paste in and customize the following site configuration:
<VirtualHost *:80>
   ServerName your-yourls-domain.com
   DocumentRoot /var/www/yourls
   DirectoryIndex index.php
   <Directory /var/www/yourls/>
      AllowOverride All
      Order Deny,Allow
      Allow from all
   </Directory>
</VirtualHost>
Enable the site and restart Apache:
sudo a2ensite yourls.conf
sudo service apache2 reload
Let's create a MySQL database for YOURLS to use:
mysql -uroot -p
Create your database and permissions for YOURLS to use:
create database yourls;
grant all privileges on yourls.* TO "yourls_db_user"@"localhost" identified by "yourls-pwd";
flush privileges;
exit;
Configure the YOURLS Site
Now that our Apache site and MySQL database are available, let's configure the code a bit more.
Begin by copying the configuration sample to a live file and temporarily allow write permissions for the installation.
cd /var/www/yourls
cp ./user/config-sample.php ./user/config.php
chmod 0666  ./user/config.php
Let's edit the file:
sudo nano ./user/config.php
First, configure your database settings based on how you configured MySQL above. You can follow along the configuration settings from the YOURLS site documentation:
/*
 ** MySQL settings - You can get this info from your web host
 */

/** MySQL database username */
define( 'YOURLS_DB_USER', 'your db user name' );

/** MySQL database password */
define( 'YOURLS_DB_PASS', 'your db password' );

/** The name of the database for YOURLS */
define( 'YOURLS_DB_NAME', 'yourls' );

/** MySQL hostname.
 ** If using a non standard port, specify it like 'hostname:port', eg. 'localhost:9999' or '127.0.0.1:666' */
define( 'YOURLS_DB_HOST', 'localhost' );

/** MySQL tables prefix */
define( 'YOURLS_DB_PREFIX', 'yourls_' );
Then, provide your chosen domain site name (the URL) and initial user passwords. Entering the passwords in plain text here is okay temporarily, because YOURLS will hash them in place.
/** YOURLS installation URL -- all lowercase and with no trailing slash.
 ** If you define it to "http://site.com", don't use "http://www.site.com" in your browser (and vice-versa) */
define( 'YOURLS_SITE', 'http://site.com' );

/** Username(s) and password(s) allowed to access the site. Passwords either in plain text or as encrypted hashes
 ** YOURLS will auto encrypt plain text passwords in this file
 ** Read http://yourls.org/userpassword for more information */
$yourls_user_passwords = array(
    'username' => 'password',
	'username2' => 'password2'	// You can have one or more 'login'=>'password' lines
	);
We also need to create an .htaccess file and ensure Apache mod_rewrite is active:
sudo a2enmod rewrite
sudo nano /var/www/yourls/.htaccess
Paste the default .htaccess file in:
# BEGIN YOURLS
<IfModule mod_rewrite.c>
RewriteEngine On
RewriteBase /
RewriteCond %{REQUEST_FILENAME} !-f
RewriteCond %{REQUEST_FILENAME} !-d
RewriteRule ^.*$ /yourls-loader.php [L]
</IfModule>
# END YOURLS
More details for configuring .htaccess and YOURLS are here.
Now, visit your YOURLS site administration at http://yourexampledomain.com/admin and walk through any configuration steps that it still requires.
Once the passwords are hashed and YOURLS is running properly, be sure to change permissions on the configuration file back to read only:
sudo chmod 0440 ./user/config.php
Once you enter in a few shortcuts and begin receiving traffic, you should see something like this at your /admin path:

Build a Home Page
By default, there is no YOURLS home page. This is by design, to prevent spammers from abusing your service.
I created a default index.php file to redirect to my consulting webpage. Visitors will only get this page when they enter my YOURLS URL without a proper shortcut:
<html>
<head>
    <META http-equiv="refresh" content="0;URL=http://lookahead.io">
  </head>
  <body bgcolor="#ffffff">
    <center>
Please visit our website <a href="http://lookahead.io">Lookahead Consulting</a>
    </center>
</body>
</html>
However, if you wish to offer a public shortcut page, copy sample-public-front-page.txt to index.php.
cp sample-public-front-page.txt index.php
Creating Shortcuts
Creating shortcuts is easy and should be self-explanatory. Here's an example of me creating a shortcut to my Tuts+ instructor profile:

YOURLS makes it easy to share your URL on Twitter and Facebook:

Traffic Statistics
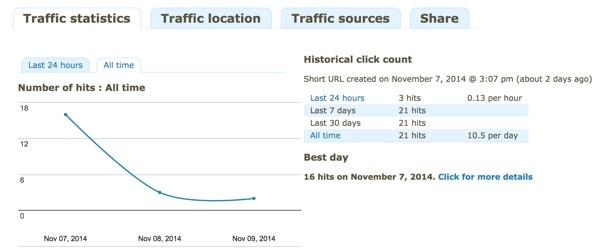
Statistics are one of the most useful aspects built in to YOURLS. Here are general activity levels over time:
And, here's geographical referral information:
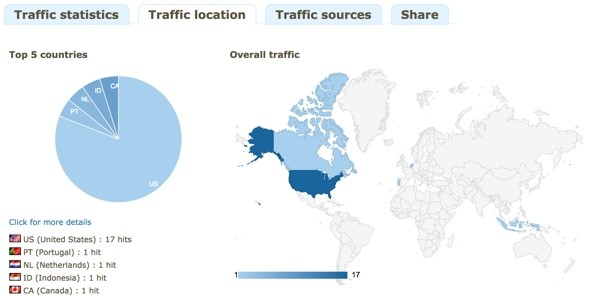
Here's the reason I chose YOURLS: to get detailed traffic numbers on which pages were driving the most affiliate referrals.
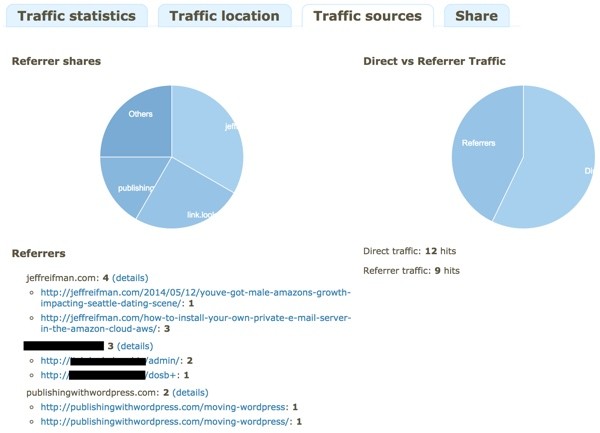
Over time, this will help me tune the placement of my affiliate advertising.
Doing More with YOURLS
There is also an extensive group of YOURLS Plugins and an API to explore. For example, there are Memcached and QR Code plugins, among others.
YOURLS is a well-configured, tight piece of PHP code for running your own URL shortener. I hope you've found this useful.
Please post any comments, corrections or additional ideas below. You can browse my other Tuts+ tutorials on my instructor page, or follow me on Twitter @reifman.


Comments