In this follow-up tutorial, we'll optimize Magento, add a Redis cache, SSL and DNS alias, then scale the application for benchmarking and production. The following assumes you've already used the first tutorial to launch a basic Magento cloud application on Pagoda Box. Ready to optimize?
Requirements
You can download the finished code for this tutorial, or install Magento from a Quickstart to test a working site.
- A Pagoda Box Account (free)
- A functional local Magento Install
- Local Development Software (MAMP or WAMP)
- Git Installed (Can use SFTP)
- The Pagoda Terminal Client Installed
Fair Warning: Pagoda Box is not traditional hosting. This tutorial not only optimizes Magento, it lays the groundwork for a progressive continuous integration workflow.
Step 1: Enable eAccelerator, XCache or APC Cache
Enabling a Bytecode Cache will optimize performance, especially with large codebases such as Magento. You could use eAccelerator or XCache bytecode caching, but Magento recommends APC. To enable APC, simply add it to the list of php extensions in the Boxfile as follows:
web1:
  php_extensions:
    - apc
Your new Boxfile should look like this:
web1:
  name: mag-app
  shared_writable_dirs:
    - media
    - var
  php_version: 5.3.8
  php_extensions:
    - pdo_mysql
    - mysql
    - simplexml
    - mcrypt
    - hash
    - gd
    - dom
    - iconv
    - curl
    - soap
    - apc
  after_build:
  - "mv pagoda/local.xml app/etc/local.xml"
cron:
    - "*/15 * * * *": "curl -s -o /dev/null http://magento.pagodabox.com/cron.php"
db1:
  name: mag-db
  type: mysql
Step 2: Create a Redis Component
By default, Magento sessions on Pagoda Box are located in writable storage, and are accessible to all your web instances. This tutorial moves sessions to Redis, which is an "advanced key-value store". Redis provides extremely powerful in-memory caching, coupled with persistent data for far better read, write, and session performance.
Create a Redis Cache from the Boxfile
First, enable the Redis extension by adding - redis to the extensions list in the Boxfile, just as we did for APC. This allows your PHP components to connect with Redis. Also add a Redis cache component to your Boxfile as follows:
cache1:
  name: mag-cache
  type: redis
Your updated Boxfile should look like this:
web1:
  name: mag-app
  shared_writable_dirs:
    - media
    - var
  php_version: 5.3.8
  php_extensions:
    - pdo_mysql
    - mysql
    - simplexml
    - mcrypt
    - hash
    - gd
    - dom
    - iconv
    - curl
    - soap
    - apc
    - redis
  after_build:
  - "mv pagoda/local.xml app/etc/local.xml"
cron:
    - "*/15 * * * *": "curl -s -o /dev/null http://magento.pagodabox.com/cron.php"
db1:
  name: mag-db
  type: mysql
cache1:
  name: mag-cache
  type: redis
When a Redis component is included in the Boxfile, a Redis cache is automatically added to your infrastructure when you deploy updates.
Alternate: Create a Redis Cache from the Dashboard
You can also create a Redis cache from the Pagoda Box Dashboard. The Dashboard is also where you scale the Redis component.
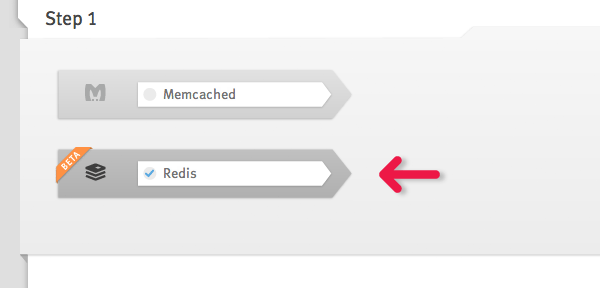
First, click "Add Cache" in the Dashboard.

...then choose Redis.
Once your new cache component has been deployed, click it in the Dashboard, then choose your preferred amount of RAM as follows:
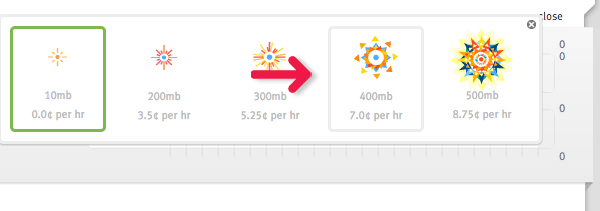
Data is persistant with Redis, so you can resize the cache without losing sessions or caching data held in memory, unlike Memcache.
Step 3: Configure Magento for Redis Sessions and Cache
This tutorial shares a single Redis component for Magento sessions and caching. If your site receives enough traffic, creating a separate Redis component for both sessions and caching can provide an added measure of performance.
Redis Sessions
Configure Magento sessions to use Redis.
If you ever need to override Magento default files (like we will here), do not modify Magento's core files. Override files should always reside in Magento's Local Directory to protect functionality and future upgrades.
-
Edit the session handler section of your
local.xmlfile to use Redis, and set the session save path as follows:<session_save><![CDATA[redis]]></session_save> <session_save_path><![CDATA[tcp://tunnel.pagodabox.com:6379]]></session_save_path>
-
Next, add Redis support to Magento by overriding a core Magento file. Copy the file:
app/code/core/Mage/Core/Model/Session/Abstract/Varien.php
Then create your own local version at:
app/code/local/Mage/Core/Model/Session/Abstract/Varien.php
In the new file, around line 62, add the following:
case 'redis':
                ini_set('session.save_handler', 'redis');
                session_save_path($this->getSessionSavePath());
                break;
Redis Cache
Now, configure Magento cache to use Redis, as well.
-
Add the Credis library and Cm Module to enable Redis as a Magento cache. The module consists of one file, which you can download here. Although the Cm module author recommends installing via modman, modman doesn't correctly register all submodules with Pagoda Box. Instead, save the file as:
app/code/community/Cm/Cache/Backend/Redis.php.Add the Credis library as a Git submodule to your project:
$ cd your_site_dir $ git submodule add git://github.com/colinmollenhour/credis.git lib/Credis -
Once again, edit the
local.xmlfile. Change the cache delcaration and it's contents as follows:<cache> <backend>Cm_Cache_Backend_Redis</backend> <backend_options> <server>tunnel.pagodabox.com</server> <port>6379</port> <database>0</database> <force_standalone>0</force_standalone> <automatic_cleaning_factor>0</automatic_cleaning_factor> <compress_data>1</compress_data> <compress_tags>1</compress_tags> <compress_threshold>20480</compress_threshold> <compression_lib>gzip</compression_lib> </backend_options> </cache> -
Set far future expires to drastically reduce the number of requests per visitor as they browse your site. Do this after finishing frontend theme work. Adding the following
static_expiredirective to theweb1section of your Boxfile will expire static asset caches after 1 year.web1: static_expire: 31536000
-
Add the updated files to git, commit and push to Pagoda Box.
	$ git add .
	$ git commit -m 'installed and configured redis'
	$ git push pagoda --all
-
After deploying, clear the Magento system cache by logging into your Magento admin and going to System -> Cache Management, then clicking 'Flush Magento Cache'.
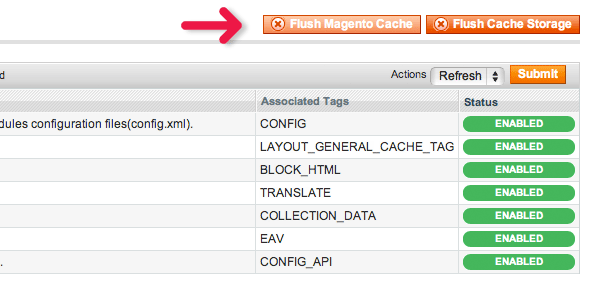
NOTE: Avoid JS & CSS in Writable Storage
Magento has a few optimization utilities that merge javascript and css files, then place them in Pagoda Box's shared writable storage. Most of the time, that's a non-issue, but at high traffic volume, Pagoda Box can access files from the distributed web instances much faster than files in shared writable storage. For high traffic performance, keeping javascript and css in the repo outperforms minification.
To turn file merging off, log into your Magento admin panel, then navigate to: System > Configuration > Developer
Choose "No" under JavaScript Settings and CSS Settings as follows:

Step 4: Verify Redis is Working
Now that Magento is configured for Redis, verify that everything is working. Follow this Redis guide to establish a secure tunnel, then use the terminal to access Redis on Pagoda Box. Once connected, run the following command to display a list of all stored keys.
$ keys *
Assuming you've browsed the udpated site, you should see a list of assorted keys. If you see session keys only, cache keys only, or if you don't see any keys at all, review your configuration settings and ensure you've cleared the Magento cache.
For a full list of useful commands when using Redis, see their official documentation.
Step 5: Adding DNS / SSL
Piggyback SSL is free and automatic for every app on Pagoda Box at their app's subdomain (appname.pagodabox.com). While it's possible to benchmark using Piggyback SSL, we'll enable Third-Party SSL for purposes of the tutorial. Wildcard Certs and Self-signed SSL are detailed in this DNS / SSL guide.
Add SSL
Begin by clicking the "Add an SSL Certificate" button under the DNS / SSL Tab in the Pagoda Box dashboard.

Next, choose whether you're creating a certificate, or using an existing SSL certifcate, as we are here. Assuming you've got an existing certificate, click "Transfer Existing".

Finally, paste the relevant information into the appropriate field and activate. Your SSL Certificate is now saved with your application.
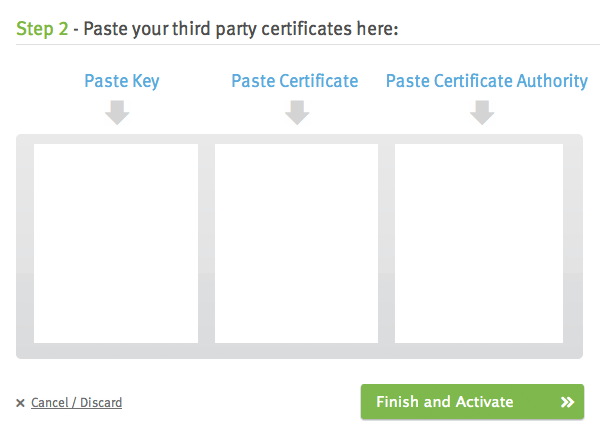
Add A DNS Alias
After you've entered an SSL Certificate, it will appear in your list of available SSL Certificates. If you haven't already, add your custom domain as a DNS Alias to your application. Click "Add New Alias" and enter your registered domain as the alias. Pagoda Box will assign a shared IP address by default, but this will change when you associate an SSL certificate with the DNS Alias.

Finally, associate your SSL certificate with your DNS alias by selecting it from the SSL dropdown list next to your DNS Alias, then click "Save". With the SSL certificate now tied to your DNS Alias, your alias gets a unique, dedicated IP address.

Once you associate an SSL Certificate with a DNS alias, that alias will get a dedicated IP address. Make sure to verify that your A-Record matches the IP provided after you add, delete or modify your SSL Certificates.
Step 6: Benchmark with Blitz.io
We've used Blitz.io to benchmark a few Magento applications. It tests both http response and database writes using variable lists URLs and Cookies.
To start, create a free account on Blitz.io. Once you've registered, look for the "START!" button at the bottom of your welcome page.

Click "Start", and Blitz will provide a series of simple tutorials that explain the variables you'll use in a Query URL to test your application. For our purposes, your base Query URL should look something like this:
-p 1-24:60 -r california -T 4000 -v:cookie list[d1b1530ff8694817e1f11f55e0a4a120,805d9a11f3b9f8ea35ee2db1d9aac3fc] -v:urls list[index.php,furniture.html,ottoman.html,about-magento-demo-store,checkout/cart/add?product=51] -b "my-cookie=#{cookie}Ó http://magento-demo.pagodabox.com/#{urls}
Specifically, that query will gradually test 1-24 concurrent visitors (can test to 250 with Free account) over 60 seconds, from California, timing out at 4 seconds. The query also sets a list of cookies and URLs as variables, plus the domain we're testing. We've included a Home page, CMS page, Catalog page, Product page and Checkout page to test.
Using Cookie variables and a checkout/cart/add?product URL lets us test the DB writes. Obtain a list of valid cookies by navigating your site in Chrome > Inspect Element > Resources > Cookies > [yoursite] > frontend. Copy the key from the Value column, as indicated below:

Replace the cookies, URLs and Domain from the URL query above with the appropriate elements from your site, then enter the new query on Blitz.io, and click "Run".

The first time you "Rush" your app, Blitz will display an Authorization Error and ask you to prove ownership by adding a specific URL to your app. Follow the onscreen Blitz instructions for creating a unique authorization file on your local computer, then push changes to Pagoda Box.
	$ git add .
	$ git commit -m "blitz auth file"
	$ git push pagoda --all
Confirm the new file is in place by visiting the URL in a browser. You should see "42". Note that the "root of your www directory" is the root of your project unless you have configured document_root in your Boxfile to be another directory.
Once everything is in place, you're free to adjust Blitz variables and test. For example, changing 1-24 to 60-60 will change concurrency from a graduated increase to 24 concurrency to 60 sustained concurrent visitors. Isolating URLs in the variable list allows you to identify performance bottlenecks by isolating various page types. You can even test DB write capacity by using the checkout/cart/add? url.
Of course, benchmarking is simply an indicator to help scale the application. Make sure to scale to various levels as you benchmark, noting the change in results (see Scaling Magento video). Blitz.io should help identify application bottlenecks and determine the appropriate scale for your expected traffic.
Step 7: Scaling on Pagoda Box
There has been quite a bit of initial prep work to get to this stage, but this is where it all comes together. Continuous integration, ongoing management, and scalability are now much simpler. As you benchmark, keep in mind that charges are hourly. Scaling to test briefly will cost only a few dollars.
Scaling Web Instances
To scale your web application for more traffic, open your Web Component from the Pagoda Box dashboard as follows:

Then, click and drag the slider to the desired number of instances, and click "Save". Pagoda Box will deploy Magento from your repository to new instances. After all instances are built and verified, the routing layer will redirect traffic to the new instances, and decommission the old without any downtime (again, see Scaling Magento video).
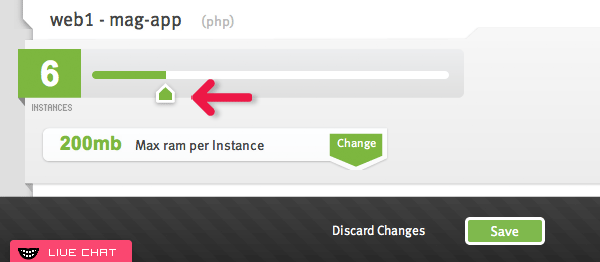
Note: As you're using it, the slider appears to max out at 25 instances, but will reset for greater scaling after the upper limit has been saved.
Scaling a Database : Cloud (Cache Components are identical)
To scale your cloud database, open your Databsase Component from the Pagoda Box dashboard as follows:

Notice the Red Face is unhappy because RAM usage is too high. To increase RAM, click the green "Change" arrow, select your desired amount of RAM, and click "Save".
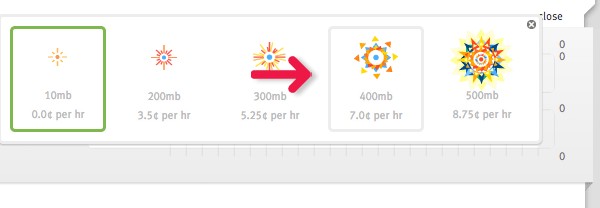
Pagoda Box will create a larger database, migrate data, sync via master-master replication, then point your application to the new database. Your site is live throughout the migration.
Scaling a Database : Private
To scale your Private database, open your Databsase Component from the Pagoda Box dashboard as follows:

Select the resources you'd like for your database, determine if you'd like replication, then click "Save".
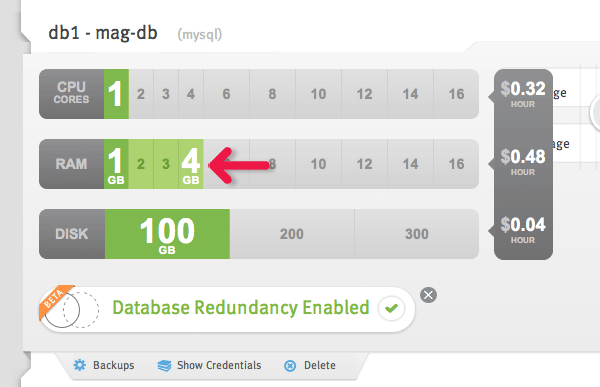
Pagoda Box will create a larger database, migrate data, sync via master-master replication, then point your application to the new database. Your site is live throughout the migration.
Keep in mind that ordering a Private database may take more than 20 minutes, as a server is provisioned to your specifications.
Note: currently, scaling from a Cloud database to a Private database requires some downtime as you manually migrate data. Scaling from Cloud to Cloud, or Private to Private is always automatic.
Summary
That's it! Your Magento application is now fully scalable in an instant, and updates are easily deployed with $ git push pagoda --all. Enjoy!


Comments