Within an OpenCart web shop, banners can be displayed in many forms. They can be displayed as a static image, a carousel, or a slideshow. Each banner may include one or more images and these group of images can be assigned to different modules depending on the size and the function they work.
When you want to place a banner on your website, first you upload pictures to banners, and then assign these banners with displaying modules.
Uploading Images for Banners
In the dashboard of OpenCart, navigate to System > Design > Banners. Let's Insert our first banner, add a name to it, and set its status. Now we just created a group for the images we will upload.
Let's start adding pictures by clicking the Add Banner button. As you see, here we can add a title for each web shop language, copy or type your link and browse or upload the image file (JPG, PNG or GIF). We can assign as many banner images as we want, but all the images should have the same size or at least the ratio, since these pictures will be switching or sliding inside a banner-holding module. (The naming convention of banners can be confusing since the system uses the term banner for a set of banner images and uses banner for the image itself, too.)

Assigning Banners to Modules
As we learnt above, banners are displayed with modules in OpenCart. There are three commonly used modules for showing banners: the Banner module, Carousel and Slideshow. These all have similar functions: they animate same-sized pictures and let the user click on them.
Adding a Banner Module
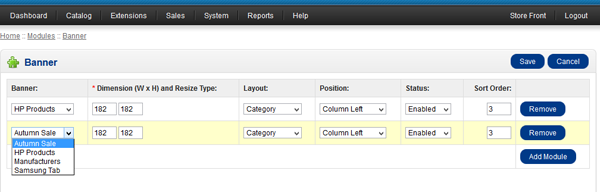
A Banner module shows banners by fading banner images in one place each after each. To assign a banner to a banner placeholder module, Navigate to Extensions > Modules > Banner > Edit.
Click Add Module and this lets us invoke banners into a layout. You need to choose which banner to show, define the Dimension, pick a Layout where to display, a Column position, set the Status and the Order of the module. The size of the module should be so that it fits in the column it will be placed. The system resizes the uploaded images according to this dimension. Layouts are predefined and their name are descriptive. Position can be set left, right, top or bottom (see details about layout positions here). Order defines the array of visual appearance of more modules within one column.
Adding Banners to Slideshow Modules
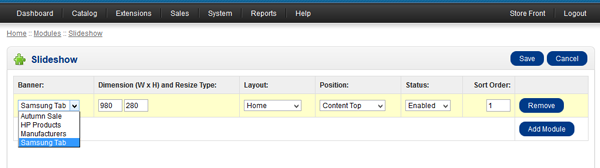
The Slideshow module displays banner images as a moving slideshow animation. This module is generally displayed on the home page with bigger landscape pictures. The main parameters of this module - like the type of animation, speed or its look- are defined in its theme file, which we don't need to modify, since we use the preset module.
We can assign an already set and uploaded banner to a slideshow by going to Extensions > Modules > Slideshow > Edit. When adding a module, we need to make similar settings as we did at the banner module above. Choose a banner to show, add its size, pick a layout and position, set the status and the order. See the illustration below.
Adding Banners to the Carousel Module
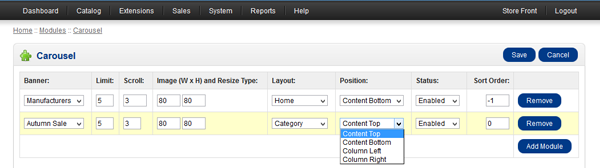
The carousel module lets you display a set of smaller banner images next to each other and animate them be displaying and hiding them step by step while moving horizontally.
We can set up this module the same way as we added a banner to a slideshow, though a carousel module accepts two more things:
- The value of Limit tells the carousel how many images it should show at the same time
- The Scroll sets the number of images the carousel to jump between two steps.
How To Track Banner Clicks
These banner modules are very useful and not many e-commerce solution have them as part of the core, though they have limited abilities e.g. you cannot see the number of clicks on the banners. If we want to measure clicks, we can use Google Analytics for that (given that you have already installed the tracking code).
Clicking on a banner which redirects to a page on the same site is an event in Google Analytics term. This is why we use the event tracking feature of Google Analytics to measure on-site banner banner clicks in OpenCart. Here's a sample HTML for implementing event tracking:
<a href="/landing-page-url" onClick="_gaq.push(['_trackEvent', 'category', 'action', 'label, 'value']);"><img src="banner.png" alt="Banner title"></a>
An event occurs when a user clicks on something. The event is tracked by the _trackEvent() method which holds the following information: category - group of objects we want to track (e.g. slideshow), action - the type of user interaction (e.g. banner click), label - an optional string for additional data, value - optional numerical data for the action. As you can see, a simple line of HTML-modification will help tracking our banner clicks.
Changing Your Module Template Files To Track Banner Clicks
The banner, slideshow and carousel modules have their own templates within the used theme's directory. We only need to change a few lines in module template files. This is what we need to add to the <a> tags within the template files: onClick="_gaq.push(['_trackEvent', '{banner type}', 'Clicked', '<?php echo addslashes($banner['title']); ?>']);"
For banners, find this or similar piece of code in your theme's {your theme folder}\template\module\banner.tpl file:
<a href="<?php echo $banner['link']; ?>"><img src="<?php echo $banner['image']; ?>" alt="<?php echo $banner['title']; ?>" title="<?php echo $banner['title']; ?>" /></a>
and replace with this:
<a href="<?php echo $banner['link']; ?>" onClick="_gaq.push(['_trackEvent', 'Banners', 'Clicked', '<?php echo addslashes($banner['title']); ?>']);"><img src="<?php echo $banner['image']; ?>" alt="<?php echo $banner['title']; ?>" title="<?php echo $banner['title']; ?>" /></a>
As you can see, we added Banners as the category component, Clicked as the action, and the unslashed version of the banner title as label. We didn't need to pick a value, since it defaults to one and in our case that is what we need.
The slideshow template, which can be found at {your theme folder}\template\module\slideshow.tpl, should be changed from this:
<a href="<?php echo $banner['link']; ?>"><img src="<?php echo $banner['image']; ?>" alt="<?php echo $banner['title']; ?>" /></a>
to this:
<a href="<?php echo $banner['link']; ?>" onClick="_gaq.push(['_trackEvent', 'Slideshow', 'Clicked', '<?php echo addslashes($banner['title']); ?>']);"><img src="<?php echo $banner['image']; ?>" alt="<?php echo $banner['title']; ?>" /></a>
The carousel template is found at {your theme folder}\template\module\carousel.tpl and these lines need to be changed from this:
<li><a href="<?php echo $banner['link']; ?>"><img src="<?php echo $banner['image']; ?>" alt="<?php echo $banner['title']; ?>" title="<?php echo $banner['title']; ?>" /></a></li>
to this:
<li><a href="<?php echo $banner['link']; ?>" onClick="_gaq.push(['_trackEvent', 'Carousel', 'Clicked', '<?php echo addslashes($banner['title']); ?>']);"><img src="<?php echo $banner['image']; ?>" alt="<?php echo $banner['title']; ?>" title="<?php echo $banner['title']; ?>" /></a></li>
The results of clicks can bee seen if go to Google Analytics and go to the Behavior section > Events overview. There we'll see the category (in our case the type of banner), the number of clicks and the name of the banner.
General Know Hows of Banners
- One drawback of the banner and slideshow modules is that we cannot set an expiry date, so the site manager or marketing manager should be aware of this.
- Banner file size should be kept low. So an about 900px wide banner file should not be more than 100-150KB.
- Flash (SWF) files, JavaScript or other HTML cannot be used here, only static pictures like JPG, PNG or GIF.
- The overuse of banners can be harmful. Nobody likes to look at a banner-wallpapered website.
- Try utilizing graphic elements similar to those used for the web design.
Conclusion
We learnt that first we have to upload the banner images to banner(group)s so later we can assign them to a display module, such as banner, slideshow or carousel. Later we changed the module template files to track click events with Google Analytics.
If you have questions, please ask them in the discussion area below.

Comments