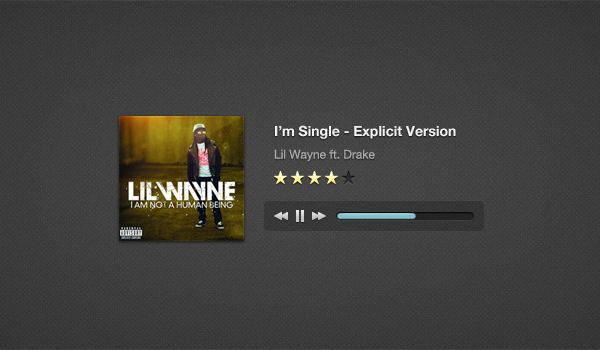
I will be showing how to integrate an HTML 5 Music Player into WordPress. After that we will be adding a Settings Page ("theme options") so you can allow for easy player customization!
This music player has finally made its way to WP! The design was originally created by Orman Clark after which Saleem from Codebase Hero created a jQuery plugin out of it.
Today I will be taking that plugin and integrating it into WP. I would like to point out that I'm not an advanced WP developer and the code that I will be using is compiled from various tutorials across the web. I would just like to share with everyone how I did it. Also I will not be going into explaining the jQuery plugin code created by Saleem, I can help answer any questions but best thing to do is to just head over to the plugin page and go through the documentation. You may download the source files and customize it to your preference. Well, lets fire away..
Things We Will Do
Hopefully by the end of this tutorial you will be able to:
- Integrate HTML5 Music Player into WP
- Create Custom Post Type + Custom Meta Box
- Create Settings Page for your Music Player
Step 1 Download Source Files
First download the required source files and copy folder named "blank" into your wp-content/themes/ folder where all your themes are located. You will need the files to complete this tutorial!
Your directory should look like this: wp-content/themes/blank.
Ok, from now on we will be working inside your "blank" theme folder.
Step 2 Creating Additional Folders and Files
Go to your downloaded source files folder and copy the playlist folder into your theme folder. The folder contains 3 folder css, images, and js.
Those folders contain all the files and images that came with the HTML5 Music Player and we will not be editing those.
Lets create some more files. Inside playlist folder create 2 files playlist.php and playlist-post-type.php. Now open css folder and create a file playlist-style.css.
Take a look at the folder structure image below to make sure you have all the correct files.

Step 3 Custom Post Type - Playlist
Lets create the post type called playlist. More on custom post types at WP Codex. Open playlist-post-type.php file.
<?php
// Adding Custom Post Type
add_action('init', 'playlist_register');
function playlist_register() {
		$labels = array(
        'name'					=> _x('Playlist','Music Player','Music Player'),
        'singular_name'		=> _x('Music Player','Music Player', 'Music Player'),
        'add_new'				=> _x('Add New Track', 'Music Listing','Music'),
        'add_new_item'			=> __('Add New Track','Music'),
        'edit_item'			=> __('Edit Track','Music'),
        'new_item'				=> __('New Music Post Item','Music'),
        'view_item'			=> __('View Music Item','Music'),
        'search_items'			=> __('Search Music Items','Music'),
        'not_found'			=> __('Nothing found','Music'),
        'not_found_in_trash'	=> __('Nothing found in Trash','Music'),
        'parent_item_colon'	=> ''
        );

        $args = array(
        'labels'				=> $labels,
        'public'				=> true,
        'exclude_from_search'	=> false,
        'show_ui'				=> true,
        'capability_type'		=> 'post',
        'hierarchical'			=> false,
        'rewrite'				=> array( 'with_front' => false ),
        'query_var'			=> false,
        'menu_icon'			=> get_stylesheet_directory_uri() . '/playlist/images/playlist.png',
        'supports'				=> array('title', 'editor', 'thumbnail'),
        );
        register_post_type( 'playlist' , $args );
        }

// Maker sure any other code added to playlist-post-type.php is above this text! The closing php tag needs to be last peice of code in this file!
?>
Pretty basic stuff here, this will create a new post type called Playlist in our admin dashboard menu. For now you won't be able to see it yet, because we haven’t actually attached it. So for that we need to go back to the main theme directory and open up functions.php file. Add the following.
// DEFINE PATHS
define('OD_PLAYER', TEMPLATEPATH . '/playlist/');	// Playlist Directory

// REQUIRE FILES
require_once(OD_PLAYER . '/playlist-post-type.php');	// Get Custom Post Type : Playlist
Go back to your dashboard and refresh the page, you should now be able to see Playlist in the menu. Click on Playlist and you'll notice that right now we have the default columns that display the Title and Date. We want to go in and change the columns to something more relevant for our post type. We will add columns for Album Cover, Track Title, and Artist Name. Open up playlist-post-type.php and add this.
//Custom Overview Page<br />add_action("manage_posts_custom_column", "music_custom_columns");
add_filter("manage_edit-playlist_columns", "my_areas_columns");<br />function my_areas_columns($columns)
{
$columns = array(
	"thumbnail"	=> "Album Cover",
	"cb"		=> "<input type=\"checkbox\" />",
	"title"		=> "Track Title",
	"artist"	=> "Artist Name"
);
	return $columns;
}
function music_custom_columns($column)
{
	global $post;
	if ("ID" == $column) echo $post->ID;
	elseif ("artist" == $column)
		echo get_post_meta(get_the_ID(),'music_artist',true);
	elseif ("thumbnail" == $column) the_post_thumbnail('album-thumb');
}
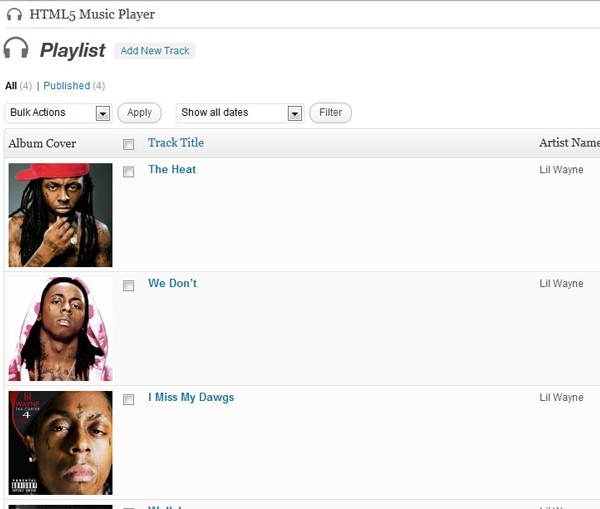
That looks much better, don't you think? Ok, lets add some more stuff to this file. I want to have a custom icon for this post type. If you hit Add New Track you'll notice that the current icon is just WP default "pin", lets add the headphones icon instead.
// Adding Custom Screen Icons on Edit and Add New Screens
add_action('admin_head', 'plugin_header');
function plugin_header() {
	global $post_type;
    ?>
    <style>
    <?php if (($_GET['post_type'] == 'playlist') || ($post_type == 'playlist')) : ?>
    #icon-edit { background:transparent url('<?php echo get_stylesheet_directory_uri() .'/playlist/images/playlist_large.png';?>') no-repeat; }
    <?php endif; ?>
    </style>
    <?php
    }
I would also like to add custom css to our new post type so lets attach a css file to it, add the following.
//Add Custom CSS to the post
add_action('admin_head', 'tracklist_admin_css');
function tracklist_admin_css() {
	global $post_type; if (($_GET['post_type'] == 'playlist') || ($post_type == 'playlist')) : ?>
	<link rel='stylesheet' type='text/css' href='<?php echo get_stylesheet_directory_uri() .'/playlist/css/playlist-style.css';?>' />
	<?php endif;
}
We will add some styles later, for now lets continue adding things to our post type. The last thing left to add is meta box. Before we do that we need to know what type of inputs we need to add. That's easy because we already know since we are building upon a "finished" product. HTML5 Music Player contains a file with the following options.
var myPlaylist = [
{
  mp3:'mix/1.mp3',
  oga:'mix/1.ogg',
  title:'Sample',
  artist:'Sample',
  rating:4,
  buy:'#',
  price:'0.99',
  duration:'0:30',
  cover:'mix/1.png'
}
];
One thing I should point out right away is we will not be focusing on the "rating" part of the music player. Ok so from that we can tell that we need the following inputs:
- mp3 (meta input)
- ogg (meta input)
- title (post title)
- artist (meta input)
- buy (meta input)
- price (meta input)
- duration (meta input)
- cover (featured image)
Lets add meta box with those items. Below code will basically prefill input fields (we will make those after this) if there was something saved in them.
// Adding Custom Meta Information for tracks
	add_action('add_meta_boxes', 'music_add_custom_box');
    function music_add_custom_box() {
    	add_meta_box('track_info', 'Track Information', 'track_box', 'playlist','normal', 'high');
	}
function track_box() {
	$music_mp3 = '';
	if ( isset($_REQUEST['post']) ) {
		$music_mp3 = get_post_meta((int)$_REQUEST['post'],'music_mp3',true);
	}

	$music_ogg = '';
	if ( isset($_REQUEST['post']) ) {
    	$music_ogg = get_post_meta((int)$_REQUEST['post'],'music_ogg',true);
    }

	$music_artist = '';
	if ( isset($_REQUEST['post']) ) {
    	$music_artist = get_post_meta((int)$_REQUEST['post'],'music_artist',true);
    }

	$music_buy = '';
	if ( isset($_REQUEST['post']) ) {
    	$music_buy = get_post_meta((int)$_REQUEST['post'],'music_buy',true);
    }

	$music_price = '';
	if ( isset($_REQUEST['post']) ) {
    	$music_price = get_post_meta((int)$_REQUEST['post'],'music_price',true);
    }

	$music_duration = '';
    if ( isset($_REQUEST['post']) ) {
    	$music_duration = get_post_meta((int)$_REQUEST['post'],'music_duration',true);
    }

	$check = "";
    if ( isset($_REQUEST['post']) ) {
    	$check = get_post_meta((int)$_REQUEST[post],'music_thumb_url_check',true);
    }

	$music_thumb_url = '';
    if ( isset($_REQUEST['post']) ) {
    	$music_thumb_url = get_post_meta((int)$_REQUEST['post'],'music_thumb_url',true);
    }

	?>
Please note that we are also closing the php tag at this point. We will reopen it later. We had to close php because we will be adding some html to the file. Above we created a function that will look through each of the input field and see if anything was saved, and if so it will auto fill those values into the fields. Lets add the inputs
<div id="track_list">

<div>
	<label for="music_mp3">MP3</label>
	<input id="music_mp3" class="widefat" name="music_mp3" value="<?php echo $music_mp3; ?>" type="text">
</div>

<div>
	<label for="music_ogg">OGG</label>
	<input id="music_ogg" class="widefat" name="music_ogg" value="<?php echo $music_ogg; ?>" type="text">
	<p style="padding-left:140px;"><a href="http://media.io/" target="_blank">Convert your music files online here</a> then use Upload/Insert <img src="images/media-button-music.gif" /></p>
</div>

<div>
	<label for="music_artist">Artist</label>
	<input id="music_artist" class="widefat" name="music_artist" value="<?php echo $music_artist; ?>" type="text">
</div>

<div>
	<label for="music_buy">URL To Purchase</label>
	<input id="music_buy" class="widefat" name="music_buy" value="<?php echo $music_buy; ?>" type="text">
</div>

<div>
	<label for="music_price">Song Price</label>
	<input id="music_price" class="widefat" name="music_price" value="<?php echo $music_price; ?>" type="text">
</div>

<div>
	<label for="music_duration">Song Duration</label>
	<input id="music_duration" class="widefat" name="music_duration" value="<?php echo $music_duration; ?>" type="text">
</div>

</div>
Try it out. Hit Add New Track and you should now see the input fields. Also you'll notice that I added a link under OGG input, that's just something I found online for converting mp3 files into OGG format online. We'll style the whole thing later, for now lets make sure those input fields actually save our input, add this code.
<?php
}
add_action('save_post','catalog_save_meta');
function catalog_save_meta($postID) {
	if ( is_admin() ) {
		if ( isset($_POST['music_mp3']) ) {
			update_post_meta($postID,'music_mp3', $_POST['music_mp3']);
		}
		if ( isset($_POST['music_ogg']) ) {
			update_post_meta($postID,'music_ogg', $_POST['music_ogg']);
		}
		if ( isset($_POST['music_artist']) ) {
			update_post_meta($postID,'music_artist', $_POST['music_artist']);
		}
		if ( isset($_POST['music_buy']) ) {
			update_post_meta($postID,'music_buy', $_POST['music_buy']);
		}
		if ( isset($_POST['music_price']) ) {
			update_post_meta($postID,'music_price', $_POST['music_price']);
		}
		if ( isset($_POST['music_duration']) ) {
			update_post_meta($postID,'music_duration', $_POST['music_duration']);
		}
	}
}
Ok, now if you try saving, it will save the data. We now have fully functional custom post type. Lets add some css to it. Open playlist-style.css, remember earlier we added a custom css file into our custom post type code? Lets style those inputs. Add the following.
/* Playlist Overview Page */
.column-thumbnail { width: 125px; padding:5px !important; }
/* Custom CSS For Post Type */
#track_list { background:url(../images/playlist_bg.png) no-repeat right center;}
#track_list label { display:block; width:130px !important; float:left; padding-top:15px; padding-right:10px; text-align:right; }
#track_list div {  clear:both !important; margin-bottom:10px; }
#track_list input { height:40px !important; width:440px !important;}

/* Input Icons */
#music_mp3 { background:url(../images/note_icon.png) no-repeat right center #fff; }
#music_ogg { background:url(../images/note_icon.png) no-repeat right center #fff; }
#music_artist { background:url(../images/artist_icon.png) no-repeat right center #fff; }
#music_rating { background:url(../images/rating_icon.png) no-repeat right center #fff; }
#music_buy { background:url(../images/url_icon.png) no-repeat right center #fff; }
#music_price { background:url(../images/money_icon.png) no-repeat right center #fff; }
#music_duration { background:url(../images/clock_icon.png) no-repeat right center #fff; }
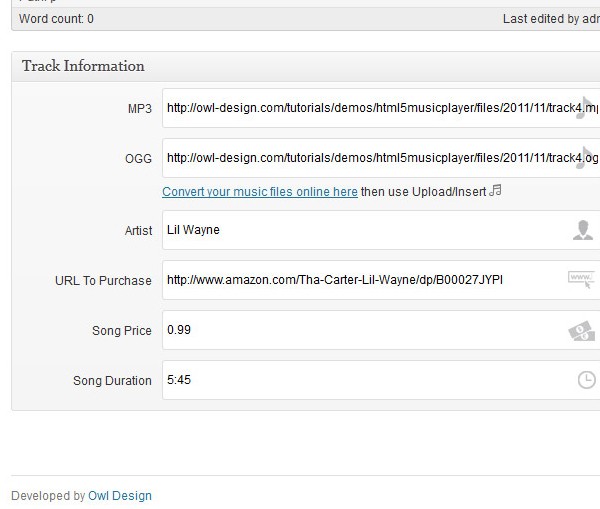
We are now completely finished with our custom post type.
One more file to edit...
Remember this code I showed earlier?
var myPlaylist = [
{
  mp3:'mix/1.mp3',
  oga:'mix/1.ogg',
  title:'Sample',
  artist:'Sample',
  rating:4,
  buy:'#',
  price:'0.99',
  duration:'0:30',
  cover:'mix/1.png'
}
];
That's basically all the information that we will be prefilling with our custom post type we created and the meta box. Open and add the following code into playlist.php.
<script type="text/javascript">
var myPlaylist = [
<?php query_posts(array('post_type' => 'playlist')); ?>

<?php while(have_posts()): the_post(); ?>
<?php $thumbnail = wp_get_attachment_image_src( get_post_thumbnail_id ( $post->ID ), "album-thumb"); ?>

	{
		mp3:'<?php echo get_post_meta(get_the_ID(),'music_mp3',true); ?>',
		oga:'<?php echo get_post_meta(get_the_ID(),'music_ogg',true); ?>',
		title:'<?php the_title() ?>',
		artist:'<?php echo get_post_meta(get_the_ID(),'music_artist',true); ?>',
		buy:'<?php echo get_post_meta(get_the_ID(),'music_buy',true); ?>',
		price:'<?php echo get_post_meta(get_the_ID(),'music_price',true); ?>',
		duration:'<?php echo get_post_meta(get_the_ID(),'music_duration',true); ?>',
		cover:'<?php echo $thumbnail[0] ?>'
	},

<?php endwhile; ?>

];
</script>
This is our custom loop for custom post type "playlist". I am using get_post_meta to pull the required data. This is all that we need for the loop. In the next section we will fire up the actual music player. Actually before we go on we need to make small addition to the functions.php file. Open it and add the following line in the // Post Thumbnails area. This is to make sure that when someone add a featured image it crops it to 125x125.
add_image_size('album-thumb', 125, 125, true); // Album Cover > Cropped
That should now look like this...
// Post Thumbnails<br />add_theme_support('post-thumbnails');
set_post_thumbnail_size(150, 150); // Post Thumbnails
add_image_size('album-thumb', 125, 125, true); // Album Cover > Cropped
That's it, lets move on.
Step 4 Getting it Working - The Music Player
Ok, now that our custom post type is fully really lets connect it all to the music player.
Go back to the theme directory and open header.php. All the following.
<!-- Playlist Styles -->
<link rel="stylesheet" href="<?php bloginfo('template_url'); ?>/playlist/css/playlist.css">

<!-- Playlist JavaScripts -->
<script src="<?php bloginfo('template_url'); ?>/playlist/js/jplayer.js"></script>
<script src="<?php bloginfo('template_url'); ?>/playlist/js/music-player.js"></script>
<script>
	$(document).ready(function(){
		$('.music-player').ttwMusicPlayer(myPlaylist, {
			tracksToShow:3,
			description:'Hello, this is a demo description',
			jPlayer:{
				swfPath: '<?php bloginfo('template_directory'); ?>/playlist/js/',
			}
		});
	});
</script>
If you followed the tutorial correctly you should now have a fully working music player. Congratulations!
If you made this for personal use you can just easily change the appearance of the music player as you see fit. But if you are like me and choose to take it even further than lets keep going. For example if I was making this for a client I know they wouldn't want to have anything to do with css files. I need to create a "theme options" page. For this tutorial I will call it Player Settings page and we will stick it into the Playlist menu just below the Add New Track.
I won't be making too much options, but just enough for you guys to easily just add more if you need to.
Step 5 Player Settings - General Appearance
Copy settings folder from the downloaded source files and paste it into your blank theme folder. Inside the settings folder create a php file and name it settings.php than open up css folder and create settings-style.css. Than go back and inside the js folder create file called settings-script.js. See folder structure picture below and make sure everything matches up!

Settings.php
Yes, open up settings.php and lets write some options. First we need to do is attach those css and js files we have inside the settings folder. Use this code to do that.
<?php
  // JavaScript
  add_action('admin_init', 'settings_page_include_js');
  function settings_page_include_js(){
  wp_register_script('settings_page_js', get_template_directory_uri().'/settings/js/settings-script.js', false);
  wp_enqueue_script('settings_page_js');
  wp_register_script('settings_page_js_colorpicker', get_template_directory_uri().'/settings/js/colorpicker.js', false);
  wp_enqueue_script('settings_page_js_colorpicker');
}
// CSS
  add_action('admin_print_styles', 'settings_page_include_styles');
  function settings_page_include_styles(){>
  wp_register_style('settings_page_style', get_template_directory_uri().'/settings/css/settings-style.css', false);
  wp_enqueue_style('settings_page_style');
  wp_register_style('settings_page_colorpicker', get_template_directory_uri().'/settings/css/colorpicker.css', false);
  wp_enqueue_style('settings_page_colorpicker');
}
Here we added js and css for colorpicker as well as the custom scripts that we will write in a little bit. Next piece of code will initialize our options and add player settings page into the submenu of Playlist post type.
/* Init plugin options to white list our options */
add_action( 'admin_init', 'theme_options_init' );
function theme_options_init(){
register_setting( 'odthemes_options', 'odthemes_theme_options', 'theme_options_validate' );
}
/* Add Player Settings Menu to the custom post type 'tracklist' */
add_action( 'admin_menu', 'theme_options_add_page' );
function theme_options_add_page() {
add_submenu_page('edit.php?post_type=playlist', __( 'Player Settings', 'odthemes' ), __( 'Player Settings', 'odthemes' ), 'edit_theme_options', 'theme_options', 'theme_options_do_page' );
}

/* Create the options page */
function theme_options_do_page() {
if ( ! isset( $_REQUEST['settings-updated'] ) )
$_REQUEST['settings-updated'] = false;

?>
If you refresh your dashboard page you will not see the link as of yet, that's because we haven't actually told WP to run the settings.php file. So go back to the root of your theme folder and open functions.php and add this piece of code.
define('OD_THEME_OPTIONS', TEMPLATEPATH . '/settings/');	// Theme Options Directory

require_once( OD_THEME_OPTIONS . '/settings.php' );	// Get Settings
With our old functions.php code, the lines should look like this...
// DEFINE PATHS
define('OD_PLAYER', TEMPLATEPATH . '/playlist/');	// Playlist Directory
define('OD_THEME_OPTIONS', TEMPLATEPATH . '/settings/');// Theme Options Directory

// REQUIRE FILES
require_once(OD_PLAYER . '/playlist-post-type.php');	// Get Custom Post Type : Playlist
require_once( OD_THEME_OPTIONS . '/settings.php' );	// Get Settings
Now, go back to your settings.php file and lets keep going. At this point if you refresh your page it will give you syntax error. That's ok, because we closed the php while our function is still open. We will be adding html code inside that function. Once we finish adding the html code and close the function the syntax error will go away.
Lets keep adding code to the end of settings.php file.
<!-- OD Panel Page Wrap -->
<form method="post" action="options.php">
<div id="od-panel">

<!-- Border Styles all around -->
<div class="glowbr">

<!-- Header -->
<div id="od_header" class="polish">
	<a id="od_logo" href="<?php echo get_admin_url(); ?>edit.php?post_type=playlist&page=theme_options">OD Themes Framework</a>
	<div class="clear"></div>
</div>

<div id="od_bar"></div> <!-- Graphic Bar below the header -->
<!-- END Header -->

<!-- Save Changes Main Button -->
<div class="button-zone-wrapper zone-top">
	<div class="button-zone">
		<span class="top"><button class="save secondary" id="od_save" name="od_save" type="submit"><?php _e("Save Changes","odfw"); ?></button></span>
	</div>
</div>

<?php settings_fields( 'odthemes_options' ); ?>
<?php $options = get_option( 'odthemes_theme_options' ); ?>

<!-- Content Container -->
<div id="od_main">


<!-- WE WILL BE ADDING PAGE CONTENT CODE HERE -->


<div class="clear"></div>
</div><!-- END Content Container -->
</div>

<?php if ( false !== $_REQUEST['settings-updated'] ) : ?>
<div class="updated fade"><p><strong><?php _e( 'Options saved', 'odthemes' ); ?></strong></p></div>
<?php endif; ?>

</div>
</form>
<!-- END OD Panel Page Wrap -->

<?php
}
?>
I added some comments into the code so I don't have to really explain what is what. If there are any questions please add a comment otherwise just look at the code its basic html. If you refresh now you will be able to see our new menu item named Player Settings show up. The page is blank with title and save changes button.
Lets add some pages to it.
<!-- Sidebar Navigation Container -->
<div id="od-panel-sidebar">
	<ul class="tabs">
		<li class="general"><a href="#od-panel-section-general">General Settings</a></li>
		<li class="appearance"><a href="#od-panel-section-appearance">Player Appearance</a></li>
		<li class="misc"><a href="#od-panel-section-misc">Miscellaneous</a></li>
	</ul>
</div>
Those will be our tabs. Now we will add a container for the tab page, assign each section an id so we can later target that specific page to the tab.
<!-- Tabs Containers -->
<div id="od-panel-content" class="tab_container">


<!-- General Section | Tab 1 -->
<div class="od-panel-section tab_content" id="od-panel-section-general">

<!-- Number of Tracks to Display -->
<div class="od-panel-field">
	<fieldset class="title">
		<label class="description" for="odthemes_theme_options[music_tracks_to_show]"><?php _e( 'Number of Tracks', 'odthemes' ); ?></label>
		<div class="od-panel-description">Number of tracks to display on the playlist?</div>
	</fieldset>
	<fieldset class="data">
		<input id="odthemes_theme_options[music_tracks_to_show]" class="regular-text" type="text" name="odthemes_theme_options[music_tracks_to_show]" value="<?php esc_attr_e( $options['music_tracks_to_show'] ); ?>" />
	</fieldset>
<div class="clear"></div>
</div>

<!-- Descripiton Text -->
<div class="od-panel-field">
	<fieldset class="title">
		<label class="description" for="odthemes_theme_options[music_player_description]"><?php _e( 'Description', 'odthemes' ); ?></label>
		<div class="od-panel-description">Add description for the player.</div>
	</fieldset>
	<fieldset class="data">
		<textarea id="odthemes_theme_options[music_player_description]" class="large-text" cols="50" rows="10" name="odthemes_theme_options[music_player_description]"><?php echo esc_textarea( $options['music_player_description'] ); ?></textarea>
	</fieldset>
<div class="clear"></div>
</div>
</div>


</div> <!-- END Tabs Containers -->
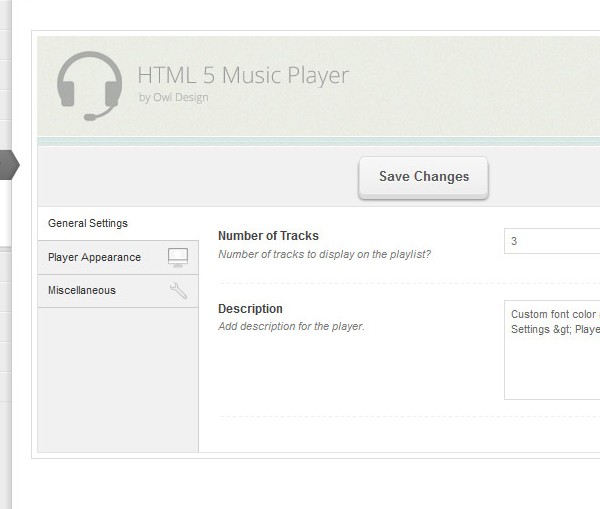
In the above code I already added some options. Basically this is the General Section Tab div that has two options. Options can be added by just adding another div with class "od-panel-field". The options that I added are Number of Tracks to show and Description of the music player.
Lets add the other two sections. Player Appearance and Miscellaneous
<!-- Appearance Section | Tab 2 -->
<div class="od-panel-section tab_content" id="od-panel-section-appearance">

<!-- Change Appearance Checkbox -->
<div class="od-panel-field">
	<fieldset class="title">
		<label class="description" for="odthemes_theme_options[od_custom_css]"><?php _e( 'Use Custom Styles?', 'odthemes' ); ?></label>
		<div class="od-panel-description">Are you going to change the appearance of your music player?</div>
	</fieldset>
	<fieldset class="data">
		<input id="odthemes_theme_options[od_custom_css]" class="checkme" name="odthemes_theme_options[od_custom_css]" type="checkbox" value="1" <?php checked( '1', $options['od_custom_css'] ); ?> />
	</fieldset>
<div class="clear"></div>
</div>

<!-- Show Settings if Appearance checkbox is checked -->
<div id="extra">

<!-- Description Font Color -->
<div class="od-panel-field">
	<fieldset class="title">
		<label class="description" for="odthemes_theme_options[od_font_color]"><?php _e( 'Player Description Color', 'odthemes' ); ?></label>
		<div class="od-panel-description">Change the color of the description page. <br />(ex. enter hex #CCCCCC or click to choose)</div>
	</fieldset>
	<fieldset class="data">
		<input id="colorpicker" class="regular-text" type="text" name="odthemes_theme_options[od_font_color]" value="<?php esc_attr_e( $options['od_font_color'] ); ?>" />
	</fieldset>
<div class="clear"></div>
</div>

<!-- Description Font Size -->
<div class="od-panel-field">
	<fieldset class="title">
		<label class="description" for="odthemes_theme_options[od_font_size]"><?php _e( 'Player Description Font Size', 'odthemes' ); ?></label>
		<div class="od-panel-description">Change description font size. <br />(ex. 12px or 2em)</div>
	</fieldset>
	<fieldset class="data">
		<input id="odthemes_theme_options[od_font_size]" class="regular-text" type="text" name="odthemes_theme_options[od_font_size]" value="<?php esc_attr_e( $options['od_font_size'] ); ?>" />
	</fieldset>
<div class="clear"></div>
</div>

</div> <!-- END Show Settings if Appearance checkbox is checked -->
</div>

<!-- Miscellaneous Section | Tab 3 -->
<div class="od-panel-section tab_content" id="od-panel-section-misc">

<!-- Footer Text -->
<div class="od-panel-field">
	<fieldset class="title">
		<label class="description" for="odthemes_theme_options[od_footer_text]"><?php _e( 'Player Footer Text', 'odthemes' ); ?></label>
		<div class="od-panel-description">Change footer text.</div>
	</fieldset>
	<fieldset class="data">
		<input id="odthemes_theme_options[od_footer_text]" class="regular-text" type="text" name="odthemes_theme_options[od_footer_text]" value="<?php esc_attr_e( $options['od_footer_text'] ); ?>" />
	</fieldset>
<div class="clear"></div>
</div>

</div>
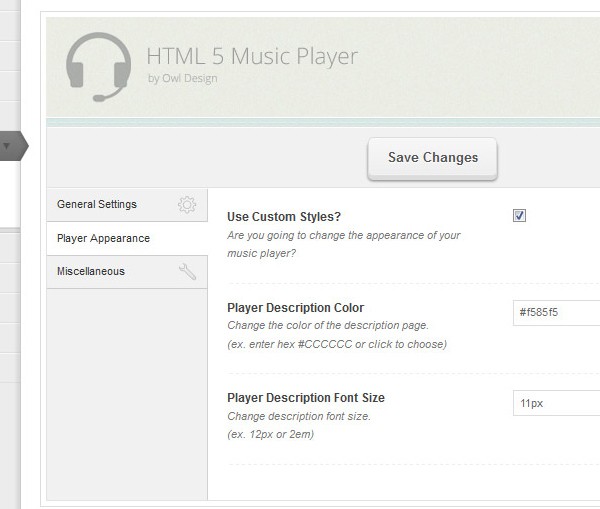
Brief explanations about these two sections. In Appearance we added a checkbox if checked we will use jQuery to show options but if it's unchecked the options will be hidden. Available options are to change description text color and font size. In the Miscellaneous section we added just one option and that will be footer area text.
Nothing is being saved yet. Lets make sure we can save our options! Paste this last piece of code to the settings.php file. Make sure it's added to the very last line...
<?php
/* Sanitize and validate input. Accepts an array, return a sanitized array. */
function theme_options_validate( $input ) {
// Our checkbox value is either 0 or 1
if ( ! isset( $input['od_custom_css'] ) )
$input['od_custom_css'] = null;
$input['od_custom_css'] = ( $input['od_custom_css'] == 1 ? 1 : 0 );
// Text input
$input['music_tracks_to_show'] = wp_filter_nohtml_kses( $input['music_tracks_to_show'] );
$input['od_font_color'] = wp_filter_nohtml_kses( $input['od_font_color'] );
$input['od_font_size'] = wp_filter_nohtml_kses( $input['od_font_size'] );
$input['od_footer_text'] = wp_filter_nohtml_kses( $input['od_footer_text'] );
// Textarea
$input['music_player_description'] = wp_filter_post_kses( $input['music_player_description'] );
return $input;
}
Now that all our options are being saved, lets make this page look good.
Javascript
Before we add the styles, lets add the javascript functions. Go into your js folder and open settings-script.js file. Add the following code. This is a function that we will use to change the color of a div to red when someone makes a change to any options.
// Function that will change color do a div whenver someone makes a change to the input fields
function activate_save_animation(e){
jQuery('.button-zone').animate({
	backgroundColor: '#f3d9d9',
	borderLeftColor: '#555',
	borderRightColor: '#555'
});
jQuery('.button-zone button').addClass('save-me-fool');
}
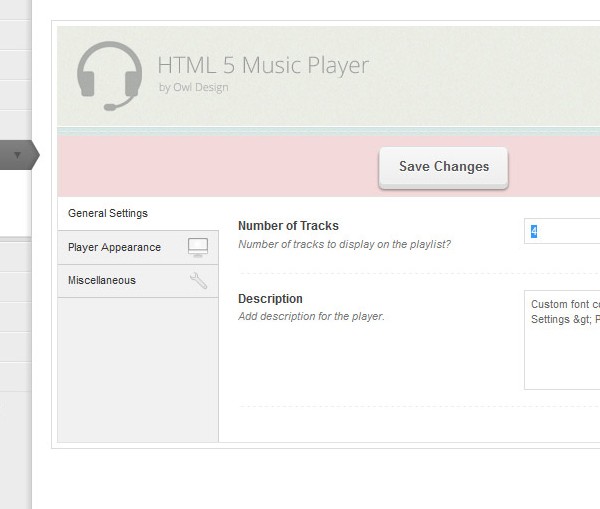
The next piece of code is used to see if the checkbox in the Player Appearance section is checked or not. If it's not checked it will hide the div with an id of "extra".
// This bit of code shows extra options if the checkbox is checked
jQuery(document).ready(function($) {
if($('.checkme').is(':checked')){
	$("#extra").show("fast");
} else
{
	$("#extra").css("display","none");
}
});
jQuery(document).ready(function($){
$(".checkme").click(function(){
if ($(".checkme").is(":checked")) {
	$("#extra").show("fast");
} else {
	$("#extra").hide("fast");
}
});
Just below the previous code lets add this next code. We created a function to change the background color to red when someone makes a change, now we have to initialize it.
// If there was a change to the input fields fire up the 'activate_save_animation' functions
$('#od-panel input, #od-panel select,#od-panel textarea').live('change', function(e){
	activate_save_animation(e);
);
You can give it a test now, try changing any options and you'll notice that the background around "Save Changes" changes the color. The next code will activate our tabs.
// Script for Tabs
$(".tab_content").hide(); //Hide all content
$("ul.tabs li:first").addClass("active").show(); //Activate first tab
$(".tab_content:first").show(); //Show first tab content
$("ul.tabs li").click(function() {
$("ul.tabs li").removeClass("active"); //Remove any "active" class
$(this).addClass("active"); //Add "active" class to selected tab
$(".tab_content").hide(); //Hide all tab content
var activeTab = $(this).find("a").attr("href"); //Find the href attribute value to identify theactive tab + content
$(activeTab).fadeIn(); //Fade in the active ID content
return false;
});
Test it now, they should now navigate to their specific tab content. The last code we will add is for the color picker.
// Script for color picker
$('#colorpicker').ColorPicker({
	color: '#ffffff',
	onShow: function (colpkr) {
		$(colpkr).fadeIn(500);
		return false;
	},
	onHide: function (colpkr) {
		$(colpkr).fadeOut(500);
		return false;
	},
	onChange: function (hsb, hex, rgb) {
		$('#colorpicker').attr('value', '#' + hex);
	}
});
});
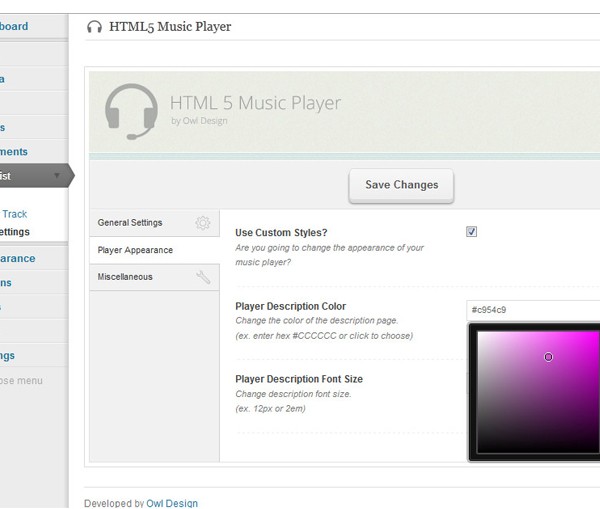
That should be the whole js code we'll need.
CSS
Lets make sure everything looks good. Go to css folder and open settings-style.css file. First bit of code will fix up the layout a bit and add some icons.
/* Layout Styling */
.glowbr { background:#FFFFFF; border:1px solid #ddd; padding:5px; margin:0 auto;  }

/* Icons */
#od-panel-sidebar li.general { background:url(../images/general_icon.png) no-repeat center right; }
#od-panel-sidebar li.general:hover { background-color: #eaeaea; }
#od-panel-sidebar li.appearance { background:url(../images/appearance_icon.png) no-repeat center right; }
#od-panel-sidebar li.appearance:hover { background-color: #eaeaea; }
#od-panel-sidebar li.misc { background:url(../images/misc_icon.png) no-repeat center right; }
#od-panel-sidebar li.misc:hover { background-color: #eaeaea }
#od_logo { background:url(../images/od_logo.png) no-repeat; display:block; width:353px; height:71px; text-indent:-9999px; float:left;  }
#od_header{ height:70px; background:url(../images/head_bg.jpg) repeat scroll; border-bottom: 1px solid #fff; padding:15px 0 15px 20px; }
#od_bar { display:block; background:url(../images/border_strip.jpg) repeat-x; height:8px; width:100%; }
#od_subheader { background:url(../images/head_bg.jpg) repeat scroll; border-bottom: 1px solid #fff; height: 35px; padding: 0 10px; }
#od_subheader { background:url(../images/head_bg.jpg) repeat scroll;	border-bottom: 1px solid #fff; height: 35px;	padding: 0 10px; }
#od_subheader .sublinks { float: left; }
#od_subheader .savelink { float: right; padding-top:5px; }
#od_subheader .savelink img {	vertical-align:middle; }
#od_subheader a { color: #8d8d8d;	font-size: 11px;	text-decoration:none;	line-height:35px; }
#od_subheader .sublinks a	{ padding: 2px 20px; }
#od_subheader .sublinks a:hover	{ color:#4ca0bf; }
.subicon_support { background:url(../images/support_icon.png) 0 0 no-repeat; }
.subicon_documentation	{ background:url(../images/documentation_icon.png) 0 0 no-repeat; }
.subicon_log { background:url(../images/log_icon.jpg) 0 0 no-repeat; }
.subicon_at { background:url(../images/at_icon.png) 0 0 no-repeat; }
#od-panel { margin-top:30px; margin-right:20px; width: 785px; }
#od_main {  box-shadow: 0 1px 0 rgba(255,255,255,0.8) inset; -webkit-box-shadow: 0 1px 0 rgba(255,255,255,0.8) inset; -moz-box-shadow: 0 1px 0 rgba(255,255,255,0.8) inset; border: 1px solid #e3e3e3; border-top: 0; background: #fff url(../images/odfw_sidebar_bg.jpg) repeat-y top left; }
#od-panel-sidebar { float:left; width:160px; overflow: visible; margin-bottom:20px;  }
#od-panel-sidebar ul, #od-panel-sidebar li { list-style-type:none; margin:0; padding:0; }
#od-panel-sidebar a { display:block; font-size:11px; padding:8px 10px; border-bottom:1px solid #ccc; text-decoration:none; color:#333333;  }
#od-panel-sidebar li.active a { box-shadow: none;	-moz-box-shadow: none; background-color:#fff;	-webkit-box-shadow: none; width: 141px; }
#od-panel-content {  padding: 20px; margin-left: 0; float: left;	width: 570px;}
#od-panel-content, #od-panel-content p { font-size:11px; color:#666; }
.od-panel-section { display:none; }
.od-panel-section.od-panel-active { display:block; }
The last css code will style the buttons and the form fields.
/*  Button Style */
#od-panel input[type="submit"], #od-panel input[type="button"], #od-panel button, #od-panel .button{
	font-family: Arial, Tahoma, sans-serif;
	font-weight: bold;
	border: 1px solid #2356a1;
	padding: 9px 15px;
	color: #fff;
	-moz-border-radius: 5px;
	-webkit-border-radius: 5px;
	border-radius: 5px;
	text-shadow: 0 -1px 0 hsla(214,100%,0%,.5);
	background: #1161a0;
	cursor: pointer;
	background: -webkit-gradient( linear, left top, left bottom, color-stop(.2, #3fa0ff), color-stop(1, #2356a1) );
	background: -moz-linear-gradient( center top, #3fa0ff 20%, #2356a1 100% );
	-webkit-box-shadow: inset 0 1px 1px hsla(0,100%,100%,.4), inset 0 -1px 0 hsla(0,100%,100%,.3), 0 4px 0 hsla(212,77%,26%,1), 0 5px 2px hsla(214,100%,0%,.5);
	-moz-box-shadow: inset 0 1px 1px hsla(0,100%,100%,.4), inset 0 -1px 0 hsla(0,100%,100%,.3), 0 4px 0 hsla(212,77%,26%,1), 0 5px 2px hsla(214,100%,0%,.5);
	box-shadow: inset 0 1px 1px hsla(0,100%,100%,.4), inset 0 -1px 0 hsla(0,100%,100%,.3), 0 4px 0 hsla(212,77%,26%,1), 0 5px 2px hsla(214,100%,0%,.5);
}
#od-panel input[type="submit"]:hover, #od-panel input[type="button"]:hover, #od-panel button:hover, #od-panel .button:hover {
	background: -webkit-gradient( linear, left top, left bottom, color-stop(.2,#5cabf8), color-stop(1, #3970c0) );
	background: -moz-linear-gradient( center top, #5cabf8 20%, #3970c0 100% ); }
#od-panel input[type="submit"].secondary, #od-panel input[type="button"].secondary, #od-panel button.secondary, #od-panel .secondary {
	border-color: #dddddd;
	background: #eeeeee;
	color: #555;text-shadow: 0 1px 0 hsla(0,0%,100%,1);
	background: -webkit-gradient( linear, left top, left bottom, color-stop(0, #f7f7f7), color-stop(1, #eeeeee) );
	background: -moz-linear-gradient( center top, #f7f7f7 0%, #eeeeee 100% );
	box-shadow: inset 0 1px 1px hsla(0,100%,100%,.4), inset 0 -1px 0 hsla(0,100%,100%,.3), 0 4px 0 hsla(0, 0%, 86%,1), 0 5px 2px hsla(0,0%,0%,0.5);
	-moz-box-shadow: inset 0 1px 1px hsla(0,100%,100%,.4), inset 0 -1px 0 hsla(0,100%,100%,.3), 0 4px 0 hsla(0, 0%, 86%,1), 0 5px 2px hsla(0,0%,0%,0.5);
	-webkit-box-shadow: inset 0 1px 1px hsla(0,100%,100%,.4), inset 0 -1px 0 hsla(0,100%,100%,.3), 0 4px 0 hsla(0, 0%, 86%,1), 0 5px 2px hsla(0,0%,0%,0.5); }
#od-panel input[type="submit"].secondary:hover, #od-panel input[type="button"].secondary:hover, #od-panel button.secondary:hover, #od-panel .secondary:hover { background: -webkit-gradient( linear, left top, left bottom, color-stop(.2, #f2f2f2), color-stop(1, #eee) ); background: -moz-linear-gradient( center top, #f2f2f2 20%, #eee 100% ); }
#od-panel input[type="submit"]:active, #od-panel input[type="button"]:active, #od-panel button:active, #od-panel .button:active { box-shadow: none;	-moz-box-shadow: none; -webkit-box-shadow: none; margin-top: 5px; margin-bottom: -5px; }
#od-panel input[type="submit"].secondary:active, #od-panel input[type="button"].secondary:active, #od-panel button.secondary:active, #od-panel .secondary:active { box-shadow: none; -moz-box-shadow: none; -webkit-box-shadow: none;	margin-top: 5px; margin-bottom: -5px; }
#od-panel .button-zone-wrapper {	clear: both; height: auto; background: #f1f1f1; box-shadow: 0 1px 0 rgba(255,255,255,0.8) inset; -webkit-box-shadow: 0 1px 0 rgba(255,255,255,0.8) inset; -moz-box-shadow: 0 1px 0 rgba(255,255,255,0.8) inset; border: 1px solid #e3e3e3;	z-index:999; }
#od-panel .button-zone {	padding: 10px; height:40px; z-index: 150; line-height: 1em; text-align: center; }
#od-panel fieldset { width: 50%; max-width: 50%; float: left; position: relative; }

/* Form Styles */
#od-panel-content fieldset.title{	width: 45%; margin-right: 5%; }

/* Fields Styling */
#od-panel-content .od-panel-field { margin-bottom:15px; padding-bottom:15px; border-bottom:1px dashed #eee; }
#od-panel-content label { font-weight:bold; color:#444; font-size:12px; margin-bottom:5px; text-shadow:1px 0 0 #fff; }
#od-panel-content .od-panel-description { font-style:italic; margin-bottom:5px; color:#777; text-shadow:1px 0 0 #fff; }
#od-panel-content input[type=text], #od-panel-content textarea, #od-panel-content option, #od-panel-select { border:1px solid #ddd; color:#666; font-size:11px; background:#fff; border-radius:0; -moz-border-radius:0; -webkit-border-radius:0;  }
#od-panel-content input[type=text], #od-panel-content textarea { padding:5px; }
#od-panel-content input[type=text] { width:270px; }
#od-panel-content textarea {  height:100px; }
That is all for css styles. We are now completely done with the settings page.
Hooking Up Our Options
Ok, lets hook all our options to our music player. Go back to the theme root folder and open header.php file. On the very top of the file add this piece of code, it will get all of our options.
<?php $options = get_option('odthemes_theme_options'); ?>
Add this code bellow the <!-- Playlist Styles --> section, where your css is. This code is our custom css style which we set up in the Player Appearance settings page.
<?php if( $options['od_custom_css'] == '1' ) : ?>
<style type="text/css" media="screen">
.description {
<?php if( $options['od_font_color'] != '' ) : ?>color:<?php echo $options['od_font_color']; ?> !important; <?php else: ?><?php endif; ?>
<?php if( $options['od_font_size'] != '' ) : ?>font-size:<?php echo $options['od_font_size']; ?> !important; <?php else: ?><?php endif; ?>
}
</style>
<?php else: ?>
<?php endif; ?>
You can now add some custom color and text size to the description text. Try it out and if all went well, they changes should take effect.
Lets make some more changes, find this js code just below...
<script>
$(document).ready(function(){
$('.music-player').ttwMusicPlayer(myPlaylist, {
	tracksToShow:2,
	description:'Hello, this is a demo description',
	jPlayer:{
		swfPath: '<?php bloginfo('template_directory'); ?>/playlist/js/',
	}
	});
});
</script>
We have the option to change the number of tracks and the description text. Lets add some code so it can actually work. Change this:
	tracksToShow:2,
	description:'Hello, this is a demo description',
To this...
	tracksToShow:<?php echo $options['music_tracks_to_show']; ?>,
	description:'<?php echo $options['music_player_description']; ?>',
Now, we can tell the player how many tracks to show from the settings page. The description text can also be set.
We have one more file to edit and we'll be done! Open footer.php file. Replace all the code you see with this one...
<?php  $options = get_option('odthemes_theme_options'); ?>
<div class="bar"></div>

<div id="footer">
	<?php if( $options['od_footer_text'] != '' ) : ?>
	<p><?php echo $options['od_footer_text']; ?></p>
<?php else: ?>
	<p><a href="http://owl-design.com/" title="Owl Design">Owl Design</a></p>
	<?php endif; ?>
</div>

</div>
</body>
</html>
This is for the Miscellaneous section where you able to add your own footer text.
We are done!
That is all, we are now finished with the music player and a custom settings page!
Feel free to comment on improvements that can be done or if you have suggestions, like I said I'm not a pro and this is how I got it to work.


Comments