In this tutorial, we will draw a selection rectangle with the mouse (as seen in strategy games such as StarCraft and Command and Conquer), and we will also learn how to select units with the rectangle!
Final Result Preview
Let's take a look at the final result we will be working towards:
Click and drag with your mouse to draw a rectangle that will select any soldier that it touches.
Step 1: The Setup
If you are using Flash, create a new ActionScript 3.0 file with the size '550 x 400'. However, if you are not using the Flash IDE and are using another such as FlashDevelop or Flash Builder, this tutorial contains the SWC files so you can use MovieClips from within your IDE of preference. If you are curious on how to import MovieClips with your IDE, check out the Beginner's Guide to FlashDevelop and Beginner's Guide to FDT!
I should also note that I have included the FLA file in case you do not wish to draw any of your own material.
Step 2: Creating the Document Class
Ok, now you may be a little confused if you haven't really worked with classes before. If you wish to learn more about why classes are important in programming, check out this article by kirupa, or this guide to the document class.
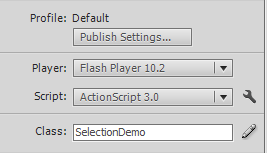
Create a new 'ActionScript 3.0 Class' and give it the name 'SelectionDemo'. When the file has been created, save it as 'SelectionDemo.as'. You should save files all the time. I can not stress this enough but the amount of times I have forgot to save work that I have done and lost it all doesn't bear thinking about. So please, do save the files!
If you are using an IDE that generates the code for you when you create the class, you should have most of the code below. However, you must still add the lines that I have highlighted:
package
{

	import flash.display.MovieClip;

	public class SelectionDemo extends MovieClip
   	{

		public function SelectionDemo()
        	{

		}

	}

}
We are not done yet however! If you are using the Flash IDE, navigate to the 'Properties Panel' and set the 'DocumentClass' to 'SelectionDemo'. If you are wondering what that does, it means that when your application/game is run by the Flash Player, this Class will be the Main class that manages the game. Cool, huh?
Run the program; if you get no errors then you should be good to go!
Step 3: Creating the Rectangle
Now we should be ready to make the Rectangle! This part will contain a few functions, that's all. Below is the code for drawing the rectangle:
package  {

	// IMPORTING THE CLASSES WE NEED
	import flash.display.MovieClip;
	import flash.events.MouseEvent;
	import flash.geom.Rectangle;
	import flash.display.Sprite;

	public class SelectionDemo extends MovieClip {

		public var selectionRect:Rectangle; // Will hold the data for our rectangle.
		public var selectionSprite:Sprite = new Sprite(); // Making a new Sprite to draw the rectangle.


		public function SelectionDemo() {

			//Adding listeners
			stage.addEventListener(MouseEvent.MOUSE_DOWN, SetStartPoint);

		}


		public function SetStartPoint( me:MouseEvent ):void
		{

			selectionRect = new Rectangle( stage.mouseX, stage.mouseY ); // Creating the selection rectangle.

		}


	}

}
Now, it's kind of useless having a rectangle that we cannot see, right? Exactly, so let's get started!
Step 4: Drawing the Rectangle
Great, now we must draw the rectangle to the screen using the selectionSprite variable you seen in the last snippet. Why use a sprite, you ask? All Sprites contain a graphics object, which in turn contains a method called drawRect() this allows us to easily draw a rectangle dynamically in AS3.
Below, I have placed the code for drawing the rectangle, with comments:
package  {

	// IMPORTING THE CLASSES WE NEED
	import flash.display.MovieClip;
	import flash.events.MouseEvent;
	import flash.geom.Rectangle;
	import flash.display.Sprite;
	import flash.events.Event;

	public class SelectionDemo extends MovieClip {

		public var selectionRect:Rectangle; // Will hold the data for our rectangle.
		public var selectionSprite:Sprite = new Sprite(); // Making a new Sprite to draw the rectangle.
		public var isMouseHeld:Boolean; // Will tell us whether the mouse button is Up/Down


		public function SelectionDemo() {

			//Initializing

			isMouseHeld = false; // The mouse is not held yet.
			stage.addChild(selectionSprite); // Adding the selectionSprite to the stage.

			stage.addEventListener(MouseEvent.MOUSE_DOWN, SetStartPoint); // Listen for mouse hold.
			stage.addEventListener(MouseEvent.MOUSE_UP, RemoveRectangle); // Listen for mouse release.
			stage.addEventListener(Event.ENTER_FRAME, UpdateGame); // Run this function every frame (24 FPS).

		}


		public function SetStartPoint( me:MouseEvent ):void
		{

			selectionRect = new Rectangle( stage.mouseX, stage.mouseY ); // Creating the selection rectangle.
			isMouseHeld = true; // The mouse is now held.

		}


		public function RemoveRectangle( me:MouseEvent ):void
		{

			isMouseHeld = false; // The mouse is no longer held.

		}


		public function UpdateGame( e:Event ):void
		{

			selectionSprite.graphics.clear(); // Clear the rectangle so it is ready to be drawn again.

			if( isMouseHeld )
			{
				selectionRect.width = stage.mouseX - selectionRect.x; // Set the width of the rectangle.
				selectionRect.height = stage.mouseY - selectionRect.y; // Set the height of the rectangle.
				selectionSprite.graphics.lineStyle(3, 0x3B5323, 0.6); // Set the border of the rectangle.
				selectionSprite.graphics.beginFill( 0x458B00, 0.4 ); // Set the fill and transparency of the rectangle.
				selectionSprite.graphics.drawRect( selectionRect.x, selectionRect.y, selectionRect.width, selectionRect.height ); // Draw the rectangle to the stage!
				selectionSprite.graphics.endFill(); // Stop filling the rectangle.
			}

		}


	}

}
If you have that code, run your application and watch it work!
Step 5: Draw a Unit
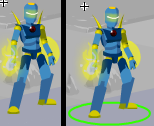
In flash, create a new MovieClip and draw a Unit. In the first frame, just draw a unit; in the second frame, add a green circle under the unit or anything that lets the player know that the unit has been selected. It should look something like this:
I also just drew a quick grassy background on the stage to make it look nice :)
Step 6: Exporting the Unit
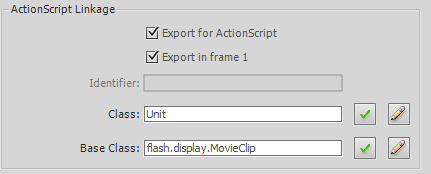
Now you have created the MovieClip, right-click the symbol in your Library and select Properties. Check the boxes that say 'Export to ActionScript' and 'Export in Frame 1'. Then, give it the name 'Unit'. Your properties should look something like this:
Note: when you click 'OK', you may get a warning because no such class "Unit" exists yet. If so, click OK and we shall fix this now by making a new class!
Step 7: Creating the Unit Class
Remember before when you exported the Unit MovieClip? This is where we create the class for that MovieClip. So create a new ActionScript class file named 'Unit.as' and place this code within the class:
package
{

	import flash.display.MovieClip;


	public class Unit extends MovieClip
	{

		public var isActive:Boolean; // Tells us whether the unit is selected or not.

		public function Unit()
		{

			isActive = false; // The unit has not been selected yet.
			gotoAndStop(1); // Go to and stay on the first frame ( no selection ring ).

		}

	}

}
Ahead, comrades!
Step 8: Placing the Units
Now it is time to add the Units to the stage and give them a position. Also, we are going to place each Unit in an 'Array'. An array is basically a list which allows us to access the things inside it using an index. A great example of arrays is right at Republic of Code; they've also been explained here in AS3 101: Arrays.
Here is the updated code for 'SelectionDemo.as'. First, we add a new public Array called unitList just after the other variables:
public var selectionRect:Rectangle; // Will hold the data for our rectangle.
public var selectionSprite:Sprite = new Sprite(); // Making a new Sprite to draw the rectangle.
public var isMouseHeld:Boolean; // Will tell us when the mouse is Up/Down
public var unitList:Array; // All the units will be held in here
Then, we update the Main function by placing a function called PlaceUnits(15);. We will create this in a moment.
public function SelectionDemo() {

	//Initializing
	isMouseHeld = false; // The mouse is not held yet.
	stage.addChild(selectionSprite); // Adding the selectionSprite to the stage.
	PlaceUnits(15); // Calling a function to place the units on the stage.

	//Adding listeners
	stage.addEventListener(MouseEvent.MOUSE_DOWN, SetStartPoint); // Listen for mouse hold.
	stage.addEventListener(MouseEvent.MOUSE_UP, RemoveRectangle); // Listen for mouse release.
	stage.addEventListener(Event.ENTER_FRAME, UpdateGame); // Run this function every frame (24 FPS).

}
Time to make the function! Ok, we will place this function after the UpdateGame(e:Event):void function and what this function will do is add the amount of units you specified in the brackets to the stage. We will also add the units to the list and give them random positions on the stage while making sure they cannot spawn off the stage.
public function PlaceUnits( amount:int ):void
{

	unitList = new Array(); //Making a new Array(list) to hold all the Units.

	for( var i:int = 0; i < amount; i++ ) // Run whatever is inside the brackets 'amount' times.
	{
		var unit:Unit = new Unit(); // Creating a new unit.
		unit.x = Math.random() * (550 - unit.width); // Setting a random X Position.
		unit.y = Math.random() * (400 - unit.height); // Setting a random Y Position.
		stage.addChild(unit); // Adding the new unit to the stage.
		unitList.push( unit ); // Placing the unit in the Array(list).
	}

}
When you run this, you should have 15 units randomly placed. Time to move on and program the unit selection.
Step 9: Z-Sorting!
When you run the game, you will probably see that there is a strange overlap of the units. Let's fix it! This is extremely easy and will only require a small change to the PlaceUnits() function.
Basically, what we need to do is add all the units to an Array (list) and then sort the list based on the Y (vertical position) of the units. The lower the Y property, the further backwards it should be. We will change the PlaceUnits() function to:
public function PlaceUnits( amount:int ):void
{

	unitList = new Array(); //Making a new Array(list) to hold all the Units.

	for( var i:int = 0; i < amount; i++ ) // Run whatever is inside the brackets 'amount' times.
	{
		var unit:Unit = new Unit(); // Creating a new unit.
		unit.x = Math.random() * (550 - unit.width); // Setting a random X Position.
		unit.y = Math.random() * (400 - unit.height); // Setting a random Y Position.
		unitList.push( unit ); // Placing the unit in the Array(list).
	}

	unitList.sortOn("y", Array.NUMERIC); // Sorting the list in order of the 'y' properties!

	for( var j:int = 0; j < amount; j++ ) // We will run through this loop again to add the units.
	{
		stage.addChild( unitList[j] ); // This adds the 'sorted' unit to the stage.
	}

}
There we have it... no more overlaps!
Step 10: Selecting Units
Now, each frame we will check whether any units have been selected; if they have then we will make their selection ring appear.
Edit the UpdateGame() function to the following:
public function UpdateGame( e:Event ):void
{

		selectionSprite.graphics.clear(); // Clear the rectangle so it is ready to be drawn again.

		if( isMouseHeld )
		{
			selectionRect.width = stage.mouseX - selectionRect.x; // Set the width of the rectangle.
			selectionRect.height = stage.mouseY - selectionRect.y; // Set the height of the rectangle.
			selectionSprite.graphics.lineStyle(3, 0x3B5323, 0.6); // Set the border of the rectangle.
			selectionSprite.graphics.beginFill( 0x458B00, 0.4 ); // Set the fill and transparency of the rectangle.
			selectionSprite.graphics.drawRect( selectionRect.x, selectionRect.y, selectionRect.width, selectionRect.height ); // Draw the rectangle to the stage!
			selectionSprite.graphics.endFill(); // Stop filling the rectangle.
			CheckForSelection(); // We will check to see if any units have been selected.
		}

}
As you can see, we added a function called CheckForSelection(). Let's create that function after the others:
public function CheckForSelection():void
{

	for each( var unit:Unit in unitList ) // For every unit that is in the Unit Array(list)...
	{

		if( unit.hitTestObject( selectionSprite ) ) // If the selectionSprite is touching the Unit.
		{
			unit.select(); // Make the unit selected.
		}
		else
		{
			unit.deselect(); // De-select the unit.
		}

	}

}
As you can see in the highlighted lines, the select() and deselect() functions do not exist. Open up 'Unit.as' and let's put them in:
package
{

	import flash.display.MovieClip;


	public class Unit extends MovieClip
	{

		public var isActive:Boolean; // Tells us whether the unit is selected or not.

		public function Unit()
		{

			isActive = false; // The unit has not been selected yet.
			gotoAndStop(1); // Go to and stay on the first frame ( no selection ring ).

		}


		public function select():void
		{
			isActive = true; // The unit is selected.
			gotoAndStop(2); // Show the ring.
		}


		public function deselect():void
		{
			isActive = false; // The unit is not selected.
			gotoAndStop(1); // Do not show the ring.
		}


	}

}
Run the game and all should be working!
Step 11: Challenges
Now that you have sucessfully completed this tutorial, I now have some challenges for you to follow. Feel free to skip them, but following them will help you learn.
Beginner:
- Spawn 25 units instead of 15
- Change the colour and border of the rectangle
Intermediate:
- All of the above
- Add a TextField under the unit and make it display the unit's name ONLY when selected.
- Play a sound when a unit is selected
Advanced:
- All of the above
- When the player clicks a position, make selected units move to that position. (Hint: use an Array to know what units are selected.)
Only do the challenges you feel comfortable with!
Conclusion
Thankyou for reading this tutorial and I hope you learned something new. Also, I would also like to thank Tomas Banzas for the art he did!
If you have completed some of the challenges and would like to show off the results, please post a link in the comments - I'd love to see them!

Comments