In this Quick Tip we'll take a look at how to embed and display a 3D model in Flash, using Papervision3D.
Final Result Preview
Let's take a look at the final result we will be working towards:
Introduction
To use this tutorial you will need to have a 3D model, exported as a .dae file, and its texture, as an image file.
I'm going to be using this low-poly mountain bike model from 3DOcean, created by OneManBand (who also created this neat 3D Object Viewer in AIR).
You will need to download a copy of Papervision3D (you can also find a copy in the source files)
Step 1: Creating the Flash File
Create a new ActionScript 3 document with dimensions of 550x200px and set the frame rate to 30fps. Also, set the document class to "EmbeddingDAE".
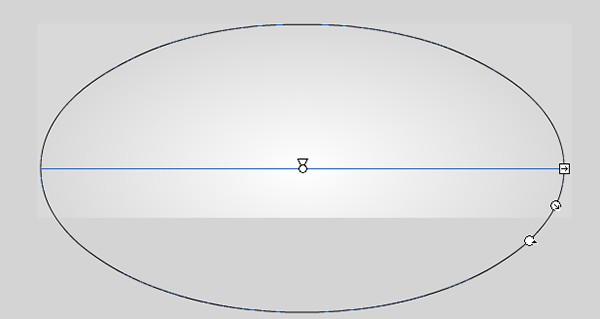
Create a rectangle that covers the whole stage, and fill it with a radial gradient of #FFFFFF to #D9D9D9. Adjust the gradient with the Gradient Transform Tool, so it looks like this:

Step 2: Setting up the Document Class
Create a new ActionScript 3 file and name it "EmbeddingDAE". This class will extend a class from Papervision that has all the basic functionality set up.
As we're going to be embedding the 3D model in your SWF, we need to make sure the file has been fully loaded before trying to make use of it.
Here is the code for that:
package
{
	import flash.events.Event;
	import org.papervision3d.view.BasicView;

	public class EmbeddingDAE extends BasicView
	{

		public function EmbeddingDAE()
		{
			this.loaderInfo.addEventListener ( Event.COMPLETE, onFullyLoaded ) ;
		}

		private function onFullyLoaded(e:Event):void
		{

		}

	}

}
Step 3: Embedding the Resources
Instead of hosting our resources at a webserver and loading them from there, we're simply going to embed them in the SWF. We do this by using the Flex SDK Embed tag. If you don't have the Flex SDK, or are having trouble with the pre-installed version, you can download it here
Flash knows how to deal with certain types of files, like my .png texture file, but it doesn't know the .dae file format. Therefore we have to set a secondary parameter, the MIME type, to application/octet-stream - this means the file will be transformed into a ByteArray.
When using the Embed tag, we need to be referring the relative (or full) path of the file, and assigning a class to this file. Later we can create an instance of the embedded file using this class.
Here you can see the code:
public class EmbeddingDAE extends BasicView
{
	[Embed(source="mountain_bike.dae", mimeType="application/octet-stream")]
	private var bikeModelClass:Class;

	[Embed(source="bike_texture.png")]
	private var bikeTextureClass:Class;

	public function EmbeddingDAE()
You will need to replace the paths so they match your own files.
Step 4: Handling the Texture
To use our texture with our model in Papervision3D, we need to do three things:
- Create an instance of the texture as a
Bitmap- so we can access itsbitmapData. - Create a
Materialwith thisbitmapData-- this will function like a texture. - Create a
MaterialsList, which will link our material to our model. It will need the name of the material used for the model. If you only have one texture file (which is most common) you do not need to worry about this, just use "all".
Here is the code doing this (added to onFullyLoaded()):
var bitmap:Bitmap = new bikeTextureClass ( ) ;

var bitmapMaterial:BitmapMaterial = new BitmapMaterial ( bitmap.bitmapData ) ;

var materialsList:MaterialsList = new MaterialsList ( ) ;
materialsList.addMaterial ( bitmapMaterial, "all" ) ;
Remember to import:
import flash.display.Bitmap;
import org.papervision3d.materials.BitmapMaterial;
import org.papervision3d.materials.utils.MaterialsList;
Step 5: Load the Model
To load our model, we need to do four things:
- Create a variable for our model - think of this as an empty shell.
- Create an instance of the
ByteArraycontaining our model. - Create an instance of the variable for our model - creating the shell.
- Load our model by passing the
ByteArrayand theMaterialsListto our empty shell.
First create the variable:
private var bikeModelDAE:DAE;
Then do the rest (adding to onFullyLoaded)
var byteArray:ByteArray = new bikeModelClass ( ) ;

bikeModelDAE = new DAE ( ) ;
bikeModelDAE.load ( byteArray, materialsList ) ;
Remember to import:
import flash.utils.ByteArray;
import org.papervision3d.objects.parsers.DAE;
Step 6: Displaying the Model
Now all we are missing is being able to see the model, which is a piece of cake. I'm also adjusting the position of the camera so we can get a good look at this model. Then I'm telling Papervision3D to re-render every frame.
Here's the code (again adding to onFullyLoaded()):
this.scene.addChild ( bikeModelDAE ) ;

this.camera.z = 500;

this.startRendering ( ) ;
This is what it will look like:

Step 7: Adding Rotation
Now we can see the model, but only from one point of view. That is a little dull isn't it? Lets add some rotation! Here we're going to override a function that is being called every frame by the Papervision3D engine.
override protected function onRenderTick(event:Event = null):void
{
	super.onRenderTick ( event ) ;
	bikeModelDAE.yaw ( 1 ) ;
}
Here it is once again:
Conclusion
Now you know how to add 3D models to your Flash projects, and it is actually quite simple. I hope you enjoyed reading and found it useful.
Thanks for reading!


Comments