In this Quick Tip, I will show you how to build a contact form using PHP and ActionScript 3. We'll learn how to pass variables from Flash to PHP and alert the owner by sending either an email or an SMS text message.
Step 1: Setting up the Document
The first thing to do is download the source files for this tutorial. Since this tutorial is a Quick Tip, I will skip the layout steps. Once you have the files downloaded, open the 'contactForm.fla' file.
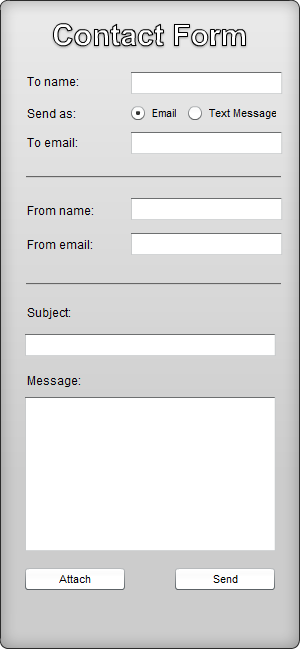
The SWF layout looks like this:
Step 2: The Document Class
Create a new 'ActionScript' file and save it to the same folder as 'contactForm.fla.' Give the file a name of 'contatForm.as.' Next, link the Flash file and ActionScript file together in the Properties panel. For a more in-depth look at how to set up the Document class, check out this quick guide.
Step 3: The Imports
Here are the import statements that we will be using for this file. Also, we will create two global variables. One is to use for a file attachment, and the other is to keep track whether we're going to use that file or not.
package {

	import fl.controls.ProgressBarMode;
	import fl.controls.RadioButton;
	import fl.controls.RadioButtonGroup;
	import fl.controls.TextInput;
	import fl.core.UIComponent;

	import flash.display.MovieClip;
	import flash.display.Sprite;
	import flash.events.Event;
	import flash.events.FocusEvent;
	import flash.events.MouseEvent;
	import flash.events.ProgressEvent;
	import flash.external.ExternalInterface;
	import flash.net.FileFilter;
	import flash.net.FileReference;
	import flash.net.URLLoader;
	import flash.net.URLRequest;
	import flash.net.URLRequestMethod;
	import flash.net.URLVariables;
	import flash.text.TextField;

	public class contactForm extends Sprite
	{
		private var file:FileReference;
		private var attachment:Boolean;

		public function contactForm()
		{
			init();
		}
	}
}
Step 4: Starting to Code
The first function we call is init(). Within the function, we set up the labels for our text fields. Also, we create an array of the cell phone providers. Since I'm located in the United States, I use only the U.S. providers. Check out this article on Wikipedia that will help you with the cell phone providers in your country.
private function init():void
{
	var labelArray:Array = [[nameLabel, "From name:"], [subjectLabel, "Subject:"], [messageLabel, "Message:"], [emailLabel, "From email:"], [toLabel, "To name:"], [addyLabel, "To email:"]];
	var textArray:Array = [nameText, subjectText, messageText, emailText, toText, addyText];
	var len:int = labelArray.length;
	attachment = false;
	pBar.visible = false;
	pBar.minimum = 0;
	pBar.maximum = 100;
	pBar.mode = ProgressBarMode.MANUAL;
	combo.visible = false;

	for(var i:int = 0; i<len; i++)
	{
		labelArray[i][0].dyText.text = labelArray[i][1];
		labelArray[i][0].addEventListener(MouseEvent.CLICK, onLabel);
	}
	len = textArray.length;

	for(i = 0; i<len; i++)
	{
		textArray[i].addEventListener(MouseEvent.ROLL_OVER, onText);
		textArray[i].addEventListener(MouseEvent.ROLL_OUT, onText);
	}

	combo.addItem({label:"--- Select a provider ---", data:""});
	var providers:Array = [["Alltel", "message.alltel.com"], ["AT&T", "txt.att.net"], ["Boost Mobile", "myboostmobile.com"], ["Cricket Wireless", "sms.mycricket.com"], ["Nextel", "messaging.nextel.com"], ["Sprint", "messaging.sprintpcs.com"], ["T-Mobile", "tmomail.net"], ["Verizon", "vtext.com"], ["Virgin Mobile USA", "vmobl.com"]];
	len = providers.length;

	for(i = 0; i<len; i++)
	{
		combo.addItem({label:providers[i][0], data:providers[i][1]});
	}

	var group:RadioButtonGroup = new RadioButtonGroup("ContactGroup");
	group.addEventListener(Event.CHANGE, onChange);
	handleOffset(true);
	sender.addEventListener(MouseEvent.CLICK, onClick);
	attach.addEventListener(MouseEvent.CLICK, onAttach);
	handleAddy();
}
We also set up the radio buttons.
Step 5: Handling the Attachment
The first thing we'll worry about is handling the attachment. Since I'm using Flash CS3, we'll do the attaching the old fashioned way. When the 'attach' button is clicked, we will instantiate the FileReference variable that we created. One important thing to note is that the FileReference variable must be a global variable (i.e. not specific to just one function) for events to fire correctly.
When the user has selected a file to upload, we will make the progress bar visible and listen for the 'progress' and 'complete' events. When the 'complete' event fires, we disable the 'attach' button, set the attachment variable to true and hide the progress bar.
private function onAttach(event:MouseEvent):void
{
	file = new FileReference();
	file.addEventListener(Event.SELECT, onSelect);
	file.browse([new FileFilter("Images (*.jpg, *.jpeg, *.gif, *.png)", "*.jpg;*.jpeg;*.gif;*.png")]);
}
private function onSelect(event:Event):void
{
	pBar.visible = true;
	file.addEventListener(ProgressEvent.PROGRESS, onProgress);
	file.addEventListener(Event.COMPLETE, onUpload);
	file.upload(new URLRequest("upload.php"), "file");
}
private function onProgress(event:ProgressEvent):void
{
	pBar.setProgress(int((event.bytesLoaded/event.bytesTotal) * 100), 100);
}
private function onUpload(event:Event):void
{
	pBar.visible = false;
	attach.enabled = false;
	attachment = true;
}
Step 6: The Upload Document
Switching over to PHP. First, create a new PHP document and save it as 'upload.php'. Now, create a directory on your web server called 'temp'. This will be the folder that we use to store the uploaded file. We will assign that location to a PHP variable called 'folder'. Next, we use the '$_FILES' super global variable to get the name of the file we uploaded. Then we create a variable that stores the temporary name of the file we just uploaded. Lastly, we move the file into our 'temp' directory. You can find a great tutorial on uploading files with PHP over on Nettuts+.
<?php

$folder = 'temp/';
$file = $_FILES['file']['name'];
$temp = $_FILES['file']['tmp_name'];
move_uploaded_file($temp, $folder . $file);

?>
Step 7: The Message Document
Create a new PHP document and save it as 'message.php'. In this file, we will receive the variables from Flash. The first thing we do is use the '$_POST' super global variable to set the all the email fields such as 'to' and 'from'. Next, we set our 'headers' variable. In PHP, we use '.' instead of '+' to concatenate. On our 'headers' variable, you'll notice '.=' which works the same as '+=' in ActionScript. After each time we concatenate we add two line returns. This is important and without it our email may fail to send.
Finally, after all our headers and fields are ready to go, we call the 'mail' function. If the mail is successful, we check to see if there was a file associated with the email. If the 'file' variable is set, then we simply delete that file from our server using the 'unlink' function.
<?php
$bool = $_POST['bool'];

$to = $_POST['to'] . ' <' . $_POST['toAddy'] . '>';

$address = $_POST['email'];

$message = $_POST['message'];
$subject = $_POST['subject'];
$name = $_POST['name'];
$from = $_POST['from'];

$headers = "From: $from <$address>\r\n";
$headers .= "Return-Path: $address\r\n";
$headers .= "Reply-To: $address\r\n";
$headers .= "X-Mailer: PHP " . phpversion() . "\r\n";
$headers .= "MIME-Version: 1.0\r\n";

//FILE ATTACHMENT GOES HERE

$headers .= "Content-type: text/plain; charset=utf-8\r\n";

if(mail($to, $subject, $message, $headers))
{
	if(isset($file))
	{
		unlink($file);
	}
	echo 1;
}
else
{
	echo 0;
}
?>
Step 8: Adding the Attachment
Here is the code that we use to send an attachment. If you want to include this type of functionality in your application, simply insert this code where it says 'FILE ATTACHMENT GOES HERE'. The first thing we do is check to see if the 'file' variable has been posted. Also, we check to see if the 'bool' variable is 'true'. This will check to make sure that the user isn't trying to send an attachment as a text message. Although you can send files as attachments to cell phones, the maximum dimensions are only about 640x480. That would take some extra logic to resize the image and is out of the scope of this Quick Tip. Feel free to try it out yourself, though!
Back on track, we'll create a 'file' variable to leads to the location of the file we uploaded. Also, after doing some simple string replacing, we check the file extension. Finally, we modify our 'headers' variable to include the file as well as all the information that is needed to attach it.
if(isset($_POST['file']) && $bool === 'true')
{
	$file = 'temp/' . $_POST['file'];
	$ext = $_POST['ext'];
	$name = str_replace($ext, '', $_POST['file']);
	$ext = str_replace('.', '', $ext);
	$attachment = chunk_split(base64_encode(file_get_contents($file)));
	switch($ext)
	{
		case 'jpg' :
		case 'jpeg' :
		$ext = 'image/jpeg';
		break;
		case 'gif' :
		$ext = 'image/gif';
		break;
		case 'png' :
		$ext = 'image/png';
		break;
	}
	$mime_boundary = md5(time());
	$headers .= "Content-Type: multipart/mixed; boundary=\"$mime_boundary\"\r\n";
	$headers .= "--$mime_boundary\r\n";
	$headers .= "Content-Type: $ext; name=\"" . $name . "\"\r\n";
	$headers .= "Content-Transfer-Encoding: base64\r\n";
	$headers .= "Content-Disposition: attachment; filename=\"" . $_POST['file'] . "\"\r\n";
	$headers .= "\n";
	$headers .= $attachment . "\r\n";
	$headers .= "--$mime_boundary\r\n";
}
Step 9: Back in Flash
When the 'sender' button is clicked, we call the 'onClick()' function. We perform some checking to see if it is an email or a text message that the user is trying to send. If it's a text message, we'll format the phone number a little, check to see if the user has selected a provider, and make sure the number is valid. After we've validated all of the user's information, we will load the 'message.php' document, send all our variables to it and listen for the 'complete' event.
private function onClick(event:MouseEvent):void
{
	var textArray:Array = [nameText, messageText, subjectText];
	var len:int = textArray.length;
	if(!emailRadio.selected)
	{
		addyText.text = addyText.text.replace(/[()-\s\.\+]/g, "");
	}
	for(var i:int = 0; i<len; i++)
	{
		if(!handleString(textArray[i].text))
		{
			var errorMessage:String = "Please enter a " + textArray[i].name.replace("Text", "");
			ExternalInterface.call("alert", errorMessage);
			return;
		}
	}
	if(emailRadio.selected)
	{
		if(!handleEmail(emailText.text))
		{
			ExternalInterface.call("alert", "Please enter a valid email address");
			return;
		}
	}
	else
	{
		if(combo.selectedItem.data === "")
		{
			ExternalInterface.call("alert", "Please select a provider");
			return;
		}
		else if(!handleNumber(addyText.text))
		{
			ExternalInterface.call("alert", "Please select a valid number");
			return;
		}
	}
	var url:URLLoader = new URLLoader();
	var req:URLRequest = new URLRequest("message.php");
	var vars:URLVariables = new URLVariables();
	req.method = URLRequestMethod.POST;
	if(attachment)
	{
		vars.file = file.name;
		vars.ext = file.type;
	}
	vars.bool = emailRadio.selected;
	vars.subject = subjectText.text;
	vars.message = messageText.text;
	vars.email = emailText.text;
	vars.from = nameText.text;
	vars.to = toText.text;
	if(emailRadio.selected)
	{
		vars.toAddy = addyText.text;
	}
	else
	{
		vars.toAddy = addyText.text + "@" + combo.selectedItem.data;
	}
	req.data = vars;
	url.addEventListener(Event.COMPLETE, onComplete);
	url.load(req);
}
Step 10: The Event Handlers
When the 'complete' event is fired, we will simply parse the integer that PHP sends us. Along with the 'complete' event, below are the rest of the event handler functions used in this project.
The 'onChange' function will toggle the combo box visibility as well as call the 'handleAddy' function. The 'onText' function will set the focus of the text field when the label is clicked - like in HTML. Finally, the 'onLabel' function will handle the highlighting of the text field when the mouse moves over it.
private function onComplete(event:Event):void
{
	var num:int = parseInt(event.target.data);
	if(num)
	{
		ExternalInterface.call("alert", "Message was sent");
	}
	else
	{
		ExternalInterface.call("alert", "There was an error");
	}
}

private function onChange(event:Event):void
{
	switch(event.target.selection)
	{
		case emailRadio :
			combo.visible = false;
			attach.visible = true;
			addyLabel.dyText.text = "To email:";
			handleOffset(false);
		break;
		case textRadio :
			attachment = false;
			combo.visible = true;
			attach.visible = false;
			addyLabel.dyText.text = "To number:";
			handleOffset(true);
		break;
	}
	handleAddy();
}

private function onText(event:MouseEvent):void
{
	switch(event.type)
	{
		case MouseEvent.ROLL_OVER :
			event.target.drawFocus(true);
		break;
		case MouseEvent.ROLL_OUT :
			event.target.drawFocus(false);
		break;
	}
}

private function onLabel(event:MouseEvent):void
{
	var labelName:String = event.currentTarget.name.replace("Label", "Text");
	var tf:UIComponent;
	if(labelName === "messageText")
	{
		tf = TextArea(this.getChildByName(labelName));
	}
	else
	{
		tf = TextInput(this.getChildByName(labelName));
	}
	switch(event.type)
	{
		case MouseEvent.ROLL_OVER :
			tf.drawFocus(true);
		break;
		case MouseEvent.ROLL_OUT :
			tf.drawFocus(false);
		break;
		case MouseEvent.CLICK :
			tf.setFocus();
		break;
	}
}

private function onFocus(event:FocusEvent):void
{
	event.target.text = "";
}
Step 11: The Rest of the Functions
These are the final functions that will handle checking the text fields to make sure they're not empty as well as handling the offset caused by the radio button selection.
private function handleOffset(bool:Boolean):void
{
	var ch:Number = combo.height + 10;
	switch(bool)
	{
		case true :
			nameLabel.y += ch;
			subjectLabel.y += ch;
			messageText.y += ch;
			messageLabel.y += ch;
			subjectText.y += ch;
			sender.y += ch;
			nameText.y += ch;
			rule.y += ch;
			emailLabel.y += ch;
			emailText.y += ch;
			rule2.y += ch;
		break;
		case false :
			messageText.y -= ch;
			messageLabel.y -= ch;
			subjectText.y -= ch;
			subjectLabel.y -= ch;
			sender.y -= ch;
			nameLabel.y -= ch;
			nameText.y -= ch;
			rule.y -= ch;
			emailLabel.y -= ch;
			emailText.y -= ch;
			rule2.y -= ch;
		break;
	}
}

private function handleString(string:String):Boolean
{
	if(string.toLowerCase().search(/[a-z0-9]/g) != -1)
	{
		return true;
	}
	else
	{
		return false;
	}
}

private function handleEmail(string:String):Boolean
{
	//this RegExp is used to check whether the user entered a valid email address
	var pattern:RegExp = /[a-z0-9!#$%&'*+\/=?^_`{|}~-]+(?:\.[a-z0-9!#$%&'*+\/=?^_`{|}~-]+)*@(?:[a-z0-9](?:[a-z0-9-]*[a-z0-9])?\.)+[a-z0-9](?:[a-z0-9-]*[a-z0-9])?/g;
	if(pattern.exec(string) != null)
	{
		return true;
	}
	else
	{
		return false;
	}
}

private function handleNumber(string:String):Boolean
{
	if(string.search(/[0-9]/) === -1)
	{
		return false;
	}
	else
	{
		//you may need to change this logic depending on the length of
		//mobile phone numbers in your country
		if(string.length < 11)
		{
			return false;
		}
		else
		{
			return true;
		}
	}
	return false;
}

private function handleAddy():void
{
	addyText.addEventListener(FocusEvent.FOCUS_IN, onFocus);
	if(!emailRadio.selected)
	{
		addyLabel.text = "To email:";
		addyText.text = "";
	}
	else
	{
		addyLabel.text = "To number:";
		addyText.text = "Starting with country code";
	}
}
Conclusion
In this Quick Tip, you learned how to use Flash and AS3 to send not only simple text variables but images as well - and not just by email, but also via SMS text message. These techniques can be used in a variety of ways. Keep experimenting and remember to subscribe to the Tuts+ feed. Thanks for reading!

Comments