Instead of just showing your business location on a Google Map, why not offer your users the opportunity to get driving directions on the same page? No need for them to open up a new browser window and find it themselves, we can do better than that!
Using the Google Maps API within your WordPress website is a relatively simple process and we'll explore exactly how to do it in this tutorial.
What We'll Be Doing in This Tutorial...
- First we'll set up some custom options so that we can enter information about our map in the WordPress Admin panel.
- Then we'll use shortcodes to output a map container, input fields and directions container
- Finally we'll write some JavaScript to initiate the Google Map
Note: We'll be writing a fair bit of JavaScript here, but don't worry! This is a WordPress tutorial so feel free to gloss over the JavaScript parts :)
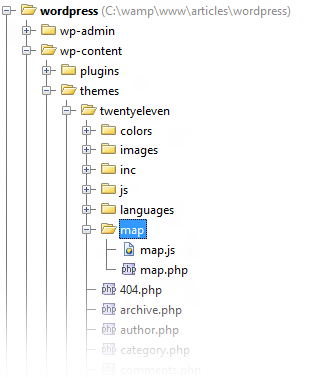
Step 1 Create the Directory and Files
- Create a folder inside your theme called Map
- Inside this folder, create map.php
- Finally create map.js
Step 2 Include the map.php File
In your functions.php file (located in the root directory of your theme) – include the map.php file you created at the top.
/* functions.php */
include('map/map.php');
Step 3 Register Settings
There are 3 things that we want to be able to edit from the Admin area.
- The Destination. We're going to use Longitude and Latitude values to specify the precise location of your destination (more details to follow)
- The
infoWindowcontent. This is the white bubble you often see on Google Maps – we want to be able to edit the text in the bubble! - Initial Zoom Level of the map – how far the map is zoomed in when the user first loads the page.
In map.php, hook into admin_init to register our settings:
function map_init() {
	register_setting('general', 'map_config_address');
	register_setting('general', 'map_config_infobox');
	register_setting('general', 'map_config_zoom');
}

add_action('admin_init', 'map_init');
Now we can set up the heading text for our section in the options page and all of the inputs we need.
function map_config_option_text() {
	echo '<p>Set Options for the Map here:</p>';
}

// Longitude, Latitude Values for the Destination
function map_config_address() {
	printf(('<input type="text" id="map_config_address" name="map_config_address" value="%s" size="50"/>'), get_option('map_config_address'));
}

// The text content for the InfoWindow Bubble
function map_config_infobox() {
	printf(('<textarea name="map_config_infobox" id="map_config_infobox" cols="30" rows="3">%s</textarea>'), get_option('map_config_infobox'));
}

// The initial Zoom Level of the map.
function map_config_zoom() {
	printf(('<input name="map_config_zoom" id="map_config_zoom" value="%s" />'), get_option('map_config_zoom'));
}
Finally we hook into admin_menu to display our settings in the WordPress Admin:
function map_config_menu() {
	add_settings_section('map_config', 'Map Configuration', 'map_config_option_text', 'general');
	add_settings_field('map_config_address', 'Address - Longitude and Latitude', 'map_config_address', 'general', 'map_config');
	add_settings_field('map_config_infobox', 'Map InfoWindow', 'map_config_infobox', 'general', 'map_config');
	add_settings_field('map_config_zoom', 'Map Zoom Level', 'map_config_zoom', 'general', 'map_config');
}
add_action('admin_menu', 'map_config_menu');
Go into your admin area, you should now see this:
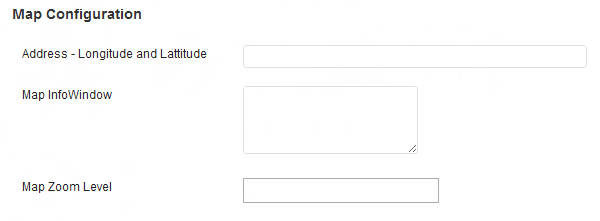
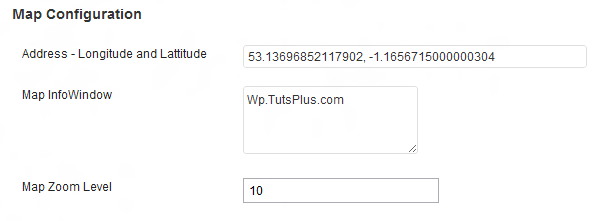
Step 4 Enter Your Destination, infoWindow Text and Zoom Level
-
Destination Address
The Google Maps API actually accepts regular addresses such as 'Newgate Lane, Mansfield, Nottinghamshire, UK' – However, you'll find that you will want to be more precise with your destination (for example, you'll most likely want to point directly to your business and not just the street). You can use a Google Maps API V3 Sample to search for your destination. Drag the target around until you have pin-pointed your spot. When you're happy, copy the
Lat/Lng:value into the address field in the options – for example27.52774434830308, 42.18752500000007(just the numbers separated by the comma, no brackets or quotes!) -
InfoWindow Text
Make this whatever you want. Your Business Name would be a good idea :)
-
Zoom Level
A good starting point is 10.
Click 'Save Changes' and when the page refreshes you can check that the info has been stored. It should look something like this now:
Step 5 Set Up the Shortcodes
When we are finished, we'll have 3 elements: the Map, the Form, and the Directions – so in this tutorial I've decided to split them up into 3 separate shortcodes. This will allow us to change the order/placement of each item without having to modify any of our PHP code. For example, you may decide to have your directions above the map instead of below, or at the side, etc.
-
Shortcode 1 :
wpmap_mapHere we register and enqueue the Google Maps API JavasScript file as well as our own maps.js file.
Next we use the
$outputvariable to store ourmap-containerdiv along with some custom data attributes. (data-map-infowindowwill store the content for the infowindow anddata-map-zoomwill represent the initial zoom level – both of these values are returned using WordPress'sget_optionfunction).Finally we return the generated HTML to be output:
function wpmap_map() { wp_register_script('google-maps', 'http://maps.google.com/maps/api/js?sensor=false'); wp_enqueue_script('google-maps'); wp_register_script('wptuts-custom', get_template_directory_uri() . '/map/map.js', '', '', true); wp_enqueue_script('wptuts-custom'); $output = sprintf( '<div id="map-container" data-map-infowindow="%s" data-map-zoom="%s"></div>', get_option('map_config_infobox'), get_option('map_config_zoom') ); return $output; } add_shortcode('wpmap_map', 'wpmap_map'); -
Shortcode 2 :
wpmap_directions_containerHere we simply return an empty
divwith an ID ofdir-container. This will act as the container for the directions.function wpmap_directions() { $output = '<div id="dir-container" ></div>'; return $output; } add_shortcode('wpmap_directions_container', 'wpmap_directions'); -
Shortcode 3 :
wpmap_directions_inputThis generates the Markup needed for our form.
This is also where we'll set our final custom option – the destination Address. This time, we'll use a hidden form field to hold the Latitude/Longitude value that we entered earlier in the Admin Panel.
		function wpmap_directions_input() {

			$address_to = get_option('map_config_address');

			$output = '<section id="directions" class="widget">
						<strong>For Driving Directions, Enter your Address below :</strong><br />
						<input id="from-input" type="text" value="" size="10"/>
						<select class="hidden" onchange="" id="unit-input">
							<option value="imperial" selected="selected">Imperial</option>
							<option value="metric">Metric</option>
						</select>
						<input id="getDirections" type="button" value="Get Directions" onclick="WPmap.getDirections();"/>
						<input id="map-config-address" type="hidden" value="' . $address_to . '"/>
					</section>';
			return $output;
		}
		add_shortcode('wpmap_directions_input', 'wpmap_directions_input');
Now we have the shortcodes set up, you can go ahead and type them into your Contact Us page (or any page you like).
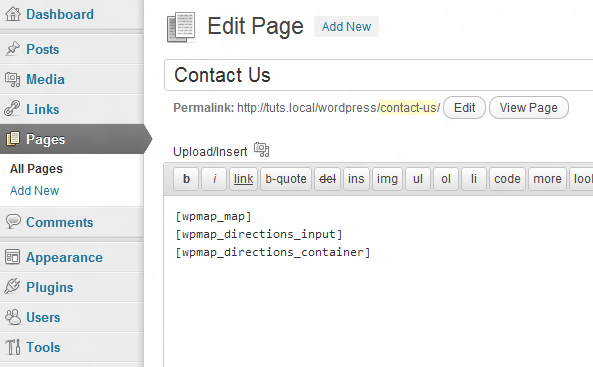
If you preview the page now, all you'll see is the form input fields. That's because we haven't written our JavaScript that will initialize the Map yet and the div for the directions is currently empty.
Note: Before we dive into the JavaScript, we just need to add this to our style.css:
#map-container {
	width: 100%;
	height: 400px;
}
Step 7 Writing JavaScript to Interact With Google Maps API
Now it's time to make the magic happen! I'll provide a quick run-down of what we're going to do first, then we'll dig straight into the code.
- First we're going to create an object
WMmapand assign properties to it (some of which we'll be grabbing from the markup that we created in the shortcodes) - Then we'll add a few methods to handle the functionality of the map and directions.
- One of these methods,
init, will be responsible for loading the map and also for setting some default values such as the infoWindow text, zoom level and initial marker position (all from WordPress options) - Finally we'll set an event listener to load our map when the page is ready.
Ready?
I'll explain each part of the code step-by-step, but don't worry if you get lost, we'll put it all together at the end.
Set Properties
Let's create our object and set some properties. Here we are simply querying the DOM to retrieve the HTML elements that contain the values we need. The property names we're using should be very clear and self-explanatory (mapContainer is obviously the Map Container, etc :))
Here we also get a couple of objects from the API that we'll use later when we deal with Directions.
var WPmap = {

	// HTML Elements we'll use later!
	mapContainer	: document.getElementById('map-container'),
	dirContainer	: document.getElementById('dir-container'),
	toInput			: document.getElementById('map-config-address'),
	fromInput		: document.getElementById('from-input'),
	unitInput		: document.getElementById('unit-input'),

	// Google Maps API Objects
	dirService		: new google.maps.DirectionsService(),
	dirRenderer		: new google.maps.DirectionsRenderer(),
	map				: null,

	/* continues below */
}
The Methods
These are also part of our WPmap object, if you are unsure how everything ties together, be sure to check out the bottom of this tutorial to see all of the code together.
showDirections()
This is called from within another method that we'll see later, it basically controls the insertion of the directions into the page.
/* within WPmap object */
showDirections:function (dirResult, dirStatus) {
	if (dirStatus != google.maps.DirectionsStatus.OK) {
		alert('Directions failed: ' + dirStatus);
		return;
	}

	// Show directions
	WPmap.dirRenderer.setMap(WPmap.map);
	WPmap.dirRenderer.setPanel(WPmap.dirContainer);
	WPmap.dirRenderer.setDirections(dirResult);
},
getStartLatLng()
This is called once from our init method. It will set the startLatLng property equal to a google.maps.LatLng object that we can use later. It requires that we provide it separate Latitude and Longitude values – how can we do this?
- In our shortcode we inserted a hidden form field that contains the Latitude & Longitude value that we set in the WordPress Admin. Then we retrieved the hidden form field and stored it in
toInput. This means we can now access the value usingWPmap.toInput.value - However, the value we set in the form is just a string with a comma separating the numbers. To separate the values we can split the string up using
.split(","). This will return an array containing the Latitude and Longitude as separate values. - Now we can access each one by using the arrays index.
	/* within WPmap object */
	getStartLatLng: function () {
		var n = WPmap.toInput.value.split(",");
		WPmap.startLatLng = new google.maps.LatLng(n[0], n[1]);
	},
getSelectedUnitSystem()
Because we have allowed our users to select whether they would prefer directions in Metric or Imperial, we use this method to set DirectionsUnitSystem to either METRIC or IMPERIAL.
	/* within WPmap object */
	getSelectedUnitSystem:function () {
		return WPmap.unitInput.options[WPmap.unitInput.selectedIndex].value == 'metric' ?
			google.maps.DirectionsUnitSystem.METRIC :
			google.maps.DirectionsUnitSystem.IMPERIAL;
	},
getDirections()
This is the method that is called when the user clicks the Get Directions button.
- First we get the address that the user entered and store it in the
fromStrvariable. - Next we set up an options object –
dirRequest. This will contain the options needed to provide the Driving Directions.-
origin– The address that the user entered. -
destination– Thegoogle.maps.LatLngobject containing the Latitude and Longitude values of your destination. -
travelMode– Here we ensure we are only retrieving Driving Directions. -
unitSystem– Specify which unit of measurement to use based on user's choice.
-
- Finally, we call
WPmap.dirService.route– and pass two parameters to it:-
dirRequest– this is the object containing our options. -
WPmap.showDirections– the callback function that handles the placement of the directions into the page.
-
	/* within WPmap object */
	getDirections:function () {

		var fromStr = WPmap.fromInput.value;

		var dirRequest = {
			origin      : fromStr,
			destination : WPmap.startLatLng,
			travelMode  : google.maps.DirectionsTravelMode.DRIVING,
			unitSystem  : WPmap.getSelectedUnitSystem()
		};

		WPmap.dirService.route(dirRequest, WPmap.showDirections);
	},
init()
This is the method that is called when the page is loaded. It is responsible for :
- Initiating the map, centered on your address.
- Retrieving values that are needed to set the infoWindow text and the initial Zoom level.
- Setting a marker pin showing your address.
- Listening for when when a user clicks 'Get Directions' so that it can remove the initial Marker and infoWindow
	init:function () {

		// get the infowindow text and zoom level
		var infoWindowContent = WPmap.mapContainer.getAttribute('data-map-infowindow');
		var initialZoom       = WPmap.mapContainer.getAttribute('data-map-zoom');

		// call the method that sets WPmap.startLatLng
		WPmap.getStartLatLng();

		// setup the map.
		WPmap.map = new google.maps.Map(WPmap.mapContainer, {
			zoom      : parseInt(initialZoom),
			center    : WPmap.startLatLng,
			mapTypeId : google.maps.MapTypeId.ROADMAP
		});

		// setup the red marker pin
		marker = new google.maps.Marker({
			map       : WPmap.map,
			position  : WPmap.startLatLng,
			draggable : false
		});

		// set the infowindow content
		infoWindow = new google.maps.InfoWindow({
			content : infoWindowContent
		});
		infoWindow.open(WPmap.map, marker);

		// listen for when Directions are requested
		google.maps.event.addListener(WPmap.dirRenderer, 'directions_changed', function () {

			infoWindow.close();         //close the initial infoWindow
			marker.setVisible(false);   //remove the initial marker

		});
	}//init

};// <-- this is the end of the object.
** Optional **
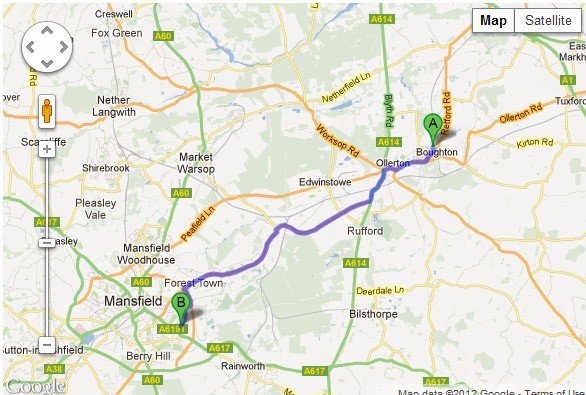
If you want to display a nice message (like the one seen below) to your users after they have requested directions, just copy the code under the image into the event listener inside the init method.
Optional Thank you message:
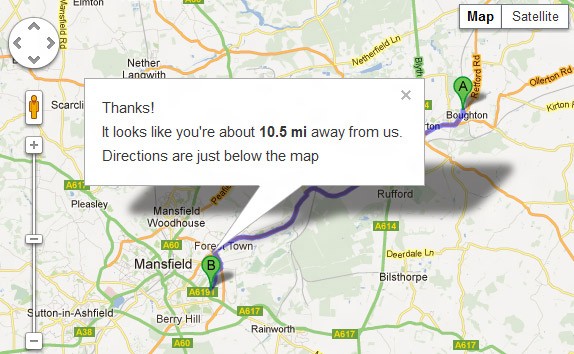
	// Get the distance of the journey
	var distanceString = WPmap.dirRenderer.directions.routes[0].legs[0].distance.text;

	// set the content of the infoWindow before we open it again.
	infoWindow.setContent('Thanks!<br /> Looks like you\'re about <strong> ' + distanceString + '</strong> away from us. <br />Directions are just below the map');

	// re-open the infoWindow
	infoWindow.open(WPmap.map, marker);

	setTimeout(function () {
		infoWindow.close()
	}, 8000); //close it after 8 seconds.
Step 8 Add the Event Listener That Will Load the Map
Are you still with me? We've made it all the way to end now and all that's left to do is call the WPmap.init() method when the page loads. Add this to the bottom of map.js
google.maps.event.addDomListener(window, 'load', WPmap.init);
Putting All the JavaScript Together
We've covered a lot of ground here, so let's see how it looks when it's all put together.
var WPmap = {

	// HTML Elements we'll use later!
	mapContainer   : document.getElementById('map-container'),
	dirContainer   : document.getElementById('dir-container'),
	toInput        : document.getElementById('map-config-address'),
	fromInput      : document.getElementById('from-input'),
	unitInput      : document.getElementById('unit-input'),
	startLatLng    : null,

	// Google Maps API Objects
	dirService     : new google.maps.DirectionsService(),
	dirRenderer    : new google.maps.DirectionsRenderer(),
	map:null,

	showDirections:function (dirResult, dirStatus) {
		if (dirStatus != google.maps.DirectionsStatus.OK) {
			alert('Directions failed: ' + dirStatus);
			return;
		}

		// Show directions
		WPmap.dirRenderer.setMap(WPmap.map);
		WPmap.dirRenderer.setPanel(WPmap.dirContainer);
		WPmap.dirRenderer.setDirections(dirResult);
	},

	getStartLatLng:function () {
		var n = WPmap.toInput.value.split(",");
		WPmap.startLatLng = new google.maps.LatLng(n[0], n[1]);
	},

	getSelectedUnitSystem:function () {
		return WPmap.unitInput.options[WPmap.unitInput.selectedIndex].value == 'metric' ?
			google.maps.DirectionsUnitSystem.METRIC :
			google.maps.DirectionsUnitSystem.IMPERIAL;
	},

	getDirections:function () {

		var fromStr = WPmap.fromInput.value; //Get the postcode that was entered

		var dirRequest = {
			origin      : fromStr,
			destination : WPmap.startLatLng,
			travelMode  : google.maps.DirectionsTravelMode.DRIVING,
			unitSystem  : WPmap.getSelectedUnitSystem()
		};

		WPmap.dirService.route(dirRequest, WPmap.showDirections);
	},

	init:function () {

		// get the content
		var infoWindowContent = WPmap.mapContainer.getAttribute('data-map-infowindow');
		var initialZoom       = WPmap.mapContainer.getAttribute('data-map-zoom');

		WPmap.getStartLatLng();

		// setup the map.
		WPmap.map = new google.maps.Map(
			WPmap.mapContainer,
			{
				zoom: parseInt(initialZoom),     //ensure it comes through as an Integer
				center: WPmap.startLatLng,
				mapTypeId: google.maps.MapTypeId.ROADMAP
			}
		);

		// setup the red pin marker
		marker = new google.maps.Marker({
			map: WPmap.map,
			position: WPmap.startLatLng,
			draggable: false
		});

		// set the infowindow content
		infoWindow = new google.maps.InfoWindow({
			content:infoWindowContent
		});
		infoWindow.open(WPmap.map, marker);

		// listen for when Directions are requested
		google.maps.event.addListener(
			WPmap.dirRenderer,
			'directions_changed',
			function () {

				infoWindow.close();         //close the first infoWindow
				marker.setVisible(false);   //remove the first marker

				// setup strings to be used.
				var distanceString = WPmap.dirRenderer.directions.routes[0].legs[0].distance.text;

				// set the content of the infoWindow before we open it again.
				infoWindow.setContent('Thanks!<br /> Looks like you\'re about <strong> ' + distanceString + '</strong> away from us. <br />Directions are just below the map');

				// re-open the infoWindow
				infoWindow.open(WPmap.map, marker);
				setTimeout(function () {
					infoWindow.close()
				}, 8000); //close it after 8 seconds.

			}
		);
	}//init
};

google.maps.event.addDomListener(window, 'load', WPmap.init);
Tutorial Notes
- Be sure to research anything you don't understand on Google's Maps API Website
-
When writing this tutorial, I was testing my code using the stock TwentyEleven WordPress Theme. Something was causing the arrow at the bottom of the InfoWindow on the map to display incorrectly. It's because
.entry-content imgon line 857 has amax-widthset. This screws up the way that Google renders the infoWindow. To fix it, enter this somewhere below it:#map-container img { max-width: none; }

Comments