In May, Google announced the next version of the Android platform, Android M. While it’s still unknown what the "M" stands for (Marshmallow? Macaroon? Macadamia Nut Cookie?), you can already get your hands on the Android M developer preview. Developer preview 2 was released only a few days ago.
In this tutorial, we'll look at how you can set up your development environment and install this early release of Android M, before exploring some of the new features included in this developer preview. We'll take a look at how you can use the new Data Binding library to cut down on boilerplate code, how your app can take advantage of Android M's new permissions model, and how Android's built-in app linking is set to become more powerful in Android M.
Disclaimer
Although you can explore Android M features in the developer preview, don't forget that this is a development release that delivers preview APIs, so you should expect significant changes right up until the final SDK. You also cannot publish any apps that target the M developer preview to Google Play.
Since this developer preview is a work in progress, it’s important you keep your development environment up to date and always work with the very latest release of the Android M developer preview. To make sure you don’t miss any updates, you may want to bookmark the Android Developers Blog, join the Android M Developer Community, and make a note of Google's (tentative) release dates.
- Developer Preview 3: Late July
- Final SDK: Q3 2015, with speculation that Android M will be released in September
1. Setting Up the Android M Preview SDK
If you want to start experimenting with the Android M developer preview release, you’ll need Android Studio 1.3 beta or higher.
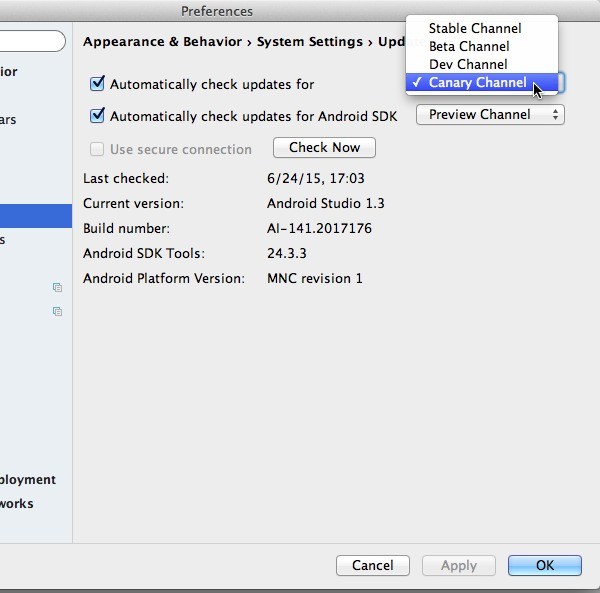
The Android Studio team releases updates via several channels, stable, beta, dev, and the canary channel. Despite the beta tag, you'll find Android Studio 1.3 beta on the canary channel.
To connect to the canary channel:
- Open Android Studio.
- In the toolbar, click Android Studio and select Preferences.
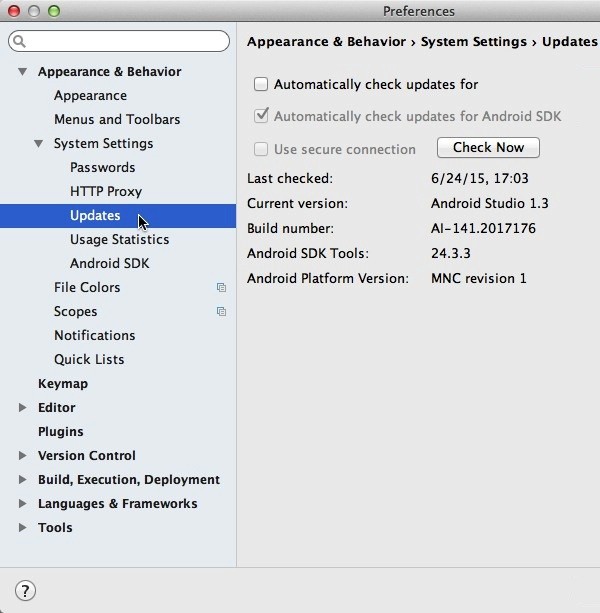
- Open the Appearance & Behavior menu, expand System Settings, and click Updates.

- Make sure the Automatically check updates for checkbox is selected.
- Open the drop-down menu and select Canary Channel.
- Click the Check Now button.

At this point, Android Studio should ask whether you want to download the latest canary build. Click Update and restart. If you don't see a dialogue box, try closing the Preferences window by clicking Update. This should force the dialogue box to appear.
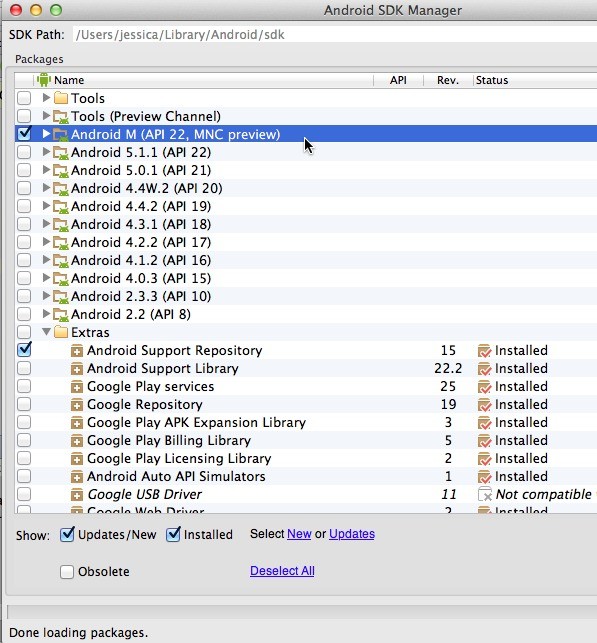
Next, open your SDK Manager and download:
- Android MNC Preview
- Android Support Repository (revision 15 or later)

And that's it. Your development environment is now Android M-ready.
Over the next few sections, I'll cover some of the major features introduced in the preview SDK and show you how to start working with these features in your own Android M projects.
If you want to create an Android M sample project and try some of the code snippets for yourself, just create a new Android project as normal, but set the minimum SDK to MNC Android M (Preview).
2. Data Binding Library
Android M adds data binding to the developer's toolset with the release of a dedicated Data Binding library. This new Data Binding library sets out to minimize the amount of code you need to write by letting you bind data directly into specific views in your layout files.
The best way to understand how data binding works is to see it in action. So instead of looking at the theory behind data binding, let's get stuck into some code.
Step 1: Setting Up the Data Binding Library
To make data binding available to your project, you need to add the Data Binding library dependency to your project’s build.gradle file. Open your top-level Gradle build file and add the following:
    ...

    dependencies {
        classpath "com.android.tools.build:gradle:1.3.0-beta4"
        classpath "com.android.databinding:dataBinder:1.0-rc0"
    }
}
You'll also need to add the data binding plug-in to every module where you want to use data binding. Open your module's build.gradle file and add the following:
apply plugin: ‘com.android.application'
apply plugin: 'com.android.databinding'
Step 2: Data Binding Example
With the Data Binding library set up, let's look at a basic example of data binding. Imagine your have a Student class:
public class Student {
    public final String firstName;
    public Student(String firstName) {
        this.firstName = firstName;
    }
}
You want to display the student's first name in your layout file. To achieve this via data binding, you'd use the following in your layout file:
<?xml version="1.0" encoding="utf-8"?>
<layout xmlns:android="http://schemas.android.com/apk/res/android">
This new <layout> tag transforms your layout file into a data-binding layout file.
<data>
Between these <data> tags, you list all the variables you want to bind to your user interface elements.
<variable name="student" type="com.databindingexample.Student"/>
This line of code defines a variable, student in this instance, and describes a property that you can then use within your layout.
</data>
After the closing <data> tag, you can create the rest of your layout as normal, the only difference is that you can now set the property of student to firstName in your layout file.
android:text="@{student.firstName}"/>
Android Studio may flag up some errors until you build your project. This is because the Data Binding library needs to generate a class that contains the bindings from the layout properties and knows how to assign values for the binding expressions. This file is only generated when you build your project, so open the Build menu and select Make project.
Android Studio builds your project and generates a new class named after your layout file, with the addition of a binding suffix (e.g., ActivityMainBinding).
To make this binding work, you need to add the binding class to the onCreate() method of your main activity:
@Override
protected void onCreate(Bundle savedInstanceState) {
    super.onCreate(savedInstanceState);
    ActivityMainBinding binding = DataBindingUtil.setContentView(this, R.layout.main_activity);
    Student student = new Student("Test");
    binding.setStudent(student);
}
This is a very simple data binding example. When you use the data binding library in your own projects, it usually makes sense to elaborate on this basic example and give your data objects the ability to update your application's user interface whenever the property of that data object changes. To see an example of this kind of data binding in action, check out Google's official Data Binding Guide.
3. Permissions on Android M
We're all storing more personal information on our smartphones and tablets than ever before, so it makes sense that Google are giving users increased control over the information their mobile apps have access to in Android M.
Up until now, Android apps have taken an all-or-nothing approach to permissions. At install time, apps request all the permissions they could possibly require upfront and users can then either accept or reject the entire permissions list.
Android M introduces a completely new permissions model that gives users the ability to pick and choose which permissions they grant each app at runtime. Essentially, apps request permissions as and when they need them, and the user can then either accept or deny each permission.
For example, the user could let the Facebook app access their location but not their device's microphone or camera. Users can also revoke previously-granted permissions. If they decide they no longer want Facebook to know their location, they can always revoke android.permission.ACCESS_FINE_LOCATION.
Permissions and Backwards Compatibility
The new permissions model is good news for security-conscious Android users, but what does it mean for developers?
Firstly, the new permissions model is only supported on Android M. Although the Android operating system actually makes backwards compatibility pretty straightforward (as you’ll see in a minute), it relies on your app knowing whether it's installed on a device running Android M or a device running an earlier version of Android.
Checking the version of Android may sound straightforward, but this fairly routine task gets a bit more confusing due to the development-only nature of Android M. Currently, for your app to check whether it's installed on the Android M developer preview, you need to use the MNC codename.
return "MNC".equals(Build.VERSION.CODENAME);
But according to Google’s code samples, once the API has been finalized, your app should use the following instead:
return Build.VERSION.SDK_INT == Build.VERSION_CODES.MNC;
So use "MNC".equals for now, but don't be surprised if this changes at some point before the final SDK release. Also make sure you double-check this piece of code once the final Android M SDK makes an appearance.
Regardless of the version of Android your device winds up on, you declare all the permissions in your manifest as normal. Then, if your app is installed on a device running anything other than Android M, it simply reverts to the old permissions model and requests all the permissions at install time.
Handling permission requests and responses on Android M is a bit more complicated, but you still declare the permissions in exactly the same manner, in your manifest.
The only quirk is that if your app requires a permission on Android M only, you should declare it using the new <uses-permission-sdk-m> element. On Android M, <uses-permission-sdk-m> behaves exactly the same as <uses-permission>, but anything declared with <uses-permission-sdk-m> is ignored on pre-Android M devices.
Requesting and Handling Permissions on Android M
Imagine your app has verified that it's installed on Android M, how do you go about making permission requests and handling user responses?
These are the different stages:
-
Check whether your app already has the required permission. Whenever your app needs to perform a restricted action, it should check whether it currently has access to the required permission. You need to complete this step even if the user has granted this permission previously. This is because the user can revoke a permission at any time and your app won't be notified. The good news is that checking for permissions is fairly straightforward, just call
Context.checkSelfPermission(permission_name). -
Don’t have the permission? Request it. You request permissions using the new
Activity.requestPermissions(String[], int)method. When you call this method, the system displays a dialogue box where the user can either grant or deny the permission. You may notice there's no way of adding aString/@StringResto explain why you’re making this request, so if it isn’t immediately obvious why your app needs a particular permission you may want to give the user some information before callingrequestPermissions.
-
Receiving the user’s response. Once the user has granted or denied the permission, the system calls your activity’s
onRequestPermissionsResult(int, String[], int[])method and passes it the results.
-
Handling the user’s response. The final step is inspecting these results and acting accordingly. To act on the
onRequestPermissionsResult()data, your activity needs to override this method:
@Override
public void onRequestPermissionsResult(int requestCode, String permissions[], int[] grantResults) {
    switch (requestCode) {
        case YOUR_REQUEST_CODE: {
            if (grantResults[0] == PackageManager.PERMISSION_GRANTED) {

            } else {

            }
        }
        return;
    }
}
Best Practices for the New Permissions Model
A new permissions model means new best practices. Here are a few guidelines that can help you use Android M's granular permission settings more effectively.
Require as Few Permissions as Possible
Every time your app makes a permissions request, you're giving the user the chance to reduce your app's functionality by denying that request. So you should design your app to make as few permission requests as possible.
You may also want to consider whether you can achieve the same results by instructing another app to perform the task in question via an intent. For example, instead of requesting android.permission.CAMERA, you could use a MediaStore.ACTION_IMAGE_CAPTURE intent.
Handle Rejection Gracefully
The user can deny any (and even every) permission request. If this happens, you'll want to ensure your app doesn't freeze, crash, stop working, or disable features without any explanation. After all, your users could think there's something fundamentally wrong with your app and may even leave you a negative review on Google Play as a result.
Handling rejection gracefully will vary depending on your app, but it could involve things like returning an empty data set, removing an option from your app's menu, or displaying a pop-up explaining that the user can unlock this feature by granting your app certain permissions.
Testing, Testing and More Testing
Your goal is to deliver a great user experience regardless of what permissions the user chooses to grant or deny. This means you'll want to make sure your app can handle every eventuality and the only way to do this is through testing.
4. App Linking
When you're browsing the internet, clicking a link will often bring up an App Chooser dialogue. While this is useful when you have multiple apps that could handle the linked content, this additional step often isn't necessary, particularly when you only have one app that can handle the content in question.
In the upcoming M release, Android's built-in app linking is getting an upgrade that aims to remove this often-unnecessary App Chooser step by automatically associating apps with web domains.
For example, imagine you clicked a link to a Twitter profile in your Google search results. In Android M, the system checks whether any of your apps can handle this Twitter URL and have auto-linking enabled. Android will then launch the official Twitter app without displaying the App Chooser dialogue (assuming you have Twitter installed on your device).
This is good news if you own a web domain that relates to your app. Once you've associated your website with your application, whenever a user clicks any link to your website, the operating system will automatically launch your app instead of displaying the App Chooser dialogue. This not only helps you deliver a more seamless user experience, but it keeps driving the user back towards your app, rather than giving them the option of using a competing third-party app or a web browser.
How Do I Establish App Linking?
To establish a link between your app and a web domain your own, you need to host a JSON file at the .well-known location on your domain.
If you wanted your app to automatically handle the links related to your website (mywebsite.com), you'd need to upload a JSON file to the root of mywebsite.com.
Here's an example of the contents and layout of a statement.json file that states Android should always use your app (myapp) to display content relating to mywebsite.com:
http://<domain>:<optional port>/.well-known/statements.json

[{
    "relation": ["delegate_permission/common.handle_all_urls"],
    "target": {
        "namespace": "android_app",
        "package_name": "<com.mywebsite.myapp>",
        "sha256_cert_fingerprints": ["6C:EC:C5:0E:34:AE....EB:0C:9B"]
    }
}]
The package_name key refers to the the package name you declared in your app's manifest. The value of the sha256_cert_fingerprints key is the public certificate fingerprint (SHA256) of your app's signing certificate.
Note that in the first M developer preview release, this JSON file is verified via the HTTP protocol. In the final M release, it'll be verified over the encrypted HTTPS protocol. Again, this is one of the quirks of working with a developer preview and something you'll want to keep an eye on over subsequent releases.
The final step is telling the Android operating system that it doesn't need to prompt the user for certain types of links. This means adding the android:autoVerify="true" attribute to each <intent-filter> tag in your app's manifest.
<intent-filter android:autoVerify="true">
When the android:autoVerify attribute is present in your app's manifest, the Android operating system verifies these links when the user first installs your app. Essentially, a list of unique hostnames is compiled from the <intent-filter> tags in the package, and Android M's new Intent Filter Verifier component attempts to fetch the JSON file from each hostname. These JSON files are then checked against the application ID and the certificate of the installed package, and Android's package manager stores the result.
Of course, if this verification fails then app link behavior will not be available to your app. But assuming verification is successful, Android M will automatically launch your app whenever the user clicks on any link related to your web domain.
Conclusion
In this tutorial, we've looked at how app linking, the new permissions model, and the Data Binding library will function in Android M. We've also seen how you can start experimenting with these new features today by setting up the Android M developer preview in Android Studio 1.3 beta or higher.
For more information about Android M, check out Google's official documentation. Here you'll find more information about the new features, a testing guide and, if you want to get some hands-on experience with Android M from the user's perspective, you'll find system images that you can flash to your Android device.


Comments