In this tutorial we will go from asking "What is Flixel?" to having an indoor room and a keyboard-controlled character in the top-down role playing game style (think Zelda).
Final Result Preview
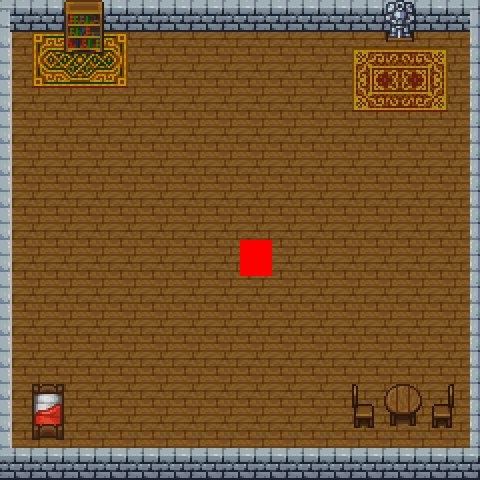
Let's take a look at the final result we will be working towards:
Step 1: Understanding the Project Structure
For the visual people among us, let's see how everything will be organized so the rest will make sense.
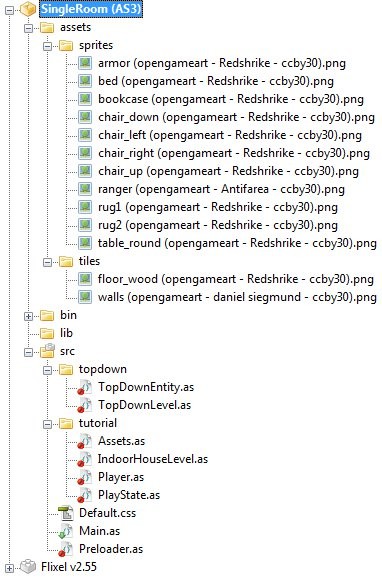
Basically, we have all of our artwork stored in the assets folder and all of our ActionScript files stored in the src folder. If you want to use this tutorial as the basis for your own game engine, the topdown folder contains the generic stuff (a.k.a. the engine) and the tutorial folder shows how to use it.
You'll probably notice rather quickly that the art files have really long names. Rather than showing you a tutorial filled with compelling red boxes (the apex of my artistic ability), we will use some open source artwork from OpenGameArt. Each file is named to show the source, the artist, and the license. So, for example, armor (opengameart - Redshrike - ccby30).png means it's an image of armor, downloaded from OpenGameArt, created by the artist known as Redshrike, and it uses the CC-BY-30 license (Creative Commons Attribution).
Long story short - these art files can be used for any purpose as long as we link back to the site and give credit to the artist.
Here's a description of each source file in the project:
-
topdown/TopDownEntity.as- base class for any moveable sprites in our top-down RPG -
topdown/TopDownLevel.as- base class for a top-down RPG level -
tutorial/Assets.as- imports any images that we need to use in this tutorial -
tutorial/IndoorHouseLevel.as- defines an indoor room with some objects lying around -
tutorial/Player.as- a keyboard-controlled, animated Ranger -
tutorial/PlayState.as- Flixel state that controls our game -
Default.css- an empty file needed to prevent the Flex compiler from giving us a warning -
Main.as- entry point for the application -
Preloader.as- Flixel preloader
Now let's get down to business!
Step 2: Firing Up Flixel
Flixel is a 2D game engine for ActionScript 3. To quote the home page:
Flixel is an open source game-making library that is completely free for personal or commercial use.
The most important thing to know about Flixel is that it is designed to use bitmap images (raster graphics) instead of Flash-style vector graphics. You can use Flash movie clips, but it takes a little massaging. Since I don't feel like giving a massage today, we will be using images for all our art.
Flixel comes with a tool that creates a dummy project for you. This tool creates the three files that are in the root of our project: Default.css, Main.as, and Preloader.as. These three files form the basis for almost any project in Flixel. Since Default.css is just there to avoid a compiler warning, let's take a look at Main.as.
package
{
	import org.flixel.*;
	import tutorial.*;

	[SWF(width="480", height="480", backgroundColor="#ffffff")]
	[Frame(factoryClass="Preloader")]
	public class Main extends FlxGame
	{
		/**
		 * Constructor
		 */
		public function Main() {
			super(240, 240, PlayState, 2);
		}
	}
}
There are only three lines of importance here. First off, we tell Flash to use a 480x480 window with a white background. Then we tell Flash to use our Preloader class while loading. Finally, we tell Flixel to use a 240x240 window (zooming in by a factor of 2 to make things look bigger) and to use PlayState once everything is ready to go.
Let me share a quick word about Flixel's states. In Flixel, states are kind of like a window, but you can only have one at a time. So, for example, you could have a state for your game's main menu (MainMenu), and when a user clicks the Start Game button you switch to PlayState. Since we want our game to just get going immediately, we just need one state (PlayState).
Next up is Preloader.as.
package
{
	import org.flixel.system.FlxPreloader;

	public class Preloader extends FlxPreloader
	{
		/**
		 * Constructor
		 */
		public function Preloader():void {
			className = "Main";
			super();
		}
	}
}
Not much to see here. Since we extend from FlxPreloader, Flixel really just takes care of it. The only thing to note is that if you changed Main to some other name, you would have to change className here on the highlighted line.
We're almost up to seeing something on the screen now. All we need is a Flixel state to get the ball rolling, so here's PlayState.as.
package tutorial
{
	import org.flixel.*;

	/**
	 * State for actually playing the game
	 * @author Cody Sandahl
	 */
	public class PlayState extends FlxState
	{
		/**
		 * Create state
		 */
		override public function create():void {
			FlxG.mouse.show();
		}
	}
}
If you compiled this code, you'd get a marvelous black screen with a mouse cursor. Never fear, it gets better from here.
Step 3: Creating a Basic Level
Now that we have Flixel up and running, it's time to make a top-down RPG level. I like to give you reusable classes so you can make your own levels, so we'll actually create a generic level class that we can use to make something more interesting later. This is topdown/TopDownLevel.as.
package topdown
{
	import org.flixel.*;
	/**
	 * Base class for all levels
	 * @author Cody Sandahl
	 */
	public class TopDownLevel extends FlxGroup
	{
		/**
		 * Map
		 */
		public var state:FlxState; // state displaying the level
		public var levelSize:FlxPoint; // width and height of level (in pixels)
		public var tileSize:FlxPoint; // default width and height of each tile (in pixels)
		public var numTiles:FlxPoint; // how many tiles are in this level (width and height)
		public var floorGroup:FlxGroup; // floor (rendered beneath the walls - no collisions)
		public var wallGroup:FlxGroup; // all the map blocks (with collisions)
		public var guiGroup:FlxGroup; // gui elements

		/**
		 * Player
		 */
		public var player:TopDownEntity;
		public var playerStart:FlxPoint = new FlxPoint(120, 120);

		/**
		 * Constructor
		 * @param	state		State displaying the level
		 * @param	levelSize	Width and height of level (in pixels)
		 * @param	blockSize	Default width and height of each tile (in pixels)
		 */
		public function TopDownLevel(state:FlxState, levelSize:FlxPoint, tileSize:FlxPoint):void {
			super();
			this.state = state;
			this.levelSize = levelSize;
			this.tileSize = tileSize;
			if (levelSize && tileSize)
				this.numTiles = new FlxPoint(Math.floor(levelSize.x / tileSize.x), Math.floor(levelSize.y / tileSize.y));
			// setup groups
			this.floorGroup = new FlxGroup();
			this.wallGroup = new FlxGroup();
			this.guiGroup = new FlxGroup();
			// create the level
			this.create();
		}

		/**
		 * Create the whole level, including all sprites, maps, blocks, etc
		 */
		public function create():void {
			createMap();
			createPlayer();
			createGUI();
			addGroups();
			createCamera();
		}

		/**
		 * Create the map (walls, decals, etc)
		 */
		protected function createMap():void {
		}

		/**
		 * Create the player, bullets, etc
		 */
		protected function createPlayer():void {
			player = new TopDownEntity(playerStart.x, playerStart.y);
		}

		/**
		 * Create text, buttons, indicators, etc
		 */
		protected function createGUI():void {
		}

		/**
		 * Decide the order of the groups. They are rendered in the order they're added, so last added is always on top.
		 */
		protected function addGroups():void {
			add(floorGroup);
			add(wallGroup);
			add(player);
			add(guiGroup);
		}

		/**
		 * Create the default camera for this level
		 */
		protected function createCamera():void {
			FlxG.worldBounds = new FlxRect(0, 0, levelSize.x, levelSize.y);
			FlxG.camera.setBounds(0, 0, levelSize.x, levelSize.y, true);
			FlxG.camera.follow(player, FlxCamera.STYLE_TOPDOWN);
		}

		/**
		 * Update each timestep
		 */
		override public function update():void {
			super.update();
			FlxG.collide(wallGroup, player);
		}
	}
}
All of the variables have their own descriptions in the source code, so I won't bore you with too much repetition. I should, however, explain groups in Flixel.
We have three groups defined here: floorGroup, wallGroup, and guiGroup. Flixel uses groups to determine in what order to render sprites (to decide what's on top when they overlap) and to handle collisions. We want the player to be able to walk around on a floor (no collisions needed), but we also want walls and objects (collisions definitely needed) so we need two groups. We also need a separate group for our user interface (guiGroup) so we can make sure it gets rendered on top of everything else.
Groups are rendered in the order they are added, which is determined in our addGroups() function. Since we want guiGroup to always be on top, we call add(guiGroup) after all the other groups. If you make your own groups and forget to call add(), they won't show up on the screen.
In our constructor, we store some useful values (like the number of tiles in the level) and call create(). The create() function shows you what goes into a Flixel level - a map, a player, an interface, groups (to control rendering order and collisions), and a camera view. Each of these gets its own function to help keep things more readable and so we can re-use common functionality. For instance, take a look at createCamera().
/**
 * Create the default camera for this level
 */
protected function createCamera():void {
    FlxG.worldBounds = new FlxRect(0, 0, levelSize.x, levelSize.y);
    FlxG.camera.setBounds(0, 0, levelSize.x, levelSize.y, true);
    FlxG.camera.follow(player, FlxCamera.STYLE_TOPDOWN);
}
We won't need to change this function to make our own indoor level. Flixel has a built-in camera for top-down games (FlxCamera.STYLE_TOPDOWN). All we're really doing here is telling the camera not to leave the level (by calling setBounds()) and telling the camera to follow the player (by calling follow()) if the level is bigger than the screen and requires scrolling. This will work for almost every kind of level, so we can keep it here rather than re-coding this for each of our levels.
The only other thing to notice is in update().
/**
 * Update each timestep
 */
override public function update():void {
    super.update();
    FlxG.collide(wallGroup, player);
}
FlxG.collide(wallGroup, player) causes the player to bump into walls rather than walking through them. Since we don't call FlxG.collide(floorGroup, player), the player can walk all over the floors with nary a collision in sight (same thing for guiGroup, too).
Finally, we need to make PlayState use our fancy level.
package tutorial
{
	import org.flixel.*;
	import topdown.*;

	/**
	 * State for actually playing the game
	 * @author Cody Sandahl
	 */
	public class PlayState extends FlxState
	{
		/**
		 * Constants
		 */
		public static var LEVEL_SIZE:FlxPoint = new FlxPoint(240, 240); // level size (in pixels)
		public static var BLOCK_SIZE:FlxPoint = new FlxPoint(16, 16); // block size (in pixels)

		/**
		 * Current level
		 * NOTE: "public static" allows us to get info about the level from other classes
		 */
		public static var LEVEL:TopDownLevel = null;

		/**
		 * Create state
		 */
		override public function create():void {
			FlxG.mouse.show();
			// load level
			LEVEL = new TopDownLevel(this, LEVEL_SIZE, BLOCK_SIZE);
			this.add(LEVEL);
		}
	}
}
Remember to call this.add(LEVEL) unless you want to stare at a black screen forever. As the comment states, I used public static var LEVEL as a convenience for the future. Suppose you add some artificial intelligence to your game and your AI needs to know where the player is located; this way, you can call PlayState.LEVEL.player and keep things nice and easy. It's not necessarily the prettiest way to do things, but it'll get the job done if used sparingly.
Step 4: Creating a Basic Entity
An entity is something that needs to be displayed and can move around. This could be the player, a computer-controlled character, or perhaps even something like an arrow. Since there can be many entities on a level, we want a generic class that we can use to save ourselves some time. Take a look at topdown/TopDownEntity.as.
package topdown
{
	import org.flixel.*;

	/**
	 * A moveable object in the game (player, enemy, NPC, etc)
	 * @author Cody Sandahl
	 */
	public class TopDownEntity extends FlxSprite
	{
		/**
		 * Constants
		 */
		public static const SIZE:FlxPoint = new FlxPoint(16, 18); // size in pixels

		/**
		 * Constructor
		 * @param	X	X location of the entity
		 * @param	Y	Y location of the entity
		 */
		public function TopDownEntity(X:Number = 100, Y:Number = 100):void {
			super(X, Y);
			makeGraphic(SIZE.x, SIZE.y, 0xFFFF0000); // use this if you want a generic box graphic by default
		}
	}
}
Notice that we extend from FlxSprite. This gives us access to much of the power behind Flixel. makeGraphic() creates a rectangular bitmap of the given size (16x18 in this case), using the color you pass in. This color is in 0xAARRGGBB format, so 0xFFFF0000 means we're creating a solid red box (I warned you about my artistic abilities). You can mess around with this value to see how the color changes. In fact, we now have something other than a blank screen!
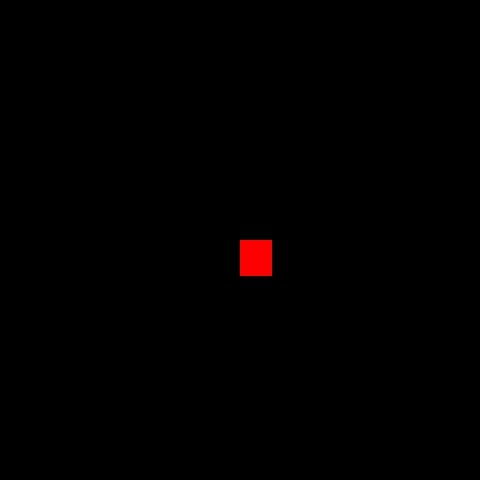
Still not too exciting, but at least we can see something, right?
Step 5: Creating an Indoor Room
I don't know about you, but I'm tired of looking at that black background. Let's make it look like a room. Here's tutorial/IndoorHouseLevel.as.
package tutorial
{
	import org.flixel.*;
	import topdown.*;

	/**
	 * A basic indoor scene
	 * @author Cody Sandahl
	 */
	public class IndoorHouseLevel extends TopDownLevel
	{
		/**
		 * Floor layer
		 */
		protected static var FLOORS:Array = new Array(
			0, 0, 0, 0, 0, 0, 0, 0, 0, 0, 0, 0, 0, 0, 0,
			0, 0, 0, 0, 0, 0, 0, 0, 0, 0, 0, 0, 0, 0, 0,
			0, 0, 0, 0, 0, 0, 0, 0, 0, 0, 0, 0, 0, 0, 0,
			0, 0, 0, 0, 0, 0, 0, 0, 0, 0, 0, 0, 0, 0, 0,
			0, 0, 0, 0, 0, 0, 0, 0, 0, 0, 0, 0, 0, 0, 0,
			0, 0, 0, 0, 0, 0, 0, 0, 0, 0, 0, 0, 0, 0, 0,
			0, 0, 0, 0, 0, 0, 0, 0, 0, 0, 0, 0, 0, 0, 0,
			0, 0, 0, 0, 0, 0, 0, 0, 0, 0, 0, 0, 0, 0, 0,
			0, 0, 0, 0, 0, 0, 0, 0, 0, 0, 0, 0, 0, 0, 0,
			0, 0, 0, 0, 0, 0, 0, 0, 0, 0, 0, 0, 0, 0, 0,
			0, 0, 0, 0, 0, 0, 0, 0, 0, 0, 0, 0, 0, 0, 0,
			0, 0, 0, 0, 0, 0, 0, 0, 0, 0, 0, 0, 0, 0, 0,
			0, 0, 0, 0, 0, 0, 0, 0, 0, 0, 0, 0, 0, 0, 0,
			0, 0, 0, 0, 0, 0, 0, 0, 0, 0, 0, 0, 0, 0, 0,
			0, 0, 0, 0, 0, 0, 0, 0, 0, 0, 0, 0, 0, 0, 0
		);

		/**
		 * Wall layer
		 */
		protected static var WALLS:Array = new Array(
			1, 2, 2, 2, 2, 2, 2, 2, 2, 2, 2, 2, 2, 2, 3,
			6, 0, 0, 0, 0, 0, 0, 0, 0, 0, 0, 0, 0, 0, 8,
			6, 0, 0, 0, 0, 0, 0, 0, 0, 0, 0, 0, 0, 0, 8,
			6, 0, 0, 0, 0, 0, 0, 0, 0, 0, 0, 0, 0, 0, 8,
			6, 0, 0, 0, 0, 0, 0, 0, 0, 0, 0, 0, 0, 0, 8,
			6, 0, 0, 0, 0, 0, 0, 0, 0, 0, 0, 0, 0, 0, 8,
			6, 0, 0, 0, 0, 0, 0, 0, 0, 0, 0, 0, 0, 0, 8,
			6, 0, 0, 0, 0, 0, 0, 0, 0, 0, 0, 0, 0, 0, 8,
			6, 0, 0, 0, 0, 0, 0, 0, 0, 0, 0, 0, 0, 0, 8,
			6, 0, 0, 0, 0, 0, 0, 0, 0, 0, 0, 0, 0, 0, 8,
			6, 0, 0, 0, 0, 0, 0, 0, 0, 0, 0, 0, 0, 0, 8,
			6, 0, 0, 0, 0, 0, 0, 0, 0, 0, 0, 0, 0, 0, 8,
			6, 0, 0, 0, 0, 0, 0, 0, 0, 0, 0, 0, 0, 0, 8,
			6, 0, 0, 0, 0, 0, 0, 0, 0, 0, 0, 0, 0, 0, 8,
			2, 2, 2, 2, 2, 2, 2, 2, 2, 2, 2, 2, 2, 2, 2
		);

		/**
		 * Constructor
		 * @param	state		State displaying the level
		 * @param	levelSize	Width and height of level (in pixels)
		 * @param	blockSize	Default width and height of each tile (in pixels)
		 */
		public function IndoorHouseLevel(state:FlxState, levelSize:FlxPoint, blockSize:FlxPoint):void {
			super(state, levelSize, blockSize);
		}

		/**
		 * Create the map (walls, decals, etc)
		 */
		override protected function createMap():void {
			var tiles:FlxTilemap;
			// floors
			tiles = new FlxTilemap();
			tiles.loadMap(
				FlxTilemap.arrayToCSV(FLOORS, 15), // convert our array of tile indices to a format flixel understands
				Assets.FLOORS_TILE, // image to use
				tileSize.x, // width of each tile (in pixels)
				tileSize.y, // height of each tile (in pixels)
				0, // don't use auto tiling (needed so we can change the rest of these values)
				0, // starting index for our tileset (0 = include everything in the image)
				0, // starting index for drawing our tileset (0 = every tile is drawn)
				uint.MAX_VALUE // which tiles allow collisions by default (uint.MAX_VALUE = no collisions)
			);
			floorGroup.add(tiles);
			// walls
			// FFV: make left/right walls' use custom collision rects
			tiles = new FlxTilemap();
			tiles.loadMap(
				FlxTilemap.arrayToCSV(WALLS, 15), // convert our array of tile indices to a format flixel understands
				Assets.WALLS_TILE, // image to use
				tileSize.x, // width of each tile (in pixels)
				tileSize.y // height of each tile (in pixels)
			);
			wallGroup.add(tiles);
		}
	}
}
The first thing you notice are those two giant arrays of numbers, FLOORS and WALLS. These arrays define our map layers. The numbers are tile indices based on the artwork we're using. I've zoomed in on the image we're using for our walls to show you what I'm talking about.
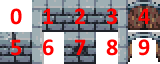
Notice that zero is blank (draw nothing). The floor image, on the other hand, is just one tile, repeated, at the moment. That means we want to draw every tile (including zero). So if you look at the createMap() function, our code to load in the floor is longer than our code to load in the walls.
We start with FlxTilemap.arrayToCSV(FLOORS, 15), which converts our big array into a format Flixel likes (CSV). The number at the end tells Flixel how many values are in each row. Next we tell Flixel which image to use (Assets.FLOORS_TILE - I'll explain what that's about in the next step). After defining the size of each block in the image, we have four more values for our floor than for our walls. Since we want all the tiles (including zero) drawn for our floor, we need to pass in these extra values.
The only one that's a little weird is the last: uint.MAX_VALUE. Every tile number (zero through the number of tiles in our image) that is above the number passed at this parameter will be marked for collisions. Everything below this number will ignore collisions by default. So, if you had a wall that the player could walk through, you could put it at the end of your image (a high index) and use this value to have Flixel ignore collisions. Since we never want any collisions to happen with the floor, we use uint.MAX_VALUE because every tile index will be below this value and will therefore not have collisions.
Finally, we have to remember to add our tilemaps to a group or they won't show up on the screen. Before we can run the project, though, we need to load in our artwork.
Step 6: Loading Assets
Since we're using images, we need to let Flash know about them. One of the more straightforward ways to do this is by embedding them in your SWF. Here's how we're doing that in this project (found in tutorial/Assets.as).
package tutorial
{
	import flash.utils.ByteArray;
	/**
	 * Embeds and imports all assets for the game
	 * @author Cody Sandahl
	 */
	public class Assets
	{
		// sprites
		[Embed(source = "../../assets/sprites/ranger (opengameart - Antifarea - ccby30).png")] public static var RANGER_SPRITE:Class;
		[Embed(source = "../../assets/sprites/rug1 (opengameart - Redshrike - ccby30).png")] public static var RUG1_SPRITE:Class;
		[Embed(source = "../../assets/sprites/rug2 (opengameart - Redshrike - ccby30).png")] public static var RUG2_SPRITE:Class;
		[Embed(source = "../../assets/sprites/bookcase (opengameart - Redshrike - ccby30).png")] public static var BOOKCASE_SPRITE:Class;
		[Embed(source = "../../assets/sprites/chair_down (opengameart - Redshrike - ccby30).png")] public static var CHAIRDOWN_SPRITE:Class;
		[Embed(source = "../../assets/sprites/chair_left (opengameart - Redshrike - ccby30).png")] public static var CHAIRLEFT_SPRITE:Class;
		[Embed(source = "../../assets/sprites/chair_right (opengameart - Redshrike - ccby30).png")] public static var CHAIRRIGHT_SPRITE:Class;
		[Embed(source = "../../assets/sprites/chair_up (opengameart - Redshrike - ccby30).png")] public static var CHAIRUP_SPRITE:Class;
		[Embed(source = "../../assets/sprites/table_round (opengameart - Redshrike - ccby30).png")] public static var TABLEROUND_SPRITE:Class;
		[Embed(source = "../../assets/sprites/armor (opengameart - Redshrike - ccby30).png")] public static var ARMOR_SPRITE:Class;
		[Embed(source = "../../assets/sprites/bed (opengameart - Redshrike - ccby30).png")] public static var BED_SPRITE:Class;

		// tiles
		[Embed(source = "../../assets/tiles/walls (opengameart - daniel siegmund - ccby30).png")] public static var WALLS_TILE:Class;
		[Embed(source = "../../assets/tiles/floor_wood (opengameart - Redshrike - ccby30).png")] public static var FLOORS_TILE:Class;
	}
}
I'm giving you all the artwork at once, because it's not all that complicated once you get the hang of it. Let's take a look at the highlighted lines. Here we are loading in two images: one for our walls and one for our floor. If you remember in the last step, we told Flixel to use Assets.WALLS_TILE and Assets.FLOORS_TILE when loading in the map layers. This is where we define those variables.
Notice that we use a path relative to the Assets.as file. You can also embed things like XML files, SWF files, and a ton of other assets. All we need, however, are images. For more information on embedding assets in Flash, check out this article from the Nightspade blog.
Now that we have our images embedded and accessible, we can tell PlayState.as to use our newfangled level.
/**
 * Create state
 */
override public function create():void {
    FlxG.mouse.show();
    // load level
    LEVEL = new IndoorHouseLevel(this, LEVEL_SIZE, BLOCK_SIZE);
    this.add(LEVEL);
}
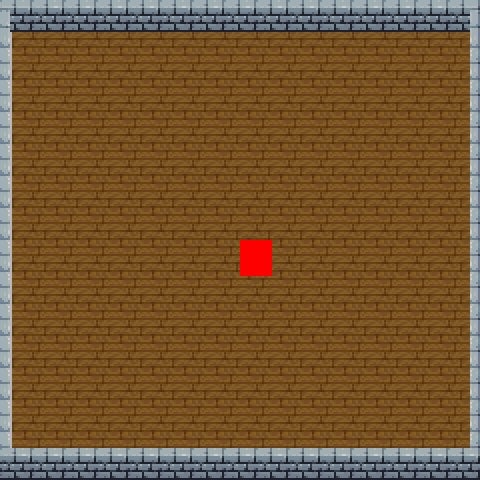
We changed the highlighted line from using TopDownLevel to using our new IndoorHouseLevel. Now if you run the project you should see something that looks a bit more like a room.
Step 7: Adding Objects and Eye Candy
It might be a room, but it's a boring room. Let's spruce it up a bit with some furniture. First, we need some more groups and some variables inside IndoorHouseLevel.
/**
 * Custom groups
 */
protected var decalGroup:FlxGroup; // extra decorative elements (no collisions)
protected var objectGroup:FlxGroup; // objects and obstacles (with collisions)

/**
 * Game objects
 */
protected var bookcase:FlxSprite;
protected var armor:FlxSprite;
protected var table:FlxSprite;
protected var bed:FlxSprite;
decalGroup will allow us to add some rugs (purely visual eye candy), while objectGroup will allow us to add some furniture that will get in the player's way. The other variables are the pieces of furniture we will be adding in a moment.
Next, we need to add these objects to the level. We're adding the highlighted line and everything beneath it.
/**
 * Create the map (walls, decals, etc)
 */
override protected function createMap():void {
    var tiles:FlxTilemap;
    // floors
    tiles = new FlxTilemap();
    tiles.loadMap(
        FlxTilemap.arrayToCSV(FLOORS, 15), // convert our array of tile indices to a format flixel understands
        Assets.FLOORS_TILE, // image to use
        tileSize.x, // width of each tile (in pixels)
        tileSize.y, // height of each tile (in pixels)
        0, // don't use auto tiling (needed so we can change the rest of these values)
        0, // starting index for our tileset (0 = include everything in the image)
        0, // starting index for drawing our tileset (0 = every tile is drawn)
        uint.MAX_VALUE // which tiles allow collisions by default (uint.MAX_VALUE = no collisions)
    );
    floorGroup.add(tiles);
    // walls
    // FFV: make left/right walls' use custom collision rects
    tiles = new FlxTilemap();
    tiles.loadMap(
        FlxTilemap.arrayToCSV(WALLS, 15), // convert our array of tile indices to a format flixel understands
        Assets.WALLS_TILE, // image to use
        tileSize.x, // width of each tile (in pixels)
        tileSize.y // height of each tile (in pixels)
    );
    wallGroup.add(tiles);
    // objects
    createObjects();
}

/**
 * Add all the objects, obstacles, etc to the level
 */
protected function createObjects():void {
    var sprite:FlxSprite;
    // create custom groups
    decalGroup = new FlxGroup();
    objectGroup = new FlxGroup();
    // decals (decorative elements that have no functionality)
    sprite = new FlxSprite(
        16, // x location
        16, // y location
        Assets.RUG1_SPRITE // image to use
    );
    decalGroup.add(sprite);

    sprite = new FlxSprite(
        11 * tileSize.x, // x location (using tileSize to align it with a tile)
        1.5 * tileSize.y, // y location (showing that you don't need to line up with a tile)
        Assets.RUG2_SPRITE // image to use
    );
    decalGroup.add(sprite);
    // objects and obstacles
    // NOTE: this group gets tested for collisions
    bookcase = new FlxSprite(
        32, // x location
        0, // y location (showing that you can overlap with the walls if you want)
        Assets.BOOKCASE_SPRITE // image to use
    );
    bookcase.immovable = true; // don't allow the player to move this object
    objectGroup.add(bookcase);

    table = new FlxSprite(192, 192, Assets.TABLEROUND_SPRITE);
    table.immovable = true;
    objectGroup.add(table);

    sprite = new FlxSprite(176, 192, Assets.CHAIRRIGHT_SPRITE);
    sprite.immovable = true;
    objectGroup.add(sprite);

    sprite = new FlxSprite(216, 192, Assets.CHAIRLEFT_SPRITE);
    sprite.immovable = true;
    objectGroup.add(sprite);

    armor = new FlxSprite(192, 0, Assets.ARMOR_SPRITE);
    armor.immovable = true;
    objectGroup.add(armor);

    bed = new FlxSprite(16, 192, Assets.BED_SPRITE);
    bed.immovable = true;
    objectGroup.add(bed);
}
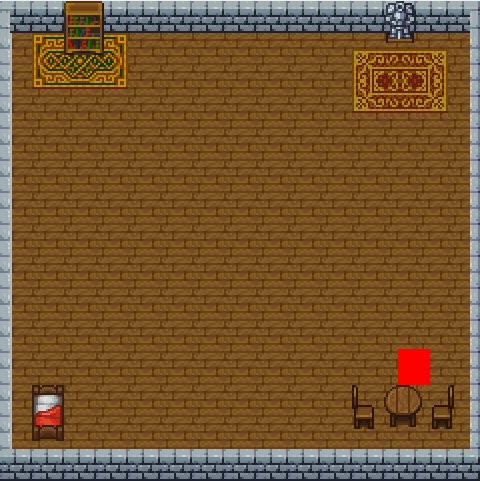
I'm using an extra function, createObjects(), simply to keep things easier to read. The comments explain each individual object, but let me offer a few general observations. First, we always need to remember to call add() for each object or it won't get displayed. In addition, we need to use the right group (mapGroup, floorGroup, decalGroup, objectGroup, etc.) when calling add() or it will mess up our render order and our collision detection.
Also take notice of all the various ways we can decide where to place our objects and decals. We can hard code the values (like we do with the first rug), we can use tileSize to align it with the floor and wall tiles (like we do with the second rug), and we can mix and match to our heart's content. Just know that Flixel won't detect it if we place something off the level or overlapping another object - it assumes we know what we're doing.
Now we need to display our new groups in the right order and handle collisions. Add these functions to the bottom of IndoorHouseLevel.
/**
 * Decide the order of the groups. They are rendered in the order they're added, so last added is always on top.
 */
override protected function addGroups():void {
    add(floorGroup);
    add(wallGroup);
    add(decalGroup);
    add(objectGroup);
    add(player);
    add(guiGroup);
}

/**
 * Update each timestep
 */
override public function update():void {
    super.update(); // NOTE: map -> player collision happens in super.update()
    FlxG.collide(objectGroup, player);
}
Since we want our new groups to render on top of the floors and walls, we need to completely re-do the addGroups() function that we had in TopDownLevel. We also need to add collision detection for our furniture in objectGroup. Once again, since we don't call FlxG.collide() for decalGroup, the player won't be stymied by our imposing rugs. Now our room is looking a little less vacant.
Step 8: Creating Our Player
I keep talking about collisions, but it's hard to collide with an immobile red box. Over the next three steps we will add keyboard controls to our red box before finally making it a proper animated sprite. Let's create tutorial/Player.as.
package tutorial
{
	import org.flixel.*;
	import topdown.*;
	/**
	 * Player-controlled entity
	 * @author Cody Sandahl
	 */
	public class Player extends TopDownEntity
	{
		/**
		 * Constructor
		 * @param	X	X location of the entity
		 * @param	Y	Y location of the entity
		 */
		public function Player(X:Number=100, Y:Number=100):void {
			super(X, Y);
		}
	}
}
This is the skeleton we'll be using to flesh out a more interesting player. Now that we have our custom player, we need to use it in IndoorHouseLevel. Add this function at the end of the class.
/**
 * Create the player
 */
override protected function createPlayer():void {
    player = new Player(playerStart.x, playerStart.y);
}
This changed from using TopDownEntity to using Player. Now let's make this red box move around.
Step 9: Adding Keyboard Controls
Since we might want entities other than Player to be able to move, we're going to add some functionality to TopDownEntity. Here's the new version.
package topdown
{
	import org.flixel.*;

	/**
	 * A moveable object in the game (player, enemy, NPC, etc)
	 * @author Cody Sandahl
	 */
	public class TopDownEntity extends FlxSprite
	{
		/**
		 * Constants
		 */
		public static const SIZE:FlxPoint = new FlxPoint(16, 18); // size in pixels
		public static const RUNSPEED:int = 80;

		/**
		 * Constructor
		 * @param	X	X location of the entity
		 * @param	Y	Y location of the entity
		 */
		public function TopDownEntity(X:Number = 100, Y:Number = 100):void {
			super(X, Y);
			makeGraphic(SIZE.x, SIZE.y, 0xFFFF0000); // use this if you want a generic box graphic by default
			// movement
			maxVelocity = new FlxPoint(RUNSPEED, RUNSPEED);
			drag = new FlxPoint(RUNSPEED * 4, RUNSPEED * 4); // decelerate to a stop within 1/4 of a second
		}

		/**
		 * Update each timestep
		 */
		public override function update():void {
			updateControls();
			super.update();
		}

		/**
		 * Check keyboard/mouse controls
		 */
		protected function updateControls():void {
			acceleration.x = acceleration.y = 0; // no gravity or drag by default
		}

		/**
		 * Move entity left
		 */
		public function moveLeft():void {
			facing = LEFT;
			acceleration.x = -RUNSPEED * 4; // accelerate to top speed in 1/4 of a second
		}

		/**
		 * Move entity right
		 */
		public function moveRight():void {
			facing = RIGHT;
			acceleration.x = RUNSPEED * 4; // accelerate to top speed in 1/4 of a second
		}

		/**
		 * Move entity up
		 */
		public function moveUp():void {
			facing = UP;
			acceleration.y = -RUNSPEED * 4; // accelerate to top speed in 1/4 of a second
		}

		/**
		 * Move playe rdown
		 */
		public function moveDown():void {
			facing = DOWN;
			acceleration.y = RUNSPEED * 4; // accelerate to top speed in 1/4 of a second
		}
	}
}
We've added a new constant, RUNSPEED, that determines how quickly our entities move. Then we set maxVelocity and drag (deceleration) in our constructor. After that, we call updateControls() each frame so we can check for keyboard, mouse, or AI (depending on our needs). Finally, we add some helper functions for moving in each direction. Notice that we update facing in each of these. This is a handy way to know which animation to use later down the line.
Now we need to actually use the keyboard inside Player. Add this function after the constructor.
/**
 * Check for user input to control this entity
 */
override protected function updateControls():void {
    super.updateControls();
    // check keys
    // NOTE: this accounts for someone pressing multiple arrow keys at the same time (even in opposite directions)
    var movement:FlxPoint = new FlxPoint();
    if (FlxG.keys.pressed("LEFT"))
        movement.x -= 1;
    if (FlxG.keys.pressed("RIGHT"))
        movement.x += 1;
    if (FlxG.keys.pressed("UP"))
        movement.y -= 1;
    if (FlxG.keys.pressed("DOWN"))
        movement.y += 1;
    // check final movement direction
    if (movement.x < 0)
        moveLeft();
    else if (movement.x > 0)
        moveRight();
    if (movement.y < 0)
        moveUp();
    else if (movement.y > 0)
        moveDown();
}
So every frame we check what keys are being pressed. Flixel allows us to test keys in different ways. Here we're using pressed(), which is true for as long as the key is being held down. If we used justPressed(), it would only be true immediately after the player presses the key, even if the key is held down after that. That would be reversed if we used justReleased().
As I state in the comments, I want to handle the case where the user is pressing left and right (for example) at the same time by not moving. Incrementing or decrementing movement.x based on which arrow is pressed allows us to do that because movement.x would be zero if both left and right were being pressed.
If you run the project now, you should be able to move the red box around with the arrow keys and see collisions happen between the box, and the walls or furniture (but not the rugs).
You'll probably notice that the box doesn't go all the way over to the left and right walls. This is a more esoteric aspect of Flixel. Flixel uses rather simple collision detection (but allows us to make it more complicated if we want to). Since the images we're using for all the walls are the same size (16x16), Flixel uses 16x16 as the collision size even though most of the left and right wall images are transparent. Fixing that behavior is beyond the scope of this tutorial, but it can be done.
Step 10: Adding Animations
I promised we wouldn't stick with the red box (endearing though it is), so here we go with an animated sprite. Since we probably want the ability to animate future entities, we will be adding the basic functionality to TopDownEntity instead of Player. Here are the new constructor, createAnimations(), and update() functions for TopDownEntity.
/**
 * Constructor
 * @param	X	X location of the entity
 * @param	Y	Y location of the entity
 */
public function TopDownEntity(X:Number = 100, Y:Number = 100):void {
    super(X, Y);
    makeGraphic(SIZE.x, SIZE.y, 0xFFFF0000); // use this if you want a generic box graphic by default
    // movement
    maxVelocity = new FlxPoint(RUNSPEED, RUNSPEED);
    drag = new FlxPoint(RUNSPEED * 4, RUNSPEED * 4); // decelerate to a stop within 1/4 of a second
    // animations
    createAnimations();
}

/**
 * Create the animations for this entity
 * NOTE: these will be different if your art is different
 */
protected function createAnimations():void {
    addAnimation("idle_up", [1]);
    addAnimation("idle_right", [5]);
    addAnimation("idle_down", [9]);
    addAnimation("idle_left", [13]);
    addAnimation("walk_up", [0, 1, 2], 12); // 12 = frames per second for this animation
    addAnimation("walk_right", [4, 5, 6], 12);
    addAnimation("walk_down", [8, 9, 10], 12);
    addAnimation("walk_left", [12, 13, 14], 12);
    addAnimation("attack_up", [16, 17, 18, 19], 12, false); // false = don't loop the animation
    addAnimation("attack_right", [20, 21, 22, 23], 12, false);
    addAnimation("attack_down", [24, 25, 26, 27], 12, false);
    addAnimation("attack_left", [28, 29, 30, 31], 12, false);
}

/**
 * Update each timestep
 */
public override function update():void {
    updateControls();
    updateAnimations();
    super.update();
}
FlxSprite assumes that, if we're animating, we have multiple frames of animation stored in a single image (called a sprite sheet). While our red box doesn't have frames to animate, the artwork we will be using does. If you use artwork that is arranged differently in your own game, you would need to change these frame numbers. Additionally, if you look at the idle animations you'll notice that we need to pass in an array of frame indices even if we only have one.
Here's the ranger sprite sheet we'll be using for our player just so you can see a little more clearly.
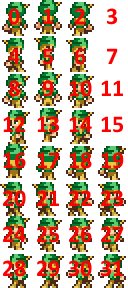
Note that we included some blank frames in the sprite sheet. This was mainly for convenience in editing the animations since our bottom four animations (attacking) have one more frame than our top four animations (walking). Also notice that we are using the middle frame from each of the walking animations as our idle animation.
As long as all of our entities in our game use these same frame numbers, we never have to change the animation code. If our artwork used a different number of frames to animate walking and attacking, we would have updated the frames passed into addAnimation() accordingly. Since the animations are in their own function - createAnimations(), you can also override this function to make some entities have different animations than the rest.
We also made another new function to show the right animation: updateAnimations().
/**
 * Based on current state, show the correct animation
 * FFV: use state machine if it gets more complex than this
 */
protected function updateAnimations():void {
    // use abs() so that we can animate for the dominant motion
    // ex: if we're moving slightly up and largely right, animate right
    var absX:Number = Math.abs(velocity.x);
    var absY:Number = Math.abs(velocity.y);
    // determine facing
    if (velocity.y < 0 && absY >= absX)
        facing = UP;
    else if (velocity.y > 0 && absY >= absX)
        facing = DOWN;
    else if (velocity.x > 0 && absX >= absY)
        facing = RIGHT;
    else if (velocity.x < 0 && absX >= absY)
        facing = LEFT
    // up
    if (facing == UP) {
        if (velocity.y != 0 || velocity.x != 0)
            play("walk_up");
        else
            play("idle_up");
    }
    // down
    else if (facing == DOWN) {
        if (velocity.y != 0 || velocity.x != 0)
            play("walk_down");
        else
            play("idle_down");
    }
    // right
    else if (facing == RIGHT) {
        if (velocity.x != 0)
            play("walk_right");
        else
            play("idle_right");
    }
    // left
    else if (facing == LEFT) {
        if (velocity.x != 0)
            play("walk_left");
        else
            play("idle_left");
    }
}
This is more laborious than it is complicated. Basically we are calculating how much we're moving vertically and horizontally. Whichever has more movement, we use that direction's animation. This would come into play if you are moving at an angle and suddenly bump into something. Whichever direction you can still move in will determine the animation used.
We have only one more thing to do before we can finally put the red box out of its misery. We need to tell Player to use the ranger sprite sheet.
/**
 * Constructor
 * @param	X	X location of the entity
 * @param	Y	Y location of the entity
 */
public function Player(X:Number=100, Y:Number=100):void {
    super(X, Y);
    loadGraphic(
        Assets.RANGER_SPRITE, // image to use
        true, // animated
        false, // don't generate "flipped" images since they're already in the image
        TopDownEntity.SIZE.x, // width of each frame (in pixels)
        TopDownEntity.SIZE.y // height of each frame (in pixels)
    );
}
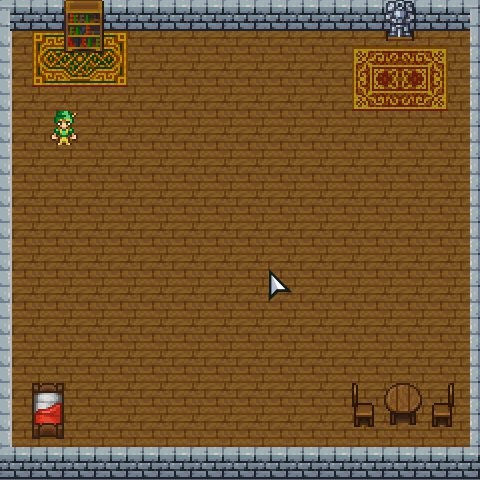
Once again we are going to our Assets class to pull in the image we want. The comments tell you what's going on, but let me tell you a bit about "flipped" images. Instead of generating different animations when travelling left/right and up/down, Flixel can just flip the "right" animation to make it "left" and flip the "up" animation to make it "down" (or vice versa). Our "up" and "down" animations look very different (and we already have the artwork with all the directions), so we tell Flixel not to bother with flipping the animations.
Now we have a true indoor top-down RPG level!
Step 11: Adding a GUI
As a bonus, let's see how to add GUI elements to the screen. We're going to add a simple set of instructions at the top so users know what to do once they load up this level. Let's add a GUI to IndoorHouseLevel.
/**
 * Create text, buttons, indicators, etc
 */
override protected function createGUI():void {
    var instructions:FlxText = new FlxText(0, 0, levelSize.x, "Use ARROW keys to walk around");
    instructions.alignment = "center";
    guiGroup.add(instructions);
}
This adds a text area at the top of the screen that is as wide as the level and uses center alignment. As always, it must be added to the right group for it to show up.
Conclusion
Now you have everything you need to create your own top-down RPG levels. Thank you for sticking with me and go make something fun!

Comments