WordPress ships with the ability to add users, either manually or via registration. This includes the ability to assign various roles and capabilities. But more often than not you don't want users to be exposed to the WordPress backend. In this tutorial I'll show you how to create a custom registration form on the front of your site as well as a custom profile form. Users will also receive custom emails with each step of the registration process. Please note, this tutorial won't be covering membership payments.
Some Background & What We'll Be Covering
We'll be using the TwentyEleven theme where we'll be editing the functions.php and the header.php. Some people might prefer to use BuddyPress for a task like this, and that's cool, but I feel like why have all those features if you're not going to use them.
This is what we'll be doing
- Installing required plugins
- Configuring plugins
- Adapting our menus
- Creating a custom profile page
- Creating a custom registration page
- Creating custom emails for each stage of the registration process
It's kind of a lengthy process so grab a coffee or beer and knuckle down.
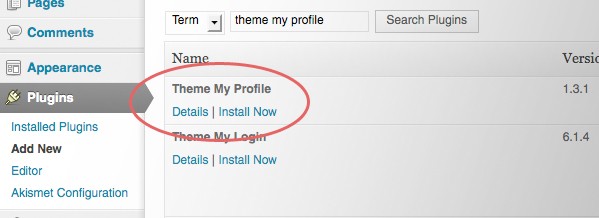
Step 1 Get the Plugins
Okay so first things first, let's get the plugins we need. I'll be adding them using the WordPress interface but if you'd prefer you can use the links below to download and install them manually.
Step 2 Configure
"Make sure you have 'Anyone can register' ticked under General Settings"
Time to configure our plugins, but before that though make sure you have Anyone can register ticked under Settings -> General.
Okay, now onto the plugin configuration, lets start with:
Theme My Login - Basic Setup
Theme My Login creates a "login/logout" page once installed and by default it adds it to your pagelist. For more control let's set it up manually:
- Go to Settings -> Theme My Login and untick the option "Show in Pagelist"
- Click "Save Changes"
- Navigate to Appearance -> Menus and add it to your menu (if your theme supports more than one menu you can put it anywhere)*
*Not sure how to use the menu? Read here
Alright - so now if you jump to the front of your website you'll notice you have a login/logout menu item. It should say "Log Out" as you are logged in. Nice one!
But let's say you don't want it in your menu? No problem, you can remove it from your menu and add it as a widget. Luckily Jeff Farthing (creator of the plugin) has included a nifty widget with loads of options. They are all pretty self-explanatory so I won't go through it. Just head to Appearance -> Widgets and drag the Theme My Login widget to the desired widget area. I prefer it in my menu, but you could have both.
Now lets set up some of the modules.
Theme My Login - Modules Setup
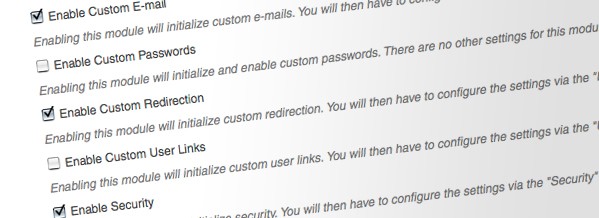
Jump back to Settings -> Theme My Login -> Modules and enable the following:
- Enable Custom E-mail
- Enable Custom Redirection
- Enable Security
- Enable Themed Profiles
- Enable User Moderation
Great. Now let's configure those modules starting with E-mail. Basically you are required to create custom email content for each phase of the membership process (New User, Retrieve Password, Reset Password, User Activation, User Approval, User Denial). Obviously this is up to you what you write, but make sure:
- For the "From E-mail" use something like [email protected]
- You'll want the "E-mail Format" to be Plain Text.
It's a good idea to make use of the email variables – %user_login%, %user_email%, %user_pass% – but don't worry too much about nutting it out perfectly right now. We'll be sending a few tests so you can polish it later.

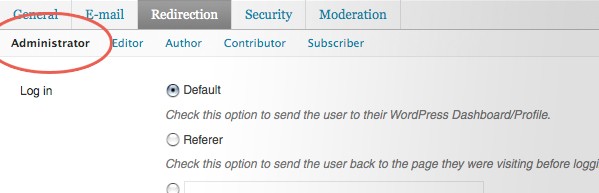
Okay ready for some Redirection magic? As Administrator you'll still want to be taken to the backend/dashboard when you login so you'll want to leave the Administrator role as is (Don't lock yourself out). I want my users to be taken to their profile when they login so I'm going to change all the other roles. So for "Log in":
- Use the "custom location" option and enter something like http://yourdomain/profile
(assuming your permalink structure is /%category%/%postname%/)
and for "Log out":
- I'm putting "Referer". That way when users log out they stay on the page they were on.
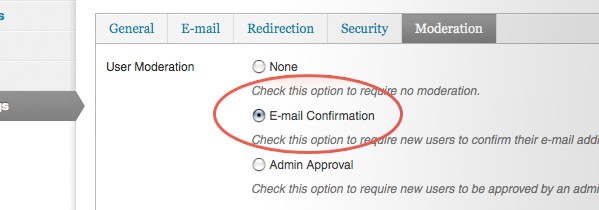
For Security I'm just going to leave as is, but it's worth having a look to see if those settings suit you. Finally Moderation. As we are running a free-to-join site, choose E-mail Confirmation for User Moderation.
Okay let's apply some profile goodness.
Theme My Profile
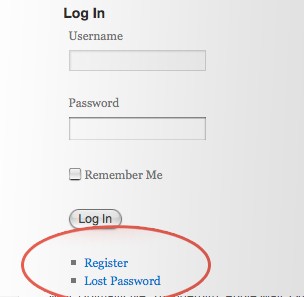
We are going to need a page to house our user profile in so head over to Pages -> Add New. Give your page a title, something like "Profile", and paste this shortcode [theme-my-profile] into the content (make sure you're in the HTML edit mode). Take note of the page ID and publish.
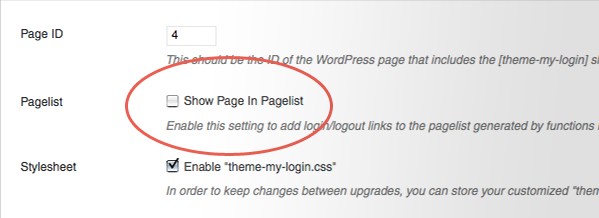
Go to Settings -> Theme My Profile. Apply these settings but please be careful not to lock yourself out of the backend:
- Enter the page ID of the newly created "Profile" page
- Make sure Show in Pagelist "Never" is selected (we're using WP 3 Menus)
- Use theme-my-profile.css is ticked.
- For the template settings check out the image below:
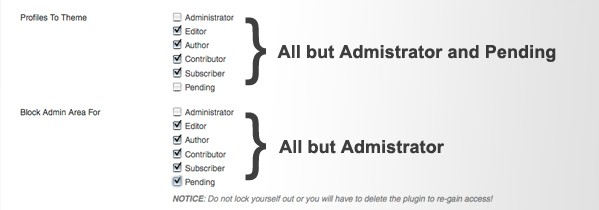
Save the changes.
Step 3 Setting Up the Menus
Basically we will be using two menus: one for signed-in users, and one for signed-out users or non-members. So open your FTP program and download header.php from your theme. We want to add an if statement to the code that sets up the menu. It's line 118 if you are using TwentyEleven.
Replace this:
<?php wp_nav_menu( array( 'theme_location' => 'primary' ) ); ?>
With this:
	  <?php if ( is_user_logged_in() ) { ?>
          <?php wp_nav_menu( array( 'theme_location' => 'user-menu', 'items_wrap' => '<ul id="menu-menu" class="menu">%3$s</ul>', 'container_class' => 'menu-menu-container' ) );?> <!-- sign out -->
      <?php } else { ?>
          <?php wp_nav_menu( array( 'theme_location' => 'main-menu', 'items_wrap' => '<ul id="menu-menu" class="menu">%3$s</ul>', 'container_class' => 'menu-menu-container' ) );?> <!-- sign in -->
      <?php } ?>
If you'd like to, you can read more about wp_nav_menu in the WordPress Codex.
Okay now get the functions.php file and change line 101 in the header.php to reflect the updates.
Replace this:
register_nav_menu( 'primary', __( 'Primary Menu', 'twentyeleven' ) );
With this:
	register_nav_menus(
			array(
				'main-menu' => __( 'Main Menu' ),
				'user-menu' => __( 'User Menu' ),
			)
		);
Now upload those files to your theme directory and jump to the WordPress backend. Let's set up the menus, go to Appearance -> Menus. You should now have two menus available to you: "main menu" and "user menu", activate both.

- Under main menu have "Login" page
- Under user menu have "Login" and "Profile" pages
Save the changes and let's get into some custom email templates.
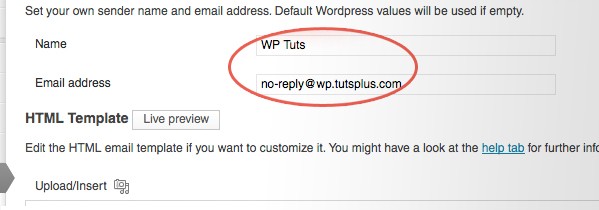
Step 4 WP Better Emails - Setup
Alrighty time to get some custom emails happening so jump to Settings -> WP Better Emails. For the "Name" and "Email address" inputs use something like Blog Name and [email protected]. Okay great, now scroll down and send yourself a preview. Hop over to your email client and you should have a pretty nice looking email waiting for you. Not bad but lets customise it a little. Jump back to WordPress and copy all that HTML and paste it into your favourite text editor. It's really up to you how much you want to edit this. Let's keep it simple and just change the logo. So create an image 500px wide by 100px heigh. Upload it to your server and copy the path.
On line 22 in the HTML replace the %blog_name% with your image, something like this:
<td style="line-height: 32px; padding-left: 30px;" valign="baseline"><span style="font-size: 32px;"><a href="%blog_url%" style="text-decoration: none;" target="_blank"><img src="http://yourdomain.com/wp-content/uploads/email-logo.jpg" /></a></span></td>
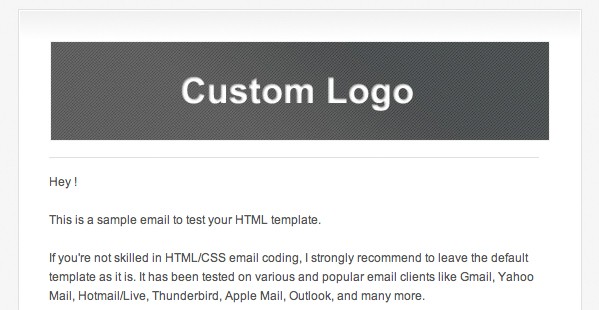
Now send yourself another test and you should have something like this:
Step 5 Custom Registration Page
Things are taking shape, but you have use the register link under the login form to register. Bummer. I want the "register" to be part of my menu. So head over to Appearance -> Menus and add a new menu item to the "main menu" using the "Custom Links" panel. I've called mine "Sign up" and the URL is http://yourdomain.com/login?action=register (assuming your permalinks are set to%category%/%postname%).
Great so now we have a "sign-up" tab that takes people to the registration page. Nice right? But let's say you want to include some custom fields? Like first name, website and postcode.
Theme My Login ships with some template forms. So you can can download the forms wp-content -> plugins -> theme-my-login -> templates and edit them and upload to your theme directory. But let's do it using our functions.php. So download your functions.php and paste this after all the existing code.
/*-----------------------------------------------------------------------------------*/
/*	Adding required fields to the registration page
/*-----------------------------------------------------------------------------------*/

	add_action('register_form','show_this');
	add_action('register_post','check_fields',10,3);
	add_action('user_register', 'register_extra_fields');

	function show_this()
	{
	?>
		<p>
        <label>First name</label>
		<input id="first_name" type="text" size="25" value="<?php echo $_POST['first_name']; ?>" name="first_name" />
        </p>

		<p>
        <label>Website</label>
		<input id="website" type="text" size="25" value="<?php echo $_POST['website']; ?>" name="website" />
        </p>

        <p>
        <label>Postcode</label>
		<input id="postcode" type="text" size="4" value="<?php echo $_POST['postcode']; ?>" name="postcode" />
        </p>

	<?php
	}

	function check_fields ( $login, $email, $errors )
	{
		global $website;
		if ( $_POST['first_name'] == '' )
		{
			$errors->add( 'empty_realname', "<strong>ERROR</strong>: Please enter the name of your first name" );
		}
		else
		{
			$website = $_POST['first_name'];
		}

		global $website;
		if ( $_POST['website'] == '' )
		{
			$errors->add( 'empty_realname', "<strong>ERROR</strong>: Please enter the name of your website" );
		}
		else
		{
			$website = $_POST['website'];
		}

		global $postcode;
		if ( $_POST['postcode'] == '' )
		{
			$errors->add( 'empty_realname', "<strong>ERROR</strong>: Please enter your postcode" );
		}
		else
		{
			$postcode = $_POST['postcode'];
		}
	}

	function register_extra_fields ( $user_id, $password = "", $meta = array() )
	{
		update_user_meta( $user_id, 'first_name', $_POST['first_name'] );
		update_user_meta( $user_id, 'website', $_POST['website'] );
		update_user_meta( $user_id, 'postcode', $_POST['postcode'] );
	}
Okay so you might want to edit that to suit you. Here's a basic breakdown:
- The first function (
show_this) says insert the following fields into the form - The second function (
check_fields) checks if the fields are filled in and spits out errors if necessary (basic validation) - The third function (
register_extra_fields) updates the user's data - as well as the user's profile
And for a bonus let's change the word "register" to "join":
/*-----------------------------------------------------------------------------------*/
/*	Change 'register' to 'join'
/*-----------------------------------------------------------------------------------*/

	function tml_title_filter( $title, $action ) {
	if ( $action == 'register' )
		return __( 'join' );
	return $title;
	}
	add_filter( 'tml_title', 'tml_title_filter', 10, 2 );
Step 6 Custom Profile Page
Like most people it baffles me why WordPress has stuff like AIM and Jabber in the profile fields... so lets get rid of them! Paste the following code under your current functions.php code.
/*-----------------------------------------------------------------------------------*/
/*	Reomve feilds from profile
/*-----------------------------------------------------------------------------------*/
	function extra_contact_info($contactmethods) {
		unset($contactmethods['aim']);
		unset($contactmethods['yim']);
		unset($contactmethods['jabber']);

		$contactmethods['postcode'] = 'Post code (required)';

		return $contactmethods;
	}
	add_filter('user_contactmethods', 'extra_contact_info');

Step 7 Test & Style
Alright, alright alright! (Kevin Hart style) Let's test this! Logout of WordPress and hop to the front of your site. Click "sign-up" and go through the process.
Take note of any changes you need to make, for example, email template messages, etc. then apply them and re-test until you are happy.
Now you might want to style it up a bit, and luckily it's easy using some appropriately named stylesheets uploaded to your theme directory. You can download these to get you started using the "Download Source Files" link at the top of this tutorial.
Using these style sheets will make sure your CSS isn't overwritten when your theme updates.
Step 8 One More Thing
One last thing, the admin bar, let's banish it for good. Add the code below to your functions.php.
/*-----------------------------------------------------------------------------------*/
/*   Disable admin bar for all
/*-----------------------------------------------------------------------------------*/
show_admin_bar(false);
Conclusion
So you can see it's pretty easy to pull the membership process to the front of your website. This method is extremely flexible, the plugin configuration used in this tutorial may differ to suit your needs. It's also fairly easy to have member specific content (try using wp-members). I've had success using this in commercial projects.
Please leave any feedback, or if you have suggestions I'd love to hear them, in the comments below.

Comments