Whoops is a small library, available as a Composer package, that helps you handle errors and exceptions across your PHP projects.
Out of the box, you get a sleek, intuitive and informative error page each time something goes pants-up in your application. Even better, under all that is a very straight-forward, but flexible, toolset for dealing with errors in a way that makes sense for whatever it is that you're doing.
The library's main features are:
- Detailed and intuitive page for errors and exceptions
- Code view for all frames
- Focus on error/exception analysis through the use of custom, simple middle-ware/handlers
- Support for JSON and AJAX requests
- Included providers for Silex and Zend projects through the bundled providers, and included as part of the Laravel 4 core
- Clean, compact, and tested code-base, with no extra dependencies
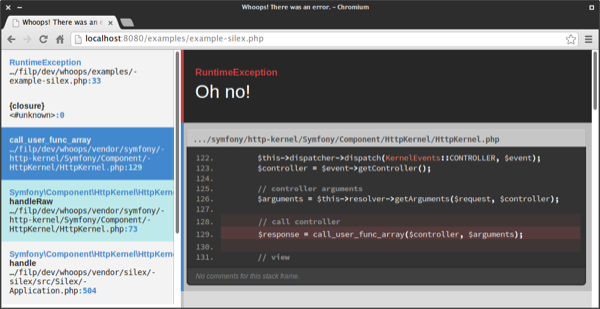
Whoops achieves this through a system of stacked handlers. You tell Whoops which handlers you want to use (you can choose from the included handlers or make your own), and if something happens, all the handlers are given, in order, a chance do to something - this can be anything from analyzing the error (Whoops makes it easier to extract meaningful information from an error or exception), to displaying helpful error screens (like the built-in PrettyPageHandler, which gives you the cool looking page pictured above).
Let's give it a try, first, by looking at the basics, and then by having a go at building our own handler with Whoops and the Laravel framework. For this short guide, I'll assume that you're moderately comfortable with PHP, and that you've heard of Composer. If this is not the case, read-up on it here at Nettuts+.
Installing Whoops
Create a directory for your project, change into it, create a composer.json file with the Whoops requirement, and install it. Whoops (as of version 1.0.5) has no dependencies, so this will only take a second.
$ cd /path/to/your/project
$ composer require filp/whoops 1.*
$ composer install
Using Whoops: The Basics
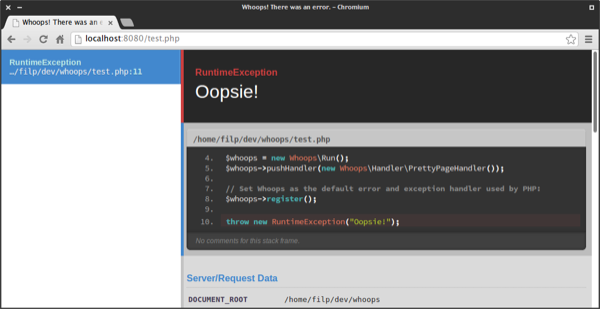
To see that sleek error page in action, let's setup Whoops and ensure that something breaks by throwing an exception within our code. Create a file within your project's directory; for this guide, let's say that it's called, index.php.
$ cd /path/to/your/project
$ your-favorite-editor index.php
Because we installed Whoops with Composer, and it is PSR-0 compliant, all we need to do is require the Composer autoloader and we're ready to start using the library within our own code!
<?php
# index.php
require __DIR__ . "/vendor/autoload.php";

$whoops = new Whoops\Run();
$whoops->pushHandler(new Whoops\Handler\PrettyPageHandler());

// Set Whoops as the default error and exception handler used by PHP:
$whoops->register();

throw new RuntimeException("Oopsie!");
?>
If you already have a web-server running, go ahead and access the file that you just created. Don't forget: if you're using PHP 5.4, you can leverage the built-in development server, like so:
$ cd /path/to/your/project
$ php -S localhost:8080
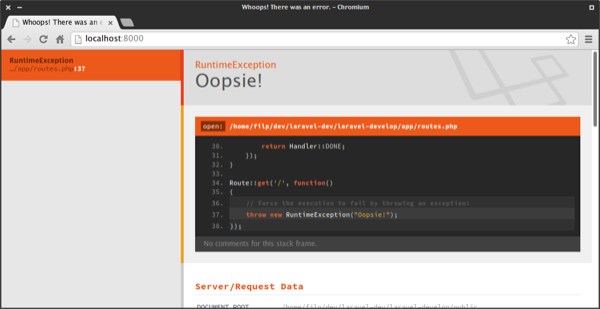
This is what you'll get:
Pretty neat, right? Handlers, themselves, can expose options to modify or augment their behavior. For example, among other things, you can set the title of the default error page, and even insert extra information:
<?php
# index.php
$whoops = new Whoops\Run();

// Configure the PrettyPageHandler:
$errorPage = new Whoops\Handler\PrettyPageHandler();

$errorPage->setPageTitle("It's broken!"); // Set the page's title
$errorPage->setEditor("sublime");         // Set the editor used for the "Open" link
$errorPage->addDataTable("Extra Info", array(
      "stuff"     => 123,
      "foo"       => "bar",
      "useful-id" => "baloney"
));

$whoops->pushHandler($errorPage);
$whoops->register();

throw new RuntimeException("Oopsie!");
?>
Also, since this is simply a regular Whoops handler, we can mix-and-match with other handlers to achieve more dynamic results. Let's imagine that you're working on an AJAX+JSON-driven website. Right now, if your application were to fail somehow, you would get a bunch of nasty HTML coming down the pipe, when you were expecting JSON. No big deal:
<?php
# index.php
$whoops->pushHandler(new Whoops\Handler\PrettyPageHandler());
$whoops->pushHandler(new Whoops\Handler\JsonResponseHandler());

$whoops->register();

throw new RuntimeException("Oopsie!");
That's it. Now, if something fails during an AJAX request, Whoops will respond with a JSON response detailing the error. If it's NOT an AJAX request, you will continue to see the regular error page. If an error ocurrs, Whoops will filter through each of the registered handlers (starting at the last handler to be registered), and give them a chance to analyze, modify and respond to the request.
Now that you have a general idea of how Whoops works, let's have a go at building our own handler with Whoops and the Laravel 4 framework.
Whoops and Laravel 4
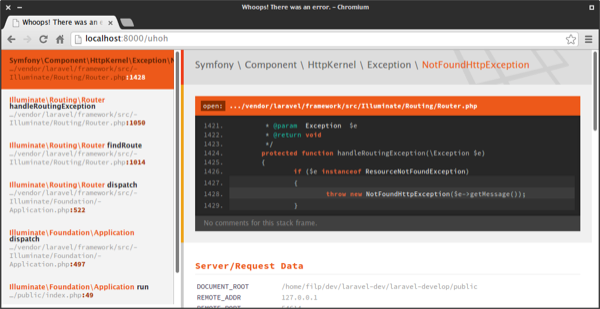
Laravel 4 bundles Whoops as a core exception handler, enabled by default in development mode, including a custom color-scheme by Dayle Rees:
If you haven't installed Laravel yet, head on over and follow the installation steps. Laravel is covered extensively on Nettuts+ and Tuts+ Premium, so you'll find plenty of training here, if you'd like to dig in further.
For the next steps, I'll assume that you are somewhat comfortable with the basics of Laravel 4. However, even if you aren't, it should still be easy to follow.
If you're in development (debug) mode, Whoops is available through the IoC container as whoops, and pre-set with one of two handlers: PrettyPageHandler or JsonResponseHandler, as whoops.handler (the same two we just talked about). Both of these handlers expose useful additional methods, as you've seen above with the PrettyPageHandler. By accessing these services, we can start customizing our Whoops experience within the framework.
For simplicity's sake, in your app/routes.php file, let's hook into the Whoops service and set a custom page title for our error pages:
<?php
#app/routes.php

/*
|--------------------------------------------------------------------------
| Application Routes
|--------------------------------------------------------------------------
*/

use Whoops\Handler\PrettyPageHandler;

// Use the Laravel IoC container to get the Whoops\Run instance, if whoops
// is available (which will be the case, by default, in the dev
// environment)
if(App::bound("whoops")) {
    // Retrieve the whoops handler in charge of displaying exceptions:
    $whoopsDisplayHandler = App::make("whoops.handler");

    // Laravel will use the PrettyPageHandler by default, unless this
    // is an AJAX request, in which case it'll use the JsonResponseHandler:
    if($whoopsDisplayHandler instanceof PrettyPageHandler) {

        // Set a custom page title for our error page:
        $whoopsDisplayHandler->setPageTitle("Houston, we've got a problem!");

        // Set the "open:" link for files to our editor of choice:
        $whoopsDisplayHandler->setEditor("sublime");
    }
}

Route::get('/', function()
{
    // Force the execution to fail by throwing an exception:
    throw new RuntimeException("Oopsie!");
});
?>
Tip: Whoops supports a few editors by default, and allows you to implement support for your own as you wish. Read more about it here.
If you now access your Laravel application, you'll be greeted with an error message with your custom page title. If you click the file path above the code box, it should open the referenced file right in your editor or IDE of choice. How cool is that? Also, since we can reach the handler already setup by the Laravel core, we can put to use the other features we've learned about above. For example, we can add custom tables (with PrettyPageHandler::addDataTable) with useful information about our application.
Let's have a go at one more example. This will be our first attempt at writing our own custom handler. We want to get all the stack frames for an exception, and remove anything that's not part of our application code. Sounds simple enough, right?
<?php
#app/routes.php

/*
|--------------------------------------------------------------------------
| Application Routes
|--------------------------------------------------------------------------
*/

use Whoops\Handler\Handler;

// Use the Laravel IoC to get the Whoops\Run instance, if whoops
// is available (which will be the case, by default, in the dev
// environment)
if(App::bound("whoops")) {
    $whoops = App::make("whoops");

    $whoops->pushHandler(function($exception, $exceptionInspector, $runInstance) {
        // Get the collection of stack frames for the current exception:
        $frames = $exceptionInspector->getFrames();

        // Filter existing frames so we only keep the ones inside the app/ folder
        $frames->filter(function($frame) {
            $filePath = $frame->getFile();

            // Match any file path containing /app/...
            return preg_match("/\/app\/.+/i", $filePath);
        });

        return Handler::DONE;
    });
}

Route::get('/', function()
{
    // Force the execution to fail by throwing an exception:
    throw new RuntimeException("Oopsie!");
});
?>
Tip: You don't actually have to return Handler::DONE - this serves only a semantic purpose. If you want Whoops to stop running any extra handlers after yours, write return Handler::LAST_HANDLER. If you want Whoops to exit the script execution after your handler, return Handler::QUIT.
You can see that it's remarkably concise. Whoops\Run's pushHandler method accepts a closure that receives up to three arguments: the exception object, an exception inspector, which exposes some utility methods to, you guessed it, inspect exceptions, and the Whoops\Run instance that captured the exception. Through this handler, we use the exception inspector to extract the stack frames, all within a neat FrameCollection object:
<?php
$frames = $exceptionInspector->getFrames(); // #=> Whoops\Exception\FrameCollection;
count($frames); #=> int

foreach($frames as $frame) {
    get_class($frame); // #=> Whoops\Exception\Frame

    print $frame->getFile() . ":" . $frame->getLine() . "\n";
        #=> "/path/to/file.php:123"
}
?>
Tip: Whoops internally converts closures to a special handler: Whoops\Handler\CallbackHandler.
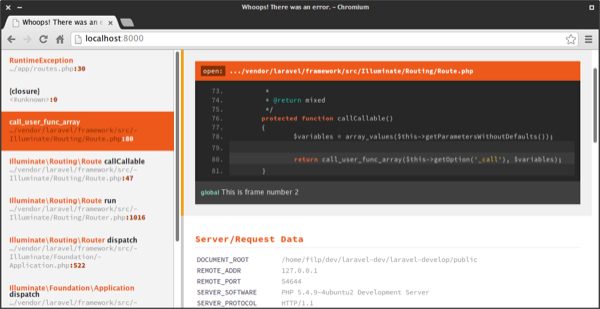
You can count, iterate, map and filter the contents of this class, with the interesting but important aspect that the map and filter operations mutate the object in-place. This means that both of these operations modify the original instance directly, instead of creating a new collection. How is this important? It means handlers can more easily perform changes that propagate downwards to all the other handlers in the stack. This is exactly what we did with our simple handler above. If you now run the script again, you'll see that we get a shorter list of stack frames, only concerning the code living within our application directory.
As for the Frame object, itself (Whoops\Exception\Frame), it exposes a set of methods to gather information about the frame contents (the file path, line number, the method or function call, class name, etc,), and methods that allow you to attach comments to individual stack frames. A Frame comment is a useful feature in Whoops that allows handlers to provide additional information that they gather from an exception by attaching notes directly to individual frames in the stack. Handlers like the PrettyPageHandler, for example, can then gather those comments and display them along with the frame's file path and line number.
<?php
$whoops->pushHandler(function($exception, $exceptionInspector, $runInstance) {
    foreach($exceptionInspector->getFrames() as $i => $frame) {
        $frame->addComment("This is frame number {$i}");
    }

    return Handler::DONE;
});
?>
Frame comments may also receive a second scope argument. If you have multiple custom handlers, you can, for example, filter frame comments by this argument to gather only the information that you care about.
<?php
$frames = $exceptionInspector->getFrames();
foreach($frames as $frame) {
    // Was this frame within a controller class? (ends in Controller)
    $className = $frame->getClass();
    if(substr($className, -10) == "Controller") {
        $frame->addComment("This frame is inside a controller: $className", "controller-error");
    }

    // Later, in another handler, get all comments within the 'controller-errors' scope:
    $controllerErrors = $frame->getComments("controller-errors"); // #=> array
}
?>
Also of interest, the PrettyPageHandler naturally HTML-escapes the frame comments before displaying them, but will intelligently capture URIs in the comment's body and convert them to clickable anchor elements. Want to link frames to documentation, or to GitHub repositories? It's easy enough; let's create our own handler class for this example.
Tip: Using your own class instead of a closure provides you with some extra control over your handler - not to mention making it easier to cover with automated tests. Your custom handler classes must implement the Whoops\Handler\HandlerInterface interface, but you may instead simply extend the Whoops\Handler\Handler class, and implement the missing handle method, as shown in the example below.
<?php
# LaravelGithubLinkHandler.php

use Whoops\Handler\Handler as BaseHandler;

/**
 * When possible, link laravel source files to their location
 * on the laravel/framework repo @ github.com
 */
class LaravelGithubLinkHandler extends BaseHandler
{
    private $repoBase = "https://github.com/laravel/framework/blob/master";

    /**
     * @return int
     */
    public function handle()
    {
        $frames = $this->getInspector()->getFrames();

        foreach($frames as $frame) {
            $file = $frame->getFile();
            $line = $frame->getLine();

            // Some frames may not have a file path, for example, if it ocurred within
            // a Closure, so we'll need to check for that:
            if(!$file) continue;

            // Check if the file path for this frame was within the laravel/framework
            // directory, inside the Composer vendor/ directory, and use a regex capture
            // to extract just the parts we want:
            if(preg_match("/\/vendor\/laravel\/framework\/(.+)$/", $file, $matches)) {
                $path = $matches[1]; // First match is whole path, second is our capture
                $url  = "{$this->repoBase}/$path";

                // We can also link directly to a line number, if we have it. Github
                // supports this by appending #L<line number> to the end of the URL:
                if($line !== null) {
                    $url .= "#L{$line}";
                }

                $frame->addComment($url, "github-linker");
            }
        }

        return Handler::DONE;
    }
}
?>
That's it, as far as our handler goes. Put that class somewhere in your project, and all that's left to do is enable and try it out:
<?php
# app/routes.php
// ...
$whoops->pushHandler(new LaravelGithubLinkHandler());
// ...
?>

With only a handful of lines of code, we've added an extra layer of (possibly useless, but hey, it's an example) functionality to our error pages. Here are a few extra ideas, if you're looking for a challenge:
- Package your custom error handler as a Laravel service provider.
- Are you using Git to manage your project? Build a custom handler that hooks into
git-blameto determine who the last person to touch that file that keeps throwing an exception (and yell at them) was, directly from the error page. - If you're feeling brave, use nikic's PHP-Parser to analyze the troublesome code, and provide suggestions for fixes (I promise it's not as complicated as it sounds).
Final Thoughts
I hope that this short guide has helped you gain an understanding of the sort of possibilities that this library enables in your every-day projects. For more information, refer to the complete API documentation.
Whoops is framework-agnostic, light-weight and, I believe, quite powerful in its simplicity and focus on mix-and-matching small tools. It's also open-source and open to suggestions and improvements. If you'd like to contribute or report a bug, head to the official repository!

Comments