Welcome to the fourth tutorial in our series on Photoshop for developers! In this Quick Tip, I’ll introduce you to the Gradient Tool and demonstrate the fundamentals of how to use it.
Using the Gradient Tool (G)
Gradients are a great way to add that little something extra to a background or image. According to Adobe, “The Gradient tool creates a gradual blend between multiple colors.” Pretty straightforward, right?
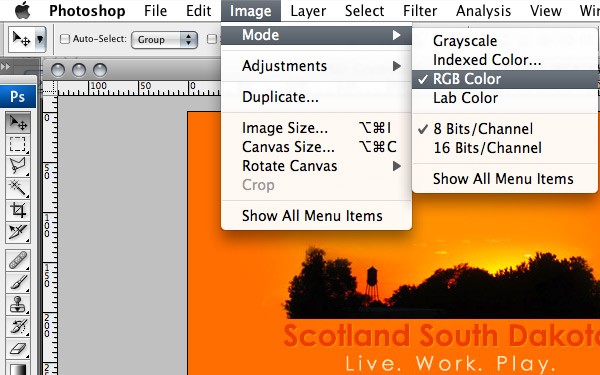
Like many of the other tools, the Gradient Tool (G) will not work if your document is in Bitmap or Indexed mode. So, you will have to change the mode of the image if you are opening an existing .gif or .bmp file. To determine what mode your file is in:
- Click the IMAGE menu.
- Choose MODE from the menu.
From here you will be able to differentiate between grayscale, indexed color, RGB, or lab. For all web and mobile images we are going to want to make sure we select RGB.
Like anything else in Photoshop, there are multiple ways to apply a gradient. This article simply covers the Gradient Tool (G). Gradients are applied by dragging the tool across the image. The starting point is defined by where the mouse is initially clicked and the ending point is where the mouse is released.
Gradients can be applied to the whole active layer or just select portions of an active layer.
- Select the Gradient tool
 from the toolbar or press the letter G on the keyboard.
 - In the Option bar, there are multiple different types of gradients you can apply:
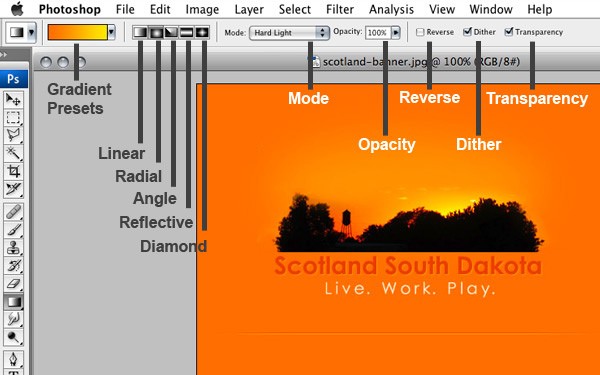
- Gradient presets give you the options to create a gradient from templates or customize your own.
-
 Linear gradient - Shades from the start point to the end point in a straight line.
 -
 Radial gradient - Shades from the start point to the end point in a circular pattern.
 -
 Angle gradient - Shades in a counterclockwise sweep around the start point.
 -
 Reflective gradient - Shades using symmetric linear gradients on either side of the start point.
 -
 Diamond gradient - Shades from the start point outward in a diamond pattern. The end point defines one corner of the diamond.
 - Specify a blending mode and opacity for the gradient.
- Reverse - swaps the selected colors of the gradient.
- Dither - creates a smoother gradient.
- Transparency creates a transparency mask for the gradient fill.
With all the options configured, we can now apply the gradient.
- Position the pointer in the image where you want. Click to set the starting point of the gradient, drag and release to define the ending point. To constrain the line angle to a multiple of 45°, hold down SHIFT as you drag.
- To adjust the look of the Gradient, try adjusting your start point and endpoint and that is that.
It’s about as simple as Adobe made it sound. Here are some more examples of what you can do with Gradients:


Comments