Cover image via PONTIER
Introduction
PHP 7 was released last December. Once you've tested your code locally to run on it, it's time to upgrade your production server. Generally, I found that most of my sites run well on it.
However, I suspect that not many sites have upgraded yet. It's often safer and easier to stay on older releases. In fact, a survey of WordPress sites showed that few have:
"As of November 2016, 52.9% of WordPress websites run a PHP version less PHP 5.5. Only 3.4% of WordPress websites run PHP 7, the current main version of PHP." via PHP Compatibility Checker.
But PHP 7 has now been out for nearly a year.
In today's episode, I'll walk you through my recommended approach to upgrading to PHP 7 on Ubuntu 14.x and resolving problems with PHPMyAdmin, which a lot of early upgraders ran into.
At this time, if you are using WordPress, install the PHP Compatibility Checker plugin to ensure that you won't run into any unexpected problems with your array of plugins.
I am always appreciative of your ideas and feedback. If you have a question or topic suggestion, please post your thoughts in the comments below.
You can also reach me on Twitter @reifman directly. This is especially true with popular upgrade scripts like this one—where users' own experience and input will be unique and valuable.
Upgrading Your Server
I tried using some standard guides to upgrading PHP 7 and ran into a series of different problems. So the scripts I share with you below have been tested repeatedly, and I believe what I'm presenting will work well for you.
Again, I greatly appreciated Digital Ocean, which makes it easy to back up my server and repeatedly create test instances for running through upgrade steps from scratch.
Let's get started.
Note Any Customizations to PHP 5
At this point you may want to make note of your PHP .ini customizations and possibly back up your php.ini file as you will later need to migrate these to PHP 7.
This should help you find your .ini file:
$ php --ini
This showed me:
$ php --ini
PHP Warning:  PHP Startup: Unable to load dynamic library '/usr/lib/php5/20121212/newrelic.so' - /usr/lib/php5/20121212/newrelic.so: cannot open shared object file: No such file or directory in Unknown on line 0
Configuration File (php.ini) Path: /etc/php5/cli
Loaded Configuration File:         /etc/php5/cli/php.ini
Scan for additional .ini files in: /etc/php5/cli/conf.d
...
For Apache, mine was in /etc/php5/apache2.
Remove PHP5 and Related Packages
First, let's purge all our older PHP packages. I found it was best to do this thoroughly, covering not only PHP5 but also 5.5 and 5.6, which I had experimented with on my server.
$ sudo apt-get -y purge php php-common php-mcrypt php-mbstring
$ sudo apt-get -y purge php5 php5-common php5-cli libapache2-mod-php5 php5-curl php5-gd php5-imap php5-intl php5-json php5-mcrypt php5-mysql php5-pspell php5-readline php5-sqlite
$ sudo apt-get -y purge php5.5 php5.5-common php5.5-mcrypt php5.5-mbstring
$ sudo apt-get -y purge php5.6 php5.6-common
$ sudo apt-get autoremove
When I didn't purge all these variations of PHP, I ran into problems later trying to configure PHP 7. If you have a simple approach, please share it in the comments.
Adding a Personal Package Archive for PHP7 and PHPMyAdmin
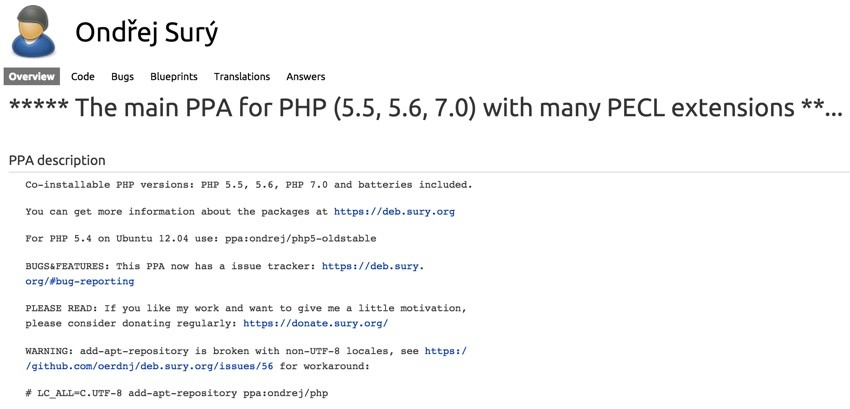
$ sudo add-apt-repository ppa:ondrej/php
 Co-installable PHP versions: PHP 5.5, 5.6, PHP 7.0 and batteries included.

You can get more information about the packages at https://deb.sury.org

For PHP 5.4 on Ubuntu 12.04 use: ppa:ondrej/php5-oldstable

BUGS&FEATURES: This PPA now has a issue tracker: https://deb.sury.org/#bug-reporting

PLEASE READ: If you like my work and want to give me a little motivation, please consider donating regularly: https://donate.sury.org/

WARNING: add-apt-repository is broken with non-UTF-8 locales, see https://github.com/oerdnj/deb.sury.org/issues/56 for workaround:

# LC_ALL=C.UTF-8 add-apt-repository ppa:ondrej/php
 More info: https://launchpad.net/~ondrej/+archive/ubuntu/php
Press [ENTER] to continue or ctrl-c to cancel adding it

gpg: keyring `/tmp/tmpj6czswxr/secring.gpg' created
gpg: keyring `/tmp/tmpj6czswxr/pubring.gpg' created
gpg: requesting key E5267A6C from hkp server keyserver.ubuntu.com
gpg: /tmp/tmpj6czswxr/trustdb.gpg: trustdb created
gpg: key E5267A6C: public key "Launchpad PPA for Ondřej Surý" imported
gpg: Total number processed: 1
gpg:               imported: 1  (RSA: 1)
OK
And then I updated my packages and distribution and cleansed any remaining files:
$ sudo apt-get update
$ sudo apt-get dist-upgrade
$ sudo apt-get autoremove
You may see errors like this:
The link /vmlinuz.old is a damaged link
Removing symbolic link vmlinuz.old
 you may need to re-run your boot loader[grub]
I chose to reboot at this point, and that seemed to work:
$ sudo reboot
Install PHP7
Next, we install PHP7 and all of its packages:
sudo apt-get install php7.0 php7.0-mysql libapache2-mod-php7.0 php-apcu php7.0-gd php7.0-mcrypt php-memcache php7.0-curl php7.0-tidy php-xml php-json php7.0-mbstring php-gettext libmcrypt-dev mcrypt php-gd libmcrypt4 libmhash2 libtidy5 libxslt1.1 php-apcu-bc php-pear php7.0-mbstring php7.0-xml
At this point you will want to migrate any changed settings in your configuration files to /etc/php/7.0/apache2/php.ini.
I also needed to add extension=apc.so to my php.ini file:
$ sudo nano /etc/php/7.0/apache2/php.ini
I pasted that here:
;extension=php_openssl.dll
;extension=php_pdo_firebird.dll
;extension=php_pdo_mysql.dll
;extension=php_pdo_oci.dll
;extension=php_pdo_odbc.dll
;extension=php_pdo_pgsql.dll
;extension=php_pdo_sqlite.dll
;extension=php_pgsql.dll
;extension=php_shmop.dll
extension=apc.so
Disabling PHPMyAdmin
At this point, if you're running PHPMyAdmin, you'll run into problems reloading Apache. If so, you'll need to disable PHPMyAdmin:
$ sudo nano /etc/apache2/apache2.conf
Comment out the line that loads it at the bottom:
# Include of directories ignores editors' and dpkg's backup files,
 # see README.Debian for details.

 # Include generic snippets of statements
 IncludeOptional conf-enabled/*.conf

 # Include the virtual host configurations:
 IncludeOptional sites-enabled/*.conf

 # vim: syntax=apache ts=4 sw=4 sts=4 sr noet
 # Include /etc/phpmyadmin/apache.conf
Then, I enabled mcrypt and mbstring and then restarted Apache:
$ sudo phpenmod mcrypt
$ sudo phpenmod mbstring
$ sudo service apache2 restart
I tested this on a server running apps built on only HTML, for PHP and for Yii1.x, and all of them worked.
Reinstalling PHPMyAdmin
Next, let's repair the PHPMyAdmin installation. A lot of people struggled with this.
First, I added the package repository by nijel:
$ sudo add-apt-repository ppa:nijel/phpmyadmin
 Latest phpMyAdmin packages - https://www.phpmyadmin.net/. Based on packages available in Debian.

There are some notable changes:

* it currently requires updated PHP packages, you can get packages from https://launchpad.net/~ondrej/+archive/ubuntu/php/
* it does include embedded copies of PHP libraries

If you like phpMyAdmin, you can support it's further development at https://www.phpmyadmin.net/donate/ or https://www.phpmyadmin.net/sponsors/, thanks!
 More info: https://launchpad.net/~nijel/+archive/ubuntu/phpmyadmin
Press [ENTER] to continue or ctrl-c to cancel adding it

gpg: keyring `/tmp/tmp6zix40vr/secring.gpg' created
gpg: keyring `/tmp/tmp6zix40vr/pubring.gpg' created
gpg: requesting key 06ED541C from hkp server keyserver.ubuntu.com
gpg: /tmp/tmp6zix40vr/trustdb.gpg: trustdb created
gpg: key 06ED541C: public key "Launchpad PPA for Michal Čihař" imported
gpg: no ultimately trusted keys found
gpg: Total number processed: 1
gpg:               imported: 1  (RSA: 1)
OK
Then, I updated the packages and installed PHPMyAdmin:
$ sudo apt-get update
$ sudo apt-get install phpmyadmin
Note, this will still reload a bunch of older PHP 5.x packages, but PHPMyAdmin will ultimately work.
Then, I uncommented the PHPMyAdmin line we commented above.
$ sudo nano /etc/apache2/apache2.conf
Here:
# Include of directories ignores editors' and dpkg's backup files,
 # see README.Debian for details.

 # Include generic snippets of statements
 IncludeOptional conf-enabled/*.conf

 # Include the virtual host configurations:
 IncludeOptional sites-enabled/*.conf

 # vim: syntax=apache ts=4 sw=4 sts=4 sr noet
 Include /etc/phpmyadmin/apache.conf
And, I restarted Apache:
$ sudo service apache2 restart
Secure Your PHPMyAdmin Installation
This installed PHPMyAdmin back into the default location, which is very insecure and hackable. Please follow Installing and Using PHPMyAdmin With WordPress to better secure your installation.
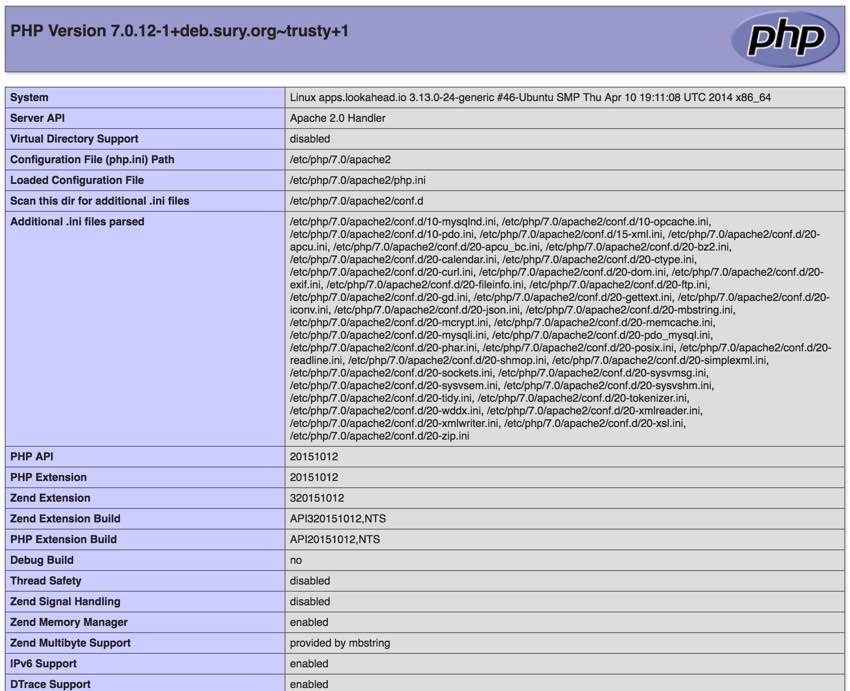
Verify PHP 7 Is Running
Afterwards, I built a small phpinfo(); file to verify PHP 7 was active:
In Closing
Upgrading to PHP 7 on my existing Ubuntu 14.x was problematic and required a lot of changes from the published scripts to get right. I hope you find today's tutorial helpful.
If you enjoyed this, please watch for upcoming tutorials in our Programming With Yii2 series and the Building Your Startup With PHP series, which documents the process of building my startup, Meeting Planner.
You can also follow me @reifman on Twitter or check my instructor page for updates.

Comments