A few years ago, when I was still an employee in a mobile consultancy, I worked on an app for a big investment bank. Big companies, especially banks, usually have processes in place to ensure that their software is secure, robust, and maintainable.
Part of this process involved sending the code of the app I wrote to a third party for review. That didn’t bother me, because I thought my code was impeccable and that the review company would say the same.
When their response came back, the verdict was different than I thought. Although they said the quality of the code was not bad, they pointed to the fact that the code was hard to maintain and to test (unit testing was not very popular in iOS development back then).
I dismissed their judgement, thinking that my code was great and there was no way it could be improved. They must just not understand it!
I had the typical developer hubris: we often think that what we do is great and others don’t get it.
In hindsight I was wrong. Not much later, I started reading about some best practices. From then on, the problems in my code started to stick out like a sore thumb. I realized that, like many iOS developers, I had succumbed to some classic pitfalls of bad coding practices.
What Most iOS Developers Get Wrong
One of the most common iOS development bad practices arises when passing state between the view controllers of an app. I myself have fallen into this trap in the past.
State propagation across view controllers is vital in any iOS app. As your users navigate through the screens of your app and interact with it, you need to keep a global state that tracks all the changes the user makes to the data.
And this is where most iOS developers reach for the obvious, but incorrect, solution: the singleton pattern.
The singleton pattern is very quick to implement, especially in Swift, and it works well. You just have to add a static variable to a class to keep a shared instance of the class itself, and you are done.
class Singleton {
    static let shared = Singleton()
}
It is then easy to access this shared instance from anywhere in your code:
let singleton = Singleton.shared
For this reason, many developers think they found the best solution to the problem of state propagation. But they are wrong.
The singleton pattern is actually considered an anti-pattern. There have been many discussions of this in the development community. For example, see this Stack Overflow question.
In a nutshell, singletons create these problems:
- They introduce a lot of dependencies in your classes, making it harder to change them in the future.
- They make global state accessible to any part of your code. This can create complex interactions that are hard to track and cause many unexpected bugs.
- They make your classes very hard to test, since you cannot separate them from a singleton easily.
At this point, some developers think: “Ah, I have a better solution. I will use the AppDelegate instead”.
The problem is that the AppDelegate class in iOS apps is accessed through the UIApplication shared instance:
let appDelegate = UIApplication.shared.delegate
But the shared instance of UIApplication is itself a singleton. So you haven't solved anything!
The solution to this problem is dependency injection. Dependency injection means that a class does not retrieve or create its own dependencies, but it receives them from the outside.
To see how to use dependency injection in iOS apps and how it can enable state sharing, we first need to revisit one of the fundamental architectural patterns of iOS apps: the Model-View-Controller pattern.
Extending the MVC Pattern
The MVC pattern, in a nutshell, states that there are three layers in the architecture of an iOS app:
- The model layer represents the data of an app.
- The view layer shows information on the screen and allows interaction.
- The controller layer acts as glue between the other two layers, moving data between them.
The usual representation of the MVC pattern is something like this:

The problem is that this diagram is wrong.
This “secret” hides in plain sight in a couple of lines in Apple’s documentation:
“One can merge the MVC roles played by an object, making an object, for example, fulfill both the controller and view roles—in which case, it would be called a view controller. In the same way, you can also have model-controller objects.”
Many developers think that view controllers are the only controllers that exist in an iOS app. For this reason, a lot of code ends up being written inside them for lack of a better place. This is what brings developers to use singletons when they need to propagate state: it seems like the only possible solution.
From the lines quoted above, it is clear that we can add a new entity to our understanding of the MVC pattern: the model controller. Model controllers deal with the model of the app, fulfilling the roles that the model itself should not fulfil. This is actually how the above scheme should look:
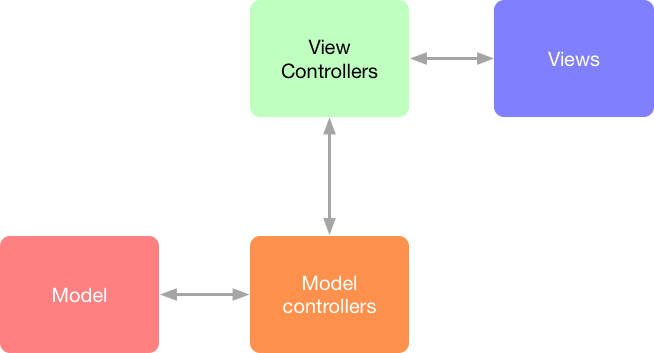
The perfect example of when a model controller is useful is for keeping the app’s state. The model should represent only the data of your app. The app’s state should not be its concern.
This state keeping usually ends inside view controllers, but now we have a new and better place to put it: a model controller. This model controller can then be passed to view controllers as they come on the screen through dependency injection.
We have solved the singleton anti-pattern. Let’s see our solution in practice with an example.
Propagating State Across View Controllers Using Dependency Injection
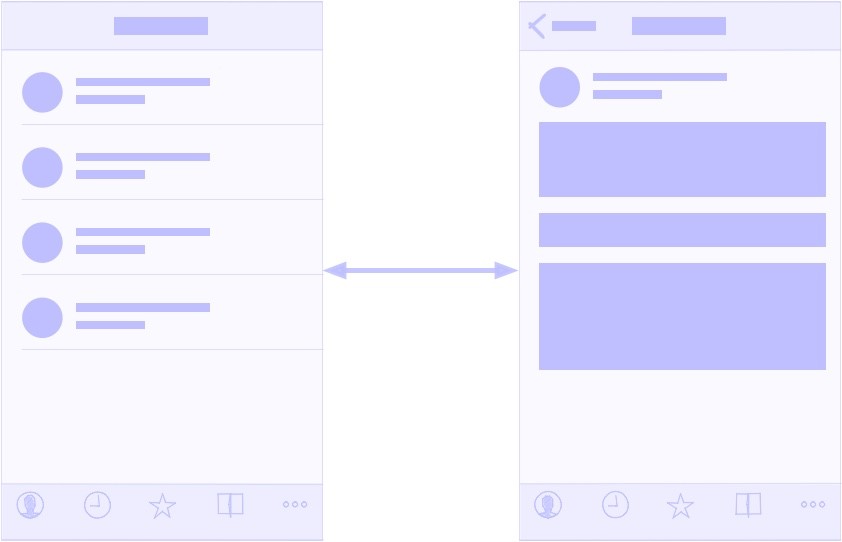
We're going to write a simple app to see a concrete example of how this works. The app is going to show your favorite quote on one screen, and allow you to edit the quote on a second screen.
This means that our app will need two view controllers, which will need to share state. After you see how this solution works, you can expand the concept to apps of any size and complexity.
To start, we need a model type to represent the data, which in our case is a quote. This can be done with a simple struct:
struct Quote {
    let text: String
	let author: String
}
The Model Controller
We then need to create a model controller that holds the state of the app. This model controller needs to be a class. This is because we will need a single instance that we will pass to all our view controllers. Value types like structs get copied when we pass them around, so they clearly are not the right solution.
All our model controller needs in our example is a property where it can keep the current quote. But, of course, in bigger apps model controllers can be more complex than this:
class ModelController {
    var quote = Quote(
		text: "Two things are infinite: the universe and human stupidity; and I'm not sure about the universe.",
		author: "Albert Einstein"
	)
}
I assigned a default value to the quote property so we will have already something to display on the screen when the app launches. This is not necessary, and you could declare the property to be an optional initialized to nil, if you wish your app to launch with a blank state.
Create the User Interface
We have now the model controller, which will contain the state of our app. Next, we need the view controllers that will represent the screens of our app.
First, we create their user interfaces. This is how the two view controllers look inside the app’s storyboard.
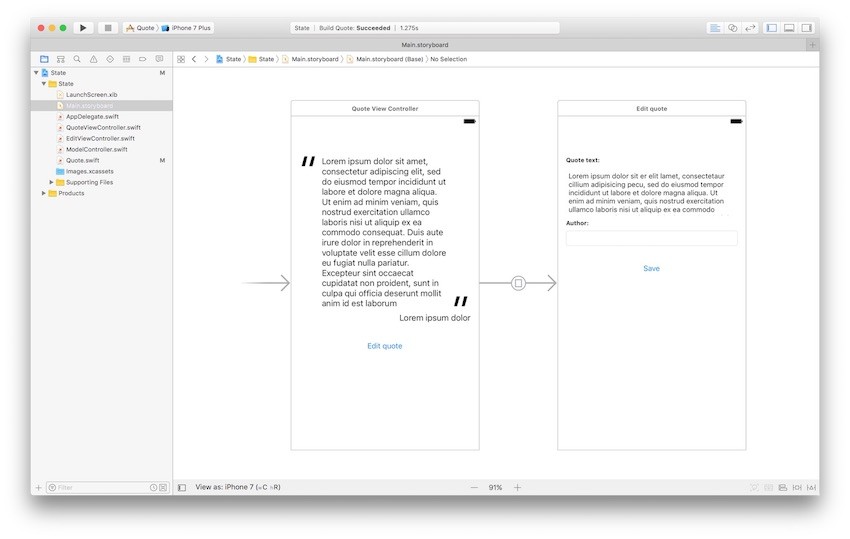
The interface of the first view controller is made up of a couple of labels and a button, put together with simple auto layout constraints. (You can read more on auto layout here on Envato Tuts+.)

The interface of the second view controller is the same, but has a text view to edit the text of the quote and a text field to edit the author.
The two view controllers are connected by a single modal presentation segue, which originates from the Edit quote button.
You can explore the interface and the constraints of the view controllers in the GitHub repo.
Code a View Controller With Dependency Injection
We now need to code our view controllers. The important thing that we need to keep in mind here is that they need to receive the model controller instance from the outside, through dependency injection. So they need to expose a property for this purpose.
var modelController: ModelController!
We can call our first view controller QuoteViewController. This view controller needs a couple of outlets to the labels for the quote and author in its interface.
class QuoteViewController: UIViewController {
    @IBOutlet weak var quoteTextLabel: UILabel!
	@IBOutlet weak var quoteAuthorLabel: UILabel!

	var modelController: ModelController!
}
When this view controller comes on screen, we populate its interface to show the current quote. We put the code to do this in the controller's viewWillAppear(_:) method.
class QuoteViewController: UIViewController {
    @IBOutlet weak var quoteTextLabel: UILabel!
	@IBOutlet weak var quoteAuthorLabel: UILabel!

	var modelController: ModelController!

	override func viewWillAppear(_ animated: Bool) {
		super.viewWillAppear(animated)
		let quote = modelController.quote
		quoteTextLabel.text = quote.text
		quoteAuthorLabel.text = quote.author
	}
}
We could have put this code inside the viewDidLoad() method instead, which is quite common. The problem, though, is that viewDidLoad() is called only once, when the view controller is created. In our app, we need to update the user interface of QuoteViewController every time it comes on the screen. This is because the user can edit the quote on the second screen.
This is why we use the viewWillAppear(_:) method instead of viewDidLoad(). In this way we can update the view controller’s UI each time it appears on the screen. If you want to know more about a view controller’s lifecycle and all the methods that get called, I wrote an article detailing all of them.
The Edit View Controller
We now need to code the second view controller. We will call this one EditViewController.
class EditViewController: UIViewController {
    @IBOutlet weak var textView: UITextView!
	@IBOutlet weak var textField: UITextField!

	var modelController: ModelController!

	override func viewDidLoad() {
		super.viewDidLoad()
		let quote = modelController.quote
		textView.text = quote.text
		textField.text = quote.author
	}
}
This view controller is like the previous one:
- It has outlets for the text view and the text field the user will use to edit the quote.
- It has a property for the dependency injection of the model controller instance.
- It populates its user interface before coming on screen.
In this case, I used the viewDidLoad() method because this view controller comes on screen only once.
Sharing the State
We now need to pass the state between the two view controllers and to update it when the user edits the quote.
We pass the app state in the prepare(for:sender:) method of QuoteViewController. This method is triggered by the connected segue when the user taps on the Edit quote button.
class QuoteViewController: UIViewController {
    @IBOutlet weak var quoteTextLabel: UILabel!
	@IBOutlet weak var quoteAuthorLabel: UILabel!

	var modelController: ModelController!

	override func viewWillAppear(_ animated: Bool) {
		super.viewWillAppear(animated)
		let quote = modelController.quote
		quoteTextLabel.text = quote.text
		quoteAuthorLabel.text = quote.author
	}

	override func prepare(for segue: UIStoryboardSegue, sender: Any?) {
		if let editViewController = segue.destination as? EditViewController {
			editViewController.modelController = modelController
		}
	}
}
Here we pass forward the instance of the ModelController that keeps the state of the app. This is where the dependency injection for the EditViewController happens.
In the EditViewController, we have to update the state to the newly entered quote before we go back to the previous view controller. We can do this in an action connected to the Save button:
class EditViewController: UIViewController {
    @IBOutlet weak var textView: UITextView!
	@IBOutlet weak var textField: UITextField!

	var modelController: ModelController!

	override func viewDidLoad() {
		super.viewDidLoad()
		let quote = modelController.quote
		textView.text = quote.text
		textField.text = quote.author
	}

	@IBAction func save(_ sender: AnyObject) {
		let newQuote = Quote(text: textView.text, author: textField.text!)
		modelController.quote = newQuote
		dismiss(animated: true, completion: nil)
	}
}
Initialize the Model Controller
We are almost done, but you might have noticed that we are still missing something: the QuoteViewController passes the ModelController to the EditViewController through dependency injection. But who gives this instance to the QuoteViewController in the first place? Remember that when using dependency injection, a view controller should not create its own dependencies. These need to come from the outside.
But there is no view controller before the QuoteViewController, because this is the first view controller of our app. We need some other object to create the ModelController instance and to pass it to the QuoteViewController.
This object is the AppDelegate. The role of the app delegate is to respond to the app’s lifecycle methods and configure the app accordingly. One of these methods is application(_:didFinishLaunchingWithOptions:), which gets called as soon as the app launches. That is where we create the instance of the ModelController and pass it to the QuoteViewController:
class AppDelegate: UIResponder, UIApplicationDelegate {
    var window: UIWindow?
	func application(_ application: UIApplication, didFinishLaunchingWithOptions launchOptions: [UIApplicationLaunchOptionsKey: Any]?) -> Bool {
		if let quoteViewController = window?.rootViewController as? QuoteViewController {
			quoteViewController.modelController = ModelController()
		}
		return true
	}
}
Our app is now complete. Each view controller gets access to the global state of the app, but we don’t use singletons anywhere in our code.
You can download the Xcode project for this example app in the tutorial GitHub repo.
Conclusions
In this article you've seen how using singletons to propagate the state in an iOS app is a bad practice. Singletons create a lot of problems, despite being very easy to create and use.
We solved the problem by looking more closely at the MVC pattern and understanding the possibilities hidden in it. Through the use of model controllers and dependency injection, we were able to propagate the state of the app across all view controllers without using singletons.
This is a simple example app, but the concept can be generalized to apps of any complexity. This is the standard best practice to propagate state in iOS apps. I now use it in every app I write for my clients.
A few things to keep in mind when you expand the concept to bigger apps:
- The model controller can save the state of the app, for example in a file. In this way, our data will be remembered every time we close the app. You could also use a more complex storage solution, for example Core Data. My recommendation is to keep this functionality in a separate model controller that only takes care of storage. That controller can then be used by the model controller that keeps the state of the app.
- In an app with a more complex flow, you will have many containers in your app flow. These are usually navigation controllers, with the occasional tab bar controller. The concept of dependency injection still applies, but you need to take the containers into account. You can either dig into their contained view controllers when performing the dependency injection, or create custom container subclasses that pass the model controller on.
- If you add networking to your app, this should go in a separate model controller as well. A view controller can perform a network request through this network controller and then pass the resulting data to the model controller that keeps the state. Remember that the role of a view controller is exactly this: to act as a glue object that passes data around between objects.
Stay tuned for more iOS app development tips and best practices!


Comments