1. Getting Started
If you followed along with the first part of this tutorial, then you probably already know that the installation process of Xamarin is not overly complicated. Xamarin has created a very nice installer that does most of the requirements verification for you and you just need to check a few boxes and click Next. While the process of getting Xamarin.iOS up and running is quite similar, there will be a few differences depending on which platform you are developing on, OS X or Windows.
Checklist
You will quickly find that the process of creating iOS applications in C# is slightly more involved than the Android process. It's not because the SDK is any more difficult to understand, but there are a few more moving parts. In order to complete this tutorial and be able to successfully create iOS applications in C#, you're going to need the following:
- a Mac, regardless of whether or not you are using Visual Studio on a PC
- Xcode
- the latest iOS SDK
- the latest Xamarin.iOS SDK
- an Apple Developer Account
- a PC, if you wish to develop using Visual Studio
If you're coming from the Windows side of the world, you may be a little upset by the fact that you need a Mac and Xcode. The reality is that, no matter what tools and languages you use to create your iOS application, only Xcode has the capabilities to create the final iOS distributable (.ipa) and Xcode only runs on a Mac. Believe me, the sooner you accept this, the sooner you'll be enjoying the rest of the process.
2. Installation
If you followed along with the first part of this tutorial, then you probably already have a fairly good grasp on the Xamarin installation process. The steps involved to install Xamarin.iOS are similar to those of Xamarin.Android. But if you haven't read the previous tutorial, then the following section will cover all the steps involved.
Step 1: Xcode and the iOS SDK
Regardless of what platform you intend to do your development on, you are going to need to have the latest version of both Xcode and the iOS SDK. The primary reason you will need Xcode is for the build process.
First head over to the iOS Dev Center and create an account if you don't already have one. You can bypass this step and go straight to the Mac App Store to download Xcode, but if you plan on running your app on an physical device then you're going to need a developer account anyway, so you might as well do it now.
Once created, log on and navigate to the Downloads page to get the latest version of Xcode. It will take you to the Mac App Store to complete the download and installation process. This will get you not only the latest version of Xcode, but it will also download and install the latest version of the iOS SDK. Sweet.
This tutorial will not go into detail on the provisioning process and deploying your application to a device. There are other articles on Tuts+ that cover that topic as well as documentation on the Xamarin website if you wish to do that.
Step 2: Xamarin.iOS and Xamarin Studio
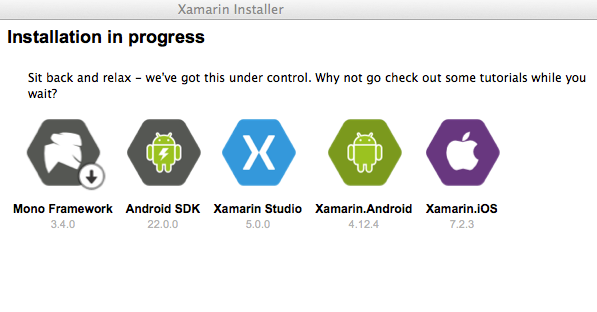
You can kill two birds with one stone by heading over to the Xamarin Download page, creating an account if you don't already have one, and clicking Download Xamarin. This will download the Xamarin installer that will take care of all the prerequisite checking, downloading, and installing for you. Double-click the .dmg file to start the installation.
Once the installer begins, you can select the pieces that you'd like to install. You will only need the Xamarin.iOS option for this tutorial, but feel free to install as much or as little as you'd like.

This screen may look a little different on your machine depending on the OS you are running as well as what products you may or may not already have installed. As mentioned before, you will still need to complete this process on a Mac if you are doing your development on a PC. Part of the installation of Xamarin.iOS is the Xamarin Build Host that allows you to connect to your Mac over the network from a PC and create the .ipa package that runs on the iOS Simulator or a physical device.
Once all the packages have been downloaded and installed, if you are doing your development on a Mac, you can start up Xamarin Studio. If you are going to do your development on a PC, then you'll need to follow the same installation process to get all the necessary Xamarin.iOS bits as well as the Xamarin plugin for Visual Studio on your Windows machine.
To do this though, you will need to have at least the Business Edition of Xamarin. You can get everything you need through the 30-day free trial of Xamarin if you don't already have it. If you don't have access to the free trial or the full software, you will need to use Xamarin Studio on your Mac.
3. Building A Simple Application
The best way to truly learn a new technology of any sort is to dig in and create something from scratch. You can build this application in either IDE (Integrated Development Environment), all you need to do is follow along with the sample code.
In the modern age of iOS development, you have three options when it comes to creating your application's user interface.
- create individual views and link them together in code
- use Storyboards, which is a more graphical version of the first option
- create the user interface in code
While the first and second options are the more popular options, we're going to create the sample application using the third option. It's important to not only understand how to do it, but also to understand why the graphical tools were created.
Step 1: Using Visual Studio on Windows
If you're using Visual Studio on a Windows machine to follow this tutorial, when you start the process of creating the project you will run into a dialog asking you to connect to a Xamarin Build Host. This is a fairly straightforward process where you only need to follow the directions on the screens. It will look something like this.
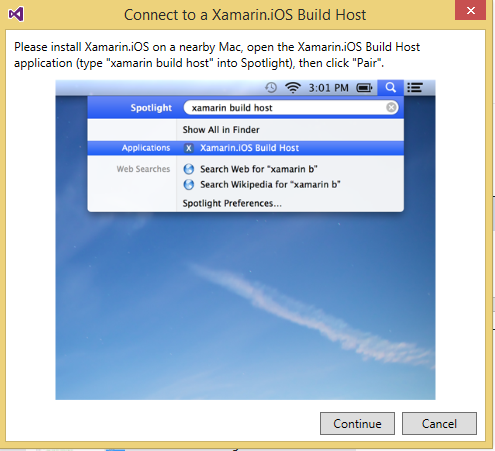
The first dialog you'll see is an instructional window that describes how to start the Xamarin Build Host on your Mac using Spotlight.

On your Mac, open the Xamarin Build Host and click the Pair button. This will provide you with a PIN.
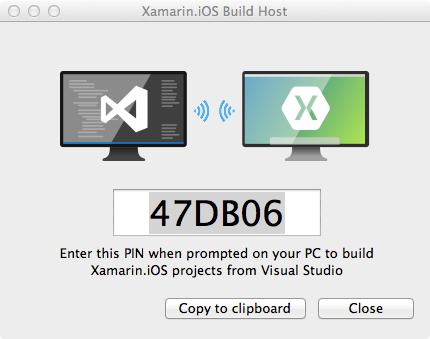
Switch back to Visual Studio and click the Continue button. If your Mac is configured correctly, it should show up in the list as a possible Xamarin Build Hosts.
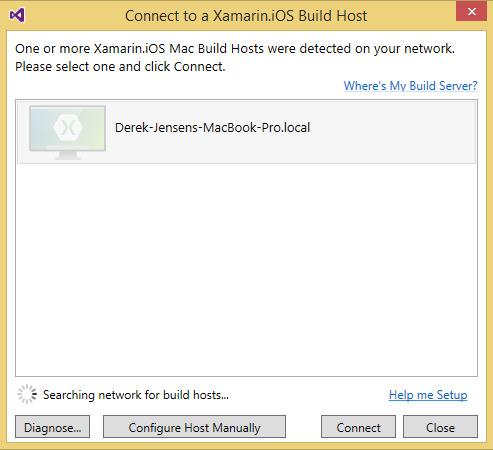
Click your Xamarin Build Host system of choice and choose Connect.
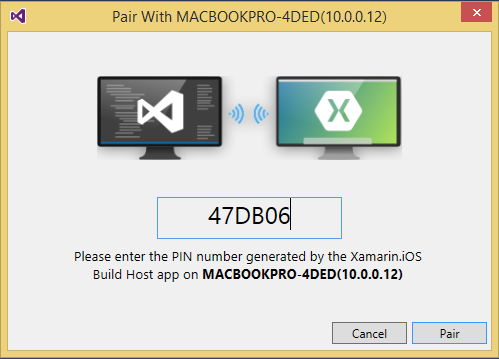
Visual Studio will then ask for the PIN. Once you've entered the PIN and paired Visual Studio with your Xamarin Build Host, you will be able to follow along with the rest of this tutorial, not only writing an iOS application in C#, but also doing it using Visual Studio. Awesome.
If you ever need to connect this particular Xamarin Build Host to another system, you can click the Unpair button. After doing this, you will have to repeat the process for the new system.

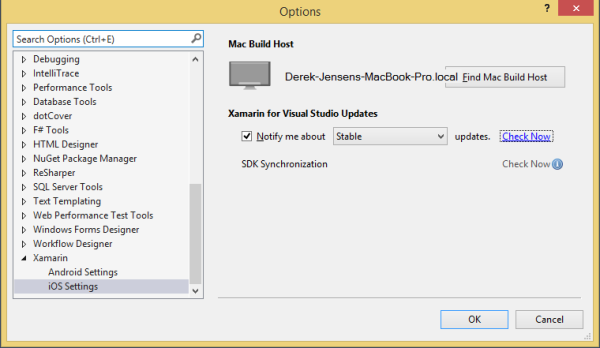
Luckily, Visual Studio will remember the Xamarin Build Host you previously connected with. If you unpair Visual Studio from the Xamarin Build Host, the next time you try to write an iOS application in Visual Studio, it will ask for the PIN for the same build host. To search for another host in Visual Studio, click Options from the Tools menu and choose Xamarin > iOS Settings. There you'll find a button that says Find Mac Build Host. This will show the dialog to select a different Xamarin Build Host.
Step 2: Creating the Project
Start by opening your IDE of choice and selecting File > New > Solution or Project depending on the IDE you're using. From the New Solution dialog box, choose C# > iOS > iPhone from the tree view and select Empty Project as the template. This will give you the basic structure for your application without all the bells and whistles getting in your way. This is what it will look like in Xamarin Studio 5.0.
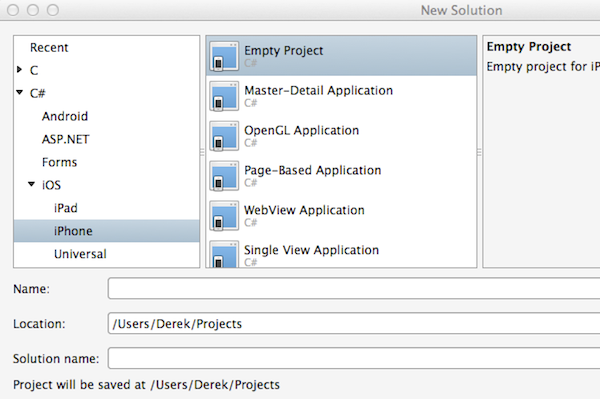
You can give your solution any name you want, but if you're interested in following along with me, then name it Feeder. Once the solution/project structure is created, you'll see a number of files that are worth zooming in on:
- AppDelegate.cs
- Entitlements.plist
- Info.plist
- Main.cs
AppDelegate.cs
In the world of iOS, the AppDelegate is the conduit to your application from the device. It is used to handle any system events that are necessary. The application delegate also keeps a reference to the window object. Each iOS application has a window, an instance of the UIWindow class, that is used to draw the user interface of the application. The AppDelegate is responsible for subscribing to any system events pertaining to your application, for example, when the application finishes launching or when it is being terminated by the operating system.
Entitlements.plist
This file is similar to the permissions section of the AndroidManifest. It specifies the permissions that the application has as well as the technologies it is allowed to use. Some of the more common technologies include iCloud, PassKit, Push Notifications, etc. You can think of a plist or property list file as a dictionary of key-value pairs that store properties used by your application.
Info.plist
Similar to the Entitlements.plist file, the Info.plist file stores key-value pairs. The difference is that this file stores application information such as the application name, icons, launch images, and more.
Main.cs
This file contains the main entry point for your application. The Main method creates a new Xamarin.iOS application and specifies the AppDelegate that will handle the events sent by the operating system.
Step 3: Creating the Model
The first step in creating the sample application is having an object that stores the information you want to display to the user. In this case, you want to store information about articles that appear on the Xamarin RSS blog feed. You can store more data than the example, but this will get you started. First, create a new class and name it RssItem. The definition of the class should look like this:
public class RssItem
{
    public string Title { get; set; }
    public string Creator { get; set; }
    public DateTime PubDate { get; set; }
    public string Link { get; set; }
}
The class is fairly straightforward:
-
Title, a string representing the title of the article -
Creator, a string representing the author of the article -
PubDate, aDateTimerepresenting the article's publication date -
Link, a string representing the a direct link to the article
With this simple model set, we can now shift our focus to the application's user interface and core implementation.
Step 4: Model-View-Controller
When creating iOS applications, you have no choice but to follow the Model-View-Controller paradigm. Even if you don't understand what that is, by the end of the process you will be an MVC soldier plugging away at iOS applications without even thinking about it. At a high level, the MVC pattern is made up of, you guessed it, three parts:
Model
You can think of the Model in the MVC pattern as the main components (or classes) in your application that contain important business data/logic. In your case, the model is the RssItem class that you just created.
View
The View in your application is the actual visual representation of data (or your model) on the device. This may come in the form of a list of data or some custom components that represent the data found in your Model.
In this example, the view layer is going to consist of a list of RssItem objects that have been downloaded from the aforementioned feed. Ideally, the Model and the View are not aware of each other and shouldn't interact directly. The two pieces of the puzzle need to be held together with some sort of glue.
Controller
The glue that ties the Model and View together, is the Controller. In the world of iOS development you will typically see a controller in the form of a ViewController class or subclass. This class has the job of controlling the interaction between the Model and View. The interaction can come in the form of the user touching some piece of the View and updating the Model based on that interaction or some piece of the Model being updated by another process behind the scenes and updating the View based on that change.
To implement the MVC pattern in your application, you need to create a View and a Controller. Add a new item to your project by right-clicking on your project and selecting Add > New File (or Item depending on your IDE). In the New File Dialog, you'll need to select the iOS group and the iPhone View Controller as the type and give it a name of FeedItem.

This process is going to add thee new files to your project. All of these files serve different purposes, but, together, they're going to build your list view that's going to present the articles of the Xamarin blog to the user.
FeedItemCell.cs
The FeedItemCell is a class that describes the individuals cells (or rows) within your list view. This class will allow you to modify the look and layout as well as the functionality of all the cells in the list to give it a custom appearance.
FeedItemSource.cs
The source of data that is visualized in your list of FeedItemCell objects comes in the form of the FeedItemSource class. This source class not only contains the data that will be visualized in your list, but also contains information about the list including its groupings, headers, footers, and item counts. It also handles the interactions with the items when a user touches one of them.
FeedItemController.cs
Once again, the actual controller is the glue that binds all things together. The FeedItemController class is the container class that will create the list view for the user to actual see on the screen. Within this class you will need to get the appropriate data to show on the screen, initialize a new FeedItemSource with that data, and pass the source to the controller.
Step 5: Getting Down to Code
Now that you have all the pieces of the puzzle ready, it's time to put them together. Let's start to work through the three files that you just created and get them ready for our data. First, take a look at the FeedItemCell class and modify it to look like this.
namespace Feeder
{
    public class FeedItemCell : UITableViewCell
	{
		public static readonly NSString Key = new NSString ("FeedItemCell");

		public FeedItemCell () : base (UITableViewCellStyle.Subtitle, Key)
		{
			// TODO: add subviews to the ContentView, set various colors, etc.
			TextLabel.Text = "TextLabel";
		}
	}
}
There's not a lot going on in this class and there is only a small change that you'll be making. This class is going to inherit from UITableViewCell. All this class contains is a constructor that calls the base constructor passing in two pieces of data.
- The first is the style of the cell. In this example, we use a built-in style know as the
Subtitlestyle. This style allows for two text fields in the cell, one on top of the other. - The second parameter of the base constructor is the key that will represent this type of cell within the list. In this case, every cell within the list will be referred to by the
FeedItemCellkey.
The next piece of the puzzle is the FeedItemSource class. Replace the contents of the default implementation with the following:
namespace Feeder
{
    public class FeedItemSource : UITableViewSource
	{
		private List<RssItem> _items;

		public FeedItemSource (List<RssItem> items)
		{
			_items = items;
		}

		public override int NumberOfSections (UITableView tableView)
		{
			// TODO: return the actual number of sections
			return 1;
		}

		public override int RowsInSection (UITableView tableview, int section)
		{
			// TODO: return the actual number of items in the section
			return _items.Count;
		}

		public override UITableViewCell GetCell (UITableView tableView, NSIndexPath indexPath)
		{
			var cell = tableView.DequeueReusableCell (FeedItemCell.Key) as FeedItemCell;
			if (cell == null)
				cell = new FeedItemCell ();

			// TODO: populate the cell with the appropriate data based on the indexPath

			cell.TextLabel.Text = _items[indexPath.Row].Title;
			cell.DetailTextLabel.Text = string.Format ("{0} on {1}", _items [indexPath.Row].Creator, _items [indexPath.Row].PubDate);

			return cell;
		}

		public override void RowSelected (UITableView tableView, NSIndexPath indexPath)
		{
			var item = _items [indexPath.Row];

			var url = new NSUrl (item.Link);
			UIApplication.SharedApplication.OpenUrl (url);
		}
	}
}
Let's break it down to get a better understanding of what's happening. The source needs the data that will be displayed in the list and that is typically handled in the constructor.
private List<RssItem> _items;

public FeedItemSource (List<RssItem> items)
{
	_items = items;
}
The source data in your list is going to be provided by a list of your model classes, RssItem. This list of items is passed into the constructor of the FeedItemSource class and held on to in a private variable _items.
public override int NumberOfSections (UITableView tableView)
{
	// TODO: return the actual number of sections
	return 1;
}
When using lists in an iOS application, you have the option to group cells into sections. The NumberOfSections method returns how many sections or groups are found within the list. In this particular application, there is a single group that contains all the items, which means the method returns 1.
public override int RowsInSection (UITableView tableview, int section)
{
	// TODO: return the actual number of items in the section
	return _items.Count;
}
With the number of sections of the list defined, the table view needs to know how many items are found in each section. You've already passed the list of RssItem objects that are going to appear in the list into the constructor and saved it into the private variable _items, so all you need to do is return _items.Count.
public override UITableViewCell GetCell (UITableView tableView, NSIndexPath indexPath)
{
	var cell = tableView.DequeueReusableCell (FeedItemCell.Key) as FeedItemCell;
	if (cell == null)
		cell = new FeedItemCell ();

	// TODO: populate the cell with the appropriate data based on the indexPath

	cell.TextLabel.Text = _items[indexPath.Row].Title;
	cell.DetailTextLabel.Text = string.Format ("{0} on {1}", _items [indexPath.Row].Creator, _items [indexPath.Row].PubDate);

	return cell;
}
The next, and arguably the most important, part of the source implementation is the GetCell method. The purpose of this method is to produce and reuse the cells that are present in the list.
var cell = tableView.DequeueReusableCell (FeedItemCell.Key) as FeedItemCell;
if (cell == null)
	cell = new FeedItemCell ();
The first line calls the DequeueReusableCell method passing in an argument of the Key of a cell that it's looking for. One of the ideas behind a list is that if the source data contains more items than can fit in the viewable section of the screen, there is no reason to continually create those cells and take up system resources.
Instead, when a cell goes off-screen, it isn't simply discarded. It's placed in a pool of other cells for later use. Later, when a cell with a particular key is needed, the system first checks the pool of reusable cells for cells with that key. If no reusable cell could be found, the cell variable is null, and a new FeedItemCell is created.
cell.TextLabel.Text = _items[indexPath.Row].Title;
cell.DetailTextLabel.Text = string.Format ("{0} on {1}", _items [indexPath.Row].Creator, _items [indexPath.Row].PubDate);

return cell;
If a cell is ready to be used, it needs to be populated with data. How you do this is completely up to you. In our example, we specified that each cell is of the Subtitle type, which means that it has two labels. The top Label is referred to as the TextLabel. In our example, it's populated with the Title property of an RssItem object. To fetch the correct RssItem object, we make use of the indexPath.Row property. The bottom Label is referred to as the DetailTextLabel and is populated with a concatenation of the Creator and PubDate properties of the corresponding RssItem object.
public override void RowSelected (UITableView tableView, NSIndexPath indexPath)
{
	var item = _items [indexPath.Row];

	var url = new NSUrl (item.Link);
	UIApplication.SharedApplication.OpenUrl (url);
}
The final override method within the FeedItemSource class is RowSelected. This method is called every time a cell within the list is tapped by the user. In this case, when a user touches a cell, you fetch the corresponding RssItem instance using the indexPath.Row property. You then create a new NSUrl object with the Link property of the RssItem object and pass that NSUrl to the UIApplication.SharedApplication.OpenUrl method. This method will determine which application on the device or emulator is best suitable to handle the url. In our example, because the url represents a web address, the built-in browser of the device or the simulator will handle the request.
It's time to turn our attention to the FeedItemController class.
namespace Feeder
{
    public class FeedItemController : UITableViewController
	{
		private List<RssItem> _items;
		public FeedItemController () : base ()
		{
			using (var client = new HttpClient ()) {
				var xmlFeed = client.GetStringAsync ("http://blog.xamarin.com/feed").Result;
				var doc = XDocument.Parse (xmlFeed);

				XNamespace dc = "http://purl.org/dc/elements/1.1/";
				_items = (from item in doc.Descendants ("item")
					select new RssItem {
						Title = item.Element ("title").Value,
						PubDate = DateTime.Parse (item.Element ("pubDate").Value),
						Creator = item.Element (dc + "creator").Value,
						Link = item.Element ("link").Value
					}).ToList();
			}
		}

		public override void DidReceiveMemoryWarning ()
		{
			// Releases the view if it doesn't have a superview.
			base.DidReceiveMemoryWarning ();

			// Release any cached data, images, etc that aren't in use.
		}

		public async override void ViewDidLoad ()
		{
			base.ViewDidLoad ();

			// Register the TableView's data source
			TableView.Source = new FeedItemSource (_items);


		}
	}
}
Before you can successfully compile this code, you will need to add a reference to the System.Xml.Linq assembly. You can do this by right-clicking on References in your project and selecting either Add Reference or Edit References, depending on the IDE you're using. You will also need to add the using System.Xml.Linq; statement to the top of the class file.
private List<RssItem> _items;
public FeedItemController () : base ()
{
	using (var client = new HttpClient ()) {
		var xmlFeed = client.GetStringAsync ("http://blog.xamarin.com/feed").Result;
		var doc = XDocument.Parse (xmlFeed);

        XNamespace dc = "http://purl.org/dc/elements/1.1/";
		_items = (from item in doc.Descendants ("item")
			        select new RssItem {
						Title = item.Element ("title").Value,
						PubDate = DateTime.Parse (item.Element ("pubDate").Value),
						Creator = item.Element (dc + "creator").Value,
						Link = item.Element ("link").Value
					}).ToList();
	}
}
This is where all the logic for retrieving the data from the Xamarin RSS blog feed lives. If you followed along in the Android version of the Introduction to Xamarin tutorial, this probably looks familiar. That's because it is the exact same code.
You start by creating an HttpClient and using the GetStringAsync method to download the data found at the supplied url and use the Parse method on the XDocument class to prepare the data for some Linq-to-Xml magic. Once you have the XDocument object, you can query it to get the values of all the child item elements found in the RSS feed and initialize instances of the RssItem class and save them into the private _items variable.
After the constructor, there are only two methods present in the implementation. Those methods are DidReceiveMemoryWarning and ViewDidLoad. You don't need to do anything with the first method, but like most things it pays to at least know what it's for.
The DidReceiveMemoryWarning method is called at any point within the execution of this class when the device or simulator has determined that your application may be taking up too much memory and could possibly be terminated. This is your opportunity to release some memory intensive resources to keep that from happening. As its name implies, the ViewDidLoad method is invoked when the view is loaded and before it's presented o the user.
public async override void ViewDidLoad ()
{
	base.ViewDidLoad ();

	// Register the TableView's data source
	TableView.Source = new FeedItemSource (_items);
}
In this method, we call the base method of ViewDidLoad and create a new instance of the FeedItemSource class, assigning it to the TableView.Source property. Once this is done, the user will be able to see the data you retrieved from the RSS feed and placed in the list view. If you're confused where the TableView property comes from, it's inherited from the FeedItemController's base class, UITableViewController. This base class provides a reference to the actual table view that is in the view controller's view.
Step 6: Putting It All Together
You now have all the necessary pieces to present a list of articles to the user. The only problem is that none of it is showing up yet. The reason is that your application hasn't been told to use the FeedItemController to show the data to the user. To do this, you need to make a small modification to your AppDelegate class.
The AppDelegate class currently contains one method, FinishedLaunching. This method is called on the application delegate by the operating system. To make everything work, we need to make a slight modification to its implementation.
public override bool FinishedLaunching (UIApplication app, NSDictionary options)
{
	// create a new window instance based on the screen size
	window = new UIWindow (UIScreen.MainScreen.Bounds);
	var controller = new FeedItemController ();
	controller.View.BackgroundColor = UIColor.White;
	controller.Title = "Xamarin Feeds";

	var navController = new UINavigationController (controller);
	window.RootViewController = navController;

	// make the window visible
	window.MakeKeyAndVisible ();

	return true;
}
The first four lines are pretty standard. You create a new instance of the UIWindow class, which will contain your application's user interface. You then create a new instance of the FeedItemController class and set it's BackgroundColor property to UIColor.White and give it a Title.
The next two lines may seem a little confusing. You create a new instance of a UINavigationController, pass to it the FeedItemController instance in the constructor, set the RootViewController property of the window object to the UINavigationController, and call MakeKeyAndVisible. Why do we need to go through this hassle? Why can't we set the RootViewController to the FeedItemController and call it a day? You can do that and your application will still work. However, if you do that, the status bar at the top of the screen will show up on top of your list and will look bad. Adding your controller to a UINavigationController is a little trick that accomplishes two things:
- it adds space between the top of your control and the top of the screen
- it makes the
Titleproperty of the controller visible
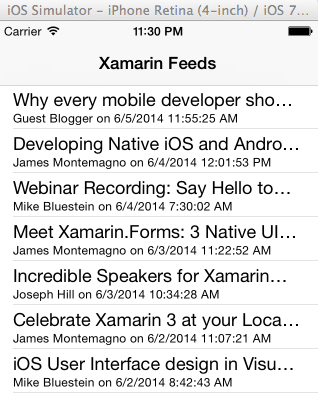
It's time to build and run your application in the iOS Simulator. The result should look similar to the screenshot below.
Conclusion
And there you have it. You have just successfully created a fully functional iOS application using nothing but C# and Xamarin. That's a pretty impressive accomplishment if you think about it.
I hope this gives you the confidence and drive to dive deeper into the realm of Xamarin and the doors that it opens for you. From here you can learn about creating Android applications in C# using Xamarin if you haven't already. If you have, you can explore how you can create cross-platform applications that can reuse the majority of a single code base and run on both iOS and Android devices. That's what I'll show you in the next tutorial.
Next Step: Watch the Course
If you'd like to learn more about Xamarin, then check out our course Building Multi-Platform Apps With C# in Xamarin.
In the course, you will learn how to create a cross-platform application from a single code base that will run on three distinctly different platforms: iOS, Android, and Windows Phone 8. Think it can’t be done? In just a little while you will be doing it yourself. Let’s get to work.
You can take the straight away with a completely free 14 day trial of a Tuts+ subscription. Take a look at our subscription options to get started or, if you're just interested in this course, you can buy it individually for $15! Here's a preview to get you started:

Comments