Large news-based sites sometimes use some sort of styling to differentiate between the sections of their site. Often this takes the form of different colors for each section.
A good example is the London Times website, which uses a different color for each section of its site. The front page uses these colors in a banner above each post, as shown in the screenshot:

And as you navigate further into the site, each section has its own color:

Using styling for the sections of your site like this can make your home page more engaging and help visitors to find content in categories that they regularly read. In this tutorial I'll show you how to target styles provided by WordPress to do just this, styling the posts on your main blog page by category.
What You'll Need
To follow this tutorial, you'll need:
- a development installation of WordPress
- a code editor
If you already have a theme you want to use this technique in, you'll be working on your theme's stylesheet. I'm going to create a child theme of the Twenty Fifteen theme and edit the stylesheet in my child theme.
Your site will probably already be populated with posts; so that my site has some posts I'm going to download the WordPress theme test data.
Creating the Theme
If you're working with your own theme you can skip this section, but where's what you need to do to create a child theme of Twenty Fifteen.
In your site's wp-content/themes folder, create a new folder and give it a name. I'm calling mine tutsplus-style-posts-by-category.
Inside that folder, create an empty CSS file called style.css and add the following to it:
/*
Theme Name:     Tuts+ Style Posts by Category
Theme URI:      http://code.tutsplus.com/tutorials/style-posts-by-category-on-your-main-blog-page--cms-23684
Description:    Theme to support tuts+ tutorial on styling posts by category. Child theme for the Twenty Fifteen theme.
Author:         Rachel McCollin
Author URI:     http://rachelmccollin.co.uk/
Template:       twentyfifteen
Version:        1.0
*/

@import url("../twentyfifteen/style.css");
This tells WordPress everything it needs to know to create a child theme and imports the stylesheet from Twenty Fifteen. You'll probably want to add your own name and details instead of mine, but this gives you an idea.
Now activate your theme.
Importing the Data
If your site already has posts you can skip this section, but here's how to import the theme unit test data into your site.
- Go to the Theme Unit Test page and download the
xmlfile which is linked to. - In your site, go to Tools > Import. Click on the WordPress link.
- Click on the Choose File button and select the file you've just downloaded. Click the Upload File and Import button.
- Follow the prompts and wait for WordPress to import the data.
Identifying Styles to Target
WordPress has a couple of template tags which output classes for your pages and posts when they're viewed in the browser. These are:
-
body_class(), which you add to thebodytag in a theme'sheader.phpfile: it adds classes to thebodyelement according to the type of page being viewed. -
post_class(), which works in a similar way but is used with posts in the loop.
If you're working with your own theme and haven't added these template tags yet, you'll need to do so. This tutorial on working with classes and IDs generated by WordPress shows you how.
If you're working with a child of the Twenty Fifteen theme, these tags will already have been added to the Twenty Fifteen theme itself, so you don't need to do anything.
If you open your site's home page in a browser and use developer tools to inspect the output HTML, you'll see that these tags have added a bunch of classes to your page.
Here's what I get when I view my site's home page:

The body tag is output as:
<body class="home blog logged-in admin-bar customize-support">
The home and blog classes tell me that this is the site's home page and that it's the main blog page. I can use these classes to target CSS on my home page.
Something similar happens to posts:

The article I've selected is tagged as:
<article id="post-1176" class="post-1176 post type-post status-publish format-standard hentry category-markup tag-alignment-2 tag-content-2 tag-css tag-markup-2">
That's a lot of classes! These tell us a few things about the post: its ID, post type, status, format, category and tags. You can use all these to target your styling. What we're going to use here is the category-markup class.
Styling the Posts
Now that I've identified which classes I need to target, it's time to add some styling. I'm going to keep it subtle and just change the text color of each post's title, which is inside a link in a <h2 class="entry-title"> tag.
Open your theme's stylesheet and add this:
.blog .category-markup .entry-title a:link,
.blog .category-markup .entry-title a:visited {
    color: #6cd2c8;
}
.blog .category-markup .entry-title a:hover,
.blog .category-markup .entry-title a:active {
	color: #120e5b;
}
I've used a shade of cyan for the link and visited states, and a navy for the hover and active states: you can change these to colors that fit with your design.
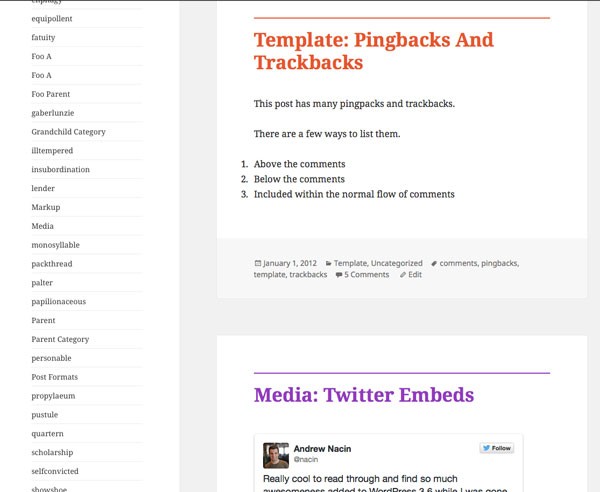
Now save your stylesheet and refresh your blog page. You'll see that posts with the category you've targeted now have a different color heading:

Now add some more colors for the other categories in your blog:
.blog .category-template-2 .entry-title a:link,
.blog .category-template-2 .entry-title a:visited {
    color: #e5572f;
}
.blog .category-template-2 .entry-title a:hover,
.blog .category-template-2 .entry-title a:active {
	color: #120e5b;
}

.blog .category-media-2 .entry-title a:link,
.blog .category-media-2 .entry-title a:visited {
	color: #933bbe;
}
.blog .category-media-2 .entry-title a:hover,
.blog .category-media-2 .entry-title a:active {
	color: #120e5b;
}
Again, adjust the colors to suit your branding. You'll now have a range of colors for your post titles.
If you like you can add borders, either instead of or as well as changing the color of the titles:
.blog .category-markup .entry-title {
    padding-top: 0.5em;
	border-top: 2px #6cd2c8 solid;
}
.blog .category-template-2 .entry-title {
	padding-top: 0.5em;
	border-top: 2px #e5572f solid;
}
.blog .category-media-2 .entry-title {
	padding-top: 0.5em;
	border-top: 2px #933bbe solid;
}
Now my posts have a subtle border as well as the change in color for the post title:

This guides visitors towards different categories in my site without being too garish.
Summary
Because WordPress gives us the body_class() and post_class() template tags, it's possible to target a specific page on your site and then target posts in each category, and style them differently.
In this tutorial you've learned how to identify which classes to target and add styling for each category, to give visitors some visual clues about the structure of your site.
In the next tutorial I'll show you how to expand on this and use it to style the different sections of your site differently.

Comments