Let's face it: we all have great ideas for a web application. Whether you write them down on paper or remember them using your eidetic memory, there comes a point when you want test whether or not your idea is really viable.
In this tutorial, we'll use a micro framework, a templating language and an ORM to rapidly develop an application prototype.
Step 1: Introduction and Setup
We've all had that feeling. You know, the one where you know you have a great web application idea, only you don't have the time to whip up a quick prototype and test the idea will truly work. Using a micro framework, a templating language and an ORM, you could have it up and running in minutes.
For this tutorial, we'll be using the excellent micro framework Slim, the templating language Twig and the lightweight fluent ORM Paris and Idiorm. Our sample application will be a blog. You've probably built a blog before, but we're here to learn about micro frameworks, and a blog fits the bill nicely!
The first thing you'll want to do is grab these packages from their respective websites:
Now that you have all the packages downloaded to your computer, it's time to setup your directory structure. We'll be putting the files into our site root folder, so your project folder should look like so:
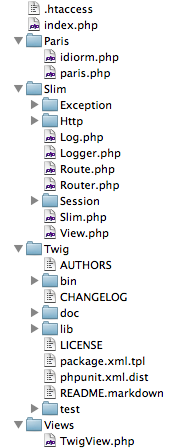
"Don't forget to include the .htaccess file that comes with Slim."
Now that we've got our project structured, go ahead and delete the contents of the Slim index.php file -- we'll write our own a little later on. You can also scrap everything but the TwigView.php class file in the Slim extras package.
Step 2: Bootstrapping
Our index.php file will act as a bootstrap, which will get Slim, Twig and Paris and Idiorm all working together nicely. Slim will redirect all requests to our application here, checking for any matching route patterns and then dispatching the appropriate response. This file will eventually contain our entire application setup and logic.
The first thing we need to do is include all the libraries that will make the magic happen. Add the following to the index.php bootstrap file:
	<?php
	// Slim
	require 'Slim/Slim.php';
	require 'Views/TwigView.php';

	// Paris and Idiorm
	require 'Paris/idiorm.php';
	require 'Paris/paris.php';
If all goes well, a request to your application should do absolutely nothing, which is great!
Now let's get Twig up and running. Using the Slim extras package we can let Slim setup a Twig environment for us. All it needs to know is the directory Twig is in, so let's add that into our bootstrap. Also go ahead and create a templates directory named templates in the site root while you are at it.
	// Configuration
	TwigView::$twigDirectory = __DIR__ . '/Twig/lib/Twig/';
The next component in our stack is Paris and Idiorm, our ORM. It utilises the inbuilt PHP PDO object, so you could use Postgres or SQLite for your prototype, but for this tutorial we'll be using MySQL. Be sure to give it the appropriate database credentials:
	ORM::configure('mysql:host=localhost;dbname=blog');
	ORM::configure('username', 'root');
	ORM::configure('password', '');
Finally, let's get Slim up and running. It's quite complicated, I think you'll agree:
	// Start Slim.
	$app = new Slim(array(
		'view' => new TwigView
	));
A word of warning. If you try run your application now, you may get a cryptic error. Don't panic! We'll resolve that in just a moment by adding some routes.
Step 3: Routing
Adding routes in Slim is simple. All Slim needs to know is the route request method (E.g. GET, POST, PUT etc) and URI to respond to, and how to respond. We'll flesh out the basic routes of our application first and create the guts of the prototype further on in this tutorial.
Let's create a homepage route first:
	// Blog Home.
	$app->get('/', function() use ($app) {

	});
Here we're telling Slim to respond to any GET request pointed to the root of our app. The final closure parameter will eventually contain the logic to generate the page output.
Let's add another route for viewing an individual blog article:
	// Blog View.
	$app->get('/view/(:id)', function($id) use ($app) {

	});
Notice the difference here? In our URI parameter, we've added a slug (:id), which tells Slim to expect a value at the end of the URI.
If you've ever used any other PHP framework, you're probably familiar with this concept. If you're not, our example would match
/view/1,/view/2etc.
We've also passed this parameter to our closure function, so we can use it in our application logic as well. Notice how we've also passed in our application variable into the closures scope, with the use statement? This allows us to access the internals of Slim, which we'll be using to grab request data and render responses.
Our administration routes will need to use different request methods, so let's add them in:
	// Admin Home.
	$app->get('/admin', function() use ($app) {

	});

	// Admin Add.
	$app->get('/admin/add', function() use ($app) {

	});

	// Admin Add - POST.
	$app->post('/admin/add', function() use ($app) {

	});

	// Admin Edit.
	$app->get('/admin/edit/(:id)', function($id) use ($app) {

	});

	// Admin Edit - POST.
	$app->post('/admin/edit/(:id)', function($id) use ($app) {

	});

	// Admin Delete.
	$app->get('/admin/delete/(:id)', function($id) use ($app) {

	});
You'll notice that we've got some POST routes in here. Later, we'll use these to process forms in our admin centre.
Finally, we'd better tell Slim to run our application.
$app->run();
Step 4: Models
Paris and Idiorm makes building models to represent your data easy as it does most of the grunt work, which is great for quick prototyping. We'll store our models in a directory named models, so go ahead and create that directory. Inside it, create the basic Article model in a file called Article.php:
	<?php
	class Article extends Model
	{

	}
Pretty simple, huh? Paris and Idiorm will extract all the information it needs from the model class name and the database table. While we're at it, we should probably create the database and add in some sample data:
	CREATE DATABASE `blog` DEFAULT CHARACTER SET utf8 COLLATE utf8_general_ci;

	USE `blog`;

	CREATE TABLE IF NOT EXISTS `article` (
	  `id` int(10) unsigned NOT NULL AUTO_INCREMENT,
	  `timestamp` datetime NOT NULL,
	  `title` varchar(128) NOT NULL,
	  `summary` varchar(128) NOT NULL,
	  `content` text NOT NULL,
	  `author` varchar(128) NOT NULL,
	  PRIMARY KEY (`id`)
	) ENGINE=MyISAM  DEFAULT CHARSET=utf8;

	INSERT INTO `article` (`id`, `timestamp`, `title`, `summary`, `content`, `author`) VALUES
	(1, '2011-07-28 02:03:14', 'Hello World!', 'Lorem ipsum dolor sit amet, consectetur adipisicing elit, sed do eiusmod tempor incididunt ut labore et dolore magna aliqua. Ut ', 'Lorem ipsum dolor sit amet, consectetur adipisicing elit, sed do eiusmod tempor incididunt ut labore et dolore magna aliqua. Ut enim ad minim veniam, quis nostrud exercitation ullamco laboris nisi ut aliquip ex ea commodo consequat. Duis aute irure dolor in reprehenderit in voluptate velit esse cillum dolore eu fugiat nulla pariatur. Excepteur sint occaecat cupidatat non proident, sunt in culpa qui officia deserunt mollit anim id est laborum.', 'Mr White'),
	(2, '2011-07-28 02:03:14', 'More Hello World!', 'Lorem ipsum dolor sit amet, consectetur adipisicing elit, sed do eiusmod tempor incididunt ut labore et dolore magna aliqua. Ut ', 'Lorem ipsum dolor sit amet, consectetur adipisicing elit, sed do eiusmod tempor incididunt ut labore et dolore magna aliqua. Ut enim ad minim veniam, quis nostrud exercitation ullamco laboris nisi ut aliquip ex ea commodo consequat. Duis aute irure dolor in reprehenderit in voluptate velit esse cillum dolore eu fugiat nulla pariatur. Excepteur sint occaecat cupidatat non proident, sunt in culpa qui officia deserunt mollit anim id est laborum.', 'Mr Green');
Lastly, as we'll be using the Article model in every page, we'll include it in our bootstrap, just after where we loaded our libraries:
	// Models
	require 'models/Article.php';
Step 5: Application Front End
Now that we've got our application routes all laid out, and our models configured, it's time to start building some pages. Our blog front end is going to be pretty simple, with a list of all blog articles and a page to view individual articles.
Using the chainable fluent interface Paris and Idiorm provide, we can quickly construct database queries, without writing any raw SQL. Let's pull out all the articles for the homepage using the route closure:
$articles = Model::factory('Article')->order_by_desc('timestamp')->find_many();
We start by calling the model factory method, which will dispense a model object of the type Article. From here, we have a fluent interface, which means we can chain our commands together. Here, we're getting all the articles in the database, ordered by their timestamp, in descending order, and then telling Paris we want many articles returned. The result of this query is an array of Article model objects.
In order to get our results to show up in the browser, we need to render a template. Slim provides a simple render method to do this. The first parameter is the template to render, and the second parameter is an associative array of data to be made available to the template, which in our case is our article objects.
return $app->render('blog_home.html', array('articles' => $articles));
We'll be writing our templates using Twig, which provides a clean and simple tag structure with inheritance features that we can use to easily layout a webpage without using any PHP. This is great for prototyping, as it means focusing on shaping the page output, instead of wading through intermingled PHP and HTML spaghetti code.
We need a base layout file -- a basic HTML file in your templates folder called layout.html will do.
<!DOCTYPE html>
<html>
<head>
<title>{% block page_title %} {% endblock %}</title>
<meta charset="utf8" />
</head>
<body>
{% block content %} {% endblock %}
</body>
</html>
Notice the Twig block tags? Blocks are named regions that you can populate with content. We'll populate these blocks in our individual page templates.
Here's a quick crash course on Twig to get you going.
Any variable or expression within
{{ }}is automatically escaped and echoed, whilst the{% %}tags allow you to use execute statements such as if else conditionals or for loops.
Let's walk though creating the blog homepage template step by step. Don't forget to create a new template called blog_home.html in your templates folder.
The first thing we want our template to do is extend our layout. The extends tag lets Twig know our template will be inheriting from the layout.html file:
{% extends 'layout.html' %}
Now, we can use the same block syntax we used earlier to populate our layout. Let's set the page title:
{% block page_title %}My Blog{% endblock %}
Twig will populate the page_title region in the layout, with what we defined in our template. To illustrate the power of Twig further, let's create the content block, and use a few more Twig features:
	{% block content %}
		{% for article in articles %}

		{% else %}
			<p>There are currently no articles.</p>
		{% endif %}
	{% endblock %}
Remember we passed our retrieved articles array to our template earlier on? This is now available in the template with the name articles. Using Twigs logic tags, we loop through the articles variable to check whether it exists and if it doesn't, we put out a polite warning message. We consolidate a for loop and else conditional into one set of tags to easily handle an empty array.
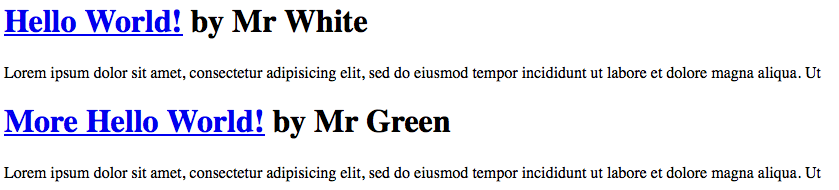
Let's display a list of blog articles on the homepage to get ourselves familiar with Twig's looping and variable output syntax:
{% block content %}
{% for article in articles %}
<h1><a href="/view/{{ article.id }}">{{ article.title }}</a> by {{ article.author }}</h1>
<p>{{ article.summary }}</p>
{% else %}
<p>There are currently no articles.</p>
{% endfor %}
{% endblock %}
The for loop syntax is the reverse of PHP's foreach statement -- we merely use the keyword in, instead of as. This loops through our array of article objects, making each available as a variable called article within the loop.
Inside the loop, we use the {{ }} tags, which will echo out an escaped value. Yes, Twig automatically escapes your output, so no more writing htmlentities()! We also access our articles title attribute using a dot (.) notation, instead of the usual PHP arrow (->). If you've written Javascript or Python, you should be familiar with some of this syntax.
So now that we have our basic homepage laid out, let's get cracking on that detail view.
	// Blog View.
	$app->get('/view/(:id)', function($id) use ($app) {
		$article = Model::factory('Article')->find_one($id);
		if (! $article instanceof Article) {
			$app->notFound();
		}

		return $app->render('blog_detail.html', array('article' => $article));
	});
Using Paris, we can quickly grab an article by its ID using the find_one() method. If no Article object instance is returned, we tell the Slim application that the page was not found, which will automatically trigger a 404 error.
If the article is found, we pass it to our detail template, which looks as follows:
{% extends 'layout.html' %}
{% block page_title %}{{ article.title }}{% endblock %}
{% block content %}
<h1>{{ article.title }}</h1>
<p>Published: {{ article.timestamp|date('jS F Y') }} by {{ article.author }}</p>
<p>{{ article.content }}</p>
<p><a href="/">Back to Homepage</a></p>
{% endblock %}
Using Twigs built in filters, we can access some basic PHP functions, such as date() in our templates. The class attribute article.timestamp is automatically given to our date filter as the first parameter, and our date format string becomes the second parameter.

We now have a front end working, albeit a simple one, but it didn't long to get it up and running. Paris makes it really easy to focus on pulling your data out of the database, and as we'll see when creating our admin centre, it makes it easy to insert and update records as well.
Step 6: Application Back End
Let's work on an admin centre for our blog, which we'll structure under the URI /admin. Seeing as we already have all the routes setup, let's write the logic for the main admin centre page. It will be identical to our main blog listing page, so the code below should make complete sense:
	// Admin Home.
	$app->get('/admin', function() use ($app) {
		$articles = Model::factory('Article')
						->order_by_desc('timestamp')
						->find_many();

		return $app->render('admin_home.html', array('articles' => $articles));
	});
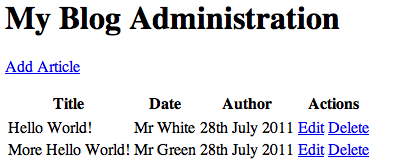
We'll use a simple table layout that has action links for adding, editing and deleting blog articles.
You're already familiar with how the block region system in Twig works, so let's just focus on our content block:
{% block content %}
<h1>My Blog Administration</h1>
<p><a href="/admin/add">Add Article</a></p>
{% if articles %}
<table>
<thead>
<tr>
<th>Title</th>
<th>Date</th>
<th>Author</th>
<th colspan="2">Actions</th>
</tr>
</thead>
<tbody>
{% for article in articles %}
<tr>
<td>{{ article.title }}</td>
<td>{{ article.author }}</td>
<td>{{ article.timestamp|date('jS F Y') }}</td>
<td><a href="/admin/edit/{{ article.id }}">Edit</a></td>
<td><a href="/admin/delete/{{ article.id }}">Delete</a></td>
</tr>
{% endfor %}
</tbody>
</table>
{% else %}
<p>There are currently no articles.</p>
{% endif %}
{% endblock %}
In this template, we're using the {% if %} {% else %} {% endif %} logic. We don't want to display our table markup if there are no articles, so we check for its existence before we decide what to display. We are also using the date filter method again, which I think you'll agree is pretty clean and legible.
The Main Admin Centre
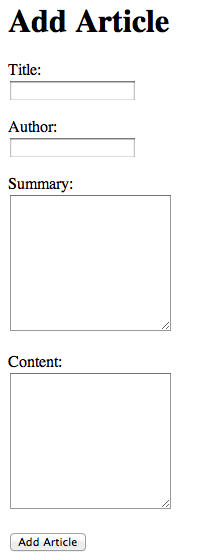
Let's move onto the real meat of our admin centre: manipulating content. What we need is a form that contains all the fields we'll need to add and edit our article. Luckily Twig supports reusable partials, so let's create a form partial called article_form.html:
<form action="{{ action_url }}" method="post">
<h1>{{ action_name }} Article</h1>
<p>
<label for="title">Title: </label><br />
<input type="text" name="title" value="{{ article.title|default('') }}" id="title" />
</p>
<p>
<label for="author">Author: </label><br />
<input type="text" name="author" value="{{ article.author|default('') }}" id="author" />
</p>
<p>
<label for="summary">Summary: </label><br />
<textarea name="summary" id="summary" rows="10" cols="20">{{ article.summary|default('') }}</textarea>
</p>
<p>
<label for="content">Content: </label><br />
<textarea name="content" id="content" rows="10" cols="20">{{ article.content|default('') }}</textarea>
</p>
<p>
<input type="submit" value="{{ action_name }} Article" />
</p>
</form>
A partial is simply a reusable template, it can still contain standard Twig logic. In our form template, we use the default filter, which outputs a default value if the variable it is filtering is empty or non-existent. In the case of our form fields, we'll output an empty string if none of the article attributes are present. We're also expecting two variables to get our form partial up and running. The first called action_name simply describes the form action for our users (I.e. Add or Edit) and the second action_url is used as the form action.
You'll no doubt have noticed how the logic for this page is split into two routes, one for GET and one for POST, which means we'll need to write a function to handle each method. Our GET route just needs to render out the page -- nothing too tricky. We'll just tell Twig to render a new template:
	// Admin Add.
	$app->get('/admin/edit/(:id)', function($id) {
		return $app->render('admin_input.html', array('action_name' => 'Add', 'action_url' => '/admin/add'));
	});
We pass the two variables expected by our form partial into the template. Speaking of which, let me explain how to use the partial in our admin_input.html template:
{% include 'article_form.html' %}
I'm sure you probably guessed it would be that simple, and it really is. We just need to include the partial inside one of our Twig block regions, and then it will appear. It will also have access to all variables within the scope of its main template (I.e. the two variables we passed in). Twig has some great variable scope controls and sandboxing security features, but they're best saved for another day.
Our final input template is pretty simple (see below) and will work well when we build our edit controls too. I suppose you're wondering why we bothered with a partial in the first palce, if both our add and edit forms will utilise the same template. The reason is because it makes reusing the form elsewhere during prototyping a real breeze to do, should it become necessary.
	{% extends 'layout.html' %}

	{% block page_title %}{{ action_name }} Article{% endblock %}

	{% block content %}
		{% include 'article_form.html' %}
	{% endblock %}
Add an Article Form
Let's work on that POST route. What we need to do is grab the posted data, and store it inside an article object. We don't bother with error checking in our example since we're only roughly prototyping our idea. We'll get Paris to dispense, or create, a new article object:
$article = Model::factory('Article')->create();
We can now go ahead with populating the article from the posted data. We'll grab the POST data from our Slim application object, which provides a handy helper method via its request object:
	$article->title 	= $app->request()->post('title');
	$article->author 	= $app->request()->post('author');
	$article->summary 	= $app->request()->post('summary');
	$article->content 	= $app->request()->post('content');
	$article->timestamp = date('Y-m-d H:i:s');
Paris takes care of escaping all our input when saving, which is handy should you ever decide to stage your prototype for others to access. All we need to do now is tell Paris to save the record.
$article->save();
Finally we tell our Slim application to take us back to the main admin dashboard page using the redirect helper method:
$app->redirect('/admin');
Onto our edit route GET method, which is simply an amalgamation of the things we've learnt from building our blog detail page and our admin add page. First, we need to load up the article we are editing, by retrieving the record with Paris:
	$article = Model::factory('Article')->find_one($id);
	if (! $article instanceof Article) {
		$app->notFound();
	}
Paris dispatches an an article object instance matching the article record ID received in our closure, or false if none exists. We then check to see if we got an instance back, if not we tell Slim to throw a 404 error.
We now tell Slim to render the input template, like in our add route, but passing in the loaded article object and the correct action URL:
	return $app->render('admin_input.html', array(
		'action_name' 	=> 	'Edit',
		'action_url' 	=> 	'/admin/edit/' . $id,
		'article'		=> 	$article
	));
Our POST edit route works almost identical to the add route, with the exception that we need to check if the article could be loaded before we go ahead and update its attributes:
	$article = Model::factory('Article')->find_one($id);
	if (! $article instanceof Article) {
		$app->notFound();
	}

	$article->title 	= $app->request()->post('title');
	$article->author 	= $app->request()->post('author');
	$article->summary 	= $app->request()->post('summary');
	$article->content 	= $app->request()->post('content');
	$article->timestamp = date('Y-m-d H:i:s');
	$article->save();

	$app->redirect('/admin');
We'll conclude our admin centre by building the delete route. We'll do this by first retrieving the record, similar to how we did on our blog detail page earlier on:
$article = Model::factory('Article')->find_one($id);
If Paris loaded an article, we need to delete it, then send the user back to the main admin page. Paris makes deleting a record as simple as can be:
	if ($article instanceof Article) {
		$article->delete();
	}

	$app->redirect('/admin');
And with that our basic prototype admin centre is done.
Step 7: Using Middleware
Our admin centre is now completed. It's pretty basic since it's only a prototype, but we still want some form of authorisation on it to protect it from prying eyes. Slim allows us to insert middleware into our routes. What this means is that we can create functions that get called before our routes response closure does.
We can use HTTP Basic Auth to protect our admin centre. Obviously, we'd be using something a little more secure in a live site, but for our prototype this is fine. At the very top of our index.php let's create two constants that contain our username and password:
	// Auth Details.
	define('USERNAME', 'admin');
	define('PASSWORD', 'password');
After we created our Slim application instance, we'll create a closure, which we'll bind to a variable to hold our authorisation middleware check:
	// Auth Check.
	$authCheck = function() use ($app) {

	};
If you've never used HTTP Basic Auth in PHP before, it's real easy. We can use the $_SERVER array to check what credentials were sent from the user's web browser, and compare them against our constants. We'll do this inside our newly created closure. The first thing we need to do in our auth check function is find out if any auth credentials were sent, and if they were, check to see if they match our constants:
	$authRequest = isset($_SERVER['PHP_AUTH_USER'], $_SERVER['PHP_AUTH_PW']);
	$authUser 	= $authRequest && $_SERVER['PHP_AUTH_USER'] === USERNAME;
	$authPass 	= $authRequest && $_SERVER['PHP_AUTH_PW'] === PASSWORD;
All we are doing here is checking whether the auth values exist and match, then storing the results in some variables. Assuming any of these variables is false, we know we need to prompt the user to authorize themselves:
if (! $authUser || ! $authPass) {
$app->response()->header('WWW-Authenticate: Basic realm="My Blog Administration"', '');
$app->response()->header('HTTP/1.1 401 Unauthorized', '');
$app->response()->body('<h1>Please enter valid administration credentials</h1>');
$app->response()->send();
exit;
}
We check if our auth credentials are okay. If they aren't, we send a response back with the appropriate headers and warning message. As you saw earlier, we could access the Slim framework request object to get access to our POST data. We can also access the internal response object, which makes it easy for us to push in our headers and overwrite the Slim response object body with a simple HTML warning message, before finally we force the script to exit.
In Slim you can add multiple callables to a route, and they are executed in the order they are specified. What this means is that we can easily prevent access to all of our routes by adding the auth checking closure before the response closure:
	// Admin Home.
	$app->get('/admin', $authCheck, function() use ($app) {
		//...
	});

	// Admin Add.
	$app->get('/admin/add', $authCheck, function() use ($app) {
		//...
	});

	// Admin Add - POST.
	$app->post('/admin/add', $authCheck, function() use ($app) {
		//...
	});

	// Admin Edit.
	$app->get('/admin/edit/(:id)', $authCheck, function($id) use ($app) {
		//...
	});

	// Admin Edit - POST.
	$app->post('/admin/edit/(:id)', $authCheck, function($id) use ($app) {
		//...
	});

	// Admin Delete.
	$app->get('/admin/delete/(:id)', $authCheck, function($id) use ($app) {
		//...
	});
And there you have it, our admin centre is now protected. Anyone who tries to access it will see a warning message and be prompted for their credentials.

Step 8: Summary
Hopefully this tutorial has shown you just how quick and easy it is to get a prototype up and running with a micro framework, an ORM and template language, whilst still maintaining good separation of concerns and readable code.
A powerful templating language can prevent your views from ending up as a mix of unreadable PHP and HTML spaghetti code, and how a fluent ORM can make tedious CRUD actions quick and painless.
These are just some of the many cool things you can do with Slim, Twig and Paris. If you dig in further, you can add relationships to your models with Paris, add macro snippets in Twig to accelerate your template development and use name based routing with Slim to make linking up your website content and changing URLs trivial.
Happy prototyping and thank you so much for reading!

Comments