Recent store trends show that offering your app in English will cover only about 25% of Windows Phone customers. Adding Spanish, French, Mandarin, Russian, and German can increase coverage to more than 75% of Windows Phone customers.
Introduction
In this tutorial, I will teach you how to localize a Windows Phone 8 app to reach more potential customers. I will show you how to set up your Windows Phone 8 project so that the entire user interface, including error messages, can be localized. At the end of the tutorial, you will have learned how to prepare your app so that it can be translated into multiple languages.
Consider the following best practices to build an app that can be easily localized:
- Create separate resource files for strings, images, and videos to make your code language independent. This ensures that it can support different languages.
- Enable multiline support and text wrap in controls. This gives you more space for displaying strings.
- Localize sentences rather than words. This may seem like extra work, but it's the best solution. It will ensure that, for example, error messages are properly translated in every language.
- Don't assume that every language uses parameters in the same order.
- Don't reuse strings, as it can cause localization problems if the context of the string changes. For example, a string like "text" and "fax" could be used as both a verb and a noun in English, which can complicate the translation process. Create a separate string for each context.
- Use unique attributes to identify your resources. You can access a resource only by using its unique value, which doesn't change, rather than by using the actual value of the resource.
We will first discuss the culture and language support offered by Windows Phone 8 and then discuss the steps involved in preparing an app for localization. After that, we will see how to build a localized application bar. We will finally discuss how to test a localized app.
1. Culture & Language Support
Numbers, currencies, date, and time are formatted differently in various cultures. Every supported culture is listed in the CultureInfo class. The CultureInfo class exposes properties to access region format data for a specific culture. You can also use the CultureInfo class with a culture code to access built-in formatting and sorting rules for that culture.
The display language determines the default user interface font. The Windows Phone 8.1 user interface is localized in 50 languages, but your app can display a much larger selection of languages. When you add support to your app for additional languages, Visual Studio generates an .resx file for each language.
The InitializeLanguage function in the App.xaml.cs file sets the app's RootFrame.Language based on the value of the AppResources.ResourceLanguage resource.
2. Standard Localization Steps
New projects and templates for Windows Phone 8 XAML apps provide several helpful new features:
- A neutral language resource file, AppResources.resx, is added by default to every new project.
- The
LocalizedStringshelper class is already configured to provide easy access to the resources that match the current culture of an app. - A new resource file with locale-specific name and app language initialization parameters in place is created when adding a Supported Culture from the Project Properties in Visual Studio.
Let's see how all this works by creating a sample app, with English as the base language.
Step 1: Binding XAML Text Elements
We first bind the XAML text elements to string resources.
Copy every hard-coded string in the app’s XAML that needs to be localized to a new row in the string table of your AppResources.resx file.
Next, refer the XAML elements to this string resource by adding the unique name and a standard binding clause in place of the hard-coded value.
The TextBlock shown below is bound using the string resource in place of the hard-coded text.
<TextBlock x:Name="AppTitleTextBlock"
    Text="{Binding Path=LocalizedResources.ApplicationTitle, Source={StaticResource LocalizedStrings}}"
    Style="{StaticResource PhoneTextNormalStyle}"/>
Search through the project’s code-behind for places where the code modifies a text attribute of a user interface element. Replace the hard-coded value with a reference to the string resource for each element.
ApplicationBarMenuItem about_appBarMenuItem = new ApplicationBarMenuItem(AppResources.AppBarAboutMenuItem);
Step 2: Adding Languages
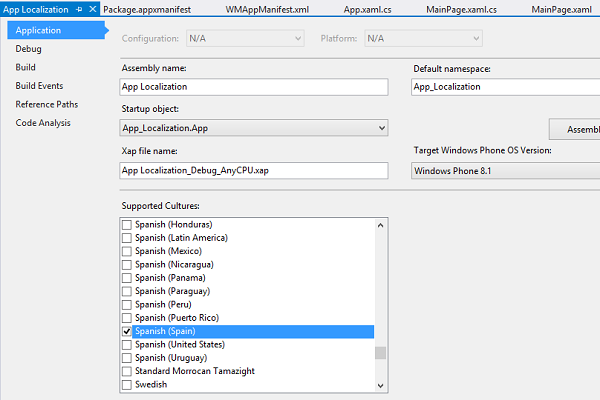
Adding languages to a Windows Phone 8 project in Visual Studio is simple. Navigate to the project’s property page and select the languages you want to support from the Supported Cultures list.
In the sample project, I have added Chinese (Simplified) and Spanish (Spain), whose locale codes are zh-Hans and es-ES, respectively. Select the languages you would like your app to support in the Supported Cultures box on the project’s Properties page.
When you save the project, Visual Studio creates an AppResources.resx file for each locale. The newly created resource file is pre-populated with the existing resources from the main AppResources.resx file.

Each resource file includes two special resources named ResourceLanguage and ResourceFlowDirection. These two resources are used when the InitializeLanguage method is called from the App.xaml.cs constructor. Their values are checked automatically to ensure that they match the culture of the resource file loaded at run time.
The ResourceLanguage value is initialized with the locale name of the resource file and is used to set the RootFrame.Language value. The ResourceFlowDirection value is set to the traditional direction of that resource language.
Note that ResourceLanguage and ResourceFlowDirection can be modified to align with your app's design style.
Step 3: Using the Multilingual App Toolkit for Translation
The Multilingual App Toolkit (MAT), which is integrated into Visual Studio, provides translation support, translation file management, and localization tools to create Windows Phone and Windows Store apps. Here are some advantages of using the Multilingual App Toolkit:
- It centralizes string resource and metadata management.
- The tool makes it easy to create, import, and export translation files in the XLIFF format, a standard in the industry.
- There's no need to switch back and forth between resource files.
- It is easy to add new translated languages right from the project's context menu.
To start using the Multilingual App Toolkit for your Windows Phone project, download and install the Visual Studio extension from MSDN. With the toolkit installed, select the project and select Enable Multilingual App Toolkit from the Tools menu as shown below.
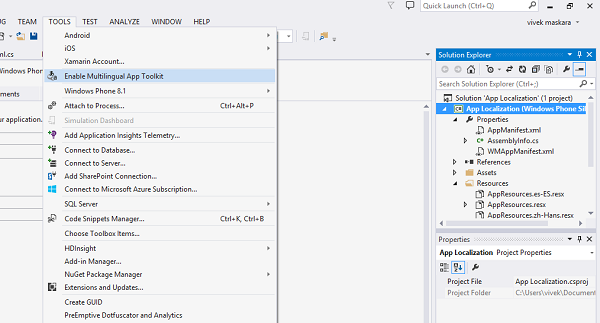
Note that localized resources are defined per project, not per solution. This means that Visual Studio's focus must be within the project for the Enable Multilingual App Toolkit option to be available from the Tools menu.
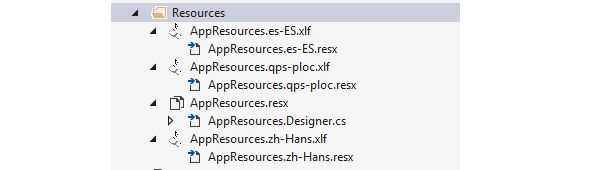
After enabling the Multilingual App Toolkit, Visual Studio will add files to the Resource folder of your project, one of them having a new type and name, AppResources.qps.ploc.xlf. The .xlf extension refers to the XLIFF standard file format I mentioned earlier.
Additional languages can be added via the Multilingual App Toolkit. This results in a new supported culture being added to your project. It also causes the addition of a supported language in the project's WMAppManifest.xml.
To translate the resources to Chinese (Simplified) and Spanish (Spain), right-click the .xlf file and select Generate machine translations from the contextual menu. Apply the translations and rebuild the project to see the changes being reflected in the .resx files for the two additional languages.
3. Building a Localized Application Bar
You can add an app bar to a page in your app, either in the page XAML or by using C# in the page code-behind. ApplicationBar is not a DependencyObject and doesn't support bindings. This means that if you need to localize it, then build the ApplicationBar from code-behind C#.
When a new Windows Phone 8 or a Windows Phone 8.1 Silverlight project is created, some commented code for localizing the application bar is added to MainPage.xaml.cs by default. Uncomment the method BuildLocalizedApplicationBar and add the buttons, menu items, and associated resources that you would like to use in your app.
private void BuildLocalizedApplicationBar()
{
    // Set the page's ApplicationBar to a new instance of ApplicationBar.
    ApplicationBar = new ApplicationBar();

    // Create a new button and set the text value to the localized string from AppResources.
    ApplicationBarIconButton appBarButton = new ApplicationBarIconButton(new Uri("/Assets/Check.png", UriKind.Relative));
    appBarButton.Text = AppResources.AppBarButtonText;
    appBarButton.Click += appBarButton_Click;
    ApplicationBar.Buttons.Add(appBarButton);

    // Create a new menu item with the localized string from AppResources.
    ApplicationBarMenuItem zh_appBarMenuItem = new ApplicationBarMenuItem("中文");
    ApplicationBar.MenuItems.Add(zh_appBarMenuItem);
    zh_appBarMenuItem.Click += new EventHandler(zh_appBarMenuItem_Click);

    ApplicationBarMenuItem en_appBarMenuItem = new ApplicationBarMenuItem("english");
    ApplicationBar.MenuItems.Add(en_appBarMenuItem);
    en_appBarMenuItem.Click += new EventHandler(en_appBarMenuItem_Click);

    ApplicationBarMenuItem es_appBarMenuItem = new ApplicationBarMenuItem("español");
    ApplicationBar.MenuItems.Add(es_appBarMenuItem);
    es_appBarMenuItem.Click += new EventHandler(es_appBarMenuItem_Click);
}
The BuildLocalizedApplicationBar method creates a new instance of ApplicationBar. Buttons and menu items are added to it and the text value is set to the localized string from AppResources. The app bar button has a binding to AppBarButtonText, which is defined in the AppResouces.resx file. Call the BuildLocalizedApplicationBar method from page's constructor to load the ApplicationBar.
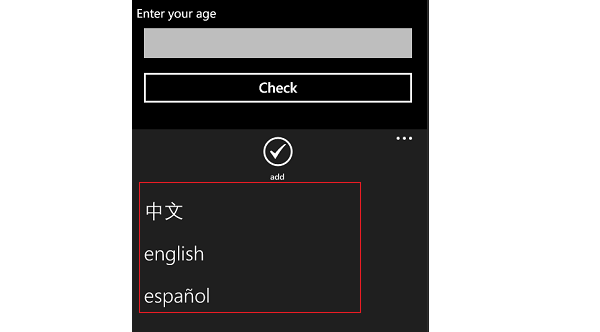
In the sample app, users can select their display language via the ApplicationBar menu. As shown in the screenshot below, the menu items stay consistent across display languages while the app bar button is localized.
When a user taps a display language in the ApplicationBar menu, the SetUILanguage method is called. The SetUILanguage method, with the name of the target language passed as a parameter, is used to set the display language.
private void SetUILanguage(String locale)
{
    CultureInfo newCulture = new CultureInfo(locale);
    Thread.CurrentThread.CurrentCulture = newCulture;
    Thread.CurrentThread.CurrentUICulture = newCulture;
    FlowDirection flow = (FlowDirection)Enum.Parse(typeof(FlowDirection),AppResources.ResourceFlowDirection);
    App.RootFrame.FlowDirection = flow;

    // Set the Language of the RootFrame to match the new culture.
    App.RootFrame.Language = XmlLanguage.GetLanguage(AppResources.ResourceLanguage);
}
The SetUILanguage method first resets the CurrentUICulture of the app to the locale supplied in the call. Any resource-bound text rendered by the app will use the resources of the specified locale after this call.
Next, set the FlowDirection and Language of the RootFrame, which will cause the user interface rendered by the app to follow the new settings.
The BuildLocalizedApplicationBar method is called from the page's constructor after the call to InitializeComponent to localize the ApplicationBar.
public MainPage()
{
    InitializeComponent();
    // code to localize the ApplicationBar
    BuildLocalizedApplicationBar();
}
4. Testing a Localized App
The Windows Phone emulator can be used to test the localized app. Change the display language to the language that the app targets to verify that the content renders correctly.
- Click Start debugging from the Debug menu.
- Navigate to region & language from Settings in the app list.
- Click Display language and select one of the languages. Use the table in the Mapping Culture Names to Display Languages section to determine which display language string to select.
- Accept the changes and restart the emulator.
- Launch your app by returning to the app list, and verify that the language of each localized string matches the display language setting that you selected earlier.
Here's how the text changes when the display language is changed. Notice that the menu items remain consistent even if the display language changes.

To dynamically change the language, call the SetUILanguage method with the name of the target language passed as a parameter.
In the sample app, every user interface element of the MainPage.xaml has already been rendered, so the currently displayed elements need to be refreshed after changing the language. The updateUI method refreshes the user interface elements of MainPage.xaml.
private void updateUI()
{
    apptitle.Text = AppResources.ApplicationTitle;
    pagetitle.Text = AppResources.mainpagetitle;
    usermessage.Text = AppResources.displayMessage;
    checkbutton.Content = AppResources.checkEligibility;
    enterage.Text = AppResources.userMessage;
}
Note that the placement of each user interface element on the screen is unchanged, regardless of the display language.
Conclusion
In this tutorial, you have learned how to prepare your app for localization. Hard-coded XAML and code-behind strings that need to be localized are placed in a resource file string table and given a unique key.
Each hard-coded value is replaced by a binding clause in XAML or a resource reference in code using the key for its related string resource.
You can add additional display languages and use the Multilingual App Toolkit to make the end-to-end process of translating your app substantially easier. Feel free to download the tutorial's source files to use as a reference.

Comments