Navigation controllers are one of the primary tools for presenting multiple screens of content with the iOS SDK. This article will teach you how to do just that!
Introduction
As we saw in the previous lesson, UIKit's table view class is a great way to present tabular or columnar data. However, when content needs to be spread across multiple screens, a navigation controller, implemented in the UINavigationController class, is often the tool of choice.
Just like any other UIViewController subclass, a navigation controller manages a UIView instance. The navigation controller's view manages several subviews including a navigation bar at the top, a view containing custom content, and an optional toolbar at the bottom.
A navigation controller creates and manages a hierarchy of view controllers, which is known as a navigation stack. Once you understand how navigation controllers work they'll become easy to use.
In this article, we'll create a new iOS application to become familiar with the UINavigationController class. You'll notice that the combination of a navigation controller and a stack of (table) view controllers is an elegant and powerful solution.
In addition to the UINavigationController class, I will also cover the UITableViewController class, another UIViewController subclass. The UITableViewController class manages a UITableView instance instead of the default UIView instance. By default, it adopts the UITableViewDataSource and UITableViewDelegate protocols, which will save us quite a bit of time.
Another Project
The application that we are about to create is named Library. With our application, users can browse a list of authors and view the books they've written. The list of authors is presented in a table view.
When the user taps the name of an author, a list of books written by the author animates into view. Similarly, when the user selects a title from the list of books, another view animates into view, showing a fullscreen image of the book cover. Let's get started.
Creating the Project
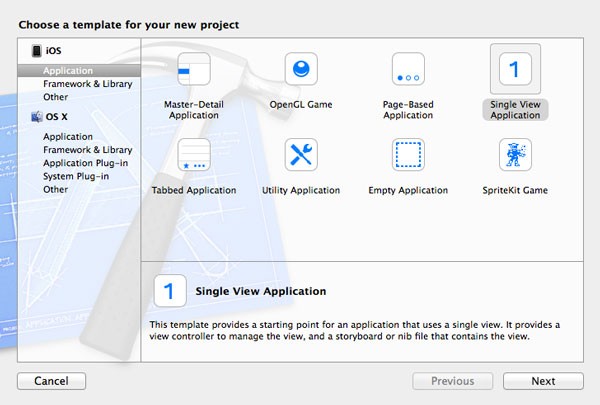
Open Xcode, create a new project by selecting New > Project... from the File menu, and select the Single View Application template from the list of iOS templates.
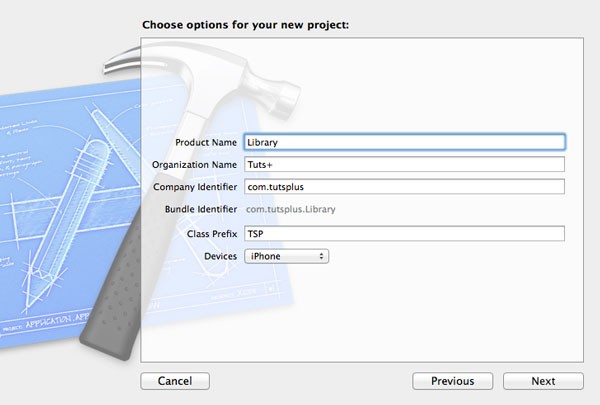
Name the project Library, assign an organization name, and a company identifier. Choose a class prefix and set Devices to iPhone. Tell Xcode where you want to save the project and hit Create.
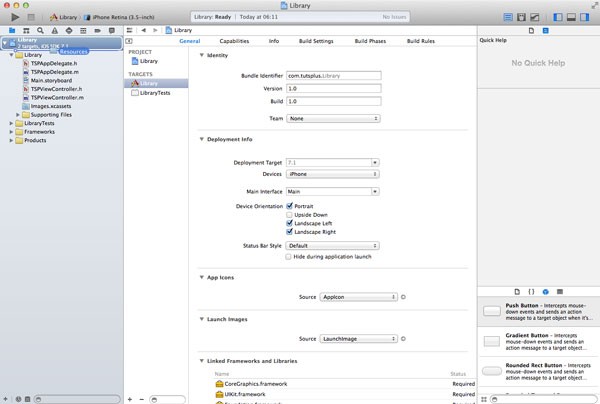
The template that we chose for this project contains an application delegate class (TSPAppDelegate), a storyboard, and a UIViewController subclass (TSPViewController).
Open TSPAppDelegate.m and take a look at the implementation of application:didFinishLaunchingWithOptions:. Its implementation should look familiar by now.
- (BOOL)application:(UIApplication *)application didFinishLaunchingWithOptions:(NSDictionary *)launchOptions {
    return YES;
}
Adding Resources
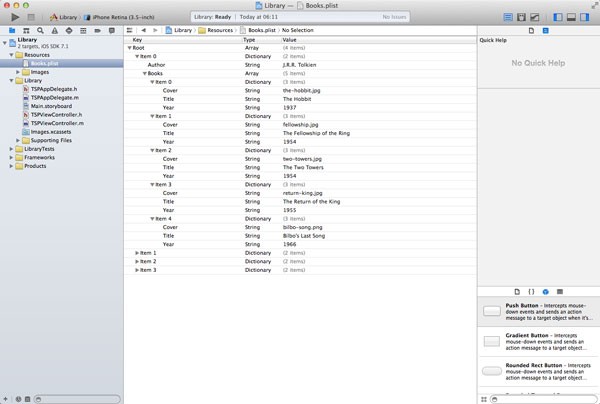
The source files provided with this article include the data that we will be using. You can find them in the folder named Resources. The folder includes a property list (Books.plist) containing information about the authors, the books they've written, and some information about each book, and an image for each book included in the property list.
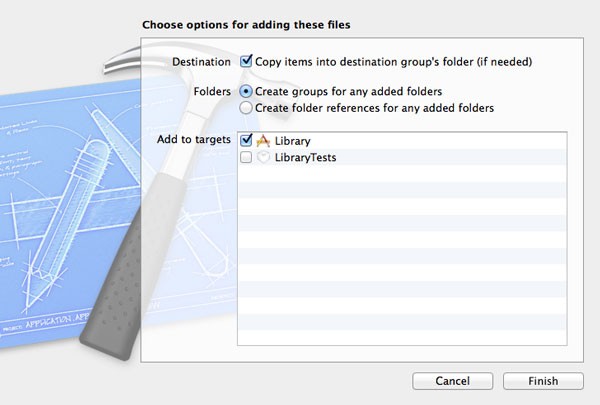
Drag the Resources folder into your project to add them to the project. Xcode will show you a few options when you add the folder to the project. Make sure to check the checkbox labeled Copy items into destination group's folder (if needed) and don't forget to add the files to the Library target.
Property Lists
Before continuing, I want to take a moment to talk about property lists and what they are. A property list is nothing more than a representation of an object graph. As we saw earlier in this series, an object graph is a group of objects forming a network through the connections or references they share with each other.
It's easy to read and write property lists from and to disk, which makes them ideal for storing small amounts of data. When working with property lists, it's also important to remember that only certain types of data can be stored in property lists, such as strings, numbers, dates, arrays, dictionaries, and binary data.
Xcode makes browsing property lists very easy as we saw earlier. Select Books.plist from the Resources folder you added to your project and browse the contents of Books.plist using Xcode's built-in property list browser. This will be a helpful tool later in this article when we start working with the contents of Books.plist.
Subclassing UITableViewController
Before we can start using the data stored in Books.plist, we first need to lay some groundwork. This includes creating a view controller that manages a table view, which will display the authors listed in Books.plist.
Instead of using a UIViewController subclass and adding a table view to the view controller's view, as we did in the previous article, we'll create a UITableViewController subclass as I alluded to earlier in this article.
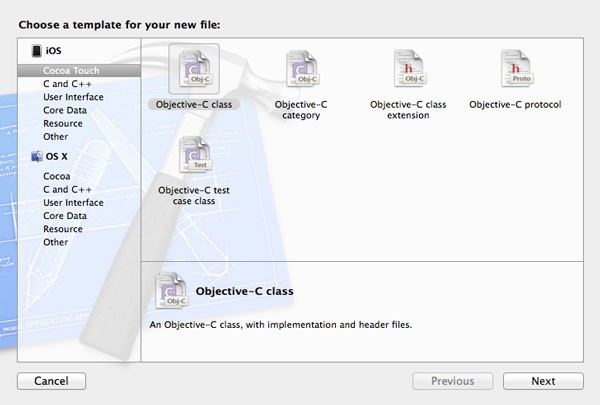
Start by removing TSPViewController.h and TSPViewController.m from your project. Create a new class by selecting New > File... from the File menu. Select the Objective-C class template in the list of iOS > Cocoa Touch templates.
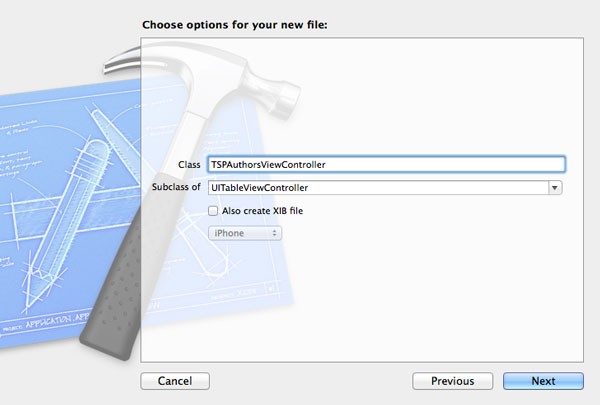
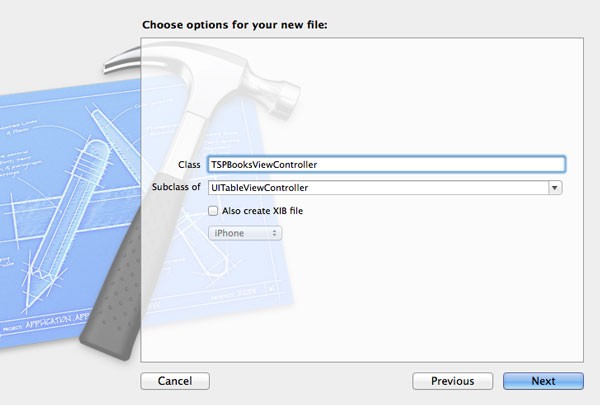
Name the new class TSPAuthorsViewController and make it a subclass of UITableViewController. There's no need to check the checkbox labeled Also create XIB file as we'll be using the storyboard to create the application's user interface.
Open Main.storyboard to replace the view controller in the storyboard with a table view controller. Select the view controller in the storyboard, hit the delete key, and drag a UITableViewController instance from the Object Library on the right. Select the new view controller, open the Identity Inspector on the right, and set its class to TSPAuthorsViewController.
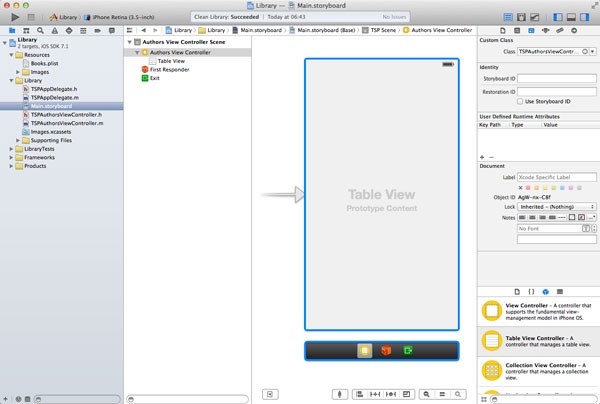
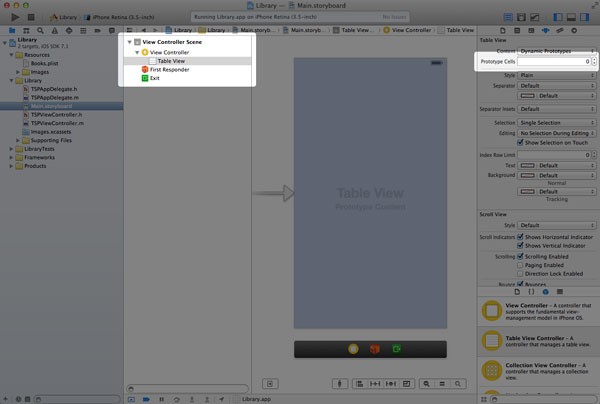
Next, select the table view object in the workspace or from the list of objects on the left, open the Attributes Inspector on the right, and set Prototype Cells to 0. We won't be using prototype cells in this article.
Populating the Table View
Open TSPAuthorsViewController.m and inspect the file's contents. BecauseTSPAuthorsViewController is a subclass of UITableViewController, the implementation file is populated with default implementations of the required and a few optional methods of the UITableViewDataSource and UITableViewDelegate protocols.
Before we can display data in the table view, we need data to display. As I mentioned earlier, the property list Books.plist will serve as the data source of the table view. To use the data stored in Books.plist, we first need to load its contents into an object, an array to be precise.
Create a property of type NSArray in the view controller's header file and name it authors.
#import <UIKit/UIKit.h>

@interface TSPAuthorsViewController : UITableViewController

@property (strong, nonatomic) NSArray *authors;

@end
The view controller's viewDidLoad method is a good place to load the data from Books.plist into the view controller's authors property. We can do this using an NSArray class method, arrayWithContentsOfFile:.
self.authors = [NSArray arrayWithContentsOfFile:filePath];
The method accepts a file path, which means that we need to figure out what the file path of Books.plist is. The file, Books.plist, is located in the application bundle, which is a fancy name for the directory that contains the application executable and the application's resources—images, sounds, etc.
To obtain the file path of Books.plist, we first need a reference to the application's main bundle by using mainBundle, an NSBundle class method. The next step is to ask the application's bundle for the path of one of its resources, Books.plist. We do this by sending it a message of pathForResource:ofType: and passing the name and type (extension) of the file we want the path for. We store the file path in an instance of NSString as shown below.
NSString *filePath = [[NSBundle mainBundle] pathForResource:@"Books" ofType:@"plist"];
If we put the two pieces together, we end up with the following implementation of viewDidLoad. I also added an NSLog statement to log the contents of the authors property to the console so we can inspect its contents after loading the property list.
- (void)viewDidLoad {
    [super viewDidLoad];

    NSString *filePath = [[NSBundle mainBundle] pathForResource:@"Books" ofType:@"plist"];
    self.authors = [NSArray arrayWithContentsOfFile:filePath];
    NSLog(@"authors > %@", self.authors);
}
If you've read the previous article of this series, then populating the table view should be straightforward. The table view will contain only one section, which makes the implementation of numberOfSectionsInTableView: trivial.
- (NSInteger)numberOfSectionsInTableView:(UITableView *)tableView {
    return 1;
}
The number of rows in the only section of the table view is equal to the number of authors in the authors array so all we need to do is count the array's items.
- (NSInteger)tableView:(UITableView *)tableView numberOfRowsInSection:(NSInteger)section {
    return [self.authors count];
}
The implementation of tableView:cellForRowAtIndexPath: is similar to the one we saw in the previous article. The main difference is how we fetch the data that we display in the table view cell.
The array of authors contains an ordered list of dictionaries, with each dictionary containing two key-value pairs. The object for the key named Author is an instance of NSString, whereas the object for the key Books is an array of dictionaries with each dictionary representing a book written by the author. Open Books.plist in Xcode to inspect the structure of the data source if this isn't clear.
With this information in mind, the implementation of tableView:cellForRowAtIndexPath: shouldn't be too difficult.
- (UITableViewCell *)tableView:(UITableView *)tableView cellForRowAtIndexPath:(NSIndexPath *)indexPath {
    static NSString *CellIdentifier = @"Cell Identifier";

    [tableView registerClass:[UITableViewCell class] forCellReuseIdentifier:CellIdentifier];

    UITableViewCell *cell = [tableView dequeueReusableCellWithIdentifier:CellIdentifier forIndexPath:indexPath];

    // Fetch Author
    NSDictionary *author = [self.authors objectAtIndex:[indexPath row]];

    // Configure Cell
    [cell.textLabel setText:[author objectForKey:@"Author"]];

    return cell;
}
The keys of a dictionary are case sensitive so double-check the keys if you run into any problems. Build and run the project once more to see the result.
Adding a Navigation Controller
Adding a navigation controller is easy using a storyboard. However, before we add a navigation controller, it's important to understand how navigation controllers work on iOS.
Just like any other UIViewController subclass, a navigation controller manages a UIView instance. The navigation controller's view manages several subviews including a navigation bar at the top, a view containing custom content, and an optional toolbar at the bottom. What makes a navigation controller unique is that it manages a stack of view controllers.

The term stack can almost be taken literally. When a navigation controller is initialized, a root view controller is specified as we'll see in a moment. The root view controller is the view controller at the bottom of the navigation stack.
By pushing another view controller onto the navigation stack, the view of the root view controller is replaced with the view of the new view controller. When working with navigation controllers, the visible view is always the view of the topmost view controller of the navigation stack.
When a view controller is removed or popped from the navigation stack, the view of the view controller beneath it becomes visible again. By pushing and popping view controllers onto and from a navigation controller's navigation stack, a view hierarchy is created and, as a result, a data hierarchy can be created. Let's see how all this pushing and popping works in practice.
Revisit the project's storyboard (Main.storyboard) and select the view controller. To add a navigation controller to the mix, select Embed In > Navigation Controller from the Editor menu. A few things have changed:
- the navigation controller is the storyboard's initial view controller
- a new scene named Navigation Controller Scene has been added
- a navigation bar is added to the navigation and authors view controller
- the navigation controller and the authors view controller are connected by a segue
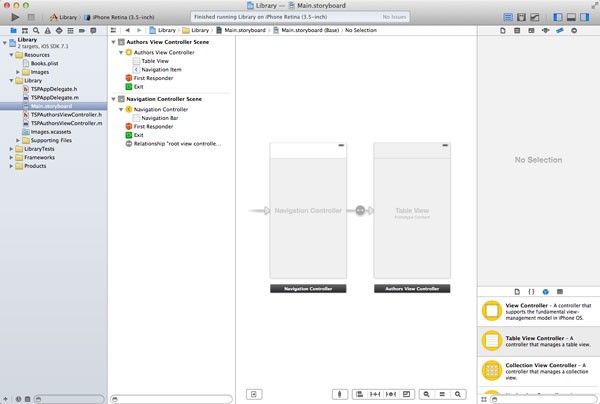
Segues are common in storyboards and we'll learn more about them later in this series. There are various kinds of segues and the segue that connects the navigation and authors view controller is a relationship segue.
Every navigation controller has a root view controller, the view controller at the bottom of the navigation stack. It cannot be popped from the navigation stack as a navigation view controller always needs a view controller to show to the user.
The segue between the navigation controller and the authors view controller symbolizes that the latter is the root view controller of the navigation controller.
The navigation bar at the top of the navigation controller and authors view controller is something you get for free when working with navigation controllers. It's an instance of UINavigationBar and helps navigating the navigation stack.
Even though the navigation controller is the initial view controller of the storyboard, the authors view controller is the first view controller we'll see when launching the application. As I mentioned earlier, the navigation controller is nothing more than a wrapper that helps navigate between a hierarchy of view controllers. Its view is populated by the views of the view controllers in its navigation stack.
To add a title to the navigation bar, insert the following line into the viewDidLoad method of the TSPAuthorsViewController class.
- (void)viewDidLoad {
    [super viewDidLoad];

    // Set Title
    self.title = @"Authors";

    // Load Books
    NSString *filePath = [[NSBundle mainBundle] pathForResource:@"Books" ofType:@"plist"];
    self.authors = [NSArray arrayWithContentsOfFile:filePath];
}
Every view controller has a title property that is used in various places like the navigation bar. Build and run the project to see the result of this small change.
Pushing and Popping
It's time to add the ability to see a list of books when the user taps the name of an author. This means that we need to capture the selection, the name of the author, instantiate a new view controller based on that selection, and push the new view controller onto the navigation stack to show it to the user. Does this sound complicated? It's not. Let me show you.
Another Table View Controller
Why not display the list of books in another table view. Create a new subclass of UITableViewController and name it TSPBooksViewController.
Loading the list of books is easy as we saw earlier, but how does the books view controller know what author the user has selected? There are several ways to tell the new view controller about the user's selection, but the approach that Apple recommends is known as passing by reference. How does this work?
The books view controller declares a property named author, which can be set to configure the books view controller to display the books of the selected author. Open TSPBooksViewController.h and add a property of type NSString and name it author as shown below. You can ignore the nonatomic keyword for now. It's not important to our story at the moment.
#import <UIKit/UIKit.h>

@interface TSPBooksViewController : UITableViewController

@property (nonatomic) NSString *author;

@end
Remember from a few lessons ago that the advantage of Objective-C properties is that getter and setter methods for the corresponding instance variables are generated automatically for us. There are times, however, when it's necessary or useful to implement your own getter or setter method. This is one of those times.
When the author property of the TSPBooksViewController class is set, the data source of the table view needs to be modified. We'll do this in the setter method of the _author instance variable. Let's see how this works.
Open TSPBooksViewController.m and add a property to the @interface block at the top of the implementation file. You might be surprised to see an @interface block in the class's implementation file. This is known as a class extension and, as the name implies, it allows you to extend the interface of the class. The advantage of adding a class extension to the implementation file of a class is that the properties and instance variables you specify in a class extension are private, which means that they're only accessible by instances of the class.
@interface MTAuthorsViewController ()

@property NSArray *books;

@end
By declaring the books property in the class extension of TSPBooksViewController, it can only be accessed and modified by an instance of the class. If an instance variable or property should only be accessed by instances of the class, then it is recommended to declare it as private.
The setter method of the view controller's _author instance variable is pasted below. You can add it anywhere in the class's @implementation block. Don't be intimidated by the implementation. Let's start at the top.
- (void)setAuthor:(NSString *)author {
    if (_author != author) {
        _author = author;

        NSString *filePath = [[NSBundle mainBundle] pathForResource:@"Books" ofType:@"plist"];
        NSArray *authors = [NSArray arrayWithContentsOfFile:filePath];

        int count = authors.count;
        for (int i = 0; i < count; i++) {
            NSDictionary *authorDictionary = [authors objectAtIndex:i];
            NSString *tempAuthor = [authorDictionary objectForKey:@"Author"];

            if ([tempAuthor isEqualToString:_author]) {
                self.books = [authorDictionary objectForKey:@"Books"];
            }
        }
    }
}
We first verify if the new value, author, differs from the the current value of _author. The underscore in front of author indicates that we are directly accessing the instance variable. The reasoning for this check is that it's usually not necessary to set the value of an instance variable if the value hasn't changed.
If the new value is different from the current value, then we update the value of the _author instance variable with the new value. A traditional setter usually ends here. However, we are implementing a custom setter method for a reason, to dynamically set or update the books array, the data source of the table view.
The next two lines should be familiar. We load the property list from the application bundle and store its contents in an array named authors. We then iterate over the list of authors and search for the author that matches the author stored in _author.
The most important snippet of this setter is the comparison between tempAuthor and _author. If you were to use a double equal sign (==) for this comparison, you would be comparing the references to the objects (pointers) and not the strings the objects are managing. The NSString class defines a method, isEqualToString:, that allows us to compare the strings instead of the object pointers.
For more information about setters and getters (accessors), I'd like to refer to Apple's documentation. It's well worth your time to read this section of the documentation.
The rest of the TSPBooksViewController class is easy compared to what we've covered so far. Take a look at the implementations of the three UITableViewDataSource protocol methods shown below.
- (NSInteger)numberOfSectionsInTableView:(UITableView *)tableView {
    return 1;
}
- (NSInteger)tableView:(UITableView *)tableView numberOfRowsInSection:(NSInteger)section {
return [self.books count];
} - (UITableViewCell *)tableView:(UITableView *)tableView cellForRowAtIndexPath:(NSIndexPath *)indexPath {
static NSString *CellIdentifier = @"Cell Identifier";
[tableView registerClass:[UITableViewCell class] forCellReuseIdentifier:CellIdentifier];
UITableViewCell *cell = [tableView dequeueReusableCellWithIdentifier:CellIdentifier forIndexPath:indexPath];
// Fetch Book
NSDictionary *book = [self.books objectAtIndex:[indexPath row]];
// Configure Cell
[cell.textLabel setText:[book objectForKey:@"Title"]];
return cell;
} Pushing a View Controller
When the user taps an author's name in the authors view controller, the application should show the list of books written by the author. This means that we need to instantiate an instance of the TSPBooksViewController class, tell the instance what author was selected by the user, and push the new view controller onto the navigation stack to show it.
Storyboards will helps us with this. Open Main.storyboard, drag another UITableViewController instance from the Object Library, and set its class to TSPBooksViewController in the Identity Inspector.

Select the table view in the new view controller and set the number of Prototype Cells to 0 in the Attributes Inspector as we did for the authors view controller. To push the books view controller onto the navigation stack of the navigation controller, we need to create another segue. This time, however, we need to create a manuel segue, a push segue to be precise.
Select the authors view controller in the storyboard, hold the Control key, and drag from the authors view controller to the books view controller. Select Push from the menu that appears to create a segue between the two view controllers.
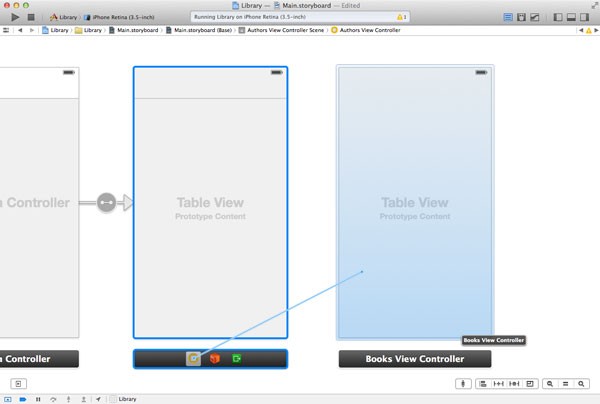
There's one more thing we need to do before returning to the implementation of the books view controller. Select the segue we created, open the Attributes Inspector on the right, and set the segue's Identifier to BooksViewController. By giving the segue a name, we can refer to it in code.
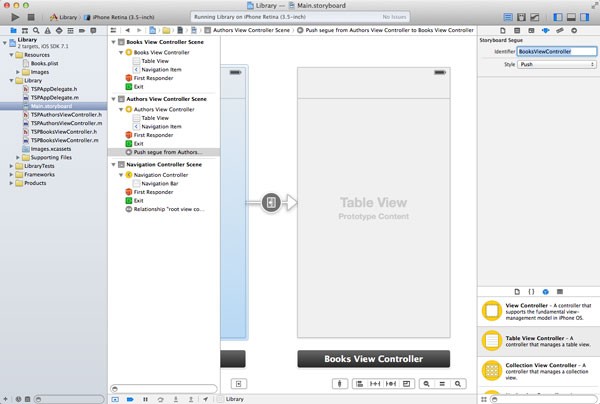
To put the segue to use, we need to implement the tableView:didSelectRowAtIndexPath: method in the authors view controller. This method is defined in the UITableViewDelegate protocol as we saw in the previous article about table views.
Before we get started, add an import statement at the top of TSPAuthorsViewController.m to import the header file of theTSPBooksViewController class.
#import "TSPBooksViewController.h"
We also need to declare a private property to temporarily store the user's selection, the author the user has selected from the table view. We already saw how to do this in the TSPBooksViewController class.
@interface TSPAuthorsViewController ()

@property NSString *author;

@end
The implementation of tableView:didSelectRowAtIndexPath: is short. We deselect the row the user has tapped, fetch the author dictionary that corresponds with the user's selection, extract the name of the author, and perform the segue that connect the authors view controller with the books view controller.
- (void)tableView:(UITableView *)tableView didSelectRowAtIndexPath:(NSIndexPath *)indexPath {
    [tableView deselectRowAtIndexPath:indexPath animated:YES];

    // Fetch Author
    NSDictionary *author = [self.authors objectAtIndex:[indexPath row]];
    self.author =  [author objectForKey:@"Author"];

    // Perform Segue
    [self performSegueWithIdentifier:@"BooksViewController" sender:self];
}
The performSegueWithIdentifier:sender: method takes two arguments, the identifier of the segue and the sender of the message. It should now be clear why we gave the push segue an identifier in the storyboard?
We set the author property of the authors view controller, but how does the books view controller know what author the user selected? Before a segue is performed, the view controller receives a message of prepareForSegue:sender:. In this method, the view controller can configure the destination view controller, the books view controller. Let's implement prepareForSegue:sender: to see how this works.
- (void)prepareForSegue:(UIStoryboardSegue *)segue sender:(id)sender {
    if ([segue.destinationViewController isKindOfClass:[TSPBooksViewController class]]) {
        // Configure Books View Controller
        [(TSPBooksViewController *)segue.destinationViewController setAuthor:self.author];

        // Reset Author
        [self setAuthor:nil];
    }
}
This method is invoked whenever a segue is performed. We first check if the destinationViewController property of the segue is an instance of the TSPBooksViewController class. We use isKindOfClass: for this. We then set the author property of the books view controller and set the author property of the authors view controller to nil. The latter is a best practice.
You may be wondering when we initialize the books view controller? We don't explicitly instantiate an instance of the books view controller. The storyboard knows what class it needs to instantiate and it does this for us.
Before you run your application, open TSPBooksViewController.m and set the view controller's title to the author property. This will update the title in the navigation bar.
- (void)viewDidLoad {
    [super viewDidLoad];

    // Set Title
    self.title = self.author;
}
Build and run the project. Tap the name of an author in the table view and observe how a new instance of the TSPBooksViewController class is pushed onto the navigation stack and displayed to the user. Have you noticed that we also get a back button for free when using a navigation controller. The title of the back button is taken from the title of the previous view controller.
Adding a Book Cover
When the user taps a book title in the books view controller, the application should show the book's cover. We won't be using a table view controller for this. Instead, we use a plain vanilla UIViewController subclass and display the book cover in an instance of the UIImageView class. The UIImageView class is a UIView subclass built for displaying images.
Create a new subclass of UIViewController—not UITableViewController—and name it TSPBookCoverViewController.
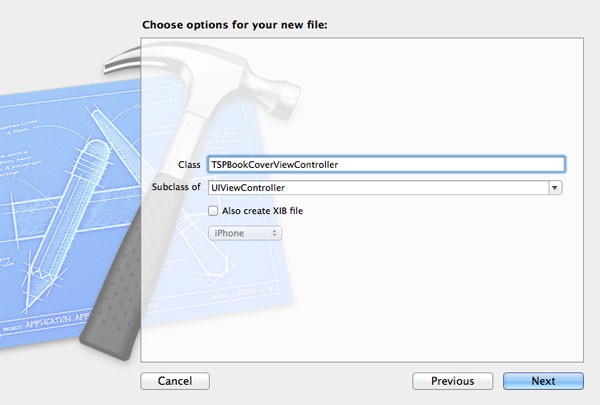
We need to add two properties to the new view controller's header file. The first property is of type UIImage, a reference to the book cover that will be displayed in the image view. The second property is a reference to the image view that we'll be using to display the book cover. The IBOutlet keyword indicates that we'll make the connection in the storyboard. Let's do that now.
#import <UIKit/UIKit.h>

@interface TSPBookCoverViewController : UIViewController

@property UIImage *bookCover;
@property IBOutlet UIImageView *bookCoverView;

@end
Open the storyboard, drag a UIViewController instance from the Object Library, and set its class to TSPBookCoverViewController in the Identity Inspector.
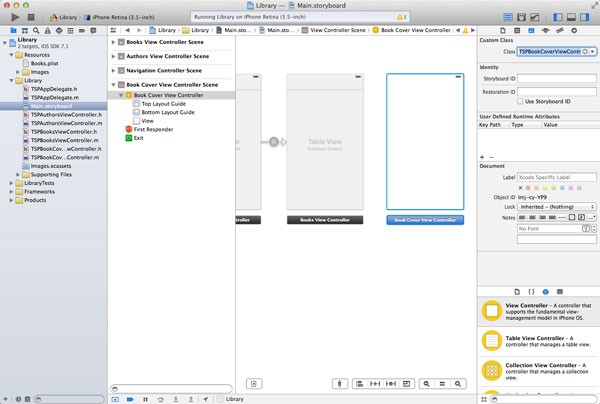
Drag a UIImageView instance from the Object Library, make it cover the entire view of the view controller, and connect it with the bookCoverView outlet of the view controller.
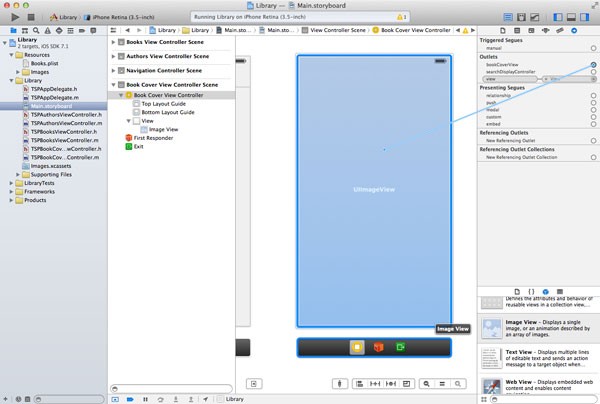
Before we implement the view controller, create a push segue between the books view controller and the book cover view controller, setting its identifier to BookCoverViewController.
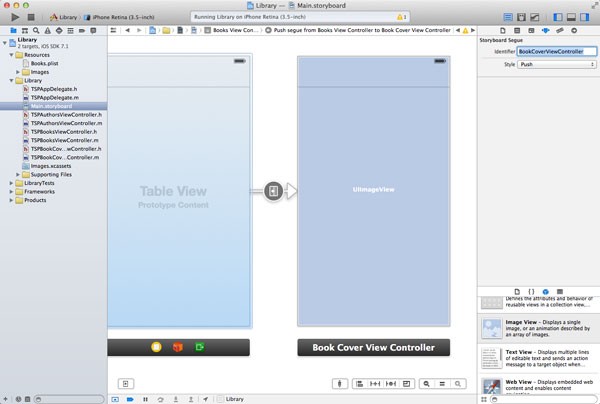
We could override the setter method of the _bookCover instance variable, but to show you an alternative approach, we set the image view's image property in the view controller's viewDidLoad method as shown below. We first check if the bookCover property is set—not nil—and then set the bookCoverView's image property to the value stored in the bookCover property.
- (void)viewDidLoad {
    [super viewDidLoad];

    if (self.bookCover) {
        [self.bookCoverView setImage:self.bookCover];
    }
}
Closing the Loop
All that's left for us to do, is show the book cover when the user tap's a book title in the books view controller. That means implementing the table view delegate method tableView:didSelectRowAtIndexPath: in the TSPBooksViewController class. Don't forget to first import the header file of the TSPBookCoverViewController class by adding an import statement at the top of TSPBooksViewController.m.
#import "TSPBookCoverViewController.h"
As we did in the authors view controller, we need to create a private property to store the image of the book cover.
@interface TSPBooksViewController ()

@property NSArray *books;
@property UIImage *bookCover;

@end
The implementation of tableView:didSelectRowAtIndexPath: in TSPBooksViewController.m should look familiar. We fetch the book the user has selected and create an UIImage instance using the imageNamed: class method and passing the name of the image. The image is stored in the bookCover property.
- (void)tableView:(UITableView *)tableView didSelectRowAtIndexPath:(NSIndexPath *)indexPath {
    [tableView deselectRowAtIndexPath:indexPath animated:YES];

    // Fetch Book Cover
    NSDictionary *book = [self.books objectAtIndex:[indexPath row]];
    self.bookCover =  [UIImage imageNamed:[book objectForKey:@"Cover"]];

    // Perform Segue
    [self performSegueWithIdentifier:@"BookCoverViewController" sender:self];
}
We then perform the segue with identifier BookCoveViewController and configure the book cover view controller in prepareForSegue:sender:.
- (void)prepareForSegue:(UIStoryboardSegue *)segue sender:(id)sender {
    if ([segue.destinationViewController isKindOfClass:[TSPBookCoverViewController class]]) {
        // Configure Book Cover View Controller
        [(TSPBookCoverViewController *)segue.destinationViewController setBookCover:self.bookCover];

        // Reset Book Cover
        [self setBookCover:nil];
    }
}
The UIImage class inherits directly from one of the Foundation root classes, NSObject. The UIImage class is more than a container for storing image data. UIImage is a powerful UIKit component for creating images from various sources including raw image data. The class also defines methods for drawing images with various options, such as blend modes and opacity values.
Where Does It Pop?
Earlier in this article, I explained that view controllers can be pushed onto and popped from a navigation stack. So far, we only explicitly pushed view controllers onto a navigation stack. Popping a view controller from a navigation stack happens when the user taps the back button in the navigation bar. This is another bit of functionality that we get for free.
However, chances are that you may need to manually pop a view controller from a navigation stack at some point. You can do so by sending the navigation controller a message of popViewControllerAnimated:, which will remove the topmost view controller from the navigation stack.
Alternatively, you can pop all the view controllers from the navigation stack—with the exception of the root view controller—by sending the navigation controller a message of popToRootViewControllerAnimated:.
Conclusion
I hope you agree that navigation controllers aren't that complicated. This article could have been much shorter, but I hope that you've learned a few more things in addition to working with navigation controllers.
In the next article, we will take a look at tab bar controllers, which also allow you to manage a collection of view controllers.


Comments