In-app purchases are an excellent way to increase revenue for your Windows Phone app. In this tutorial, I'll be showing you how to implement in-app purchases in a Windows Phone 8 Silverlight application.
To test your application, you'll need to create a product to test with. This means that you'll need an active Windows Phone developer account if you want to follow along.
Introduction
Windows Phone 8 provides a convenient purchase
experience, reliable payouts, geo-distributed services, and product management
tools to achieve meaningful commerce in your app. You can choose between
in-app purchases and other payment options (for example PayPal), but in-app
purchases give you more flexibility as they provide:
- management of products using the Windows Phone developer portal
- geo-distributed services and payouts in more than 190 countries
- consistent purchase experience for users across all apps on the phone and proof of authenticity through secure receipts
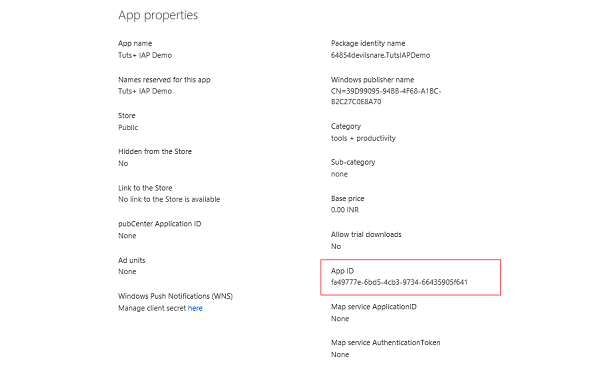
1. Get an App ID
In the Windows Phone developer portal's dashboard, browse to the Details tab of your app and make a note of the App ID. Also grab your Publisher GUID from the developer portal. You're going to need these details later to update the application manifest file.
If you are developing a new app, then go to the dashboard and click on Submit App to start the submission process and reserve a name for your app. Save these details and you can skip submitting the XAP file for now. Just note the App ID from the App properties section.
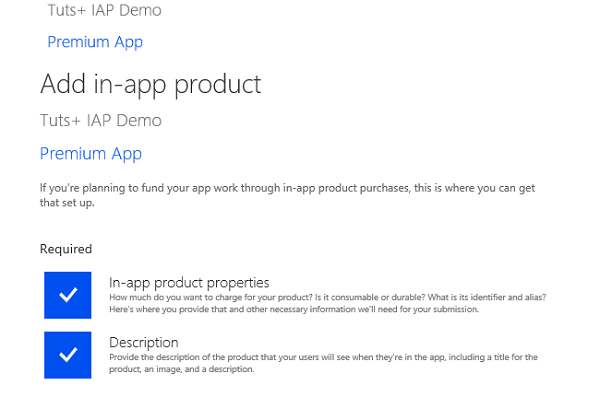
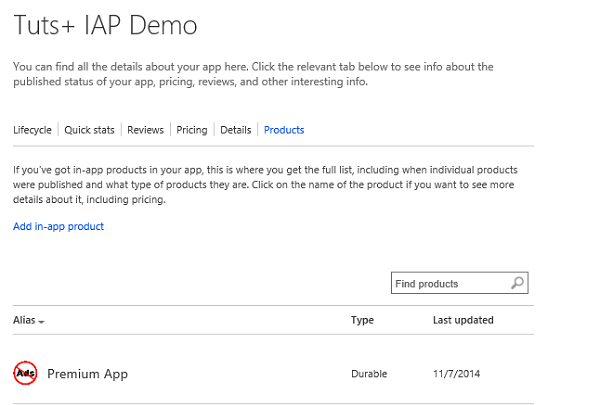
2. Add a Product to Your App
Under application details, there is a Products tab where you can add and manage in-app products for your app. For the purpose of this demonstration, we have created a product named Premium App.
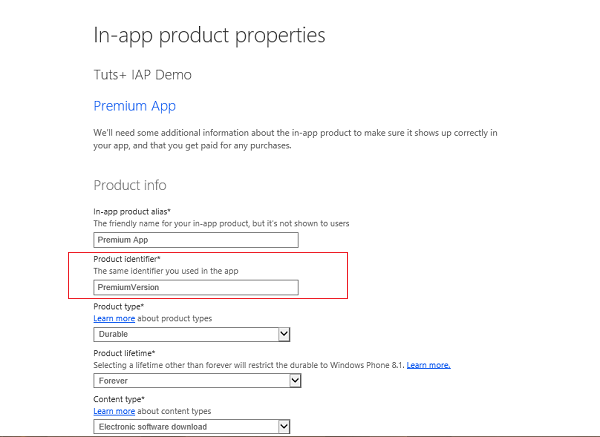
In the Windows Phone developer portal, you need to add your in-app product's properties and description. You can optionally set custom pricing in different markets for your product.
You need to fill in the properties of your in-app product as shown in the following screenshot. Remember the Product Identifier as you will need it for listing in-app products in your app.
Here are a few things worth remembering while adding an in-app product:
- You can have multiple products for an app. Each product can be consumable or durable. Durable products can only be bought once.
- Universal apps can share in-app products, letting users buy once and use anywhere. Your in-app product category can differ, but the product name and identity should match for this to work.
- You can define custom pricing for your products in different countries.
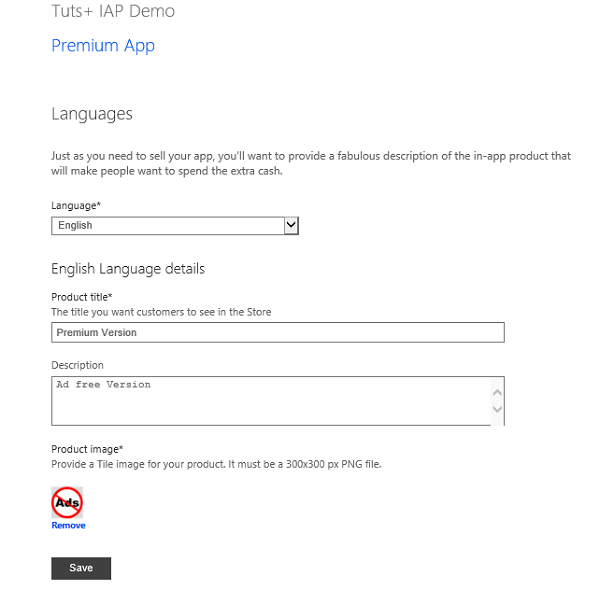
The description section requires you to add a product title, description, and image for the in-app product as shown in the screenshot below.
Note that it may take one or two hours to process your submission before the product is published.
3. Update Application Manifest
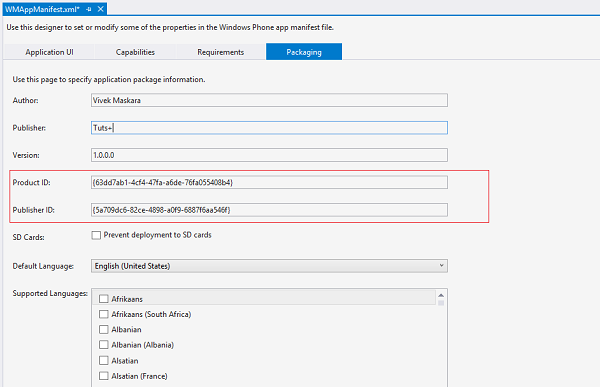
It's time to update the application manifest by adding the App ID and Publisher GUID, which you copied from the Windows Phone developer portal. Using the Solution Explorer of your project, browse to Properties and locate WMAppManifest.xml.
Visual Studio assigns a random Product ID and Publisher ID when you create a new project, which you need to change by going to the Packaging tab. If you are targeting only Windows Phone 8.1, then you need to update Package.appmanifest in addition to WMAppManifest.xml.
4. List In-App Products in Your App
The app uses the in-app purchase API available in the Windows Phone SDK to fetch products and list them. The user now has an option to purchase these products from within the app. Depending on the application you are building, you may want to list specific products in different places, but for the purpose of the demonstration let's display all the products associated with the app and handle the purchase flow.
We need an ItemsControl to hold the products. The following code snippet
shows how you can define the data template of your ItemsControl and bind the products
to it. Notice that the buy button is
visible only if the user hasn't purchased the product. Feel free to play with
the data template to make it more attractive.
<ItemsControl x:Name="pics">
    <ItemsControl.ItemTemplate>
        <DataTemplate>
            <StackPanel>
                <Grid>
                    <Grid.ColumnDefinitions>
                        <ColumnDefinition Width="*"/>
                        <ColumnDefinition Width="*"/>
                    </Grid.ColumnDefinitions>
                    <Image Margin="4" Source="{Binding imgLink}"/>
                    <StackPanel Grid.Column="1" Margin="0,30,0,0">
                        <TextBlock Foreground="white" FontWeight="ExtraBold" Text="{Binding Name}" />
                        <TextBlock Foreground="white" FontWeight="Normal" Text="{Binding Status}" />
                        <Button Content="Get it" Visibility="{Binding BuyNowButtonVisible}" Click="ButtonBuyNow_Clicked" Tag="{Binding key}" />
                    </StackPanel>
                </Grid>
            </StackPanel>
        </DataTemplate>
    </ItemsControl.ItemTemplate>
</ItemsControl>
The public class ProductItem stores all the information
related to a particular product. There is an ObservableCollection of type ProductItem
named picItems, which stores all the
products.
public class ProductItem
{
    public string imgLink { get; set; }
    public string Status { get; set; }
    public string Name { get; set; }
    public string key { get; set; }
    public System.Windows.Visibility BuyNowButtonVisible { get; set; }
}
The next step is to add a function RenderStoreItems in the code behind to list all the products for
the application. This function makes an
asynchronous call to LoadListingInformationAsync
to render the products for the current application. The function then
iterates through every product, checking its license information and adding it
to the list. We bind the name, purchase status, and price to the list box, and
display it to the user.
ListingInformation li = await Windows.ApplicationModel.Store.CurrentApp.LoadListingInformationAsync();
foreach (string key in li.ProductListings.Keys)
{
    ProductListing pListing = li.ProductListings[key];
    System.Diagnostics.Debug.WriteLine(key);
    string status = Windows.ApplicationModel.Store.CurrentApp.LicenseInformation.ProductLicenses[key].IsActive ? "Purchased" : pListing.FormattedPrice;
    string imageLink = string.Empty;
    //picItems is an observable collection with global scope to MainPage.xaml
    picItems.Add(
        new ProductItem
        {
            imgLink = key.Equals("PremiumVersion") ? "Images/block-ads.png" : "Images/block-ads.png",
            Name = pListing.Name,
            Status = status,
            key = key,
            BuyNowButtonVisible = Windows.ApplicationModel.Store.CurrentApp.LicenseInformation.ProductLicenses[key].IsActive ? System.Windows.Visibility.Collapsed : System.Windows.Visibility.Visible
        }
    );
}
pics.ItemsSource = picItems;
Note that you need to enter a correct App ID, Publisher ID, and Product ID before you can deploy the sample project with this tutorial.
Next, you need to add the click
event handler for the buy button. The function ButtonBuyNow_Clicked
initiates the purchase. The user is presented with a purchase experience
that's part of the Windows Phone 8 platform. When the purchase is complete, you
can enable a locked feature or let the user download additional content. This is entirely up to you.
Button btn = sender as Button;
string key = btn.Tag.ToString();
if (!Windows.ApplicationModel.Store.CurrentApp.LicenseInformation.ProductLicenses[key].IsActive)
{
    ListingInformation li = await Windows.ApplicationModel.Store.CurrentApp.LoadListingInformationAsync();
    string pID = li.ProductListings[key].ProductId;
    string receipt = await Windows.ApplicationModel.Store.CurrentApp.RequestProductPurchaseAsync(pID, false);
}
5. After the Purchase
You can use the in-app purchase
API to enumerate the licenses the user has for the products in your app
when the app is launched or resumed, or after a purchase. This lets you determine whether the user already owns the product he or she licensed, or whether its fulfillment
is still pending. You can also retrieve receipts for the products purchased
by the user to verify if the transaction took place using the GetProductReceiptAsync function.
string receiptXml = await CurrentApp.GetProductReceiptAsync("PremiumVersion");
Check whether LicenseInformation.IsActive returns true for a product before
fulfilling a purchase. However, the call to this function is resource intensive so it is advisable not to call it at app launch or resume.
When you think a
product purchase has completed, first verify that a license exists for that
product ID and then check to see whether IsActive is true on that license. If
the license is active then the purchase should be fulfilled immediately.
bool productStatus = Windows.ApplicationModel.Store.CurrentApp.LicenseInformation.ProductLicenses["AdBlocker"].IsActive;
A possible scenario where in-app purchases can be useful is when you want to distribute your app for free with ads and allow the user to remove them through an in-app purchase. Here's an article on implementing a "block ads" feature using the in-app purchase API. The same technique can be used to implement a trial. The advantage is that your app is listed in the free category in the store and will as a result get you more downloads.
In the case of consumable products, it's the responsibility of
the app to track consumption. The CurrentApp.LicenseInformation only provides information about the license, not the state.
6. Testing In-App Purchases
If you test your app in the emulator, in-app purchases are free and no financial transactions take place. Each time you reinstall the app in the emulator, previously stored license information is cleared.
There are three main techniques for testing in-app purchases:
- create a Dev Center beta app and add beta in-app products
- add the mock in-app purchase mock library to your solution
- set up an in-app purchase mock service using Microsoft Internet Information Services (IIS)
Conclusion
In this tutorial, you have learned how to list in-app products and enable an app feature when the user purchases a product. There are lots of customizations possible with in-app purchases and they can be used in a variety of scenarios.
I encourage you to go through the In-AppPurchase API overview on MSDN. It's also worth taking a look at options to test in-app purchase capabilities in your app before publishing it on the marketplace. Feel free to download the tutorial's source files to use as a reference.

Comments