
In celebration of Cyber Monday, today we're going to show you a technique for creating a custom "Splash Page" for your WordPress theme. You're probably seeing a lot of these around the net today, so you know that they're great for running quick promotions of products or events... but you can have fun with it and come up with creative ways to use a splash page such as advertising, donation button, radio pledge drives, highlight of an upcoming race, or highlight of a new product.
The Strategy
A splash page, also known as a static page, is the first page you see when visiting a website. The idea behind a splash page is to show off something important, that way this important product will get the attention it deserves if for some reason your homepage lacks design.
Before we dive in, let's briefly discuss some of the do's and don'ts of splash pages in terms of the overall strategy:
Don't get carried away and keep the splash page up for too long; the page is more of a temporary promotion, used improperly, it's just one extra click to your product; the more clicks your user has to take the unhappier the user will be. It also becomes an unvalued distraction after a certain amount of time. Used properly though (in short bursts, like for Black Friday deals) can very useful for a quick & bold promotion of something that is worth the value.
Design sidenote: If you don't love the design, don't fret - it's just something that I happened to work on... the workflow here is what's really important and we'll have you creating your own custom splash design in no time!
Step 1: Setting Up The Custom Page Template
The first step is to build your custom splash page is to use a page template. We've had a few tutorials on the site already about using them, so if you're not familiar, check out this post.
A splash page can be built without using a page template, but doing it this way allows us to integrate it directly into whatever theme you (or your client) is using.
Let's start off by opening your favorite text editor and adding the code below. Before adding anymore code lets save the file as splash.php. Be sure to save your new file as a php, not an html file.
<?php
/*
Template Name: Splash
*/
?>
This lets WordPress know that it is a template, so it will be available in the drop down menu via page editor by the template name of which you give it, in this case named Splash.
To build the rest of the page template you can use basic HTML or whatever code you are familiar with. Remember that shortcodes and other WordPress features will not work if you are using basic HTML though. What I'm going to do is keep it simple with code and use an image I designed for a race car driver and make it display full screen (browser).
Using a CSS style you can make an image display full screen of your browser. Even if your image is too small it will be pixilated to fit the screen. It's best to have a large image something around 900px in width or more, but keep the height smaller somewhere around 300px so your design will display on the screen. The below CSS style works in any version of good browsers: Safari / Chrome / Opera / Firefox, IE 7/8 (Mostly works: doesn't center at small sizes but fills screen fine), and IE 9 works.
Here is the CSS style:
img.splash {
        /* Set rules to fill background */
        min-height: 100%;
        min-width: 1024px;

        /* Set up proportionate scaling */
        width: 100%;
        height: auto;

        /* Set up positioning */
        position: fixed;
        top: 0;
        left: 0;
}

@media screen and (max-width: 1024px) {
        img.splash {
                left: 50%;
                margin-left: -512px;   /* 50% */
        }
}
You'll want to put the CSS style in your splash page template. To get a better understand of how and where below is my finished template.
How the style works is it finds the class="splash" inside of an img tag. You'll notice in my page template the img tag can be found inside the body which is linked to my race car design jpg. You'll want to upload your design to WordPress and insert your URL. Also, make sure the class matches up with what you have inside the img or it won't work.
<?php
/*
Template Name: Splash
*/
?>

<html><head>
	<title>Splash Page</title>

	<style>

		img.splash {
			/* Set rules to fill background */
			min-height: 100%;
			min-width: 1024px;

			/* Set up proportionate scaling */
			width: 100%;
			height: auto;

			/* Set up positioning */
			position: fixed;
			top: 0;
			left: 0;

		}
		@media screen and (max-width: 1024px){
			img.splash {
				left: 50%;
				margin-left: -512px; }
		}

	</style>
</head>
<body>
<a href="homepage"><img class="splash" src="images/Landscape_Design_Front.jpg"></a>
</body></html>
I wrapped my image around a href tag so it would make a large clickable area which is linked to the homepage. In order for my homepage link to work I have to make a new page in WordPress.
Before you do anything else let's upload our new splash.php template page to your theme folder. In your favorite ftp software (I like filezilla) transfer the splash.php template you just made and put it in your theme's main directory (/wp-content/themes/yourthemename).
Step 2: Adding the Home Page
The next step is to login to WordPress and under page click add new. From here is where you'll make the homepage. You don't have to do anything else besides enter the title "Homepage" and hitting publish. Once published you should be able to view the page at www.yourdomain.com/homepage.
Step 3: Adding the Splash Page
The next step is to create one more page, so click add new page again and this time enter the title "Splash." There is one extra important task you have to do for this page and it is to select your splash page template (you just created and uploaded using your FTP) in the page template drop down menu (usually in the sidebar). Hit publish and you should be able to view the page at www.yourdomain.com/splash.
This is a great time to see how your splash page looks. If the design you built doesn't fit the screen the way you'd like it to then rebuild; no need to change any of the CSS style. What you see is what will soon be the splash page of your website. So work with your image to get it looking the way you'd like and re-upload the image FTP to see the new results.
Step 4
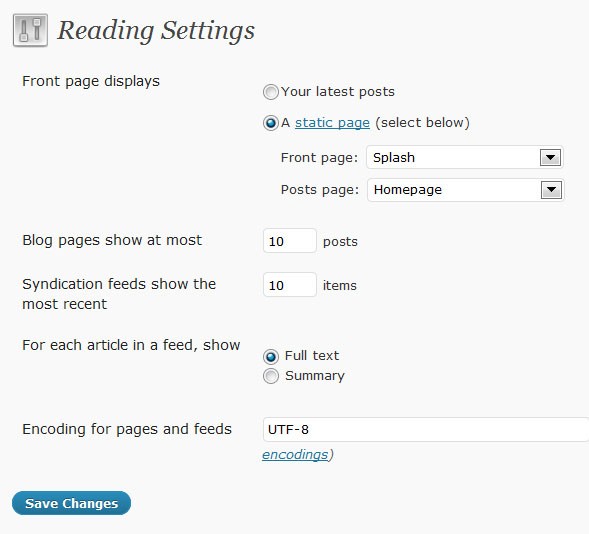
Great, now if you're still with me this is where the magic from WordPress happens. Under settings click reading. The first option "Front page displays" you'll see a radio button labeled "A static page (select below)", click the button and select "Splash" as your front page and "Homepage" as your posts page. Click save and then check out the results of your splash page by visiting your website.
You're finished. WordPress makes the first page of your site the splash page and makes the homepage you just created your new index page, which is the page that has all of your stories, photos, navigation, etc....
When you're ready to remove the splash page all you have to do is go back into readings, which is under settings and click the radio button that is labeled "Your latest posts". Everything will go back to normal… magic, right?
Changing Around Your Navigation
Something to keep in mind is your site navigation will link back to the splash page every time someone clicks on your logo or homepage link. So if you don’t want them to keep going back to the splash page, which you don’t, then you’ll need to change your homepage link to www.yourdomain.com/homepage rather than www.yourdomain.com. Unfortunately I won’t go into detail about how you can change your navigation because there are many different ways this is done.
Enjoy and have fun with the possibilities of a splash page.

Comments