Often enough, many radio stations are built using WordPress, but many don't harvest the true potential to create a true online radio station. This tutorial will demonstrate how you can turn a radio website into a fully functional radio station DJ listing with a nifty radio schedule for featured shows.
Introduction
For our online radio website, we will feature some DJ's/hosts that play on the air. We will create a custom post type for them, where we can add a picture, biography and other useful information. We will also create a show schedule using the WordPress custom post type again. Mixed with some custom metaboxes, we're going to make the show administration simple to manage.
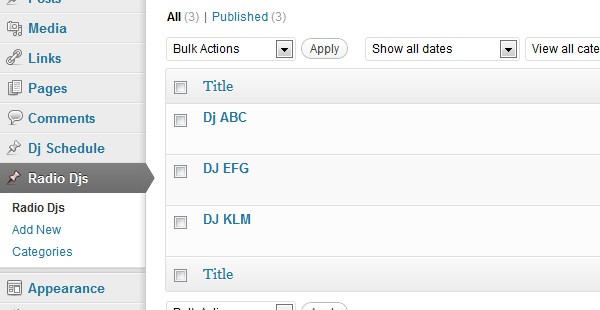
Step 1 Creating DJ/Host Custom Post Type
To avoid files cluttered with code, we'll separate our snippets and by using the PHP function include, we'll include them to our file. Open your functions.php file, located in your current theme folder and add the following snippet:
include('schedule.php');
Once complete, create a new file called schedule.php, then we add our functions to register our new post type.
For more information on custom post types, try this page custom post type
// Register DJs Post Type
add_action( 'init', 'register_my_radios_djs' );

function register_my_radios_djs() {
	$labels = array(
		'name' => _x( 'Radio Djs', 'radios_djs' ),
		'singular_name' => _x( 'Radio Dj', 'radios_djs' ),
		'add_new' => _x( 'Add New', 'radios_djs' ),
		'add_new_item' => _x( 'Add New Dj', 'radios_djs' ),
		'edit_item' => _x( 'Edit Dj', 'radios_djs' ),
		'new_item' => _x( 'New Dj', 'radios_djs' ),
		'view_item' => _x( 'View Dj', 'radios_djs' ),
		'search_items' => _x( 'Search Dj', 'radios_djs' ),
		'not_found' => _x( 'No dj  found', 'radios_djs' ),
		'not_found_in_trash' => _x( 'No dj  found in Trash', 'radios_djs' ),
		'parent_item_colon' => _x( 'Parent Dj:', 'radios_djs' ),
		'menu_name' => _x( 'Radio Djs', 'radios_djs' )
	);
	$args = array(
		'labels' => $labels,
		'hierarchical' => true,
		'description' => 'WordPress Radio DJS',
		'supports' => array( 'title', 'editor', 'thumbnail' ),
		'taxonomies' => array( 'category', 'radios_djs' ),
		'public' => true,
		'show_ui' => true,
		'show_in_menu' => true,
		'show_in_nav_menus' => true,
		'publicly_queryable' => true,
		'exclude_from_search' => false,
		'has_archive' => true,
		'query_var' => true,
		'can_export' => true,
		'rewrite' => true,
		'capability_type' => 'post'
	);

	register_post_type( 'radios_djs', $args );
}
Adding Post Thumbnails
For this tutorial, we will be using formatted images for the schedule. Therefore, we're going to add the WordPress post thumbnail functionality.
if ( function_exists( 'add_theme_support' ) ) {
	add_theme_support( 'post-thumbnails' );
	set_post_thumbnail_size( 150, 150, true );
	add_image_size( 'dj-pic', 260, 160 );
}
Notice that we've added the function add_image_size and some parameters. We'll be using the post thumbnail size of 260x160 for our end result.
Step 2 Creating Schedule Custom Post Type
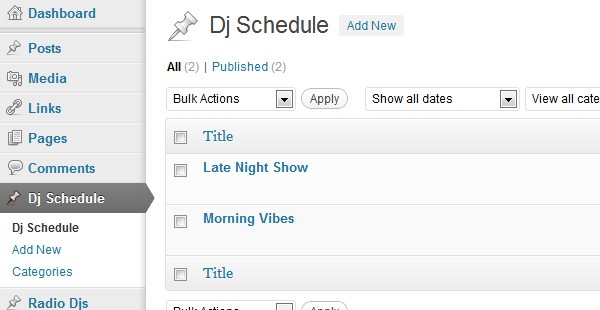
Just like the previous step, we're going to create a next post type using the same method and simply changing some names and variables.
// Register Schedule Post Type
add_action( 'init', 'register_my_dj_schedule' );

function register_my_dj_schedule() {

	$labels = array(
		'name' => _x( 'Dj Schedule', 'dj_schedule' ),
		'singular_name' => _x( 'Dj Schedule', 'dj_schedule' ),
		'add_new' => _x( 'Add New', 'dj_schedule' ),
		'add_new_item' => _x( 'Add New Schedule', 'dj_schedule' ),
		'edit_item' => _x( 'Edit Dj Schedule', 'dj_schedule' ),
		'new_item' => _x( 'New Dj Schedule', 'dj_schedule' ),
		'view_item' => _x( 'View Dj Schedule', 'dj_schedule' ),
		'search_items' => _x( 'Search Dj Schedule', 'dj_schedule' ),
		'not_found' => _x( 'No dj schedule found', 'dj_schedule' ),
		'not_found_in_trash' => _x( 'No dj schedule found in Trash', 'dj_schedule' ),
		'parent_item_colon' => _x( 'Parent Dj Schedule:', 'dj_schedule' ),
		'menu_name' => _x( 'Dj Schedule', 'dj_schedule' )
	);

	$args = array(
		'labels' => $labels,
		'hierarchical' => true,
		'description' => 'WordPress DJ Schedule',
		'supports' => array( 'title', 'editor', 'thumbnail' ),
		'taxonomies' => array( 'category', 'dj_schedule' ),
		'public' => true,
		'show_ui' => true,
		'show_in_menu' => true,
		'show_in_nav_menus' => true,
		'publicly_queryable' => true,
		'exclude_from_search' => false,
		'has_archive' => true,
		'query_var' => true,
		'can_export' => true,
		'rewrite' => true,
		'capability_type' => 'post'
	);

	register_post_type( 'dj_schedule', $args );
}
Step 3 Adding Custom Meta Boxes
This tutorial won't explain every aspect of creating custom metaboxes, but we'll highlight the most significant. With that said, we'll begin by calling two add_action hooks for our metaboxes.
add_action( 'add_meta_boxes', 'rschedule_box' );
add_action( 'save_post', 'dj_schedule_save_postdata' );
In you're interested in learning more about custom meta boxes. This is a great read: How to Create Custom WordPress Write/Meta Boxes
Add the Meta-Boxes
The function rschedule_box which was previously mentioned in the hook, will register a group of metaboxes to our post edit screen. We will use these metaboxes on our Schedule Edit page.
function rschedule_box() {
	add_meta_box(
		'time_slot_id',
		__( 'Time Slots', 'time_slot_text' ),
		'radio_time_slots',
		'dj_schedule'
	);
	add_meta_box(
		'dj_select_id',
		__( 'Select DJ', 'dj_select_text' ),
		'radio_get_dj_select_box',
		'dj_schedule',
		'side'
	);
}
Creating a DJ Select List
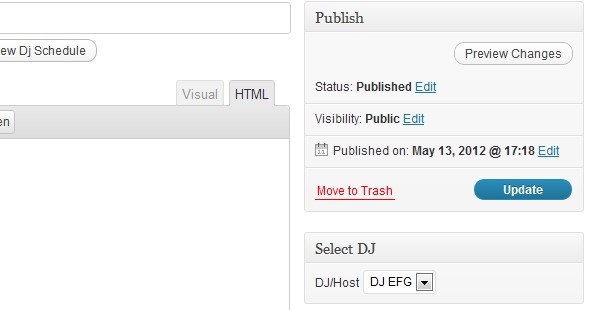
In this step, we create a function that will generate a select list on our screen. This list will display all the DJs/Hosts added to our custom post type, that we created in Step 1. This function will query the post type and return the items as an array, then we will loop though the array and mix it with some HTML. This way, we can reference the DJ post ID, which we will need in generating our output later.
function radio_get_dj_select_box($post) {
	wp_nonce_field( 'radio_schedule', 'schedule_noncename' );
	echo '<label for="dj_id">';
	_e("DJ/Host", 'dj_id' );
	echo '</label> ';
	$args = array( 'post_type' => 'radios_djs');
	$loop = new WP_Query( $args );
	echo '<select name="dj_id" id="dj_id">';
	foreach ( $loop->posts as $dj ) {
		if ( $dj->ID == get_post_meta( $post->ID, 'dj_id', true ) ) {
			$select = 'selected';
		}
		else {
			$select = '';
		}
		echo '<option value="'.$dj->ID.'" '.$select.'>'.$dj->post_title.'</option>';
	}
	echo '</select>';
}
Creating Time Slots
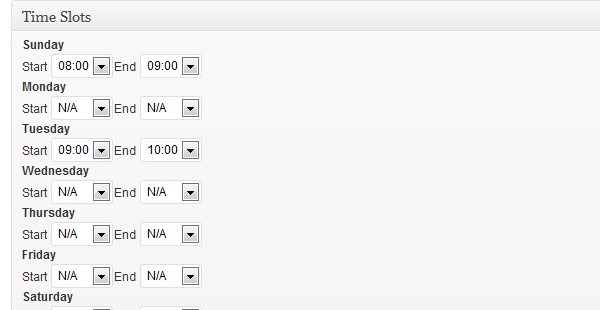
The next function is our function that will display the days of the week and options to choose the time when the show will be live. In order for us to get the days of the week, we'll create an array.
$days = array(
	'sun' => 'Sunday',
	'mon' => 'Monday',
	'tue' => 'Tuesday',
	'wed' => 'Wednesday',
	'thu' => 'Thursday',
	'fri' => 'Friday',
	'sat' => 'Saturday'
);
Now that's done, let's create our time slot function. Add the following code to your file.
/* Prints the box content */
function radio_time_slots($post) {

	global $days;
	// Use nonce for verification
	wp_nonce_field( 'radio_schedule', 'schedule_noncename' );

	foreach ( $days as $key => $value ) {
		$selected_start  = get_post_meta( $post->ID, 'schdule_dj-start-'.$key, true );  //Start Time
		$selected_end  = get_post_meta( $post->ID, 'schdule_dj-end-'.$key, true );  	  //End Time

		echo '<strong>'.$value.'</strong><br />';
		echo '<label for="schdule_dj-start-'.$key.'">';
		_e("Start", 'schdule_dj-start-'.$key );
		echo '</label> ';
		echo '<select name="schdule_dj-start-'.$key.'" id="schdule_dj-start-'.$key.'">';
		schedule_time_select($selected_start);
		echo '</select>';
		echo '<label for="schdule_dj-end-'.$key.'">';
		_e("End", 'schdule_dj-end-'.$key );
		echo '</label> ';
		echo '<select name="schdule_dj-end-'.$key.'" id="schdule_dj-end-'.$key.'">';
		schedule_time_select($selected_end);
		echo '</select>';
		echo '<br />';
	}
}
As you will notice we referenced our array of days by using global $days. We could have placed it inside of the function but we will be referencing it occasionally, so we'll leave it on the outside. Also, take a look at how the array of days is used, we have chosen to loop some select fields using the days, so we should have several select fields for the 7 days of the week. The variables $selected_start and $selected_end use the WordPress function get_post_meta, in order to get the currently selected value for our list. We are also strategically using the key of our array in our list to name our form field, label and get our selected value. When PHP interprets the field name, it will look similar to this schdule_dj-start-sun where sun will be changed according to the current day in the loop. This will be quite useful to us in other parts of the tutorial. Lastly, you will realise that we've referenced the function schedule_time_select, that we have not created as yet. Let's create that function now.
function schedule_time_select($selected) {
	$start = 8*60+0;
	$end = 24*60+0;
	echo '<option vlaue="0">N/A</option>'; //Default Value
	for($time = $start; $time<=$end; $time += 15) {
		$minute = $time%60;
		$hour = ($time-$minute)/60;
		if ( $selected == sprintf( '%02d:%02d', $hour, $minute ) ) {
			$select = 'selected';
		}
		else {
			$select = '';
		}
		echo '<option value='.sprintf('%02d:%02d', $hour, $minute).' '.$select.'>'.sprintf('%02d:%02d', $hour, $minute).'</option>';
	}
}
This function will generate the options for our select list. Each option will be incremented by 15 minutes and is based on the the 24 hour system. For the first option, we set a value of 0 for the days that we wish to neglect. Within the loop, there is a small if statement that checks the value sent from our radio time slot function to determine if the option should be set to selected.
Step 3 Saving the Meta Boxes
Finally, it's time to save all of our metabox information. WordPress has a very simple and straight forward way of saving these options but we're going to make it more dynamic. Add the following snippet to your file.
// Save Meta Data
function dj_schedule_save_postdata( $post_id ) {
	if ( defined( 'DOING_AUTOSAVE' ) && DOING_AUTOSAVE )
		return;

	if ( !wp_verify_nonce( $_POST['schedule_noncename'], 'radio_schedule' ) )
		return;

	if ( 'page' == $_POST['post_type'] ) {
		if ( !current_user_can( 'edit_page', $post_id ) )
			return;
	}
	else {
		if ( !current_user_can( 'edit_post', $post_id ) )
			return;
	}

	if( isset( $_POST['dj_id'] ) ) {
		update_post_meta( $post_id,'dj_id', esc_attr( $_POST['dj_id'] ) );
	}

	global $days;

	foreach($days as $key=>$value) {

		if( isset( $_POST['schdule_dj-start-'.$key] ) ) {
			update_post_meta( $post_id,'schdule_dj-start-'.$key, esc_attr( $_POST['schdule_dj-start-'.$key] ) );
		}

		if( isset( $_POST['schdule_dj-end-'.$key] ) ) {
			update_post_meta( $post_id,'schdule_dj-end-'.$key, esc_attr( $_POST['schdule_dj-end-'.$key] ) );
		}
	}
}
Once again, you see the usefulness of our global days variable. In this function, we loop through each day and we save our options from our select field by changing the name as the days loops through.
Step 3 Saving the Meta Boxes
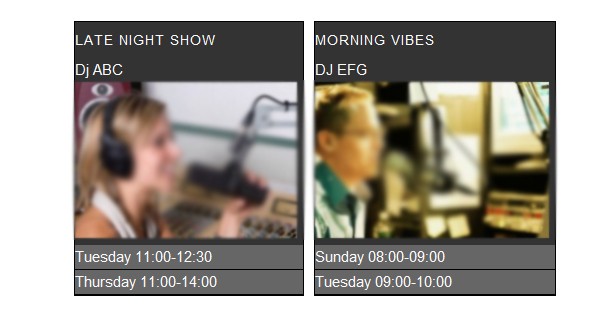
Wow! If you're still with me, let's put all these codes to work, shall we? Ok, great! The snippet below demonstrates how we're going to loop through each schedule that we created and place in divs. Add that bit of code and let's break it down.
function show_schedule() {
	global $days;
	$html='';
	$html.= '<div>';
	$args = array( 'post_type' => 'dj_schedule');
	$loop = new WP_Query( $args );
	foreach ( $loop->posts as $item ):
		$html.= '<div class="scheduleBox">';
		$html.= '<h3>'.$item->post_title.'</h3>';
		$dj_id = get_post_meta($item->ID, 'dj_id', true);
		$dj = get_post($dj_id);
		$html.= '<div>'.$dj->post_title.'</div>';
		$html.= '<div>'.get_the_post_thumbnail($dj->ID, 'dj-pic').'</div>';
		foreach( $days as $key => $value ) {
			$start = get_post_meta($item->ID, 'schdule_dj-start-'.$key, true);
			$end = get_post_meta($item->ID, 'schdule_dj-end-'.$key, true);
			if ( $start <> 0 )
				$html.= '<div id="time">'.$value.'   '.$start.'-'.$end.'</div>';
		}
		$html.= '</div>';
	endforeach;
	$html.= '<div style="clear:both;"></div>';
	$html.='</div>';
	return $html;
}
Firstly, we make a loop for our custom post type dj_schedule, create a div and list the title. While inside the div, we fetch the DJ ID we added in the admin using the get_post_meta function. Then we use that same ID and call the WordPress function get_post for the values of that post and assign them to a variable which we then use to get the DJ's name and photo.
Getting the Time Slots
Directly below our DJ, we have our day loop which loops through each day while making a check to see if any start time exists for that day. If they do exist, then we output the start and end time into a div.
Adding Our Schedule to a Page
We can do many things to add the schedule to a page, but for this tutorial, we will simply use a shortcode. So, with just one line of code, we will create a short code that we can call add on any page and voila! We have a working radio schedule!
add_shortcode('show_schedule', 'show_schedule');
Conclusion
This is the first phase of adding more great features to your WP radio website. I have chosen some simple styling for the layout, you can add these styles to your style.css file. In another tutorial, I will explain how to create a nice live stream pop-up with current show, DJ and radio player.
.scheduleBox { background-color: #333333; border: #000000 1px solid; color: #fafafa; float: left; margin-left: 10px; height: 100%; }
.scheduleBox h3 { font-size: 14px; }
.scheduleBox #time { background: #666666; border-bottom: #000000 1px solid; }

.scheduleBox:hover { background-color: #000; border: #000000 1px solid; color: #FFCC00; float: left; margin-left: 10px; }
.scheduleBox h3:hover { color: #FF9900; }
.scheduleBox #time:hover { background: #333333; border-bottom: #000000 1px solid; }
Your feedback is much appreciated. Let me know what you think in the comments below. Happy coding!

Comments