Introduction
One of the most effective marketing tools is definitely word of mouth. Social proof is a very powerful stimulus when it comes to decision making. While people easily ignore traditional advertising, few people tend to ignore advice from a trusted source, such as a friend.
In 2011, Google and Ipsos OTX carried out a survey that revealed interesting results. If recommendations are complemented by discount coupons that recipients can redeem, the probability that they will download the app or will start to use it again are much higher. This is something developers and app publishers may want to keep in mind.
The truth is that very few mobile app publishers and developers make use of a referral system that is based on recommendations. The reason is almost always technical. Keeping track of discount codes, implementing deep linking within apps, and setting up a backend are some of the hurdles developers need to take to make this work. As a result, most people don't bother or give up.
Fortunately, Google developed a system that overcomes these obstacles, App Invites. With App Invites, Google offers a powerful interface through which developers can grow their mobile app's audience by letting existing users invite their contacts to try the app.
App Invites is included in Google Play services and is also available on iOS. It optimizes your app install rates by reducing friction and providing some context, such as the app's general information and its rating on the app store, at every step of the user invitation flow.
In this tutorial, I will show you how to implement this powerful tool in your own Android application.
1. Project Setup
Step 1: Create the Project
I will use a very simple project to show you how to share invites for your app. The first thing you need to do is create a new project. In Android Studio, choose File > New > New Project. Name your app and set your company's web domain to let Android Studio define the package name of your app.
The minimum SDK version that the app can support can be as low as Android Gingerbread (API level 9). This means that you can target almost every device running Android, 99.97% at the time of writing. However, keep in mind that App Invites only work on devices that include Google's Play store since it is based on the Google Play services plugin.
Generate a blank Activity and name it MainActivity.java.
Step 2: Add Google Play Services and Support Libraries
With the new project opened in Android Studio, open the Project tab on the left and expand Gradle Scripts. It contains two files with the same name, build.gradle. The first file is the top-level build.gradle. The second file is the app-level build.gradle.

Open the top-level build.gradle and add the
following classpath for Google Play services.
classpath 'com.google.gms:google-services:1.5.0-beta2'
Open the app-level build.gradle and add the following compile dependencies to it.
compile 'com.android.support:support-v4:23.1.1'
compile 'com.android.support:design:23.1.1'
compile 'com.google.android.gms:play-services:8.3.0'
To enable the Google Play services plugin, add the following line below apply plugin: 'com.android.application'.
apply plugin: 'com.google.gms.google-services'
Android Studio will ask you to synchronize the project files. Before
you do, however, open AndroidManifest.xml and add the Google Play services version within the application tag.
<meta-data
    android:name="com.google.android.gms.version"
    android:value="@integer/google_play_services_version" />
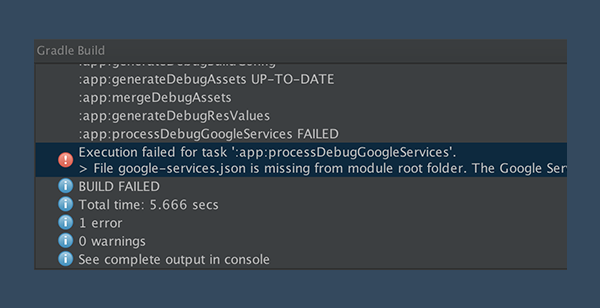
Save the changes and click Sync Now. We're not done yet. Android Studio will throw an error that tells you that the Google Play services plugin requires a configuration file, google-services.json. Let's fix that now.
2. Add Configuration File
Step 1: Visit Google Developer Platform
You frist need to visit the Google Developers website to enable Google services for your app. The project is then added to your personal developer console, which means that you have to be authenticated as a Google user before proceeding.
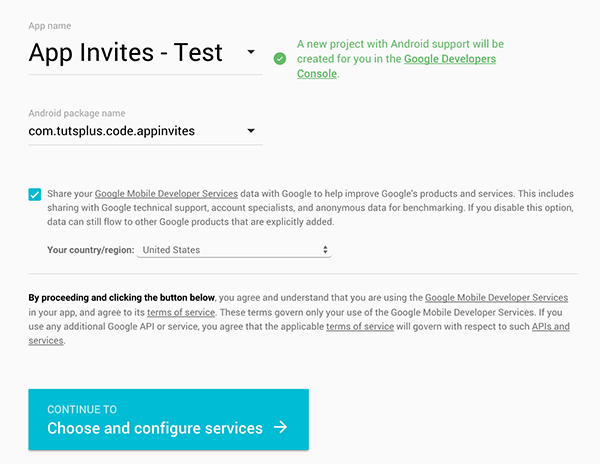
Enter the name you chose for your app and specify its package name. If you don’t remember the app's package name, then open the app-level build.gradle. You can find it under defaultConfig > applicationId.
Fill out the rest of the form and click the button at the bottom labeled Choose and configure services.
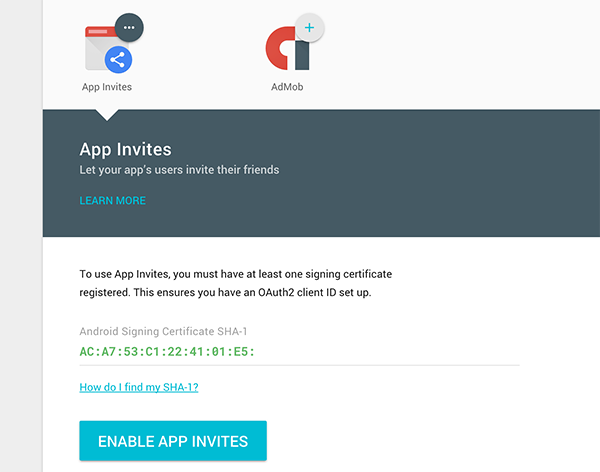
Step 2: Generate Certificate Fingerprint
The next part is a bit trickier. Google will ask you for the certificate fingerprint. To obtain the certificate fingerprint, you need to open the command line and execute the following command.
keytool -exportcert -list -v \
-alias <your-key-name> -keystore <path-to-production-keystore>
There are two possible scenarios:
- You're testing your app locally.
- You're deploying the APK on the Google Play Developer Console.
If you're testing your app locally, the key name is androiddebugekey and its default location is %USERPROFILE%\.android\debug.keystore on
Windows and ~/.android/debug.keystore on Unix systems, such as OS X and Linux. This is what the command looks like for testing locally.
keytool -exportcert -list -v \
-alias androiddebugkey -keystore ~/.android/debug.keystore
The keytool utility will prompt you to enter a password. The default password for the debug keystore is android. This will yield the SHA1 fingerprint of your debug certificate, which looks something like this.
Certificate fingerprint: SHA1: DA:39:A3:EE:5E:6B:4B:0D:32:55:BF:EF:95:60:1H:90:AF:D8:07:09.
However, if you need the release certificate fingerprint, then you need to specify the certificate's name, location, and password.
Step 3: Add Configuration File
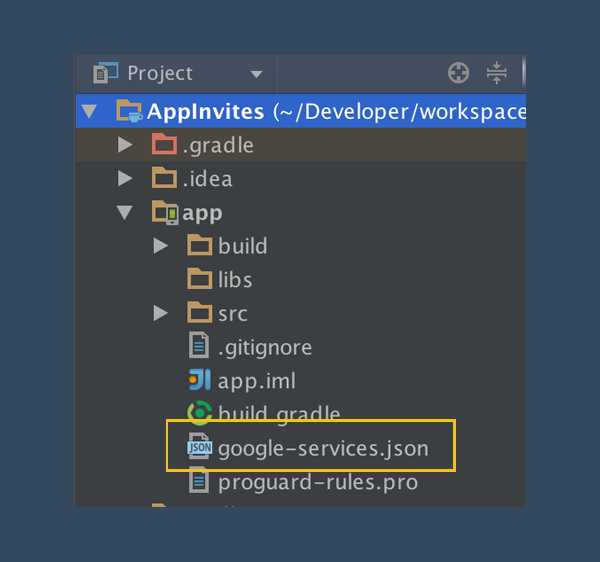
After entering the certificate fingerprint, you can enable App Invites by clicking the Enable App Invites button at the bottom. You should now be able to download the configuration file by clicking Download google-services.json.
To complete this step, copy the downloaded file to the app/ or mobile/ directory of your project.
3. Sending Invitations
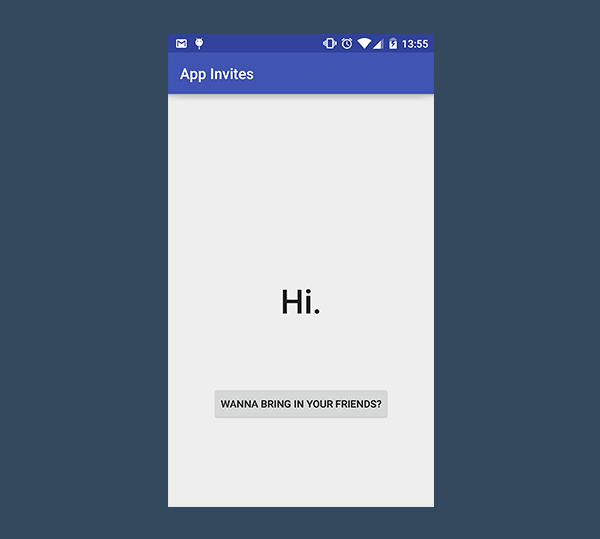
Step 1: Define Layout
With the project configured, we are ready for the next step. For the launcher Activity, define a simple layout like the one shown below. It contains a button and a label.
<?xml version="1.0" encoding="utf-8"?>
<RelativeLayout xmlns:android="http://schemas.android.com/apk/res/android"
    xmlns:tools="http://schemas.android.com/tools"
    android:id="@+id/container"
    android:layout_width="match_parent"
    android:layout_height="match_parent"
    android:paddingLeft="@dimen/activity_horizontal_margin"
    android:paddingRight="@dimen/activity_horizontal_margin"
    android:paddingTop="@dimen/activity_vertical_margin"
    android:paddingBottom="@dimen/activity_vertical_margin" tools:context=".MainActivity">

    <TextView
        android:id="@+id/title"
        android:layout_width="wrap_content"
        android:layout_height="wrap_content"
        android:layout_centerInParent="true"
        android:gravity="center"
        android:text="Hi."
        android:textAppearance="@style/TextAppearance.AppCompat.Title"
        android:textSize="45sp" />

    <Button
        android:id="@+id/invite"
        android:layout_width="wrap_content"
        android:layout_height="wrap_content"
        android:layout_centerHorizontal="true"
        android:layout_alignParentBottom="true"
        android:layout_marginBottom="100dp"
        android:colorButtonNormal="#3F51B5"
        android:text="Wanna bring in your friends?"/>

</RelativeLayout>
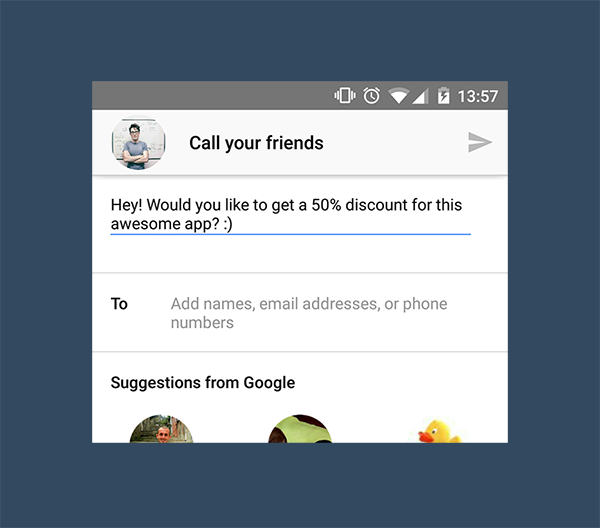
The result should look like this.
In the onCreate method the MainActivity class, add an
onCreateListener to the button.
button = findViewById(R.id.invite);
button.setOnClickListener(new View.OnClickListener() {
    @Override
    public void onClick(View v) {
        // do something, will you?
    }
});
The invitation will be sent as an Intent. You can specify a message that users can customize before sending the invites to their
friends. You can also set a call to action, a background image, and a deep link that
your app can handle once the invitation is received. You can even define the minimum SDK version (setAndroidMinimumVersionCode)
and a target application ID for other platforms, such as iOS (setOtherPlatformsTargetApplication).
Create the Intent in the body of the onClick method.
Intent intent = new AppInviteInvitation.IntentBuilder(INVITATION_TITLE)
        .setMessage(INVITATION_MESSAGE)
        .setCallToActionText(INVITATION_CALL_TO_ACTION)
        .build();
startActivityForResult(intent, REQUEST_INVITE);
Add the following strings to make all this work.
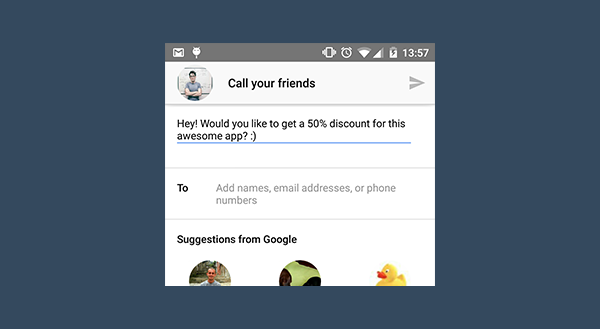
private static final
        String INVITATION_TITLE = "Call your friends",
            INVITATION_MESSAGE = "Hey! Would you like to get a 50% discount for this awesome app? :)",
            INVITATION_CALL_TO_ACTION = "Share";
That's all there is to it. When the Intent is started, a custom Activity shows up that lets the user choose how they'd like to send the invitation (email or text message), the message of the invitation, and the recipients.
The intent is started by calling startActivityForResult. It is possible to fetch the result of the intent. Once the user has hit the send button, they are brought back to the activity that started the intent. At that moment, you can do whatever is necessary in onActivityResult, such as hiding the button or tracking invites through analytics.
@Override
protected void onActivityResult(int requestCode, int resultCode, Intent data) {
    super.onActivityResult(requestCode, resultCode, data);

    if (requestCode == REQUEST_INVITE) {
        if (resultCode == RESULT_OK) {

            // You successfully sent the invite,
            // we can dismiss the button.
            button.setVisibility(View.GONE);

            String[] ids = AppInviteInvitation.getInvitationIds(resultCode, data);
            StringBuilder sb = new StringBuilder();
            sb.append("Sent ").append(Integer.toString(ids.length)).append(" invitations: ");
            for (String id : ids) sb.append("[").append(id).append("]");
            Log.d(getString(R.string.app_name), sb.toString());

        } else {
            // Sending failed or it was canceled using the back button
            showMessage("Sorry, I wasn't able to send the invites");
        }
    }
}
4. Deep Linking
Step 1: Send Deep Link Data
When a user receives the invitation and clicks the included link, the invitation flow branches according to whether or not the app is
already installed on the recipient's smartphone. If the app is already present, it will automatically receive an Intent containing the optional deep link data.
However, if the recipient doesn't have the app installed installed, they are given the chance to do so. When the app is first launched, the app will receive an Intent containing the deep link data. This way, the discount you may want to provide will always be available
to the recipient. This overcomes the issues we talked about earlier.
Let's explore deep linking in more detail. Set the deep link of the Intent we created in the onCreate method.
Intent intent = new AppInviteInvitation.IntentBuilder(INVITATION_TITLE)
                .setMessage(INVITATION_MESSAGE)
                .setDeepLink(Uri.parse("tutsplus://code.coupon/50"))
                .setCallToActionText(INVITATION_CALL_TO_ACTION)
                .build();
Step 2: Intent Filtering for Custom URLs
The first thing you need to do to handle custom
deep links is telling your app how they are made and which Activity should take care of them. Add a new Activity to your project and name it DetailsActivity.
Open AndroidManifest.xml and add the following snippet to the <activity android:name=".DetailsActivity"> tag.
<intent-filter>
    <action android:name="android.intent.action.VIEW" />

    <category android:name="android.intent.category.DEFAULT" />
    <category android:name="android.intent.category.BROWSABLE" />

    <data
        android:host="code.coupon"
        android:scheme="tutsplus" />

</intent-filter>
We are telling the system the following. If it invokes
the action VIEW on a URL whose scheme is tutsplus and whose host is code.coupon, your
app can handle it using the DetailsActivity class.
In order to receive and parse the custom URL, you first have to create an auto-managed GoogleApiClient with access to App Invites. We do this in the onCreate method of the MainActivity class.
GoogleApiClient googleApiClient = new GoogleApiClient.Builder(this)
        .addApi(AppInvite.API)
        .enableAutoManage(this, new GoogleApiClient.OnConnectionFailedListener() {
            @Override
            public void onConnectionFailed(ConnectionResult connectionResult) {
                Log.d(getString(R.string.app_name), "onConnectionFailed:" + connectionResult);
                showMessage("Sorry, the connection has failed.");
            }
        })
        .build();
Step 3: Receiving and Parsing the Deep Link
To check for invitations and to launch the deep link Activity, you can use the getInvitation method, which was introduced in Google Play services 8.3. Add the following code snippet to the onCreate method of the MainActivity class.
AppInvite.AppInviteApi.getInvitation(googleApiClient, this, true)
    .setResultCallback(
        new ResultCallback<AppInviteInvitationResult>() {
            @Override
            public void onResult(AppInviteInvitationResult result) {}
        });
Setting the last parameter of the method to true tells the plugin to automatically call the activity responsible for handling the deep link,
the DetailsActivity class in our example. This is the reason why the body of the onResult method is empty.
Open activity_details.xml and add two TextView objects like shown below.
<?xml version="1.0" encoding="utf-8"?>
<RelativeLayout xmlns:android="http://schemas.android.com/apk/res/android"
xmlns:tools="http://schemas.android.com/tools" android:layout_width="match_parent"
android:layout_height="match_parent" android:paddingLeft="@dimen/activity_horizontal_margin"
android:paddingRight="@dimen/activity_horizontal_margin"
android:paddingTop="@dimen/activity_vertical_margin"
android:paddingBottom="@dimen/activity_vertical_margin"
tools:context="com.tutsplus.code.appinvites.DetailsActivity">
<TextView
android:layout_width="wrap_content"
android:layout_height="wrap_content"
android:layout_centerInParent="true"
android:gravity="center"
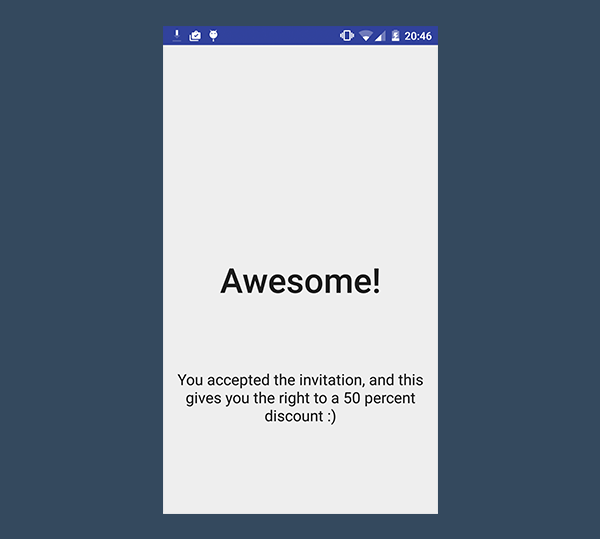
android:text="Awesome!"
android:textAppearance="@style/TextAppearance.AppCompat.Title"
android:textSize="45sp" />
<TextView
android:id="@+id/discount"
android:layout_width="wrap_content"
android:layout_height="wrap_content"
android:layout_centerHorizontal="true"
android:layout_alignParentBottom="true"
android:layout_marginBottom="100dp"
android:gravity="center"
android:text="You accepted the invitation, and this gives you the right to a %s percent discount :)"
android:textAppearance="@style/TextAppearance.AppCompat.Body1"
android:textSize="20sp" />
</RelativeLayout>
Next, open DetailsActivity and override the onStart method.
To check if the Intent contains deep link data, you have to
rely on the hasReferral method. The URL parsing is very straightforward as you can see below.
@Override
protected void onStart() {
    super.onStart();

    Intent intent = getIntent();
    if (AppInviteReferral.hasReferral(intent)) {
        // Extract the information from the Intent
        String deepLink = AppInviteReferral.getDeepLink(intent);
        Log.d(getString(R.string.app_name),
                "Found Referral: " + AppInviteReferral.getInvitationId(intent) + ":" + deepLink);

        String[] array = deepLink.split("/");

        if (array.length > 0) {
            TextView tv = (TextView) findViewById(R.id.discount);
            tv.setText(String.format(tv.getText().toString(), array[array.length-1]));
        }
    }
}
Conclusion
In this article, you learned how to implement Google's App Invites in your app, using the Google Play services plugin. This tool lets you increase the audience of your app by allowing users to send invitations to their Google contacts. You should now be able to develop a referral system by leveraging App Invites, letting your users recommend your app to their friends using personalized, contextual invitations.

Comments