In this tutorial you'll learn an open secret: how to generate screenshots of websites to use in your WordPress posts using a service provided by WordPress.com. We'll even turn this into an easy-to-use shortcode to display the screenshots... let's get started!
Background
It's an open secret, and has been for a couple of years, that WordPress exposes a screenshot generator at it's s.wordpress.com subdomain. And the scuttlebutt is that as long as you don't abuse it, then it's free to use. WordPress.com uses it for generating screenshots for it's various activities.
For instance, here's the url to show a screenshot of wp.tutsplus with a width of 400 pixels:
http://s.wordpress.com/mshots/v1/http%3A%2F%2Fwp.tutsplus.com?w=400
You may need to click the link again as the generator takes a little time to cache the image.
What we'll be doing:
- write a shortcode function to display a screenshot
- use the shortcode to display a screenshot as part of the post loop using a custom field for the url
Step 1 The Shortcode Function
Our shortcode will be used like:
[ss_screenshot width='300' site='http://wp.tutsplus.com']
You can add the code to the functions.php file in your theme directory. The full code is available in the source link above.
add_shortcode('ss_screenshot', 'ss_screenshot_shortcode');

function ss_screenshot_shortcode($atts){

  $width = intval($atts['width']);

  $width = (100 <= $width && $width <= 300) ? $width : 200;

  $site = trim($atts['site']);

  if ($site != ''){

    $query_url =  'http://s.wordpress.com/mshots/v1/' . urlencode($site) . '?w=' . $width;

    $image_tag = '<img class="ss_screenshot_img" alt="' . $site . '" width="' . $width . '" src="' . $query_url . '" />';

    echo '<a class="ss_screenshot_link" href = "' . $site . '">' . $image_tag . '</a>';

  }else{

    echo 'Bad screenshot url!';

  }
}
What this code does:
- declare a shortcode called ss_screenshot with the add_shortcode function
- the shortcode function accepts the $atts array containing the two shortcode attributes: width and site
- the width attribute is converted to an integer and checked to make sure it's within a suitable range, in this case between 100 and 300 pixels. Note: we use the PHP ternary operator to assign a default width of 200 if the supplied width is outside our range. This also takes into account a missing width attribute.
- the site attribute is trimmed to remove accidental left and right spaces
- we create a query url by adding a urlencoded site attribute and the width attribute
- finally we wrap the query_url in an image tag and a link tag so that users can click the screenshot and be taken to the site
Step 2 Test The Shortcode
In a post or page, insert this shortcode:
[ss_screenshot width='300' site='http://amazon.com']
When you view the post or page, you should see a 300 pixel wide screenshot of Amazon. Remember, you may have to refresh the page after a few seconds to see the cached screenshot. Play around with the width and watch what happens when you go out of range. By the way, you can set any width range you like. Also, test a bad url: you should see the warning message instead of a screenshot.
Now that we have a working shortcode, let's see how we can incorporate that into our WordPress loop.
Step 3 Custom Field Set-Up
Let's imagine a scenario where we want to display a screenshot of a site beside each of our posts. For formatting and usability reasons, it's best to automate this process by adding a custom field to our post edit screen. Into that field we can input a site url which can then be used in the post loop to display a screenshot using our new shortcode.
If the custom field box is not showing on your post edit screen, then look at screen top right and you should see the Screen Options tab. Click that and tick the Custom Fields box. Now you should see something like this at screen bottom:
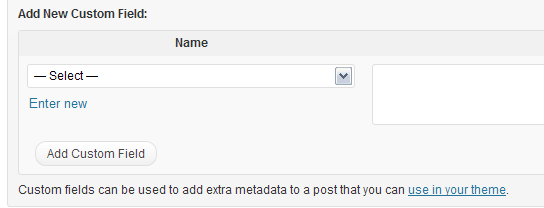
Click the Enter New link and create a new custom field called screenshot_url. This is what you should see:
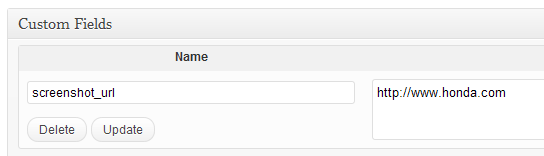
Now when you create/edit a post (the custom field appears for all posts) you can input a url for generating a screenshot related to the post.
Step 4 Add Screenshot Display To The Loop
Here's a seriously cut-down version of the standard WordPress post loop (as found in a theme template file) including our screenshot display code:
if (have_posts()) while (have_posts()) : the_post();

  the_title();

  $url = get_post_meta($post->ID, 'screenshot_url', true);

  do_shortcode('[ss_screenshot width="280" site="' . $url . '"]');

  the_content();

endif;
endwhile;
What this code does:
- check if we have posts, start looping and display the post title
- get the contents of the screenshot_url custom field by passing the current post ID and the name of the custom field to the get_post_meta function
- because we are in a template file, we use the do_shortcode function to parse our shortcode which includes the screenshot url for this post
- then we display the post content and end the loop
Step 5 Test The Loop
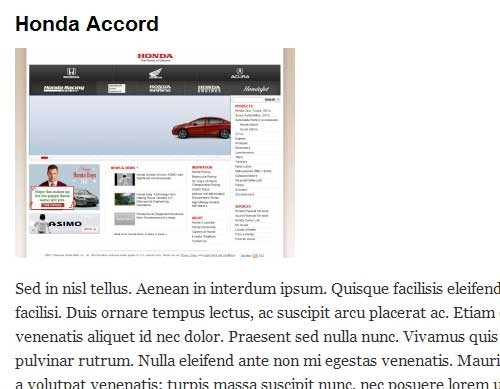
If you created a post with the title Honda Accord and gave it a screenshot url of http://www.honda.com, using your new loop setup, you should see something like this:
Conclusion
Instead of displaying a harsh warning message if a post doesn't have a screenshot url attached, you could show a default image.
If you don't wish to use the screenshot generator from WordPress, or if you have larger needs, you could use the free option at a screenshot service like http://www.shrinktheweb.com. You could apply the techniques used in this tutorial to any screenshot service.
Things to remember:
- the screenshots take a few seconds (usually) to generate, so refresh the page
- urlencode the url sent to the screenshot service
- begin your urls with http://
- if you have more demanding needs for screenshots, use a commercial service

Comments