Earlier this year, we worked through a series of tutorials covering the process of creating custom administration pages in WordPress. Though this series is not necessarily a prerequisite for the material we're about to cover, it wouldn't hurt to review it.
Out of the box, WordPress provides a lot of functionality through its many APIs. If, for example, you want to work on introducing administration pages by just focusing on the options that will be presented to the user, you can do that using the Settings API.
There are a lot of advantages of choosing this particular API, as well. Some of these include:
- sanitization and validation
- custom menu items
- ease of introducing administration pages
- working with various types of inputs
- automated messaging upon success or failure
- and much more
But just as we looked at how to create custom administration pages, it's also possible to implement a system that allows us to programmatically set our own custom messages, their type, and when and where to display them on the administration page.
So in continuing with the same theme as the aforementioned series, we're going to look at how to create our own custom messaging system for administration pages. To do this, we're going to be creating a plugin to demonstrate the concepts, we're going to be registering custom hooks with WordPress, and we're going to see how to implement them, as well.
As I mentioned, the previous tutorial isn't necessarily a prerequisite for this series, but if you're new to anything mentioned above, then please take some time to review the series first as it will give a bit of a foundation for the direction in which we're heading.
With that said, let's get started.
What You'll Need for This Series
If you've read any of my previous tutorials, you know that I like to start off each tutorial (or series, even) with two things:
- Provide a list of the software you'll need to get started.
- Provide a roadmap of where we're headed so you can decide whether or not you want to proceed with the series.
Let's do that now.
Your Development Environment
Generally speaking, this is what you're going to need to get started with the project we're going to build.
- PHP 5.6.25
- MySQL 5.6.28
- Apache (or Nginx if you're comfortable with that)
- WordPress 4.6.1
- Your favorite editor or IDE
If you're curious about how all of this fits together, I recommend reading this series.
I don't generally recommend one piece of software in terms of one being better than others because there are so many options, but if you're brand new to any of this then I highly recommend the free version of MAMP. It's compatible with macOS and Windows so it should be compatible with many of your setups. It's easy to use, easy to get started, and provides everything you need upon installation.
Our Roadmap
With that said, here's the tentative breakdown of this series:
- In this tutorial, we're going to lay the groundwork for the bare minimum of our plugin and what we need to get started.
- In the second piece, we're going to take the plugin a bit further by adding a very basic WordPress administration page. We'll also be making a call to the custom hook that we'll use, and we'll wire that up on the server-side. We'll also start the groundwork for our Settings Messenger.
- In the next tutorial, we'll begin implementing our Settings Messenger by adding support for errors and success messages as well as covering some points on security.
- We'll end by tying everything together, seeing it in action, and making the final plugin publicly available for you to download.
Note that each tutorial will include downloadable source files; however, they won't necessarily be complete source files in that they may not include documentation or other notes. That's what the tutorial is all about, after all.
But the final version that's provided will include exactly that.
Starting the Plugin
Right now, we know we're going to need the following things for our plugin:
- a basic administration page
- a menu item to take us to the administration page
- a bootstrap file to start the plugin
So let's get all of those pieces together and functional.
1. The Menu Item
The first thing we want to do is introduce the functionality that will add a submenu item to the Options menu in the WordPress administration navigation menu.
To do this, we need two classes and one file: one class that will display the submenu, one class that will display the submenu page, and a file that will display the content of the page.
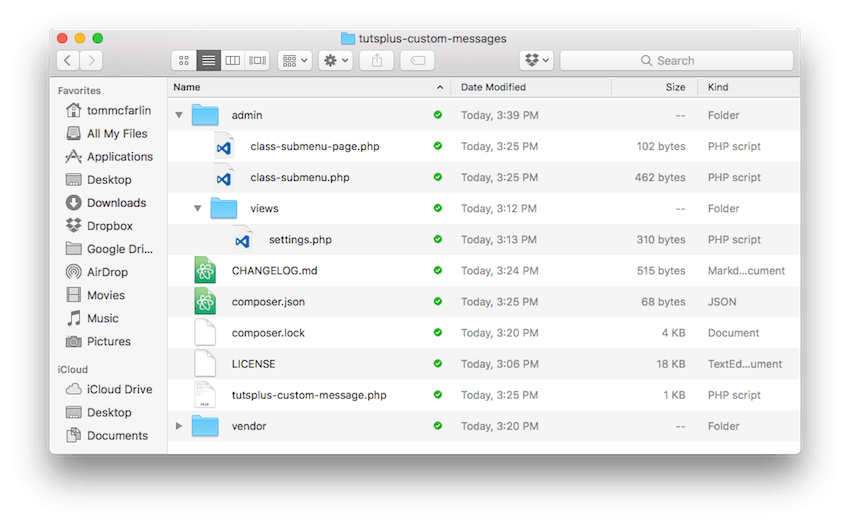
Before doing this, I recommend the following directory structure:

This means that the admin directory will have a views subdirectory. The admin directory will have class-submenu.php and class-submenu-page.php. We'll talk about the administration page in the next section.
First, let's look at each of those individual files.
class-submenu.php
This class is responsible for adding the menu item to the options page:
<?php

class Submenu {

    private $submenu_page;

	public function __construct( $submenu_page ) {
		$this->submenu_page = $submenu_page;
	}

	public function init() {
		add_action( 'admin_menu', array( $this, 'add_options_page' ) );
	}

	public function add_options_page() {

		add_options_page(
			'Tuts+ Custom Messages',
			'Tuts+ Custom Message Example',
			'manage_options',
			'tutsplus-custom-messages',
			array( $this->submenu_page, 'render' )
		);
	}
}
If you've read the API call in the Codex, you will see that this will introduce a menu item in the Tools menu that will be accessible via "Tuts+ Custom Messages" and that will house a title we'll see momentarily.
Note also that there is an init method. This function registers the add_options_page with WordPress's admin_menu hook so that it's properly registered (and displayed) during the WordPress page lifecycle.
Secondly, this menu is accessible via anyone with the manage_options capability, and it will call the render method on the submenu_page that belongs to it.
The problem? There is no submenu page. So let's create that class now.
class-submenu-page.php
The code for this class is below:
<?php

class Submenu_Page {

    public function render() {
        include_once( 'views/settings.php' );
    }
}
The Submenu_Page class is clearly simple. All it does is display the settings.php page, which we'll review in a moment.
Note that not all submenu pages will be this simple; however, the complexity of our plugin is yet to come. We'll see that in a future post.
2. The Administration Page
Just as the Submenu_Page was simple, so is the setting page. In fact, if you're familiar with basic markup, it should be easy to understand exactly what's going on:
<div class="wrap">

    <h1><?php echo esc_html( get_admin_page_title() ); ?></h1>

	<p class="description">
		We aren't actually going to display options on this page. Instead, we're going
		to use this page to demonstration how to hook into our custom messenger.
	</p><!-- .description -->
</div><!-- .wrap -->
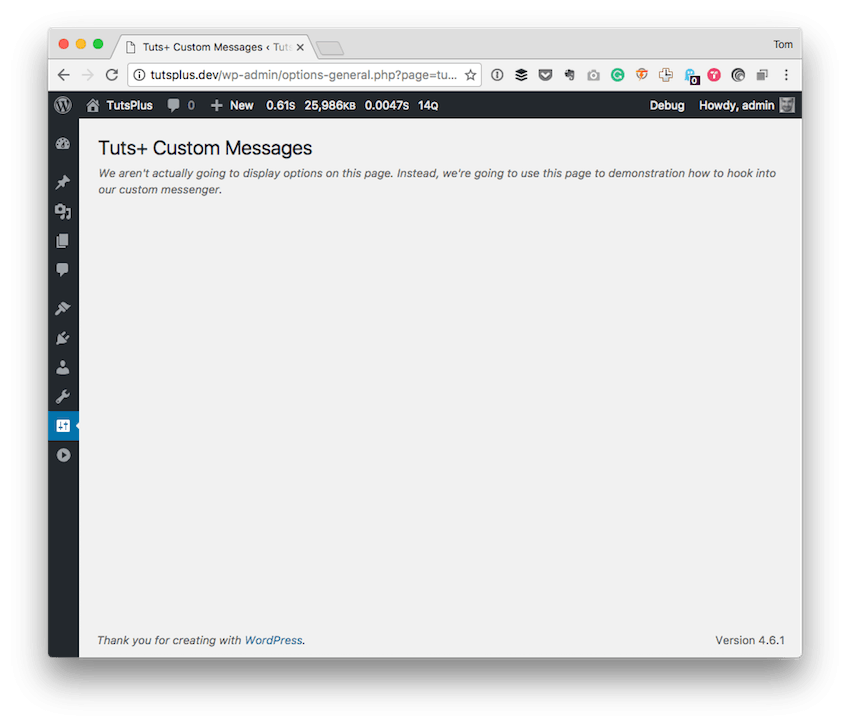
In short, this simply displays a message in WordPress that we're not going to be using this page for anything other than displaying custom messages.
After all, that is what we'll be doing.
3. Bringing It to Life
At this point, we're ready to set up the bootstrap file to get the plugin set in motion. Here's the basic bootstrap file:
<?php
/**
 * The plugin bootstrap file
 *
 * @link              TODO
 * @since             1.0.0
 * @package           TutsPlus_Custom_Messaging
 *
 * @wordpress-plugin
 * Plugin Name:       Tuts+ Custom Messaging Example
 * Plugin URI:        TODO
 * Description:       Import your employee directory as users manually or automatically, populate employees' birthdays and anniversaries into a CPT, and create a front-end directory page.
 * Version:           0.1.0
 * Author:            Tom McFarlin
 * Author URI:        https://tommcfarlin.com
 * License:           GPL-2.0+
 * License URI:       http://www.gnu.org/licenses/gpl-2.0.txt
 */

// If this file is called directly, abort.
if ( ! defined( 'WPINC' ) ) {
    die;
}

// We *could* use an autoloader here but I'm not sure everyone has read the series.
foreach ( glob( plugin_dir_path( __FILE__ ) . 'admin/*.php' ) as $file ) {
	include_once $file;
}

add_action( 'plugins_loaded', 'tutsplus_custom_messaging_start' );
/**
 * Starts the plugin.
 *
 * @since 1.0.0
 */
function tutsplus_custom_messaging_start() {

	$plugin = new Submenu(
		new Submenu_Page()
	);

	$plugin->init();
}
Take note of the comment above the foreach loop. Though we've covered autoloading in a previous series, I don't want to assume anyone has read all of the series leading up to this particular one.
Once this is in place, you should be able to log in to your WordPress account, activate the plugin, and see the following screen:

If not, double-check all of your source code against that which is attached to this post and verify that everything is exactly as it should be.
If not, make the necessary corrections and try again. If it takes a few tries, don't sweat it. Programming can be a bit of a frustrating task at times, especially when you're just getting started.
Conclusion
If you've followed most of my work up to this point, a lot of this may have seemed familiar. If not, then I'm glad to have you on board. While you're waiting for the second tutorial, I recommend checking out some of the other material I've published to get a sense of what I like to cover and my approach to teaching these concepts.
I'm also always happy to answer questions via the comments, and you can also feel free to check out my blog and follow me on Twitter. I usually talk all about software development within WordPress and tangential topics, as well.
Until the next tutorial, study the code, download the files, and see how this runs on your local machine. In the next part, we'll pick up exactly where we left off.


Comments