Sometimes you may need to enhance your online presence and reach a wider audience through submitting your content outside your web site. For example you may want to make your posts available on most popular social network aggregators, or make them available on mobile devices, or publish your audio/video podcasts on digital stores.
In most of these cases, it's necessary to customize the RSS Feed to make it suitable for publishing through adding custom metadata.
In this tutorial we will see how to achieve this goal for two major platforms: Flipboard and the iTunes Store, but the code is easily customizable for other platforms and web services.
Introduction
Flipboard is a social-network aggregation application for Android and iOS devices that periodically takes the content from your website and presents it in a magazine format so that mobile users can read your news through the app installed on their smartphone or tablet. iTunes Store is an online digital media store where you can publish your audio or video podcasts.
The subscription to both the services is free but it is subject to approval, especially in the case of Flipboard that seems to accept only web sites with a substantial number of readers.
They both allow you to publish content through your blog RSS Feed, but this must be compliant with their specifications. Luckily WordPress allows developers to modify the default RSS Feed structure.
Step 1 The Default WordPress RSS Feed Structure
By default, WordPress comes with various feeds. In this tutorial we will use the RSS 2.0 feed available at http://example.com/?feed=rss2 or http://example.com/feed/ if you use permalinks. This feed is a simple XML document structured like this:
<?xml version="1.0" encoding="UTF-8"?>
<rss version="2.0"
  <!-- these are the namespaces -->
  xmlns:content="http://purl.org/rss/1.0/modules/content/"
  xmlns:wfw="http://wellformedweb.org/CommentAPI/"
  xmlns:dc="http://purl.org/dc/elements/1.1/"
  xmlns:atom="http://www.w3.org/2005/Atom"
  xmlns:sy="http://purl.org/rss/1.0/modules/syndication/"
  xmlns:slash="http://purl.org/rss/1.0/modules/slash/"
>

	<channel>
		<!-- this is the head -->
		<title>Your Blog Title</title>
		<atom:link href="http://your-site-url.com/feed" rel="self" type="application/rss+xml" />
		<link>http://your-site-url.com</link>
		<description>your Blog Description</description>
		<lastBuildDate>Thu, 27 Sep 2012 18:30:06 +0000</lastBuildDate>
		<language>en-US</language>
		<sy:updatePeriod>hourly</sy:updatePeriod>
		<sy:updateFrequency>1</sy:updateFrequency>
		<generator>http://wordpress.org/?v=3.4.2</generator>

		<!-- this is the first post -->
		<item>
			<title>Post 1 Title</title>
			<link>http://your-site-url.com/post-1-slug</link>
			<comments>http://your-site-url.com/post-1-slug#comments</comments>
			<pubDate>Tue, 15 May 2012 13:47:12 +0000</pubDate>
			<dc:creator>John Doe</dc:creator>
			<category><![CDATA[Category 1]]></category>
			<guid isPermaLink="false">http://your-site-url.com/?p=1</guid>
			<description><![CDATA[Aliquam rutrum placerat aliquet. Maecenas congue felis erat]]></description>
			<content:encoded><![CDATA[<p>Aliquam rutrum placerat aliquet. Maecenas congue felis erat.</p>]]></content:encoded>
			<wfw:commentRss>http://your-site-url.com/post-1-slug/feed</wfw:commentRss>
			<slash:comments>0</slash:comments>
		</item>

		<!-- this is the second post -->
		<item>
			<title>Post 2 Title</title>
			<link>http://your-site-url.com/post-2-slug</link>
			<comments>http://your-site-url.com/post-2-slug#comments</comments>
			<pubDate>Tue, 15 May 2012 13:37:56 +0000</pubDate>
			<dc:creator>John Doe</dc:creator>
			<category><![CDATA[Category 1]]></category>
			<category><![CDATA[Category 2]]></category>
			<guid isPermaLink="false">http://your-site-url.com/?p=2</guid>
			<description><![CDATA[Aliquam rutrum placerat aliquet.]]></description>
			<content:encoded><![CDATA[<p>Aliquam rutrum placerat aliquet</p>]]></content:encoded>
			<wfw:commentRss>http://your-site-url.com/post-2-slug/feed</wfw:commentRss>
			<slash:comments>0</slash:comments>
		</item>
	</channel>

</rss>
As you can see, each <item> element represents a Post and contains several sub-elements, each related to that Post "component". The main are:
-
<title>is the post title -
<link>is the post permalink -
<pubDate>is the post publishing date in RFC822 format -
<dc:creator>is the post author name -
<dc:category>is a subset of elements, one for each post category -
<description>is the post excerpt without HTML tags -
<content:encoded>is the entire post content with HTML tags
Step 2 Customize the RSS Feed for Flipboard
According to Flipboard technical requirements it is possible to enhance the content.
by providing additional semantics within the article markup, adding the ability to specify pull quotes, slideshows, and other design elements
These additional semantics are:
- Title & Subtitle
- Pull quotes
- Image, Video, and Audio Assets
- Slideshows
- Geographic information
We can implement these semantics in our RSS Feed through a Plugin. As said, WordPress provide specific Hooks that allow you to modify the default RSS Feed structure:
-
rss2_ns- allows to add new namespaces inside the root XML element; -
rss2_head- allows to add to add tags in the feed header; -
the_content_feed- allows to modify the content of each Post displayed in the Feed; -
rss2_item- allows to add new sub-elements to each<item>(Post) element;
Create a new file called flipboard-feed.php, open it your favourite text editor and paste this plugin header:
<?php
/*
 * Plugin Name:   Flipboard RSS Feed
 * Plugin URI:    http://www.studio404.it
 * Description:   A plugin to customize the default RSS Feed according to Flipboard technical specifications.
 * Version:       1.0
 * Author:        Claudio Simeone
 * Author URI:    http://www.studio404.it
 */
?>
Copy the file in your /wp-content/plugins/ directory and activate it from the Plugins admin page.
Title & Subtitle
If you want to add a Title and a Subtitle before the Post Content, you have to add something like:
<hgroup>
	<h1>Title of the Post</h1>
	<h2>This is the Post subtitle</h2>
</hgroup>
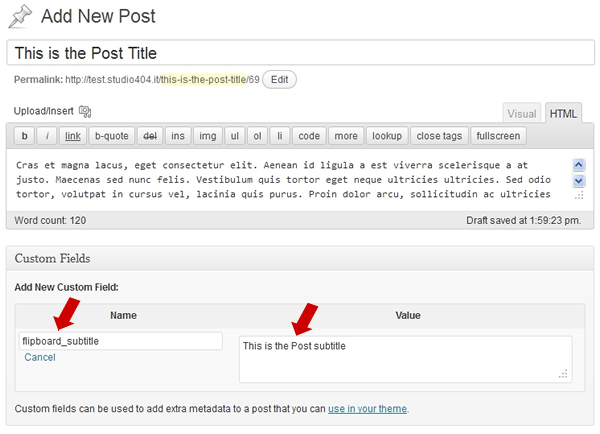
You could add this also manually to the Post Content, in the text editor, but that is not an optimal solution because these tags will then also be displayed on your web site (unless you don't hide the hgroup element through a CSS style). So, to achieve this automatically and only in the RSS Feed, it is better to use the Post title for the <h1> element and a Custom Field for the <h2> subtitle.
In your edit Post page, add a flipboard_subtitle Custom Field.
Add these lines to our Flipboard RSS Feed plugin:
add_filter( 'the_content_feed', 'flipboard_title_and_subtitle' );

function flipboard_title_and_subtitle( $content ) {
	global $post;
	$post_subtitle = get_post_meta( $post->ID, 'flipboard_subtitle', TRUE );
	// add hgroup only if the Custom Field is set
	if ( $post_subtitle ) {
		$hgroup = '<hgroup><h1>' . $post->post_title . '</h1>';
		$hgroup .= '<h2>' . $post_subtitle . '</h2></hgroup>';
		return $hgroup . $content;
	} else {
		return $content;
	}
}
Now, if you publish the Post and refresh your RSS Feed page source, you will see the hgroup tag before the Post Content.

Pull Quotes
For pull quotes you can use in your Post Content the <blockquote> tag to point out some parts of the text. We can take advantage of the plugin to replace the <blockquote> with the <aside> tag.

Add these lines to our Flipboard RSS Feed plugin:
add_filter( 'the_content_feed', 'flipboard_pull_quotes' );

function flipboard_pull_quotes( $content ) {
	// replace blockquote tag with aside
	return str_replace( 'blockquote>', 'aside>', $content );
}
Reload your RSS Feed page source, you will see the new <aside> tag.

Image
For all of these elements, we will follow another method suggested by Flipboard: instead of putting the semantics directly into the Post Content, we will add a new subset of Media RSS elements to the <item> element.
Media RSS is an RSS extension that enhances the publishing of multimedia files in RSS feeds. Image, video and audio files and their metadata can be included into RSS feeds thanks to its special elements.
In our case we will use the main one of them: <media:content>.
In addition, we also need GeoRSS extension to support Geographic information, so we have to add the correct namespaces to the RSS Feed to make it valid.
Add these lines to our Flipboard RSS Feed plugin:
add_filter( 'rss2_ns', 'flipboard_namespace' );

function flipboard_namespace() {
	echo 'xmlns:media="http://search.yahoo.com/mrss/"
	xmlns:georss="http://www.georss.org/georss"';
}
And the result will be:

Now we want to add into our RSS feed all the images attached to our Posts. We must do something like:
<item>
	<!-- Full item markup omitted for brevity -->
	<media:content type="image/jpeg" media="image" width="900" height="600" url="http://media.example.com/kitten-landscape.jpg">
		<media:description type="plain">An adorable kitten</media:description>
		<media:copyright>Carl Carlson</media:copyright>
	</media:content>
</item>
The <media:content> element supports two sub-elements: <media:description> is the caption used for the image and in WordPress is the Title of the Image, while <media:copyright> contains the copyright information or credit for the author of the image.
Now, we will implement this in our WordPress Feed. Write a Post and attach some images to it (note that images must be at least 400px in the smallest dimension):

Publish the Post, then add these lines to our Flipboard RSS Feed plugin:
add_filter( 'rss2_item', 'flipboard_attached_images' );

function flipboard_attached_images() {
	global $post;
	$attachments = get_posts( array(
		'post_type' => 'attachment',
		'post_mime_type' => 'image',
		'posts_per_page' => -1,
		'post_parent' => $post->ID,
		'exclude' => get_post_thumbnail_id()
	) );
	if ( $attachments ) {
		foreach ( $attachments as $att ) {
			$img_attr = wp_get_attachment_image_src( $att->ID, 'full' );
			?>
			<media:content url="<?php echo $img_attr[0]; ?>" type="<?php echo $att->post_mime_type; ?>" medium="image" width="<?php echo $img_attr[1]; ?>" height="<?php echo $img_attr[2]; ?>">
				<media:description type="plain"><![CDATA[<?php echo $att->post_title; ?>]]></media:description>
				<media:copyright><?php echo get_the_author(); ?></media:copyright>
			</media:content>
			<?php
		}
	}
}
Reload your RSS Feed page source, you will see a <media:content> element for each attached image.

A brief note on the <media:group> element: it can be used to provide alternate crops and sizes of the same image, for example portrait/landscape versions.
Video
For video files Flipboard suggests to use this code:
<media:content url="http://www.example.com/lisa-saxophone.mp4" type="video/mp4">
	<media:description type="plain">Lisa plays the saxophone</media:description>
	<media:thumbnail url="http://www.example.com/lisa-saxophone.jpg" width="200" height="200" />
	<media:copyright>Carl Carlson</media:copyright>
</media:content>
Here we have a new sub element: <media:thumbnail>: it simply specifies a preview image for the video. This can be a little tricky since we need a way to create a direct connection between the attached video and its preview image and tell WordPress that the two files are connected. We can proceed this way:
- Add a new Post and attach one or more videos/audio to it

- In the Media Library page, upload the preview image, take note of the image dimensions and copy the image File URL

- In the Media Library find the video, edit it and paste the image URL in the Description field and also add the width and the height of the image, each separated by a pipeline character "
|". This is necessary, to set the correct image dimensions.
Now it's time to put the video in our RSS Feed. Add these lines to our Flipboard RSS Feed plugin:
add_filter( 'rss2_item', 'flipboard_attached_videos' );

function flipboard_attached_videos() {
	global $post;
	$attachments = get_posts( array(
		'post_type' => 'attachment',
		'post_mime_type' => 'video',
		'posts_per_page' => -1,
		'post_parent' => $post->ID,
		'exclude' => get_post_thumbnail_id()
	) );
	if ( $attachments ) {
		foreach ( $attachments as $att ) {
			$video_url = wp_get_attachment_url( $att->ID );
			$parts = explode( '|', $att->post_content );
			?>
			<media:content url="<?php echo $video_url; ?>" type="<?php echo $att->post_mime_type; ?>">
				<media:description type="plain"><![CDATA[<?php echo $att->post_title; ?>]]></media:description>
				<media:copyright><?php echo get_the_author(); ?></media:copyright>
				<media:thumbnail url="<?php echo $parts[0]; ?>" width="<?php echo $parts[1]; ?>" height="<?php echo $parts[2]; ?>" />
			</media:content>
			<?php
		}
	}
}
And here is the final result:

Audio
The Fliboard code for audio files is:
<media:content url="http://www.example.com/bartman.mp3" fileSize="1000" type="audio/mpeg" >
	<media:description type="plain">Lisa plays the saxophone</media:description>
	<media:thumbnail url="http://www.example.com/lisa-saxophone.jpg" width="200" height="200" />
	<media:copyright>Carl Carlson</media:copyright>
</media:content>
As you can see, it is substantially identical to the video one: so to attach the image preview to the audio file, we can use the same method we followed for videos.
So, add these lines in our plugin:
add_filter( 'rss2_item', 'flipboard_attached_audio' );

function flipboard_attached_audio() {
	global $post;
	$attachments = get_posts( array(
		'post_type' => 'attachment',
		'post_mime_type' => 'audio',
		'posts_per_page' => -1,
		'post_parent' => $post->ID,
		'exclude' => get_post_thumbnail_id()
	) );
	if ( $attachments ) {
		foreach ( $attachments as $att ) {
			$audio_url = wp_get_attachment_url( $att->ID );
			$parts = explode( '|', $att->post_content );
			$headers = get_headers( $audio_url, 1 );
			$filesize = $headers['Content-Length'];
			?>
			<media:content url="<?php echo $audio_url; ?>" fileSize="<?php echo $filesize; ?>" type="<?php echo $att->post_mime_type; ?>">
				<media:description type="plain"><![CDATA[<?php echo $att->post_title; ?>]]></media:description>
				<media:copyright><?php echo get_the_author(); ?></media:copyright>
				<media:thumbnail url="<?php echo $parts[0]; ?>" width="<?php echo $parts[1]; ?>" height="<?php echo $parts[2]; ?>" />
			</media:content>
			<?php
		}
	}
}
Slideshows
To add all images attached to a Post in a slideshow format we must add a portion of HTML code to the RSS Feed Post content:
<section class="fl-slideshow">
	<h1>My favorite animals</h1>
	<figure>
		<img src="puppy.jpg" width="1200" height="900">
		<figcaption>Puppies are cute</figcaption>
	</figure>
	<figure>
		<img src="kitten.jpg" width="900" height="1200">
		<figcaption>Kittens are too</figcaption>
	</figure>
	<figure>
		<img src="lamb.jpg" width="900" height="900">
		<figcaption>And baby sheep grow into ewe</figcaption>
	</figure>
</section>
Add these lines in our plugin:
add_filter( 'the_content_feed', 'flipboard_slideshow' );

function flipboard_slideshow( $content ) {
	global $post;
	$attachments = get_posts( array(
		'post_type' => 'attachment',
		'post_mime_type' => 'image',
		'posts_per_page' => -1,
		'post_parent' => $post->ID,
		'exclude'     => get_post_thumbnail_id()
	) );
	if ( $attachments ) {
		$slide = '<section class="fl-slideshow"><h1>' . $post->post_title . '</h1>';
		foreach ( $attachments as $att ) {
			$img_attr = wp_get_attachment_image_src( $att->ID, 'full' );
			$slide .= '<figure>
				<img src="' . $img_attr[0] . '" width="' . $img_attr[1] . '" height="' . $img_attr[2] . '">
				<figcaption>' . $att->post_title . '</figcaption>
			</figure>';
		}
		$slide .= '</section>';
		return $content . $slide;
	} else {
		return $content;
	}
}
And this is the result:

Geographic information
To display geographic information we can use a Custom Field as we did for the hgroup Subtitle.
So, in your Edit Post page, add a flipboard_geo Custom Field and set the value in a format like this: 45.256 -71.92 (a complete list of supported tags is available in the GeoRSS documentation).
Add these lines to our Flipboard RSS Feed plugin:
add_filter( 'the_content_feed', 'flipboard_geo' );

function flipboard_geo( $content ) {
	global $post;
	$flipboard_geo = get_post_meta( $post->ID, 'flipboard_geo', TRUE );
	if ( $flipboard_geo ) {
		$geo = '<georss:poin>' . $flipboard_geo . '</georss:point>';
		return $content . $geo;
	} else {
		return $content;
	}
}
Submit Your Feed to Flipboard
Once the RSS Feed is ready, you can request Flipboard to include it in their news sources: you have to contact Flipboard staff by email, including your RSS Feed URL, Twitter, Facebook and website details. The staff will review all the info and will let you know in 5 business days.
Step 3 Customize the RSS Feed for Your Podcasts on iTunes
To publish our audio or video podcasts on Apple iTunes, we need to format the RSS Feed according to iTunes technical specs through a new plugin:
Create a new file called itunes-feed.php, open it your favourite text editor and paste this:
<?php
/*
 * Plugin Name:   iTunes RSS Feed
 * Plugin URI:    http://www.studio404.it
 * Description:   A plugin to customize the default RSS Feed according to iTunes technical specifications.
 * Version:       1.0
 * Author:        Claudio Simeone
 * Author URI:    http://www.studio404.it
 */
?>
Copy the file in your /wp-content/plugins/ directory and activate it in the Plugins admin page.
iTunes Namespace
To add the iTunes namespace and support iTunes specific meta tags, we can use the rss2_ns filter:
add_filter( 'rss2_ns', 'itunes_namespace' );

// Add namespace
function itunes_namespace() {
	echo 'xmlns:itunes="http://www.itunes.com/dtds/podcast-1.0.dtd"';
}
iTunes Head Tags
Next step is to add various information that will help iTunes to better categorize your feed in the store and show detailed information about your podcast channel.
We can add all these informations through rss2_head filter:
add_filter( 'rss2_head', 'itunes_head' );

function itunes_head() {
	?>
	<itunes:subtitle>A show about everything</itunes:subtitle>
	<itunes:author>John Doe</itunes:author>
	<itunes:summary>All About Everything is a show about everything...</itunes:summary>
	<itunes:owner>
		<itunes:name>John Doe</itunes:name>
		<itunes:email>[email protected]</itunes:email>
	</itunes:owner>
	<itunes:image href="http://example.com/podcasts/everything/AllAboutEverything.jpg" />
	<itunes:category text="Technology">
		<itunes:category text="Gadgets"/>
	</itunes:category>
	<?php
}
For the sake of brevity for this tutorial, the example is static. You can modify all the info manually in the plugin source code. If you prefer to make it dynamic, you can create an Option Page to handle all this information (see also: Handling Plugins Options in WordPress 2.8 with register_setting() by Ozh).
iTunes Post Tags
For each Post, iTunes asks to add some additional tags:
<itunes:author>John Doe</itunes:author>
<itunes:subtitle>A short primer on table spices</itunes:subtitle>
<itunes:summary>This week we talk about salt and pepper shakers...</itunes:summary>
<itunes:image href="http://example.com/podcasts/everything/AllAboutEverything/Episode1.jpg" />
<enclosure url="http://example.com/podcasts/everything/AllAboutEverythingEpisode3.m4a" length="8727310" type="audio/x-m4a" />
<guid>http://example.com/podcasts/archive/aae20050615.m4a</guid>
<itunes:duration>7:04</itunes:duration>
<itunes:keywords>salt, pepper, shaker, exciting</itunes:keywords>
We can handle some of this info like this:
- author: we'll use the Post author
- subtitle: we'll use the Post's Attachment Title
- summary: we'll use the Attachment Caption
- duration: we'll use the Attachment Description
- keywords: we'll use the Post tags
Write a new post, add a Title, some content and some Tags. Then, attach an audio file to the post.
After the file is uploaded, add other info: Title, Caption and use the Description field to specify the duration.

Add a Featured image to the Post, and finally publish it.

Now, add these lines in our itunes-feed.php plugin:
// add support for Post Thumbnails we will use for podcast covers
add_theme_support( 'post-thumbnails' );

// iTunes prefers square .jpg images that are at least 400 x 400 pixels
add_image_size( 'itunes-cover', 400, 400, true );

function itunes_attached_audio() {
	global $post;
	$attachments = get_posts( array(
		'post_type' => 'attachment',
		'post_mime_type' => 'audio', // if you use videos, change here
		'posts_per_page' => -1,
		'post_parent' => $post->ID,
		'exclude' => get_post_thumbnail_id()
	) );

	// use the post tags for itunes:keywords
	$itunes_keywords_arr = get_the_tags();
	if ( $itunes_keywords_arr ) {
		foreach( $itunes_keywords_arr as $tag ) {
			$itunes_keywords .= $tag->name . ',';
		}
		$itunes_keywords = substr_replace( trim( $itunes_keywords ), '', -1 );
	}

	// use the post thumb for itunes:image
	$post_thumbnail_id = get_post_thumbnail_id( $post->ID );
	$itunes_image_arr = wp_get_attachment_image_src( $post_thumbnail_id, 'itunes-cover' );

	if ( $attachments ) {
		foreach ( $attachments as $att ) {
			$audio_url = wp_get_attachment_url( $att->ID );
			$parts = explode( '|', $att->post_content );
			$headers = get_headers( $audio_url, 1 );
			$filesize = $headers['Content-Length'];
			?>
			<itunes:author><?php echo get_the_author(); ?></itunes:author>
			<itunes:subtitle><?php echo $att->post_title; ?></itunes:subtitle>
			<itunes:summary><?php echo $att->post_excerpt; ?></itunes:summary>
			<itunes:image href="<?php echo $itunes_image_arr[0]; ?>" />
			<enclosure url="<?php echo $audio_url; ?>" length="<?php echo $filesize; ?>" type="<?php echo $att->post_mime_type; ?>" />
			<guid><?php the_permalink(); ?></guid>
			<itunes:duration><?php echo $att->post_content; ?></itunes:duration>
			<itunes:keywords><?php echo $itunes_keywords; ?></itunes:keywords>
			<?php
		}
	}
}
Finally, publish the Post and reload the RSS Feed page source.

In Conclusion
Though this tutorial covers only two main platforms, thanks to WordPress Hooks it is possible to customize the default RSS Feed and make it suitable for other external Web applications. For each Post you can attach additional information by using new RSS extensions, or you can enhance the Post content by providing additional HTML code to meet the requirements of all the platforms you want to use to publish your content.

Comments