Planning to start working on a new web application? In this tutorial, we'll discuss how to create an API-centric web application, and explain why this is essential in today's multi-platform world.
Looking for a Shortcut?
If you want a quick solution, check out one of the API items on Envato Market, such as API Framework, which allows you to create your own API in no time. The framework is very easy to use and extend if you have PHP and OOP knowledge.
Or you could try the Any API to HTML with PHP service on Envato Studio. If you order this service, you can parse any API from third-party websites and show the results on your own website, with your layout and features.
Introduction
API?
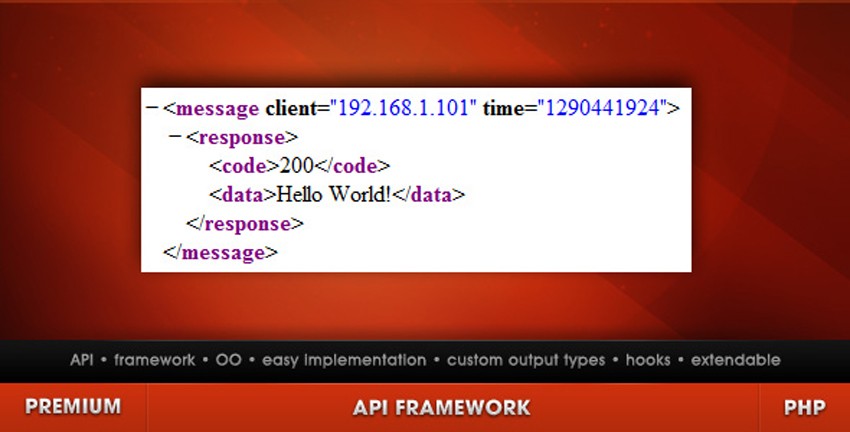
For those who are unfamiliar with the term, API is short for Application Programming Interface. According to Wikipedia:
An application programming interface (API) is a source code based specification intended to be used as an interface by software components to communicate with each other. An API may include specifications for routines, data structures, object classes, and variables.

In simpler terms, an API refers to a set of functions built into an application, which can be used by other applications (or by itself, as we'll see later), to interact with the application. An API is a great way to expose an application's functionality to external applications safely and securely, since all functionality that these external applications can do is limited with what functionality is exposed in the API.
What's an “API-Centric” Web Application?
An API-Centric Web Application is a web application that basically executes most, if not, all its functionality through API calls.
An API-Centric Web Application is a web application that basically executes most, if not, all its functionality through API calls. For example, if you were to log in a user, you would send his credentials to the API, and the API would return to you a result saying if the user provided the correct user-password combination.
Another characteristic of an API-Centric Web Application is that the API will always be stateless, meaning it can't recognize API calls by session. Since API calls will be made by usually via the backend code, it will be hard to implement session handling, since there are usually no cookies involved in that. This limitation is actually good — this “forces” a developer to build an API that works not based on the state of the current user, but rather on functionality, which in turn, makes it easier to test, since the current state of a user doesn't need to be recreated.
Why go through all this trouble?
As web developers, we've seen technology evolve first hand. It's common knowledge that people today don't just use applications via a browser, but through other gadgets, like mobile phones and tablets. For example, this article on Mashable, entitled “Consumers Now Spending More Time on Mobile Apps Than the Web”, states:
Consumers are spending more time on mobile apps than on the web for the first time, a new report claims.
Flurry compared its mobile data to stats from comScore and Alexa, and found that in June, consumers spent 81 minutes per day using mobile apps, compared to 74 minutes of web surfing.
Here's a more recent article from ReadWriteWeb, entitled “More People Browse On Mobile Than Use IE6 & IE7 Combined:
The latest data on browser trends from Sitepoint show that more people browse the Web on smartphones than use Internet Explorer 6 and 7 combined. Those two old clunkers have been the bugbears of Web developers for years, requiring sites to degrade as nicely as possible to that least common denominator of browsers. But it's a new world now; 6.95% of Web activity in November 2011 was on mobile browsers, and only 6.49% was on IE 6 or 7.
As we can clearly see, more and more people get their news from alternative venues, specifically mobile devices.
What does this have to do with me creating an API-Centric Web Application?
This would inevitably lead to more usage of our application, since it can be used anywhere a person wants.
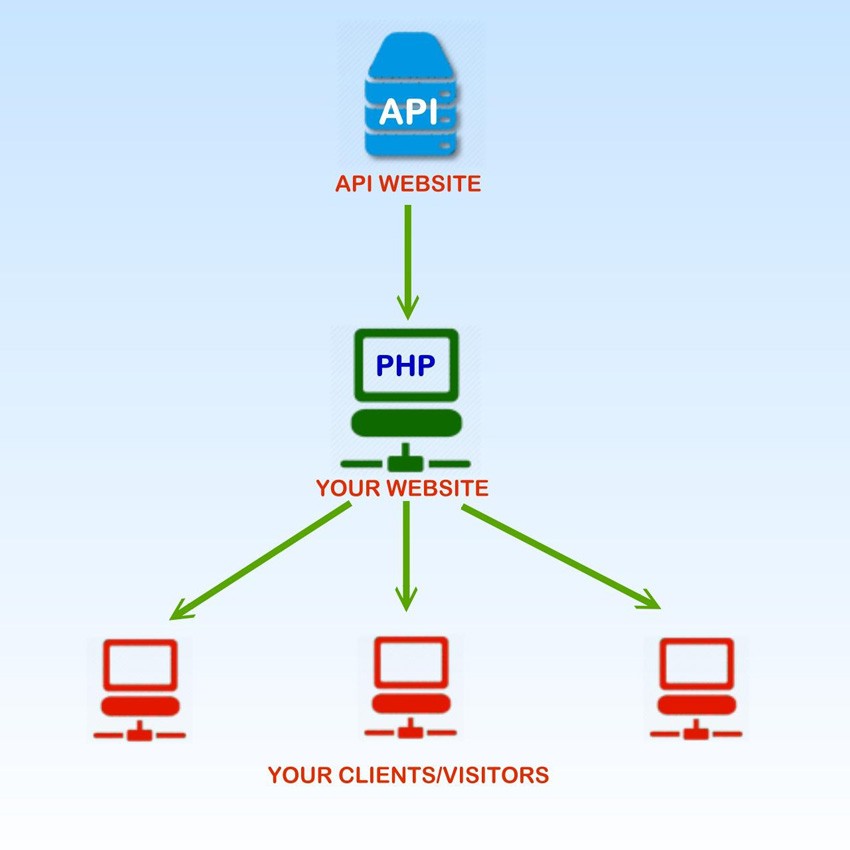
One of the main advantages of creating an API-centric application is that it helps you build functionality that can be used by ANY device, be it a browser, a mobile phone, a tablet, or even a desktop app. All you need to do is to create the API in such a way that all these devices can communicate with it, and voila! You'll have built a centralized application that can take input and execute functionality from any device that a person has!
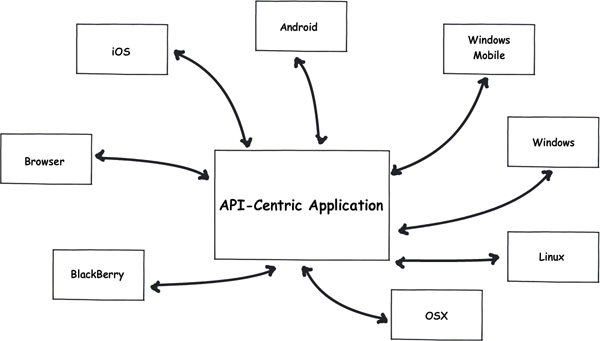
API-Centric Application Diagram
By creating an application in this manner, we're able to easily take advantage of the different mediums used by different people. This would inevitably lead to more usage of an application, since it can be used anywhere a person wants.
To drive the point home, here's an article about Twitter's new redesigned website, which tells us about how they now use their API to power Twitter.com, essentially making it API-centric:
One of the most important architectural changes is that Twitter.com is now a client of our own API. It fetches data from the same endpoints that the mobile site, our apps for iPhone, iPad, Android, and every third-party application use. This shift allowed us to allocate more resources to the API team, generating over 40 patches. In the initial page load and every call from the client, all data is now fetched from a highly optimized JSON fragment cache.
In this tutorial, we'll be creating a simple TODO list application that is API-Centric and create one front-end client on the browser that interacts with our TODO list application. By the end, you'll know the integral parts of an API-Centric application, and at the same time, how to facilitate secure communication between the two. With that in mind, let's begin!
Step 1: Plan the Application's Functions
The TODO application we'll be building in this tutorial will have the basic CRUD functions:
- Create TODO Items
- Read TODO Items
- Update TODO Items (rename, mark as done, mark as undone)
- Delete TODO Items
Each TODO item will have:
- a Title
- a Date Due
- a Description
- a flag to tell if the TODO Item Is Done
Let's mockup the application as well so we have a guide on how it should look like afterwards:
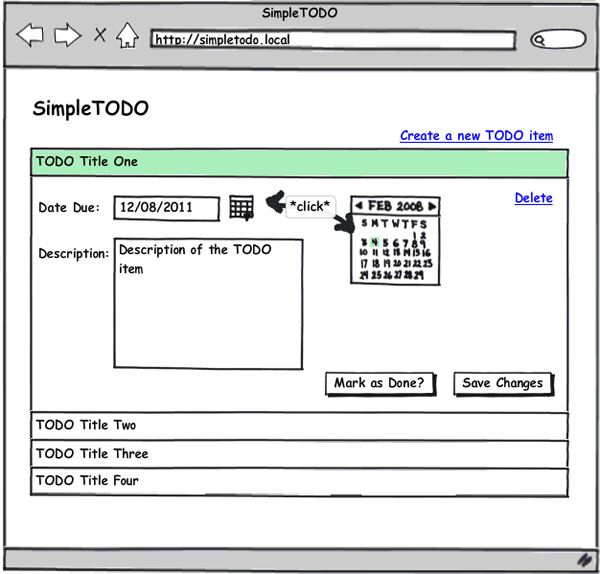
SimpleTODO Mockup
Step 2: Create the API Server
Since we're developing an API-Centric application, we'll be creating two “projects”: the API Server, and the Front-end Client. Let's begin by creating the API server first.
On your web server's folder, create a folder named simpletodo_api, and create an index.php file. This index.php file will act as a front controller for the API, so all requests to the API server will be made through this file. Open it up and put the following code inside:
<?php
// Define path to data folder
define('DATA_PATH', realpath(dirname(__FILE__).'/data'));

//include our models
include_once 'models/TodoItem.php';

//wrap the whole thing in a try-catch block to catch any wayward exceptions!
try {
	//get all of the parameters in the POST/GET request
	$params = $_REQUEST;

	//get the controller and format it correctly so the first
	//letter is always capitalized
	$controller = ucfirst(strtolower($params['controller']));

	//get the action and format it correctly so all the
	//letters are not capitalized, and append 'Action'
	$action = strtolower($params['action']).'Action';

	//check if the controller exists. if not, throw an exception
	if( file_exists("controllers/{$controller}.php") ) {
		include_once "controllers/{$controller}.php";
	} else {
		throw new Exception('Controller is invalid.');
	}

	//create a new instance of the controller, and pass
	//it the parameters from the request
	$controller = new $controller($params);

	//check if the action exists in the controller. if not, throw an exception.
	if( method_exists($controller, $action) === false ) {
		throw new Exception('Action is invalid.');
	}

	//execute the action
	$result['data'] = $controller->$action();
	$result['success'] = true;

} catch( Exception $e ) {
	//catch any exceptions and report the problem
	$result = array();
	$result['success'] = false;
	$result['errormsg'] = $e->getMessage();
}

//echo the result of the API call
echo json_encode($result);
exit();
What we've essentially built here is a simple front controller that does the following:
- Accept an API call with any number of parameters
- Extract the
ControllerandActionfor the API call - Make the necessary checks to ensure that the
ControllerandActionexist - Execute the API call
- Catch errors, if any
- Send back a result to the caller
Besides the index.php file, create three folders: a controllers, models and data folder.
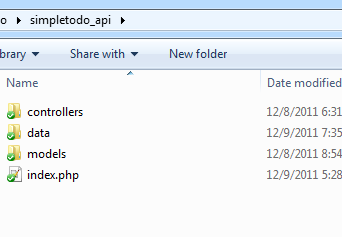
- The controllers folder will contain all the controllers we'll be using for the API server. We'll be building it using the MVC architecture to make the structure of the API server cleaner and more organized.
- The models folder will contain all the data models for the API server.
- The data folder will be where the API server saves any data
Go into the controllers folder and create a file called Todo.php. This will be our controller for any TODO list related tasks. With the functions we'll be needing for our TODO application in mind, create the necessary methods for the Todo controller:
<?php
class Todo
{
	private $_params;

	public function __construct($params)
	{
		$this->_params = $params;
	}

	public function createAction()
	{
		//create a new todo item
	}

	public function readAction()
	{
		//read all the todo items
	}

	public function updateAction()
	{
		//update a todo item
	}

	public function deleteAction()
	{
		//delete a todo item
	}
}
Now, add the necessary functionality to each action. I'll provide the code for the createAction method and I'll leave it up to you to create the code for the other methods. If you're not in the mood though, you can just download the source code for the demo and copy it from there.
public function createAction()
{
	//create a new todo item
	$todo = new TodoItem();
	$todo->title = $this->_params['title'];
	$todo->description = $this->_params['description'];
	$todo->due_date = $this->_params['due_date'];
	$todo->is_done = 'false';

	//pass the user's username and password to authenticate the user
	$todo->save($this->_params['username'], $this->_params['userpass']);

	//return the todo item in array format
	return $todo->toArray();
}
Create TodoItem.php inside the models folder so we can create the “item creation” code. Take note that I won't be connecting to a database, rather, I'll be saving the information into files. It should be relatively easy though to make this work with any database.
<?php
class TodoItem
{
	public $todo_id;
	public $title;
	public $description;
	public $due_date;
	public $is_done;

	public function save($username, $userpass)
	{
		//get the username/password hash
		$userhash = sha1("{$username}_{$userpass}");
		if( is_dir(DATA_PATH."/{$userhash}") === false ) {
			mkdir(DATA_PATH."/{$userhash}");
		}

		//if the $todo_id isn't set yet, it means we need to create a new todo item
		if( is_null($this->todo_id) || !is_numeric($this->todo_id) ) {
			//the todo id is the current time
			$this->todo_id = time();
		}

		//get the array version of this todo item
		$todo_item_array = $this->toArray();

		//save the serialized array version into a file
		$success = file_put_contents(DATA_PATH."/{$userhash}/{$this->todo_id}.txt", serialize($todo_item_array));

		//if saving was not successful, throw an exception
		if( $success === false ) {
			throw new Exception('Failed to save todo item');
		}

		//return the array version
		return $todo_item_array;
	}

	public function toArray()
	{
		//return an array version of the todo item
		return array(
			'todo_id' => $this->todo_id,
			'title' => $this->title,
			'description' => $this->description,
			'due_date' => $this->due_date,
			'is_done' => $this->is_done
		);
	}
}
The createAction method calls two functions on the TodoItem model:
-
save() - this saves the
TodoIteminto a file, as well as set thetodo_idfor theTodoItemif necessary -
toArray() - this returns an array version of the
TodoItem, where the variables are the array's indexes
Since the API is called via HTTP requests, let's test that API call by calling it through the browser:
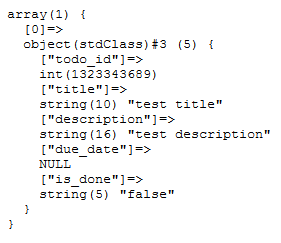
If everything worked, you should see a new folder inside the data folder, and inside that folder, you should see a file with the following content:
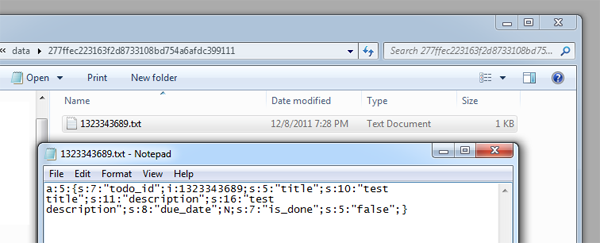
createAction() result
Congratulations! You've successfully created an API server and made an API call!
Step 3: Secure the API Server with an APP ID and APP SECRET
Currently, the API server is set to accept ALL API requests. We'll need to limit it to our own applications only, to ensure that only our own front-end clients are able to make API requests. Alternatively, you can actually create a system wherein users can create their own applications that have access to your API server, similar to how Facebook and Twitter applications work.
Begin by creating a set of id-key pairs for the clients that will be using the API server. Since this is just a demo, we can use any random, 32 character string. For the APP ID, let's say it's application APP001.
Open the index.php file again, and then update it with the following code:
<?php
// Define path to data folder
define('DATA_PATH', realpath(dirname(__FILE__).'/data'));

//Define our id-key pairs
$applications = array(
	'APP001' => '28e336ac6c9423d946ba02d19c6a2632', //randomly generated app key
);
//include our models
include_once 'models/TodoItem.php';

//wrap the whole thing in a try-catch block to catch any wayward exceptions!
try {
	//*UPDATED*
	//get the encrypted request
	$enc_request = $_REQUEST['enc_request'];

	//get the provided app id
	$app_id = $_REQUEST['app_id'];

	//check first if the app id exists in the list of applications
	if( !isset($applications[$app_id]) ) {
		throw new Exception('Application does not exist!');
	}

	//decrypt the request
	$params = json_decode(trim(mcrypt_decrypt(MCRYPT_RIJNDAEL_256, $applications[$app_id], base64_decode($enc_request), MCRYPT_MODE_ECB)));

	//check if the request is valid by checking if it's an array and looking for the controller and action
	if( $params == false || isset($params->controller) == false || isset($params->action) == false ) {
		throw new Exception('Request is not valid');
	}

	//cast it into an array
	$params = (array) $params;
	...
	...
	...
What we've done here is actually implement a very simple way of authenticating our front-end clients using a system similar to public-private key authentication. Basically, here is the step-by-step breakdown of how the authentication happens:
Public-key encryption
- an API call is made, in it an $app_id and $enc_request is provided.
- the $enc_request value is the API call parameters, encrypted using
APP KEY. TheAPP KEYis NEVER sent to the server, it's only used to hash the request. Additionally, the request can only be decrypted using theAPP KEY. - once the API call arrives to the API server, it will check its own list of applications for the
APP IDprovided - when found, the API server attempt to decrypt the request using the key that matches the
APP IDsent - if it was successful in decrypting it, then continue on with the program
Now that the API server is secured with an APP ID and APP SECRET, we can begin programming a front-end client to use the API server.
Step 4: Create the Browser Front-end Client
We'll begin by setting up a new folder for the front-end client. Create a folder called simpletodo_client_browser on your web server's folder. When that's done, create an index.php file and put this code inside:
<!DOCTYPE html>
<html>
<head>
	<title>SimpleTODO</title>

	<link rel="stylesheet" href="css/reset.css" type="text/css" />
	<link rel="stylesheet" href="css/bootstrap.min.css" type="text/css" />

	<script src="js/jquery.min.js"></script>
	<script src="js/jquery-ui-1.8.16.custom.min.js"></script>

	<style>
	body {
		padding-top: 40px;
	}
	#main {
		margin-top: 80px;
		text-align: center;
	}
	</style>
</head>
<body>
	<div class="topbar">
		<div class="fill">
			<div class="container">
				<a class="brand" href="index.php">SimpleTODO</a>
			</div>
		</div>
	</div>
	<div id="main" class="container">
		<form class="form-stacked" method="POST" action="login.php">
			<div class="row">
				<div class="span5 offset5">
					<label for="login_username">Username:</label>
					<input type="text" id="login_username" name="login_username" placeholder="username" />

					<label for="login_password">Password:</label>
					<input type="password" id="login_password" name="login_password" placeholder="password" />

				</div>
			</div>
			<div class="actions">
				<button type="submit" name="login_submit" class="btn primary large">Login or Register</button>
			</div>
		</form>
	</div>
</body>
</html>
That should look something like this:
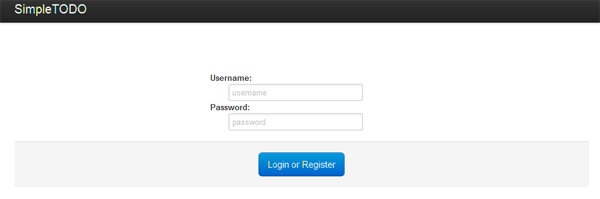
SimpleTODO Login Page
Take note that I've included 2 JavaScript files and 2 CSS files here:
- reset.css is your standard CSS reset script. I use the meyerweb.com css reset.
- bootstrap.min.css is the Twitter Bootstrap
- jquery.min.js is the latest jQuery library
- jquery-ui-1.8.16.custom.min.js is the latest jQuery UI library
Next, let's create the login.php file so we store the username and password inside a session on the client.
<?php
//get the form values
$username = $_POST['login_username'];
$userpass = $_POST['login_password'];


session_start();
$_SESSION['username'] = $username;
$_SESSION['userpass'] = $userpass;
header('Location: todo.php');
exit();
Here, we simply start a session for the user, based on the username and password combination the user will provide. This acts as a simple combination key, which will allow a user to access stored TODO items for a specific combination of both the username and password. We then redirect to todo.php, where we start interacting with the API server. Before we start coding the todo.php file though, let's first create an ApiCaller class, which will encapsulate all the API calling methods we'll need, including encrypting the requests.
Create apicaller.php and put the following inside:
<?php
class ApiCaller
{
	//some variables for the object
	private $_app_id;
	private $_app_key;
	private $_api_url;

	//construct an ApiCaller object, taking an
	//APP ID, APP KEY and API URL parameter
	public function __construct($app_id, $app_key, $api_url)
	{
		$this->_app_id = $app_id;
		$this->_app_key = $app_key;
		$this->_api_url = $api_url;
	}

	//send the request to the API server
	//also encrypts the request, then checks
	//if the results are valid
	public function sendRequest($request_params)
	{
		//encrypt the request parameters
		$enc_request = base64_encode(mcrypt_encrypt(MCRYPT_RIJNDAEL_256, $this->_app_key, json_encode($request_params), MCRYPT_MODE_ECB));

		//create the params array, which will
		//be the POST parameters
		$params = array();
		$params['enc_request'] = $enc_request;
		$params['app_id'] = $this->_app_id;

		//initialize and setup the curl handler
		$ch = curl_init();
		curl_setopt($ch, CURLOPT_URL, $this->_api_url);
		curl_setopt($ch, CURLOPT_RETURNTRANSFER, 1);
		curl_setopt($ch, CURLOPT_POST, count($params));
		curl_setopt($ch, CURLOPT_POSTFIELDS, $params);

		//execute the request
		$result = curl_exec($ch);

		//json_decode the result
		$result = @json_decode($result);

		//check if we're able to json_decode the result correctly
		if( $result == false || isset($result['success']) == false ) {
			throw new Exception('Request was not correct');
		}

		//if there was an error in the request, throw an exception
		if( $result['success'] == false ) {
			throw new Exception($result['errormsg']);
		}

		//if everything went great, return the data
		return $result['data'];
	}
}
We'll be using the ApiCaller class to send requests to our API server. This way, all the necessary encryption and cURL initialization code will be in one place, and we won't have to repeat our code.
-
the
__constructfunction takes in three parameters:-
$app_id - the
APP IDfor the client (which is APP001 for the browser client) -
$app_key - the
APP KEYfor the client (which is 28e336ac6c9423d946ba02d19c6a2632 for the browser client) -
$api_url - the URL of the API server, which is
http://localhost/simpletodo_api/
-
$app_id - the
-
the
sendRequest()function:- encrypts the request parameters using the
mcryptlibrary in the same manner that the API server decrypts it - generates the
$_POSTparameters to be sent to the API server - executes the API call via cURL
- checks the result of the API call was successful or not
- returns the data when everything went according to plan
- encrypts the request parameters using the
Now, let's begin with the todo.php page. First off, let's create some code to retrieve the current list of todo items for the user nikko with the password test1234 (this is the user/password combination we used earlier to test the API server).
<?php
session_start();
include_once 'apicaller.php';

$apicaller = new ApiCaller('APP001', '28e336ac6c9423d946ba02d19c6a2632', 'http://localhost/simpletodo_api/');

$todo_items = $apicaller->sendRequest(array(
	'controller' => 'todo',
	'action' => 'read',
	'username' => $_SESSION['username'],
	'userpass' => $_SESSION['userpass']
));

echo '';
var_dump($todo_items);
Go to the index.php page, login as nikko/test1234, and you should see a var_dump() of the TODO item we created earlier.
Congratulations, you've successfully made an API call to the API server! In this code, we've:
- started the session so we have access to the
usernameanduserpassin the$_SESSION - instantiated a new
ApiCallerclass, giving it theAPP ID,APP KEYand the URL of the API server - send a request via the
sendRequest()method
Now, let's reformat the data so it looks better. Add the following HTML to the todo.php code. Don't forget to remove the var_dump()!
<!DOCTYPE html>
<html>
<head>
	<title>SimpleTODO</title>

	<link rel="stylesheet" href="css/reset.css" type="text/css" />
	<link rel="stylesheet" href="css/bootstrap.min.css" type="text/css" />
	<link rel="stylesheet" href="css/flick/jquery-ui-1.8.16.custom.css" type="text/css" />

	<script src="js/jquery.min.js"></script>
	<script src="js/jquery-ui-1.8.16.custom.min.js"></script>

	<style>
	body {
		padding-top: 40px;
	}
	#main {
		margin-top: 80px;
	}

	.textalignright {
		text-align: right;
	}

	.marginbottom10 {
		margin-bottom: 10px;
	}
	#newtodo_window {
		text-align: left;
		display: none;
	}
	</style>

	<script>
	$(document).ready(function() {
		$("#todolist").accordion({
			collapsible: true
		});
		$(".datepicker").datepicker();
		$('#newtodo_window').dialog({
			autoOpen: false,
			height: 'auto',
			width: 'auto',
			modal: true
		});
		$('#newtodo').click(function() {
			$('#newtodo_window').dialog('open');
		});
	});
	</script>
</head>
<body>
	<div class="topbar">
		<div class="fill">
			<div class="container">
				<a class="brand" href="index.php">SimpleTODO</a>
			</div>
		</div>
	</div>
	<div id="main" class="container">
		<div class="textalignright marginbottom10">
			<span id="newtodo" class="btn info">Create a new TODO item</span>
			<div id="newtodo_window" title="Create a new TODO item">
				<form method="POST" action="new_todo.php">
					<p>Title:<br /><input type="text" class="title" name="title" placeholder="TODO title" /></p>
					<p>Date Due:<br /><input type="text" class="datepicker" name="due_date" placeholder="MM/DD/YYYY" /></p>
					<p>Description:<br /><textarea class="description" name="description"></textarea></p>
					<div class="actions">
						<input type="submit" value="Create" name="new_submit" class="btn primary" />
					</div>
				</form>
			</div>
		</div>
		<div id="todolist">
			<?php foreach($todo_items as $todo): ?>
			<h3><a href="#"><?php echo $todo->title; ?></a></h3>
			<div>
				<form method="POST" action="update_todo.php">
				<div class="textalignright">
					<a href="delete_todo.php?todo_id=<?php echo $todo->todo_id; ?>">Delete</a>
				</div>
				<div>
					<p>Date Due:<br /><input type="text" id="datepicker_<?php echo $todo->todo_id; ?>" class="datepicker" name="due_date" value="12/09/2011" /></p>
					<p>Description:<br /><textarea class="span8" id="description_<?php echo $todo->todo_id; ?>" class="description" name="description"><?php echo $todo->description; ?></textarea></p>
				</div>
				<div class="textalignright">
					<?php if( $todo->is_done == 'false' ): ?>
					<input type="hidden" value="false" name="is_done" />
					<input type="submit" class="btn" value="Mark as Done?" name="markasdone_button" />
					<?php else: ?>
					<input type="hidden" value="true" name="is_done" />
					<input type="button" class="btn success" value="Done!" name="done_button" />
					<?php endif; ?>
					<input type="hidden" value="<?php echo $todo->todo_id; ?>" name="todo_id" />
					<input type="hidden" value="<?php echo $todo->title; ?>" name="title" />
					<input type="submit" class="btn primary" value="Save Changes" name="update_button" />
				</div>
				</form>
			</div>
			<?php endforeach; ?>
		</div>
	</div>
</body>
</html>
It should now look something like this:
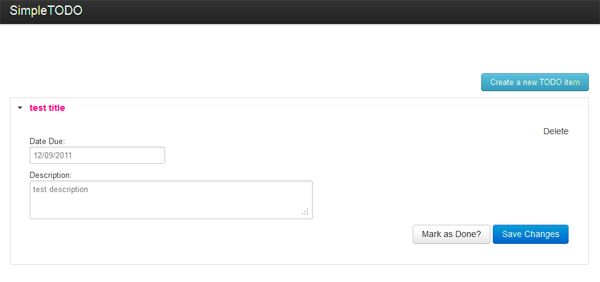
Pretty cool huh? But this currently does nothing, so let's begin adding some functionality. I'll provide the code for new_todo.php, which will call the todo/create API call to create a new TODO item. Creating the other pages (update_todo.php and delete_todo.php) should be very similar to this one, so I'll leave it up to you to create those. Open up new_todo.php and add the following code:
<?php
session_start();
include_once 'apicaller.php';

$apicaller = new ApiCaller('APP001', '28e336ac6c9423d946ba02d19c6a2632', 'http://localhost/simpletodo_api/');

$new_item = $apicaller->sendRequest(array(
	'controller' => 'todo',
	'action' => 'create',
	'title' => $_POST['title'],
	'due_date' => $_POST['due_date'],
	'description' => $_POST['description'],
	'username' => $_SESSION['username'],
	'userpass' => $_SESSION['userpass']
));

header('Location: todo.php');
exit();
?>
As you can see, the new_todo.php page uses the ApiCaller again to facilitate the sending the todo/create request to the API server. This basically does the same thing as before:
- start a session so it has access to the
$usernameand$userpasssaved in the$_SESSION - instantiate a new
ApiCallerclass, giving it theAPP ID,APP KEYand the URL of the API server - send the request via the
sendRequest()method - redirect back to
todo.php
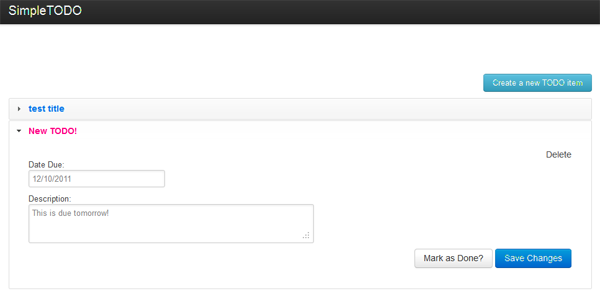
Congratulations, it works! You've successfully created an API-centric application!
Conclusion
There are so many advantages to developing an application that's built around an API. Want to create an Android application version of SimpleTODO? All the functionality you would need is already in the API server, so all you need to do is just create the client! Want to refactor or optimize some of the classes? No problem — just make sure the output is the same. Need to add more functionality? You can do it wihtout affecting any of the client's code!
Though there are some disadvantages like longer development times or more complexity, the advantages of developing a web application in this manner greatly outweight the disadvantages. It's up to us to leverage on this kind of development today so we can reap the benefits later on.
Are you planning to use an API server for your next web application, or have you already used the same technique for a project in the past? Let me know in the comments!

Comments