Behavior-Driven Development is an excellent process to follow in software development. With testing often a practice that is pushed aside to the last minute (or ignored entirely), baking the process into your daily workflow can prove to be hugely beneficial to the quality of your code. The structure and design of the tests, coupled with the Gherkin syntax, makes tests easy to read—even for team members with non-technical backgrounds.
All code should be tested thoroughly, meaning that defects should ideally never reach production. If they do, then a thorough test suite, focused on the behavior of your application as a whole, ensures that they are easy to both detect and fix. This speed, clarity, focus and quality in your code is why you need to be adopting this process... now.
What Is Behavior-Driven Development?
Behavior-Driven Development (which we will now refer to as "BDD") follows on from the ideas and principles introduced in Test-Driven Development. The key points of writing tests before code really apply to BDD as well. The idea is to not only test your code at the granular level with unit tests, but also test your application end to end, using acceptance tests. We will introduce this style of testing with the use of the Lettuce testing framework.
Behavior-Driven Development (BDD) is a subset of Test-Driven Development (TDD).
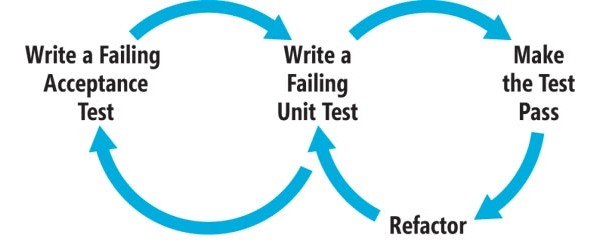
The process can be simply defined as:
- Write a failing acceptance test
- Write a failing unit test
- Make the unit test pass
- Refactor
- Make the acceptance test pass
Rinse and repeat for every feature, as is necessary.
BDD in Agile Development
BDD really comes into its own when used with agile development.
Tip: Refer to The Principles of Agile Development for more information on agile development methods.
With new features and requirements coming in every one, two or four weeks, depending on your team, you need to be able to test and write code for these demands quickly. Acceptance and unit testing in Python allows you to meet these goals.
Acceptance tests famously make use of an English (or possibly alternative) language format "feature" file, describing what the test is covering and the individual tests themselves. This can engage everyone in your team—not just the developers, but also management and business analysts who otherwise would play no part in the testing process. This can help to breed confidence across the whole team in what they are striving to achieve.
The feature files allow for tests to be described in a language this is/can be accessible to all levels of the business, and ensures that the features being delivered are articulated and tested in the way the business requires and expects. Unit testing alone can not ensure the application being delivered actually provides the full functionality that is required. Therefore acceptance testing adds another layer of confidence in your code to ensure that those individual 'units' fit together to deliver the full package required. The great thing about acceptance testing is that it can be applied to any project you are working on, either big or small scale.
Gherkin Syntax
Acceptance tests usually make use of the Gherkin Syntax, introduced by the Cucumber Framework, written for Ruby. The syntax is quite easy to understand, and, in the Lettuce Python package, makes use of the following eight keywords to define your features and tests:
- Given
- When
- Then
- And
- Feature:
- Background:
- Scenario:
- Scenario Outline:
Below, you can review these keywords in action, and how they can be used to structure your acceptance tests.
Installation
The installation of the Lettuce package is straightforward, following the usual pip install pattern that most Python developers will be familiar with.
Perform the following steps to begin using Lettuce:
$ pip install lettuce-
$ lettuce /path/to/example.featureto run your tests. You can either run just one feature file, or, if you pass a directory of feature files, you can run all of them.
You should also install nosetests (if you don't already have it installed) as you will be making use of some of the assertions that nosetests provides to make your tests easier to write and use.
$ pip install nose
Feature Files
Feature files are written in plain English, and specify the area of the application that the tests cover. They also provide some setup tasks for the tests. This means that you are not only writing your tests, but are actually forcing yourself to write good documentation for all aspects of your application. So you can clearly define what each piece of code is doing and what it is handling. This documentation aspect of the tests can be great as the size of your application grows, and you wish to review how a certain aspect of the application works, or you wish to remind yourself of how to interact with a part of the API for example.
Let's create a Feature file which will test an application that was written for my Test-Driven Development in Python article for Tuts+. The application is just a simple calculator written in Python but will show us the basic of writing acceptance tests. You should structure your application with an app and a tests folder. Within the tests folder, add a features folder also. Place the following code in a file named calculator.py under the app folder.
class Calculator(object):
    def add(self, x, y):
        number_types = (int, long, float, complex)

        if isinstance(x, number_types) and isinstance(y, number_types):
            return x + y
        else:
            raise ValueError
Now add the following code to a file named calculator.feature under the tests/features folder.
Feature: As a writer for NetTuts
  I wish to demonstrate
  How easy writing Acceptance Tests
  In Python really is.

  Background:
    Given I am using the calculator

  Scenario: Calculate 2 plus 2 on our calculator
    Given I input "2" add "2"
    Then I should see "4"
From this simple example, you can see how straightforward it is to describe your tests and share them across the various people involved in your team.
There are three key areas of note in the feature file:
- Feature block: Here is where you write documentation for what this group of tests is going to cover. No code is executed here, but it allows the reader to understand exactly what this Feature is testing.
- Background block: Executed prior to every Scenario within the Feature file. This is similar to the
SetUp()method and allows you to perform necessary setup code, such as making sure you are on some page, or have certain conditions in place. - Scenario block: Here, you define the test. The first line serves as the documentation again, and then you drop into your Scenario to execute the test. It should be fairly easy to see how you can write any test in this style.
Steps File
Following on from the Feature file, we need to have the steps file underneath. This is where the 'magic' happens. Obviously, the Feature file itself will not do anything; it requires the steps to actually map each line to execute Python code underneath. This is achieved through the use of regular expressions.
"Regular Expressions? Too complex to bother with in testing" can often be a response to RegEx's in these tests. However, in the BDD world, they are used to capture the whole string or use very simple RegEx's to pick out variables from a line. Therefore you shouldn't be put off by their use here.
Regular Expressions? Too complex to bother with in testing? Not in Lettuce. Simple and Easy!
If we review an example. you'll see how easily the Steps file follows on from the Feature.
from lettuce import *
from nose.tools import assert_equals
from app.calculator import Calculator


@step(u'I am using the calculator')
def select_calc(step):
    print ('Attempting to use calculator...')
    world.calc = Calculator()


@step(u'I input "([^"]*)" add "([^"]*)"')
def given_i_input_group1_add_group1(step, x, y):
    world.result = world.calc.add(int(x), int(y))


@step(u'I should see "([^"]+)"')
def result(step, expected_result):
    actual_result = world.result
    assert_equals(int(expected_result), actual_result)
The first thing worth noting is the standard imports at the top of the file. So we need access to our Calculator class and, of course, the tools provided by Lettuce. You also import some handy methods from the nosetest package such as assert_equals to allow for easy assertions in the steps. You can then begin to define the steps for each line in the Feature file. We can see that, as explained earlier, the regular expressions are mostly just picking up the whole string, except where we want access to the variable within the line.
If we use the @step(u'I input "([^"]*)" add "([^"]*)"') line as our example, you can see that the line is first picked up using the @step decorator. Then you use the 'u' character at the start to indicate a unicode string for Lettuce to perform regular expressions upon. Following that, it's just the line itself and a very simple regular expression to match anything within the quotes—the numbers to add in this case.
You should then see that the Python method follows directly after this, with the variables passed into the method with whatever name you wish. Here, I have called them x and y to indicate the two numbers to be passed to the calculator add method.
Another item of note here is the use of the world variable. This is a globally scoped container, and allows variables to be used across steps within a scenario. If we didn't, all variables would be local to their method, but, here, we create an instance of Calculator() once, and then access that in each step. You also use the same technique to store the result of the add method in one step and then assert on the result in another step.
Executing the Features
With the feature file and steps in place, you can now execute the tests and see if they pass. As mentioned earlier, executing the tests is simple and Lettuce provides a built-in test runner, available to you from the command line after installation. Try executing lettuce test/features/calculator.feature in your preferred command line application.
$ lettuce tests/features/calculator.feature

Feature: As a writer for NetTuts                 # tests/features/calculator.feature:1
  I wish to demonstrate                          # tests/features/calculator.feature:2
  How easy writing Acceptance Tests              # tests/features/calculator.feature:3
  In Python really is.                           # tests/features/calculator.feature:4

  Background:
    Given I am using the calculator              # tests/features/steps.py:6
    Given I am using the calculator              # tests/features/steps.py:6

  Scenario: Calculate 2 plus 2 on our calculator # tests/features/calculator.feature:9
    Given I input "2" add "2"                    # tests/features/steps.py:11
    Then I should see "4"                        # tests/features/steps.py:16

1 feature (1 passed)
1 scenario (1 passed)
2 steps (2 passed)
Lettuce's output is really nice, as it shows you each line of the feature file that has been executed and highlights in green to show that it has passed the line successfully. It also shows which feature file it is running and the line number, which comes in handy once you have built up a larger test suite of numerous features and need to find an offending line of a feature such as when a test fails. Finally, the last part of the output provides you with stats about the number of features, scenarios and steps that have been executed, and how many passed. In our example, all the tests were good, but let's take a look at how Lettuce shows you test failures and how you can debug and fix them.
Make a change to the code of calculator.py, so that the test will fail, such as changing the add method to actually subtract the two numbers passed in.
class Calculator(object):
    def add(self, x, y):
        number_types = (int, long, float, complex)

        if isinstance(x, number_types) and isinstance(y, number_types):
            return x - y
        else:
            raise ValueError
Now, when you run the feature file using Lettuce, you will see how it clearly indicates what has gone wrong in the test and which part of the code has failed.
$ lettuce tests/features/calculator.feature

Feature: As a writer for NetTuts                 # tests/features/calculator.feature:1
  I wish to demonstrate                          # tests/features/calculator.feature:2
  How easy writing Acceptance Tests              # tests/features/calculator.feature:3
  In Python really is.                           # tests/features/calculator.feature:4

  Background:
    Given I am using the calculator              # tests/features/steps.py:6
    Given I am using the calculator              # tests/features/steps.py:6

  Scenario: Calculate 2 plus 2 on our calculator # tests/features/calculator.feature:9
    Given I input "2" add "2"                    # tests/features/steps.py:11
    Then I should see "4"                        # tests/features/steps.py:16
    Traceback (most recent call last):
      File "/Users/user/.virtualenvs/bdd-in-python/lib/python2.7/site-packages/lettuce/core.py", line 144, in __call__
        ret = self.function(self.step, *args, **kw)
      File "/Users/user/Documents/Articles - NetTuts/BDD_in_Python/tests/features/steps.py", line 18, in result
        assert_equals(int(expected_result), actual_result)
      File "/System/Library/Frameworks/Python.framework/Versions/2.7/lib/python2.7/unittest/case.py", line 515, in assertEqual
        assertion_func(first, second, msg=msg)
      File "/System/Library/Frameworks/Python.framework/Versions/2.7/lib/python2.7/unittest/case.py", line 508, in _baseAssertEqual
        raise self.failureException(msg)
    AssertionError: 4 != 0

1 feature (0 passed)
1 scenario (0 passed)
2 steps (1 failed, 1 passed)

List of failed scenarios:
  Scenario: Calculate 2 plus 2 on our calculator # tests/features/calculator.feature:9
Clearly, the expected value of 4 now does not match the actual return value of 0. Lettuce has clearly shown you this issue and you could then debug your code to find out what has gone wrong, apply a fix, and make the test pass again.
Alternative Tools

There are plenty of alternative options within Python to do this form of testing. We have examples, such as Behave, Lettuce and also Cucumber, which, as mentioned, defined this structure. The other tools are essentially clones/ports of Cucumber. Cucumber can be used with Python code, via the use of a Ruby-Python interpreter, but that is beyond the scope of this tutorial.
- Behave: a near exact port of Cucumber into Python. Has a good level of documentation, and is updated constantly by the developers. They also offer a comparison with other tools, which is worth a read.
- Freshen: another direct port of Cucumber, featuring tutorials and examples on their website, and simple installation tools, such as 'pip'.
The key point, with all of these tools, is that they are all more or less the same. Once you have mastered one, you'll quickly pick up on the others, should you choose to switch. A quick review of the documentation should be enough for most developers who are proficient in Python.
Advantages
You can dive into refactoring confidently.
There are significant advantages to using a thorough test suite. One of the major ones revolves around the refactoring of code. With a robust test suite in place, you can dive into refactoring confidently, knowing that you have not broken any previous behavior in your application.
This grows in importance the more your application develops and increase in size. When you have more and more legacy code, it becomes very hard to go back and make changes with confidence and know that you have definitely not broken any existing behaviour. If you have a full suite of acceptance tests written for every feature being developed, you know that you have not broken that existing functionality as long as when you make your changes you run a full build of your tests before pushing the changes live. You check that your code has not "regressed" due to your changes and restrings.
Another great benefit of building acceptance testing into your daily workflow is the ability to have a clarification session before starting the development of a feature.
You could, for example, have the developers who will code the solution of a feature, the testers (quality assurance/QA's) who test the code once complete, and the business/technical analyst all sit down and clarify the requirements of a feature, and then document this as the feature files that the developers will work towards.
Essentially, you can have a set of failing feature files that the developers can run and make pass one by one, so that they will know they are done with the feature once all are passing. This gives developers the focus they need to deliver exactly to the requirements and not expand upon the code with features and functionality not necessarily required (also known as "gold plating"). The testers can then review the features files to see if everything is covered appropriately. The process can then be undertaken for the next feature.
Final Thoughts
Having worked in a team using the process and tools outlined above, I have personally experienced the huge advantages of working in this manner. BDD provides your team with clarity, focus, and the confidence to deliver great code, while keeping any potential bugs to a minimum.
Heads Up!
If this article has whetted your appetite for the world of testing in Python, why not check out my book "Testing Python", released on Amazon and other good retailers recently. Visit this page to purchase your copy of the book today, and support one of your Tuts+ contributors.

Comments