Over the course of this tutorial, we'll look at how to create a custom ASP.NET AJAX server control as a wrapper for the Google Maps JavaScript API. The server-side code will be written in C# (which I highly recommend), but it could just as easily be written in VB.NET. The focus will be on creating the control, and we'll take a good look at the whole process of creating a custom ASP.NET AJAX server control, with client side functionality as well.
Getting Started
If you don't already have Visual Studio installed, you'll want to grab the latest express edition.
Once that's done, fire it up and go to File -> New -> Project. From the list on the left, select Web, and then select ASP.NET AJAX Server Control from the main panel on the right. Name the project MapControl, and make sure that the option to create a new solution is selected (if applicable). Click OK to create the project.

Looking in Solution Explorer, you'll notice that Visual Studio has generated some files for us already. We'll examine the generated code a bit, but before we do, let's rename the files and the classes contained in the files.
- Rename ClientControl1.js to GoogleMap.js
- Rename ClientControl1.resx to GoogleMap.resx
- Rename ServerControl1.cs to GoogleMap.cs
Now, hit Control + H to bring up the Quick Replace window. Select the appropriate options to replace ServerControl1 with GoogleMap. Be sure that it's set to look in the whole project, and not just the current file, and then click Replace All. Now do the same thing to replace ClientControl1 with GoogleMap.
GoogleMap.js - Client-Side
Let's break GoogleMap.js apart piece by piece.
<reference name="MicrosoftAjax.js"/>
This line simply tells Visual Studio's IntelliSense engine to include the types and methods contained within MicrosoftAjax.js in the IntelliSense dropdowns.
Type.registerNamespace("MapControl");

MapControl.GoogleMap = function(element) {
    MapControl.GoogleMap.initializeBase(this, [element]);
}
The first line registers the namespace MapControl with the AJAX framework. The rest of the code here acts as the constructor for the client class of our custom control. This is where we will declare all private properties on the client side.
MapControl.GoogleMap.prototype = {
    initialize: function() {
        MapControl.GoogleMap.callBaseMethod(this, 'initialize');

        // Add custom initialization here
    },
    dispose: function() {
        //Add custom dispose actions here
        MapControl.GoogleMap.callBaseMethod(this, 'dispose');
    }
}
Here our custom control's client class is defined using the prototype model. This is where all methods for the client class are declared. As you probably guessed, the initialize and dispose methods are called automatically upon the creation and destruction of an instance of this class, respectively. In this case, we'll make use of the initialize method to make a call to the Google Maps API and set up the map.
MapControl.GoogleMap.registerClass('MapControl.GoogleMap', Sys.UI.Control);

if (typeof(Sys) !== 'undefined') Sys.Application.notifyScriptLoaded();
The first part here registers the class with the defined class name and namespace, and also assigns a base class (Sys.UI.Control). Lastly, a call is made to Sys.Application.notifyScriptLoaded(), which notifies the Microsoft AJAX framework that the script has finished loading. Note that this is no longer necessary in the .NET Framework 4 and above.
GoogleMap.cs - Server-Side Code
The file named GoogleMap.cs is where all of the server-side code is contained. Opening the file, the first thing you'll notice is that it contains a class called GoogleMap, which inherits from the ScriptControl class. ScriptControl is an abstract base class which inherits from WebControl, and implements IScriptControl.
public class GoogleMap : ScriptControl
Although it would be fine to leave that as it is, we can create a more flexible situation by implementing IScriptControl directly, and inheriting from WebControl instead. By doing so, we open up the possibility of inheriting from a more complex base class, such as ListControl. I also have run across problems inheriting from ScriptControl under various circumstances. Let's change it now to the following:
public class GoogleMap : WebControl, IScriptControl
Passing by the constructor, you'll see the GetScriptDescriptors and GetScriptReferences methods.
protected override IEnumerable<ScriptDescriptor>
            GetScriptDescriptors()
{
    ScriptControlDescriptor descriptor = new ScriptControlDescriptor("MapControl.GoogleMap", this.ClientID);
    yield return descriptor;
}

// Generate the script reference
protected override IEnumerable<ScriptReference>
        GetScriptReferences()
{
    yield return new ScriptReference("MapControl.GoogleMap.js", this.GetType().Assembly.FullName);
}
Since we're implementing
IScriptControldirectly, the access level modifiers will need to be changed from protected to public, and the override modifiers should be removed altogether.
In the GetScriptDescriptors method, the ScriptControlDescriptor object that is created and returned tells the framework which client class to instantiate, and also passes the ID of the HTML element associated with the current instance of the control. As you'll see in the next section, this is also the mechanism through which property values are passed from server-side code to the client class.
The code in the GetScriptReferences method simply adds a ScriptReference to our client code file - it will be loaded automatically by the framework when needed.
Defining Properties
Alright, now that we have some background information, it's time to start building the map control. To start out, we'll add some properties to the server-side class (in GoogleMap.cs), sticking with just the basics for now. The zoom and center point of the map is what comes to mind as necessary properties.
- Zoom
- CenterLatitude
- CenterLongitude
private int _Zoom = 8;
public int Zoom
{
    get { return this._Zoom; }
    set { this._Zoom = value; }
}

public double CenterLatitude { get; set; }
public double CenterLongitude { get; set; }
You might be wondering how the values of these properties defined in the server-side class are going to end up in the client class. Well, this is where the ScriptControlDescriptor comes into play. By simply calling the AddProperty method of the ScriptControlDescriptor and passing in the client-side property name and current value, the framework takes care of all the details.
public IEnumerable<ScriptDescriptor> GetScriptDescriptors()
{
    ScriptControlDescriptor descriptor = new ScriptControlDescriptor("MapControl.GoogleMap", this.ClientID);
    descriptor.AddProperty("zoom", this.Zoom);
    descriptor.AddProperty("centerLatitude", this.CenterLatitude);
    descriptor.AddProperty("centerLongitude", this.CenterLongitude);
    yield return descriptor;
}
Now we need to define the properties in the client class. Open GoogleMap.js and modify the constructor to look like the following:
MapControl.GoogleMap = function(element) {
    MapControl.GoogleMap.initializeBase(this, [element]);

    this._zoom = null;
    this._centerLatitude = null;
    this._centerLongitude = null;
}
To make these properties accessible to the ASP.NET AJAX framework, we need to define get and set accessors. These accessor methods must follow the naming conventions of the framework - as an example, for the zoom property the accessors should be named get_zoom and set_zoom. Add the following code to the prototype declaration for the class:
get_zoom: function() {
    return this._zoom;
},
set_zoom: function(value) {
    if (this._zoom !== value) {
        this._zoom = value;
        this.raisePropertyChanged("zoom");
    }
},
get_centerLatitude: function() {
    return this._centerLatitude;
},
set_centerLatitude: function(value) {
    if (this._centerLatitude !== value) {
        this._centerLatitude = value;
        this.raisePropertyChanged("centerLatitude");
    }
},
get_centerLongitude: function() {
    return this._centerLongitude;
},
set_centerLongitude: function(value) {
    if (this._centerLongitude !== value) {
        this._centerLongitude = value;
        this.raisePropertyChanged("centerLongitude");
    }
}
The raisePropertyChanged method is defined on an ancestor class, Sys.Component, and raises the propertyChanged event for the specified property.
Creating the Map
We'll be writing the code that creates the map in just a minute, but first we need to define a property that will store the map object. That way we will be able to access the map after it's created - in an event handler, for example. Add the following property declaration to the constructor for the client class (GoogleMap.js) after the other properties:
this._mapObj = null;
Now let's add a createMap function to the prototype:
createMap: function() {
        var centerPoint = new google.maps.LatLng(this.get_centerLatitude(), this.get_centerLongitude());
        var options = {
            zoom: this.get_zoom(),
            center: centerPoint,
            mapTypeId: google.maps.MapTypeId.ROADMAP
        };
      this._mapObj = new google.maps.Map(this._element, options);
}
The google.maps.LatLng type is defined in the Google Maps JavaScript API (which we will reference later), and as you probably guessed, represents a point on the map defined by latitude/longitude. In the map options, we're setting the zoom and center point of the map to the values passed in by the framework. A map type of roadmap is set, but this could easily be set to satellite or terrain.
The last line creates the google.maps.Map object, storing a reference to it in the property we created above.
You'll notice the constructor takes two parameters - most notably the first one is a reference to the HTML element associated with the control - the second one is just passing in the map options.
All that remains now on the client side is to call our new createMap function from the initialize function, so that the map is created when the control is initialized.
initialize: function() {
    MapControl.GoogleMap.callBaseMethod(this, 'initialize');

    this.createMap();
},
Finishing Touches
Back in the server-side code (GoogleMap.cs), we need to override the TagKey property in our GoogleMap class, and return a value of HtmlTextWriterTag.Div. This will ensure that the control is rendered as an html div element.
protected override HtmlTextWriterTag TagKey
{
    get
    {
        return HtmlTextWriterTag.Div;
    }
}
Now let's add a private field of type ScriptManager to the class - we'll call it sm. This will store a reference to the page's ScriptManager, which we'll use in a bit.
private ScriptManager sm;
Next, we'll override the OnPreRender and Render methods of the GoogleMap class.
protected override void OnPreRender(EventArgs e)
{
    if (!this.DesignMode)
    {
        // Test for ScriptManager and register if it exists
        sm = ScriptManager.GetCurrent(Page);

        if (sm == null)
            throw new HttpException("A ScriptManager control must exist on the current page.");

        sm.RegisterScriptControl(this);
    }

    base.OnPreRender(e);
}
Here, we're basically just getting the current page's ScriptManager (and making sure it exists!), and then registering the current instance of the control with it. This step, as well as the next, is absolutely necessary - otherwise the client side of the control won't work.
protected override void Render(HtmlTextWriter writer)
{
    if (!this.DesignMode)
        sm.RegisterScriptDescriptors(this);

    base.Render(writer);
}
This registers the control's script descriptors with the page's ScriptManager - sm is a reference to the ScriptManager that we retrieved in the OnPreRender method.
Last of all (for now!), we'll make this control compatible with partial trust scenarios, as is quite common due to the popularity of shared web hosting. In Solution Explorer, open the Properties folder, and then open AssemblyInfo.cs. Add the following reference near the top of the file.
using System.Security;
Add the following line somewhere in the middle or near the bottom of the file.
[assembly: AllowPartiallyTrustedCallers()]
Testing the Map Control
Now we're ready to take the control for a test drive. We'll come back later and add more functionality, but for now let's set up a small website to test the control. Right click on the solution node in Solution Explorer, and select Add -> New Web Site. Make sure that ASP.NET Web Site is selected from the list. Name the website MapControlTest, and click OK.
In the newly created Default.aspx, add a ScriptManager to the page, just inside of the form element. Remember from the last section that this is required on the page in order for our GoogleMap control to work.
<body>
    <form id="form1" runat="server">
    <asp:ScriptManager runat="server" ID="ScriptManager1">
    </asp:ScriptManager>
    <div>
    </div>
    </form>
</body>
Right click on the MapControlTest website node in Solution Explorer, and select Add Reference from the popup menu. Navigate to the Projects tab, select MapControl, and click OK. Now we need to register the assembly and namespace in Default.aspx. Add the following line near the top of the file, just above the DOCTYPE declaration.
<%@ Register Namespace="MapControl" TagPrefix="mc" Assembly="MapControl" %>
At this point, you should build the solution (Build -> Build Solution or the F6 key) so that IntelliSense works correctly for the new control. Now add the following control declaration to the page.
<mc:GoogleMap runat="server" CenterLatitude="36.1658" CenterLongitude="-86.7844" Width="500" Height="500">
</mc:GoogleMap>
Lastly, add the Google Maps JavaScript API script (in the head of the page).
<script src="http://maps.googleapis.com/maps/api/js?sensor=false"></script>
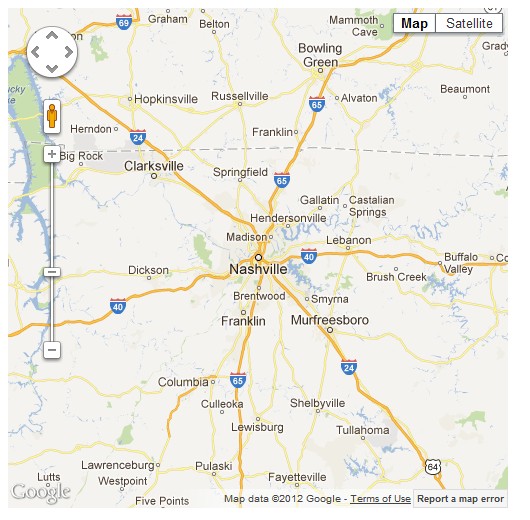
Now right click in the editor (for Default.aspx) and select View in Browser from the popup menu. Your browser should open and load the page with the map centered on Nashville, TN. You can play around with the control properties to make sure everything's working properly - specifically, try adding the Zoom property and watch the effect on the map.
Adding Markers
But a plain map isn't so exciting, so in this section we'll add some functionality that allows markers to be displayed on the map.
First, we'll need a class that contains information about each marker. Right click on the MapControl project node in Solution Explorer, and select Add -> Class from the popup menu. Name the class MapMarker and click OK.
The
Serializableattribute needs to be added to the class to allow it to be serialized and passed to the client-side code.
Add properties to the class so that the class declaration looks like this.
[Serializable]
public class MapMarker
{
    public double Latitude { get; set; }
    public double Longitude { get; set; }
    public string Title { get; set; }
    public virtual string InfoWindowHtml { get; set; }

    public MapMarker()
    {
    }
}
The Latitude and Longitude properties are fairly obvious - the Title property is for the tooltip text that will be displayed when the mouse is hovering over the marker, and the InfoWindowHtml property will contain the html to display in a popup when the marker is clicked.
In the server-side GoogleMap class (GoogleMap.cs) we'll add a property of a list of MapMarkers. The PersistenceMode attribute specifies that the property persists within the ASP.NET server control as a nested tag.
private List<MapMarker> markers = new List<MapMarker>();

[PersistenceMode(PersistenceMode.InnerProperty)]
public List<MapMarker> Markers
{
    get { return this.markers; }
}
The ParseChildren attribute also needs to be set on the GoogleMap
class for this to work.
[ParseChildren(true)]
public class GoogleMap : WebControl, IScriptControl
Now we'll add another property to the ScriptControlDescriptor in the GetScriptDescriptors method for the new property.
public IEnumerable<ScriptDescriptor> GetScriptDescriptors()
{
    ScriptControlDescriptor descriptor = new ScriptControlDescriptor("MapControl.GoogleMap", this.ClientID);
    descriptor.AddProperty("zoom", this.Zoom);
    descriptor.AddProperty("centerLatitude", this.CenterLatitude);
    descriptor.AddProperty("centerLongitude", this.CenterLongitude);
    descriptor.AddProperty("markers", this.Markers);
    yield return descriptor;
}
Switching back to the client-side code (GoogleMap.js), add a new
property declaration named _markers to the constructor. While we're
here, let's also add a property called _infoWindow, which will
store a reference to a popup that appears when a marker is clicked.
MapControl.GoogleMap = function(element) {
    MapControl.GoogleMap.initializeBase(this, [element]);

    this._zoom = null;
    this._centerLatitude = null;
    this._centerLongitude = null;
    this._markers = null;

    this._mapObj = null;
    this._infoWindow = null;
}
Now we need to add the get and set accessors for the property, as before.
get_markers: function() {
    return this._markers;
},
set_markers: function(value) {
    if (this._markers !== value) {
        this._markers = value;
        this.raisePropertyChanged("markers");
    }
},
All that remains now is to add the code that will display the markers to the createMap function.
createMap: function() {
    var centerPoint = new google.maps.LatLng(this.get_centerLatitude(), this.get_centerLongitude());
    var options = {
        zoom: this.get_zoom(),
        center: centerPoint,
        mapTypeId: google.maps.MapTypeId.ROADMAP
    };

    this._mapObj = new google.maps.Map(this._element, options);

    var markers = this.get_markers();
    if (markers != null) {
        for (var i = 0; i < markers.length; i++) {
            var marker = new google.maps.Marker
            (
                {
                    position: new google.maps.LatLng(markers[i].Latitude, markers[i].Longitude),
                    map: this._mapObj,
                    title: markers[i].Title
                }
            );

            var that = this;
            (function(marker, infoHtml) {
                google.maps.event.addListener(marker, 'click', function() {

                    if (!that._infoWindow) {
                        that._infoWindow = new google.maps.InfoWindow();
                    }

                    that._infoWindow.setContent(infoHtml);

                    that._infoWindow.open(that._mapObj, marker);

                });
            })(marker, markers[i].InfoWindowHtml);
        }
    }
}
This might look complicated, but it's really not - I'll break it apart and go through it piece by piece.
var markers = this.get_markers();
if (markers != null) {
   for (var i = 0; i < markers.length; i++) {
Here we're just getting the array of markers, making sure that it's not a null reference, and iterating through the array.
var marker = new google.maps.Marker
(
    {
        position: new google.maps.LatLng(markers[i].Latitude, markers[i].Longitude),
        map: this._mapObj,
        title: markers[i].Title
    }
);
This snippet of code is what actually adds the marker to the map - grabbing the position and title of the marker from the array through markers[i], and setting the map property to the map that was created earlier.
var that = this;
(function(marker, infoHtml) {
    google.maps.event.addListener(marker, 'click', function() {

        if (!that._infoWindow) {
            that._infoWindow = new google.maps.InfoWindow();
        }

        that._infoWindow.setContent(infoHtml);

        that._infoWindow.open(that._mapObj, marker);

    });
})(marker, markers[i].InfoWindowHtml);
The first line is to preserve the current context into the event handler - this will no longer reference our custom control there, so we use that instead. Since we're iterating through the array and the marker and i variables are changing, we need to pass the marker and infoHtml variables into a new self-executing anonymous function so that when the event handler is fired (which will be later), the variables still have their correct values. The code inside of the event handler is pretty straightforward - basically just setting the content of and opening the popup info window.
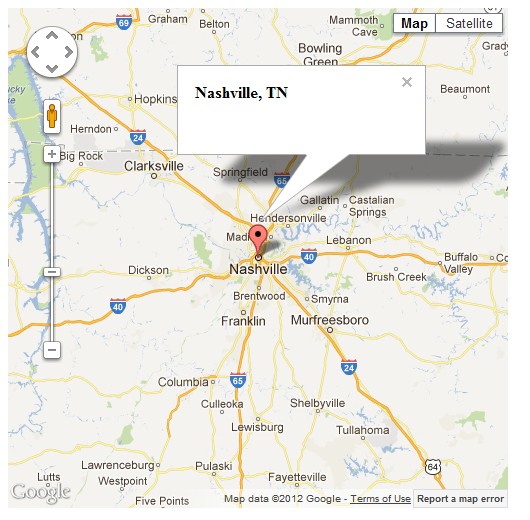
Now we can add markers to the map like this (you might need to build the solution again first for IntelliSense to work).
<mc:GoogleMap runat="server" CenterLatitude="36.1658" CenterLongitude="-86.7844" Width="500" Height="500">
    <Markers>
        <mc:MapMarker Latitude="36.1658" Longitude="-86.7844" Title="Nashville, TN" InfoWindowHtml="<strong>Nashville, TN</strong>" />
    </Markers>
</mc:GoogleMap>
If markers would be placed on the map through user input, there would be security issues to consider - specifically you would need to make sure that user input for the Title property is html encoded, and that input to the InfoWindowHtml property does not contain any dangerous code. As always, security in a production application should be of primary concern.
Conclusion
Throughout this tutorial, you hopefully not only learned a lot about creating a custom ASP.NET AJAX server control with client-side functionality, but also a bit about the Google Maps API. Some of you may be thinking that this technology is outdated, as it applies to ASP.NET Web Forms. However, Web Forms is still a very viable option for new web development, especially for individual developers working on short projects, and needing to get things done quickly.
ASP.NET MVC is probably better in terms of flexibility and testability. The point is that this tutorial isn't advocating the use of one technology over another; it simply teaches a technique that can serve to be quite handy when building ASP.NET Web Forms applications.

Comments