The BDD PHP framework Behat, allows you to test your PHP applications using human-readable sentences to write features and scenarios about how your applications should behave in order to test out its functionality. We can then run these tests to see if our application is behaving as expected. Let's spend about 15 minutes quickly going over Behat's installation process and learn how we can test our PHP applications behavior using the basics.
Installation
To begin testing with Behat, we just need to install it on our local development machine. I'll be using Composer, but you can take a look at a the documentation for additional installation methods.
Within your PHP application (I have a blank PHP app named phpbehat created in advance) create a composer.json file with the following code to load in Behat:
{
	"require": {
		"behat/behat": "2.4.*@stable"
	},
	"minimum-stability": "dev",
	"config": {
		"bin-dir": "bin/"
	}
}
In your terminal we can install it using the following command:
composer update
We should now be able to run the bin/behat command to work with Behat.
Creating Features
We always begin by creating a new feature. A feature is something that we can use to describe a feature of our application and then implement it to get the test to pass.
A feature, at its simplest, consists of:
- Human-readable, plain text.
- Uses a
.featureextension. - Contains the feature's benefit, role, and the feature itself.
- May hold a list of scenarios.
Now I can't show you how to test all possible features for an application, as that would take far too long. But what I can do is show you how to go about writing a basic feature and you can adapt this code to make it work for your specific application.
Testing the Phpadder Class
To avoid complicating the learning process, let's create a very simple Phpadder.php file which contains a couple methods that we can use to add two numbers together and display their sum.
class Phpadder {

	private $a;
	private $b;
	public $sum;

	public function __construct($a, $b) {
		$this->a = $a;
		$this->b = $b;
	}

	public function add() {
		$this->sum = $this->a + $this->b;
	}

	public function display() {
		return $this->sum;
	}
}
This creates a new class named Phpadder. We have a few properties to hold the first ($a) and second ($b) numbers to be added, as well as a $sum property to hold the values's sum.
Next, we have our constructor which initializes our properties. Then we have an add method to add the two numbers together and finally a display method to display the sum of the two numbers.
Adder Feature
Let's now test this Phpadder class. Create a new .feature file along with the following code:
# features/phpadder.feature
Feature: adder
	In order to display the sum of two numbers
	As anybody
	I need to provide two numbers
We start out by giving our feature a name of adder. Then we specify, on three lines, the feature's benefit, role, and finally the feature itself. It should be fairly self explanatory.
Now that we have our feature, let's start writing our scenarios.
Creating Scenarios
Anytime we create a feature we can define scenarios that describe how that feature behaves given certain conditions. Scenario's follow the same basic layout consisting of the scenario's description, a context, an event, and an outcome.
Let's create a scenario to test out our Phpadder application:
Scenario: Display the sum of two provided numbers
	Given I have the number 50 and the number 25
	When I add them together
	Then I should get 75
We begin with our scenario description, we then list out that we start with the two numbers of 50 and 25 and when they are added together it should display the sum of 75.
You can also have multiple contexts, events, and outcomes as well using the following keywords: And and But. Here's a modified example of the previous scenario where we'll use And:
Scenario: Display the sum of two provided numbers
	Given I have the number 50 and the number 25
	And I have a third number of 25
	When I add them together
	Then I should get 100
Creating Step Definitions
A step is nothing more than a PHP function which is made up of a keyword, a regular expression, and a callback function. Each statement within your scenario will be matched to a step. These steps define what should happen given one of your statements are called within a scenario. You store all of your steps within the features/bootstrap/FeatureContext.php file.
The "Given" Step
In our FeatureContext.php file (you may need to create this), we need to write a step for each of our statements, using its name as the function name. We'll start with the "Given I have the number" statement:
# features/bootstrap/FeaturesContext.php

require("Phpadder.php");

use Behat\Behat\Context\BehatContext,
	Behat\Behat\Exception\PendingException;

use Behat\Gherkin\Node\PyStringNode,
	Behat\Gherkin\Node\TableNode;

class FeatureContext extends BehatContext {

	private $Adder;

	/**
	 * @Given /^I have the number (\d+) and the number (\d+)$/
	 */
	public function iHaveTheNumberAndTheNumber($a, $b) {
		$this->Adder = new Phpadder($a, $b);
	}
First, we create a new PHP file, require in our Phpadder.php file (the file that we're testing), and then we use a few Behat classes with use statements, right after.
Next, we create our FeatureContext class and have it extend the BehatContext class.
Our class has only one property, $Adder, which will hold a Phpadder object.
Finally, we create a method for our first step using the same name as the statement. Our step has a regular expression, found within the method's comment. This regular expression is used to match the step to a scenario statement. Within this method we simply assign a new Phpadder object to our $this->Adder property so that the rest of our methods have access to the same Phpadder object.
Now, you've probably noticed the @Given keyword within your function's comment, this is actually an annotation so that the different types of steps can be identified. You can use @Given, @When, and @Then.
Now we just need to write the last two steps.
The "When" Step
/**
 * @When /^I add them together$/
 */
public function iAddThemTogether() {
	$this->Adder->add();
}
This step simply uses our $this->Adder object's add method to add the two numbers together.
The "Then" Step
/**
 * @Then /^I should get (\d+)$/
 */
public function iShouldGet($sum) {
	if ($this->Adder->sum != $sum) {
		throw new Exception("Actual sum: ".$this->Adder->sum);
	}
	$this->Adder->display();
}
This step starts off by checking if the actual sum (retrieved using our $this->Adder object and its sum property) is not equal to the expected sum. If this evaluates to true that means we need to have Behat show a failure. To do so, we'll just throw a new exception displaying the actual sum so we can compare. Otherwise, we call our display method.
Time to run the tests.
Running the Tests
Now that we have our features, scenarios, and steps laid out, let's run our tests using the following command:
bin/behat
You should see the following success messages inside of your terminal:
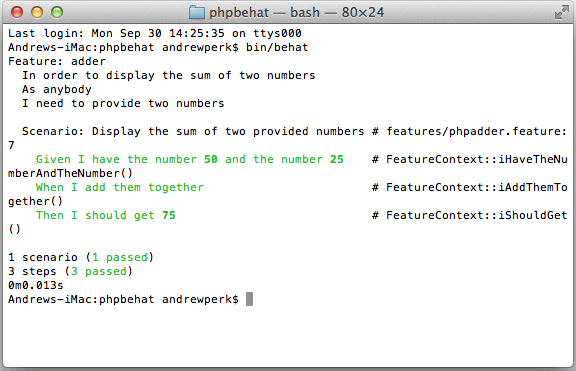
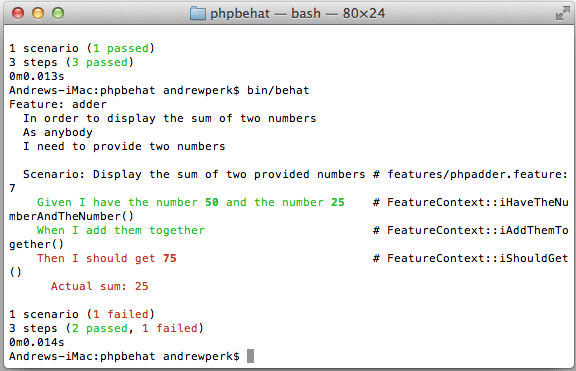
You can ensure that your tests are running correctly, by simply breaking something in your Phpadder.php file so that it doesn't run quite the same way your test expects it to. For example, if we change the add method to instead use subtraction, like so:
public function add() {
	$this->sum = $this->a - $this->b;
}
And then we rerun our tests: bin/behat. You can see in our terminal, we now have a failing test, because it's no longer adding our numbers but subtracting them:
Conclusion
In conclusion, you can follow a small four step process for testing your PHP apps using Behat:
- Define a Feature
- Define a Scenario
- Define Step Definitions
- Run the tests using
bin/behat
So, with just that small amount of code, we should now have a basic understanding of how to work with Behat to test our PHP applications. For more information about working with Behat please checkout their documentation.

Comments