Aside from the most basic of Android applications, everything you build will require at least some use of background threading to perform an operation. This is because Android has something known as an ANR (Application Not Responsive) timeout, which is caused when an operation takes five seconds or longer on the UI thread, preventing user input and causing what appears to the user to be a hanging app.
In order to avoid this, you must move longer running operations, such as network requests or slow database queries, to a different thread so as to not prevent the user from continuing to use your app. Although comprehensive coverage of threading is a large and complex subject in computer science, this tutorial will introduce you to the core concepts of threading in Android, and to some of the tools available to help you build apps that perform better by using background processes.
Do you find it easier to learn with video? Why not check out our course:

Understanding Threading
When an application is launched, a new Linux process with a single main execution thread is started. This is the thread that has access to the Android UI toolkit, listens for user inputs, and handles drawing to the Android device screen. Because of this, it is also commonly referred to as the UI thread.
All components of an application run within the same thread and process by default, though additional threads can be created to move tasks off the UI thread and prevent an ANR. When it comes to threading in Android, there are two simple rules to remember to keep your app functioning as expected:
- Do not block the UI thread.
- Do not attempt to access Android UI components from outside the UI thread.
While you can comply with the first rule by simply creating a new Thread and Runnable, handling the second rule gets a little more tricky. Consider the following code snippet:
new Thread(new Runnable() {
    public void run() {
        try {
            Thread.sleep(6000);
        } catch( InterruptedException e ) {

        }

        mTextView.setText("test");
    }
}).start();
While this code won't stall the UI thread while the thread sleeps past the ANR timeout, attempting to set the TextView text will cause the app to throw the following error:
android.view.ViewRootImpl$CalledFromWrongThreadException: Only the original thread that created a view hierarchy can touch its views.
Luckily, there are a few simple ways to get around this. You can use Android's runOnUiThread(Runnable) method to execute code back on the app's main thread.
mTextView = (TextView) findViewById(R.id.text);
new Thread(new Runnable() {
    public void run() {
        try {
            Thread.sleep(6000);
        } catch( InterruptedException e ) {

        }

        runOnUiThread(new Runnable() {
            @Override
            public void run() {
                mTextView.setText("test");
            }
        });
    }
}).start();
Or you can take a standard View object and post a Runnable to it.
new Thread(new Runnable() {
    public void run() {
        try {
            Thread.sleep(6000);
        } catch( InterruptedException e ) {

        }

        mTextView.post(new Runnable() {
            @Override
            public void run() {
                mTextView.setText("test");
            }
        });
    }
}).start();
While both of these tricks will help make your operations thread safe, as your application gets more complex this will become cumbersome to maintain.
AsyncTask
One of the tools provided by Android to help manage complexity with background threads is AsyncTask. AsyncTask provides a worker thread for blocking operations, and then posts a result back to the UI thread with a pre-created callback method, allowing you to get your tasks done easily without having to fumble with threads and handlers.
AsyncTask Lifecycle
Before you start using the AsyncTask class, you'll need to understand the lifecycle compared to running an operation on the main thread.
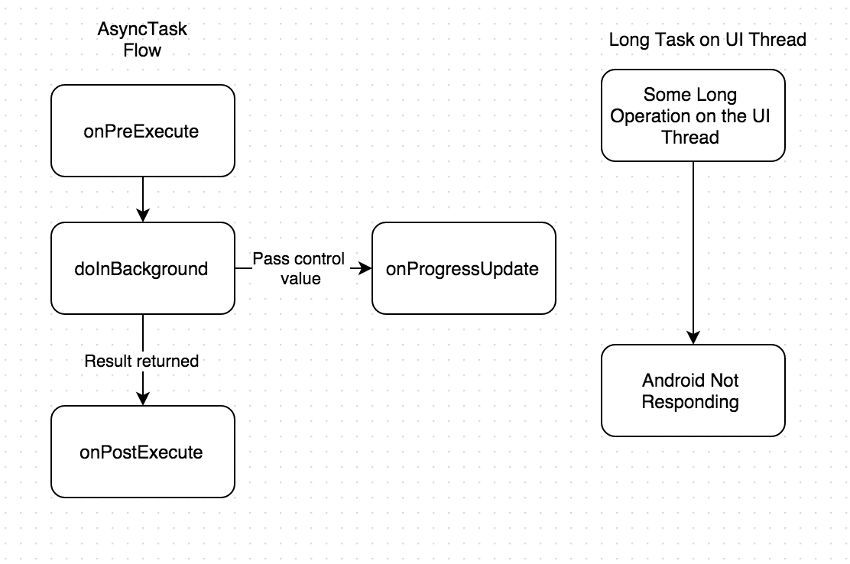
The first method that is called by an AsyncTask is onPreExecute(). This method runs on the UI thread and is meant for setting up any interface components that need to let the user know that something is happening.
After onPreExecute() has finished, doInBackground(T) is called. The generic parameter here is any information that you need to pass to the method for it to perform its task. For example, if you're writing a task that retrieves JSON from a URL, you would pass the URL to this method as a String. As an operation makes progress in doInBackground(), you can call onProgressUpdate(T) to update your UI (such as a progress bar on the screen). Here the generic is a value representing the progress, such as an Integer.
Once the doInBackground() method has completed, it can return an object that is passed into onPostExecute(T), such as a JSONObject that was downloaded from our initial URL. onPostExecute(T) runs on the UI thread.
When you create an AsyncTask class, you must override these generics in both the class declaration and in the above methods. An example AsyncTask that updates a ProgressBar every second can be seen here:
protected class DemoAsyncTask extends AsyncTask<Integer, Void, String> {
    @Override
    protected void onPreExecute() {
        super.onPreExecute();
        mProgress.setProgress(0);
        mProgress.setVisibility(View.Visible);
    }

    @Override
    protected void onProgressUpdate(Integer... values) {
        super.onProgressUpdate(values);
        mProgress.setProgress(values[0]);
    }

    @Override
    protected Void doInBackground(Void... params) {

        for( int i = 0; i < 100; i++ ) {
            try {
                Thread.sleep(1000);
            } catch( InterruptedException e ) {}
            publishProgress(i);
        }

       return "All done!";

    }

    @Override
    protected void onPostExecute(String result) {
        super.onPostExecute(aVoid);
        if( isCancelled() ) {
            return;
        }

        mProgress.setVisibility(View.GONE);
        Toast.makeText(context, result, Toast.LENGTH_SHORT).show();
    }
}
You may have noticed that onPostExecute(T) checks against isCancelled(). This is because there is one large issue with AsyncTasks: they maintain a reference to a Context even after that Context has been destroyed.
This is most easily seen when starting an AsyncTask and then rotating the screen. If you attempt to reference a Context item (such as a View or Activity) after the original Context has been destroyed, an Exception will be thrown. The easiest way around this is to call cancel(true) on your AsyncTask in your Activity or Fragment's onDestroy() method, and then validate that the task hasn't been canceled in onPostExecute(T).
As with anything in programming, the answer to when you should use an AsyncTask is: it depends. While AsyncTasks are simple to use, they aren't a be-all and end-all solution to threading, and are best used for short operations lasting at the most a few seconds. If you have an operation that may last longer, I recommend that you investigate using ThreadPoolExecutor, Service, or GcmNetworkManager (a backwards compatible version of the JobScheduler).
Services
When you need to perform a long-running operation in the background, such as playing music, performing network transactions, or interacting with a content provider, you may want to consider using a Service. A basic Service can exist in two states: started and bounded.
A started Service is kicked off by a component in your application and remains active in the background of the device, even if the original component is destroyed. When the task that a started Service is performing has completed, the Service will stop itself. A standard started Service is generally used for long-running background tasks that do not need to communicate with the rest of the app.
A bound Service is similar to a started Service, and it also provides callbacks for various app components that can bind to it. When all bound components have unbound themselves from the Service, it will stop itself. It is important to note that these two ways to run a Service are not mutually exclusive—you can start a Service that will run indefinitely and can have components bind to it.
IntentService
One of the largest issues with a standard Service is that it cannot handle multiple requests at a time, as this would be a multi-threading nightmare. One way around this is to extend an IntentService, which extends a standard Service. The IntentService creates a default worker thread for executing all intents that are received in onStartCommand(), so all operations can happen off the main thread. It then creates a work queue for sending each intent to onHandleIntent() one at a time so that you don't need to worry about multi-threading issues.
Aside from handling threading, IntentService also stops itself automatically once all start requests have been handled. Because all of the implementation details are handled in IntentService, the work for you as a developer is fairly straightforward.
public class ExampleIntentService extends IntentService {

  //required constructor with a name for the service
  public ExampleIntentService() {
      super("ExampleIntentService");
  }

  @Override
  protected void onHandleIntent(Intent intent) {
    //Perform your tasks here
      try {
          Thread.sleep(5000);
      } catch (InterruptedException e) {}
  }
}
Conclusion
In this tutorial, you've learned a lot about threading and multi-threading solutions in Android. Entire books have been written on threading in Android, but you should now have enough of a foundation to code general tasks and understand more in-depth documentation for your more complex Android applications down the line.

Comments