The dashboard is somewhat the heart of a blog. It controls all the content and the options of your blog. But, as we know, WordPress is not a custom product specific to one type of blog, but rather something that has been created to accommodate a wide variety of bloggers. Therefore, the contents of the dashboard can be pretty generic and might need a bit of customizing to be optimized for your website's type. This is where plugins and tweaks come in. Today, we'll take a look at some methods of customizing parts of your dashboard.
1. Branding The Login Screen
The login screen is your first contact with the WordPress dashboard, and it's branding is all controlled through some CSS that's pretty simple to manipulate. By adding custom styles, we can brand our copy of WordPress which can be especially favorable for client work or just those that don't want the WordPress logo hanging everywhere. The code below adds our custom logo (max. 326px wide) to the login screen.
function login_styles() {
echo '<style type="text/css">h1 a { background: url('. get_bloginfo("template_directory") .'/images/wdt_logo.png) no-repeat center top; }</style>';
}
add_action('login_head', 'login_styles');
The code above simply changes the style that sets WordPress's default logo to the one you specify, whether it uses the bloginfo function to locate it within your themes' directory, or not.
Modifying the background is also very simple, and is all handled by just styling the html tag with a background style, image or solid color. By using a combination of both the style we defined above, and the one below, we can create a result similar to the image below which is significantly different to what WordPress provides us by default.
function login_styles() {
echo '<style type="text/css">html { background: #f0f0f0 url('. get_bloginfo("template_directory") .'/images/wdt_bg.png) !important; }</style>';
}
add_action('login_head', 'login_styles');

2. Removing Dashboard Menus
I don't know about you, but there's some parts of the Dashboard I never use, meaning they're just left to bulk up the menu. This is unnecessary, and can easily be fixed by removing them with a function. It's a very common tweak that I use in almost most cases with my own blogs.
In the example below, we've removed the Links item, but you simply have to add in another item to the array to remove another.
function remove_menus () {
global $menu;
		$restricted = array(__('Links'));
		end ($menu);
		while (prev($menu)){
			$value = explode(' ',$menu[key($menu)][0]);
			if(in_array($value[0] != NULL?$value[0]:"" , $restricted)){unset($menu[key($menu)]);}
		}
}
add_action('admin_menu', 'remove_menus');
If, however, we wanted to remove both the Links and Media items, we'd swap out the thrid line of the code above for the one below. From there, it's simple to pick up on the pattern and choose your own ones to remove.
$restricted = array(__('Links'), __('Media'));

3. Customising the Admin Bar (Plugin)
WordPress introduced the admin bar in 3.1 (extending it in 3.2) to provide some quick links throughout the blog, that can be turned on and off on a user-by-user basis. This plugin customizes that bar, even going as far as to disable it entirely.
With the plugin, you get a few extra options such as a site-wide disabling of the admin bar and/or the content bump (the 28px margin that pushes your site down to accommodate the admin bar, that can cause problems with some layouts). Additionally, you can choose who sees the admin bar, so, for example, you can disable the bar for specific groups like Subscriber or Contributor.
Additionally, and potentially more interestingly, you can define custom CSS for the admin bar within the plugin's dashboard page. Conveniently, the plugin pre-fills the input field with all the available CSS styles you can use.
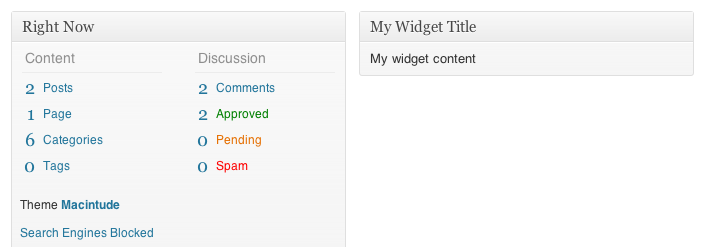
4. Adding Custom Dashboard Widgets
The WordPress dashboard is a canvas for widgets, but some of them are, quiet frankly, useless. I certainly remove quite a lot of them from my dashboard, such as the WordPress news and under-featured QuickPress.
With the code below, we can add our own widgets to the dashboard. This can be useful to add custom stats, or maybe to provide contextual help. It's pretty simple to do so, simply place whatever you want to appear within the second function. Make sure you replace your name with the third parameter of the function on line 3 too.
function my_custom_dashboard_widgets() {
global $wp_meta_boxes;

wp_add_dashboard_widget('custom_help_widget', 'My Widget Title', 'custom_dashboard_help');
}

function custom_dashboard_help() {
echo 'My widget content';
}

add_action('wp_dashboard_setup', 'my_custom_dashboard_widgets');
5. Removing Dashboard Widgets
Just as we can add our own custom dashboard widgets, we can remove specific dashboard widgets with ease.
function disable_default_dashboard_widgets() {

	remove_meta_box('dashboard_right_now', 'dashboard', 'core');
	remove_meta_box('dashboard_recent_comments', 'dashboard', 'core');
	remove_meta_box('dashboard_incoming_links', 'dashboard', 'core');
	remove_meta_box('dashboard_plugins', 'dashboard', 'core');
	remove_meta_box('dashboard_quick_press', 'dashboard', 'core');
	remove_meta_box('dashboard_recent_drafts', 'dashboard', 'core');
	remove_meta_box('dashboard_primary', 'dashboard', 'core');
	remove_meta_box('dashboard_secondary', 'dashboard', 'core');
}
add_action('admin_menu', 'disable_default_dashboard_widgets');
The code is pretty self-explanatory, with each line inside the function removing a different widget. We can add or remove these lines at will for each of the different default widgets.
6. Removing Dashboard Widgets According to User Role
It's also relatively simple to disable dashboard widgets depending on user role, just by introducing an if statement (where 3 is the user level).
function customize_meta_boxes() {
    global $current_user;
    get_currentuserinfo();

    if ($current_user->user_level < 3)
        remove_meta_box('postcustom','post','normal');
    }

add_action('admin_init','customize_meta_boxes');
You can substitute any of the meta box removal lines from item #5 with the conditional one inside the if statement here.
7. Customising Footer Text
The WordPress footer can be edited easily, which can be used for branding. If you've, for example, designed a site for a client, the footer text gives you an opportunity to credit yourself.
function modify_footer_admin () {
  echo 'Created by <a href="http://www.envato.com">Envato</a>. Powered by <a href="http://www.wordpress.org">WordPress</a>';
}

add_filter('admin_footer_text', 'modify_footer_admin');

8. Hiding Upgrade Notices
When researching this post, this specific tweak kept appearing. It my opinion, it's not advisable since most (if not all) WordPress versions contain important security updates. However, one could also argue that some versions have the potential to break your theme and hiding this message might delay clients, allowing you to test for compatibility.
Seriously, though, try to avoid this if you can; it could lead to a client missing all future updates which might end up making their blog vulnerable to attack.
add_filter( 'pre_site_transient_update_core', create_function( '$a', "return null;" ) );
9. Hover-Over Dashboard Menus (Plugin)
This plugin - one I use on my own blog - collapses all your menu items, making all the sub-menu items available when you hover over an icon, rather than by dropping down. This saves precious space, moving obtrusive menus aside until you need them.

10. Display Google Analytics Data in the Dashboard (Plugin)
A lot of blogs use Google Analytics to power their statistic keeping, and this plugin allows you to display the results right in your dashboard. This is mainly a convenience thing, but can also fill up your dashboard that was cleaned up with some of the previous code snippets.
If your Google Analytics is, say, tied to your personal account, you can still share the statistics using WordPress as a proxy by allowing other users to view the data.

11. Logout in One Click (Plugin)
This is a very minor tweak to the dashboard (although apparently difficult to achieve), but might be helpful if you happen to need to logout a lot. Instead of requiring you to open the drop down menu to access the logout link, this plugin puts it right in the header so all you need is a single click.
12. Change Contents of Dashboard Help Tab
WordPress has a little tab in the top-right corner that, when clicked, drops down some contextual help. With the assistance of this self-explanatory function, you can hook different help text to different pages.
//hook loading of new page and edit page screens
add_action('load-page-new.php','add_custom_help_page');
add_action('load-page.php','add_custom_help_page');

function add_custom_help_page() {
   //the contextual help filter
   add_filter('contextual_help','custom_page_help');
}

function custom_page_help($help) {
   //keep the existing help copy
   echo $help;
   //add some new copy
   echo "<h5>Custom Features</h5>";
   echo "<p>Content placed above the more divider will appear in column 1. Content placed below the divider will appear in column 2.</p>";
}
Wrap-up
There we go! All the tweaks and plugins we've mentioned today go some way in tweaking the dashboard to customize it specific to the blog and the users, from Google Analytics in the dashboard to changing the color of the admin bar. Hopefully they've been of use, and any that I've missed are welcome to be shared in the comments below.

Comments