I'm sure Stage3D is not foreign to most readers; it's the new API that gives AS3 programmers access to the GPU. However, coding against opcodes in Stage3D may not be everyone's preferred choice, so it's fortunate that there's a shortcut: Starling, a library developed to encapsulate this low level programming to make it much easier. And along with Starling comes its particle effects extension. In this tutorial, we'll check out the particle systems of this framework, and see its applications applied to a shoot-'em-up game.
Step 1: Basic Setup
Skip this step if you've been working with FlashDevelop for some time. For beginners, here's how you install a library package - in this case Starling and its particle extension. Note that these two items don't come in one package, so we'll have to download them separately.
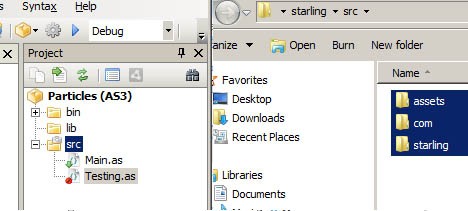
First, download Starling framework and its particle extension from their repositories. Unzip upon successful download. Scan the first unzipped directory for src folder and paste the Starling framework library, highlighted in the image below, into your project source folder.
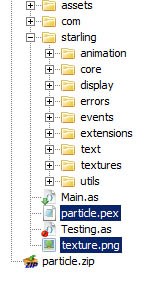
Scan the second folder for the particle extension and combine them together. You can pull the highlighted folder below into the Starling folder. The image below is the end result you should arrive at.

For more info about FlashDevelop and using external libraries, see these tutorials:
Step 2: Main Classes
If you've not been introduced to Starling and its particle extension already, I strongly encourage a visit to Lee Brimelow's video tutorials on Starling and particle effects, and Matthew Chung's tutorial about handling animation states with Starling.
We're going to just breeze through the basics in two steps here. If you're already aquainted with Starling and its particle extension, feel free to jump to Step 4.
You can see from the second image of the previous step (the lower part) that two classes are being created: Main.as and Testing.as. The first acts as a launcher for the latter. So, most of our Starling code lives in Testing.as. I've highlighted the important code in Main.as here:
private function init(e:Event = null):void
{
    removeEventListener(Event.ADDED_TO_STAGE, init);
    // entry point

    var myStarling:Starling = new Starling(Testing, stage);
    myStarling.simulateMultitouch = true;
    myStarling.start();

    //initiate Starling onto stage
    //allow mouse/ touch events to happen in Starling
    //turn key and start the engine!
}
... and Testing.as should look like this:
public class Testing extends Sprite
{
    public function Testing() {
        addEventListener(Event.ADDED_TO_STAGE, init);
    }
    private function init(e:Event):void {
        removeEventListener(Event.ADDED_TO_STAGE, init);
        // code goes here.

        stage.color = 0;	//turn stage colour to black

        //Draw a little quad on stage,
        //just to make sure everything's in place
        //Note the top left corner of sprite is aligned to middle of stage
        var q:Quad = new Quad(30, 30); addChild(q);
        q.color = 0xEEEEEE;
        q.x = stage.stageWidth >> 1; q.y = stage.stageHeight >> 1;
    }
}
And if everything is set up correctly, you should arrive at the result as shown below. Nothing much, just a sprite on the stage.
Note: Testing.as is extending Sprite from Starling.display.Sprite, not flash.display.Sprite. The classes have the same name, but are not the same.
Step 3: Particle Extension in Starling
The particle extension of Starling contains three important classes. Their functionalities are tabulated below.
| Name of Class | Functionality |
Particle.as |
A single particle with unique attributes. |
ParticleSystem.as |
Controls the flow of particles: generation, animation and recycling. |
ParticleDesignerPS.as |
An extension of ParticleSystem.as to enable easy manipulation of particle system. |
We shall create an instance of ParticleDesignerPS.as. This requires inputting the following arguments into the class constructor:
- an XML file that contains all initiation value for particle properties (quite a number of them)
- a image to sample for all particles
No worries, onebyonedesign.com will help you out with this. Visit their particle designer page and tweak all these initiation values to your heart's content. Then export all the data to ZIP format. This ZIP file will contain the XML file and the image for the particle effect you just designed through their webpage!

Unzip and pull all these into your source folder in FlashDevelop. See the highlighted items in image below.
Generate import statements to get these two items into your Testing class. You will also need to rewrite the init method in Testing. They are all below.
[Embed(source="particle.pex", mimeType="application/octet-stream")]
private var InitValues:Class

[Embed(source = "texture.png")]
private var Sample:Class
private function init(e:Event):void {
    removeEventListener(Event.ADDED_TO_STAGE, init);
    // code goes here.

    stage.color = 0;	//turn stage colour to black
    var flow1:ParticleDesignerPS =
    new ParticleDesignerPS(
            XML(new InitValues()),
            Texture.fromBitmap(new Sample())
        );
    addChild(flow1);
    flow1.emitterX = stage.stageWidth >> 1; flow1.emitterY = stage.stageHeight >> 1;
    flow1.start();
    Starling.juggler.add(flow1);
}
Here's the result you should arrive at. Rather simple, right?
Step 4: Understanding the Particle System
Our next step is to enable interaction with the particle system (that little fire) at runtime. We'll use the mouse to control the properties of fire. However before we do, I'd like to sidetrack a little to brief you on the concept of particle systems.
Particles are just sprites that get emitted from a coordinate. After birth, they will animate in a certain pattern. This pattern can be unique for each particle or common to all particles. But rest assured, their physical properties will change over time. For example:
- Distance from birth coordinate
- Direction and speed
- Color and alpha level
- Size
Also, their life on the stage is determined at birth. If each particle is allowed to live forever on stage, we'll have overpopulation and the application performance will suffer due to having a lot of graphical assets to handle. At some point, the particle dies but it doesn't get shovelled off the stage. It's recycled instead, by being relocated to a birth coordinate and assume the role of a new particle. It's a new particle because a new set of properties will be defined for it then before its animation kicks in and another cycle continues.
(This is object pooling, and you can see how to apply it to your own non-Starling Flash projects here.)
Okay, so how does this relate to our fire? Well, we can use easing functions to animate properties of this fire over time. Within the Starling framework, ParticleDesignerPS is positioned at the end of this hierarchy:
ParticleDesignerPS > ParticleSystem > DisplayObject > EventDispatcher > Object
To strike a balance, we'll just trace inherited properties from ParticleSystem. Let's have a look at these the next step...
Step 5: Properties of ParticleSystem and ParticleDesignerPS
Below are the properties of ParticleSystem.
| Property | Description |
capacity |
Maximum particles the system can carry at any moment. Increases in steps of 500 once the number of particles exceeds its current capacity. Read-only. |
numParticles |
Number of particles in the system at a given time. Read-only. |
emissionRate |
Number of particles generated from birth coordinate each second. |
emitterX, emitterY
|
Control point for the container in which all particles live. |
|
|
Context3DBlendFactor definition for source and destination. Destination refers to pixel colour from latest render and source refers to new pixel colour to draw onto destination. |
texture |
Current image sampled as texture of particles. Read-only. |
Those of ParticleDesignerPS are tabulated in the next table. Most of these properties can be fine tuned by its start and end state. For example, all generated particles will initiate with a size of 1.0 and terminate at 0.1. However, particle flow will be boring if all particles are initiated and terminated at such similar states, so ParticleDesignerPS provisions for variance of the initial value, and sometimes variance on termination value as well.
Quoting their example, if we give a variance of 0.2 on the particle's initial size, consecutive particles birthed or recycled into the system will initiate their size somewhere between 0.8 ~ 1.2 and end at 0.1.
| Property | Description |
emitterXVariance, emitterYVariance
|
Variation of the birth coordinate. |
startSize, startSizeVariance
|
Initial size and variance |
endSize, endSizeVariance
|
Termination size and variance |
emitAngle, emitAngleVariance
|
Particle's initial direction and variance |
speed, speedVariance
|
Particle's initial speed and variance |
gravityX |
Acceleration along x-axis on all particles' initial velocity |
gravityY |
Acceleration along y-axis on all particles' initial velocity |
tangentialAcceleration, tangentialAccelerationVariation
|
Rate of rotation on particle's velocity, and variance |
There are two types of particle flow provisioned for in ParticleDesignerPS: gravity and radial. Shown in the table above are properties you can tweak if you're using gravity flow. For gravity, birth coordinate of particles is located at emitterX and emitterY. For radial, birth coordinate for particles is located some point away from emitterX and emitterY, and they move towards it. The table below shows the properties of radial flow.
| Property | Description |
maxRadius, maxRadiusVariance
|
Maximum radius from center, and variance |
minRadius |
Minimum radius from center |
rotationPerSecond, rotationPerSecondVariance
|
Rate of rotation on particle's velocity |
startColor, startColorVariance
|
Initial color and variance |
endColor, endColorVariance
|
Termination color and variance |
Step 6: Adding Interactivity
Well, thanks for accommodating that little detour. Now for some ActionScript. In the init method, we will add a listener onto the stage for touch events.
stage.addEventListener(TouchEvent.TOUCH, track);
And the listener as below.
private function track(e:TouchEvent):void {
    var touch:Touch = e.getTouch(stage);	//mapping onto stage's coordinate grid
    //when user presses mouse and moves
    if (touch.phase == TouchPhase.MOVED) {

        //calculate the angle to point particle flow to
        var distX:Number = touch.globalX - flow1.emitterX;
        var distY:Number = touch.globalY - flow1.emitterY;
        var angle:Number = Math.atan2(distY, distX);

        t = new Tween(flow1, 1.5, Transitions.EASE_OUT_BACK);
        t.animate("emitAngle", angle);
        Starling.juggler.add(t);
    }
}
In order to perform the animation, a Tween instance is defined. Its manipulation is similar to that of popular Tween engines in many ways. Then, we add it to the juggler of current instance of Starling. This juggler object will help to progressively update the Tween instance over time.
The result is below. Click and drag your mouse around the stage.
Step 7: Setting Up Ship
Let's set up our ship now and put a trail on it. The assets are from opengameart.org and I've included them in the download package. Check that site out for other free game art.
We'll start afresh with another class, TestingShip.as. First, import the spaceship image "boss1.png".
[Embed(source = "boss1.png")]
private var Ship:Class
...followed by a little setup to initialise it in the init method:
//setup the graphical appearance
var shipBMP:Bitmap = new Ship() as Bitmap;	//import asset into a bmp
var shipTEX:Texture = Texture.fromBitmap(shipBMP);	//sample bmp as texture to image
var shipIMG:Image = new Image(shipTEX);	//image created with texture

//setup ship's orientation & position
shipIMG.rotation -= Math.PI*0.5;	//reorient the image
shipIMG.x -= shipIMG.width >> 1;	//because image's origin is at top left corner,
shipIMG.y += shipIMG.height >> 1;	//we reposition the image
theShip = new Sprite();  	//and put it into a sprite. Now registration point is centered.
theShip.addChild(shipIMG);	//sprite placed onto stage
addChildAt(theShip, 0);

//navigational properties of ship
loc = new Vector2D(stage.stageWidth >> 1, stage.stageHeight >> 1);
lof = new Vector2D(0, 10);

updateShip();
Update its position and orientation according to loc (location) and lof (line of sight).
private function updateShip():void {
    theShip.x = loc.x;
    theShip.y = loc.y;
    theShip.rotation = lof.getAngle();
}
Again, click and drag within the stage to see the effect:
Step 8: Setting Up Exhaust Trail
Okay, the exhaust of the ship is on top of the ship itself, and the spaceship is not responding to mouse event. We'll fix that now. Just offset the emitterX and emitterY of the particle flow some distance off from the spaceship and update spaceship's rotation using lof.
(Note that lof is updated on mouse events. You will see the script next step.)
private function updateShip():void {
    theShip.x = loc.x;
    theShip.y = loc.y;
    theShip.rotation = lof.getAngle();

    //update particle trail
    offset = new Vector2D(60, 0);
    offset.setAngle(lof.getAngle());
    flow1.emitterX = loc.x - offset.x;
    flow1.emitterY = loc.y - offset.y;
}
Step 9: Navigating Ship
Let's try to program ship navigation now, at the dispatch of a mouse event. I've only commented the important lines:
private function track(e:TouchEvent):void {
    var touch:Touch = e.getTouch(stage);
    if (touch.phase == TouchPhase.MOVED) {
        var distX:Number = touch.globalX - flow1.emitterX;
        var distY:Number = touch.globalY - flow1.emitterY;
        angle = Math.atan2(distY, distX);

        t = new Tween(flow1, 1.5, Transitions.EASE_OUT_BACK);
        t.animate("emitAngle", angle + Math.PI);

        t2 = new Tween(theShip, 1.5, Transitions.EASE_OUT);
        t2.moveTo(touch.globalX, touch.globalY);	//move the ship
        t2.onUpdate = refresh	//call upon this function whenever tween engine runs

        Starling.juggler.add(t);
        Starling.juggler.add(t2);	//add to juggler
    }
}

private function refresh():void {
    loc.x = theShip.x;	//refresh location
    loc.y = theShip.y;
    lof.setAngle(angle);	//refresh orientation

    updateShip();	// update
}
And here's a show of the end result. Drag the mouse around the stage and the spaceship will go there.
Step 10: Animate Exhaust
Let's fine tune our exhaust. When the ship is moving, the exhaust will definitely be blowing harder, right? We can step up the emissionRate and speed when moving the ship, and step down emissionRate when it's stopped. Here's the event, highlighted:
t2 = new Tween(theShip, 1.5, Transitions.EASE_OUT);
t2.moveTo(touch.globalX, touch.globalY);	//move the ship
t2.onUpdate = refresh	//call upon this function whenever tween engine runs
t2.onStart = beginState	//when ship starts moving
t2.onComplete = endState	//when ship animation stops
And here are the function calls on those events.
private function beginState():void {
    flow1.emissionRate = 250
    flow1.speed = 100;
}

private function endState():void {
    flow1.emissionRate = 50
    flow1.speed = 10;
}
Click and drag again, and pay attention to the length of the exhaust.
Step 11: Parallax Effect
Particles can also express how fast the ship is moving relative to its environment. Check out the output below. Click and drag you mouse around. Observe the speed at which the surrounding particles move. They increase as you interact with the ship, and slows down when you stop the interaction. They also orient their rotation accordingly.
Configuring this effect is relatively easy on the app showcased by onebyonedesign.com. However, we'll need to code some ActionScript in order to change it at runtime, and this will take the next few steps.
Step 12: One Emitter in Front
The initiation of the particles follows a similar format to the previous example. You may choose to tweak your effect with the app from onebyonedesign.com and import into your stage. I just code straight into ActionScript for ease.
envr = new ParticleDesignerPS( XML(new InitValues()),
    Texture.fromBitmap(new Sample())
    );
addChildAt(envr,0);
envr.blendFactorSource = Context3DBlendFactor.ONE
envr.blendFactorDestination = Context3DBlendFactor.ONE
envr.speed = 10;			envr.speedVariance = 20;
envr.startSize = 15;	envr.startSizeVariance = 0;
envr.endSize = 20;		envr.endSizeVariance = 20
envr.lifespan = 5.0;	envr.lifespanVariance = 4.0;
envr.emissionRate = 10
envr.start(); Starling.juggler.add(envr);
We'll also need to put the particle emitter a little distance ahead of the ship.
envrLoc = new Vector2D(100, 0);
envrLoc.setAngle(angle);
And update this vector at runtime.
//update the environment
envr.gravityX = -40*lof.x;	//particle is accelerating in opposite direction
envr.gravityY = -40*lof.y;	//of the line of sight vector
envr.emitterX = loc.x + envrLoc.x;
envr.emitterY = loc.y + envrLoc.y;
Step 13: The Spread
You see, the emitterXVariance and emitterYVariance handle the axes separately. This means that if we rotate the spaceship, we need some means of determining the length of the spread along these two axes.

Now check out the vector for line of sight. It's always perpendicular to that of spread line (the thin dark line). We can scale up this vector accordingly and swizzle its x and y with those of emitter's variance on start point . Check the demo below. Click and drag your mouse around. You'll see the particle flow more vividly.
Lastly, scale the magnitude of spread up and put it a little farther ahead of the ship so players won't see their emission point.
envrLoc = new Vector2D(200, 0);
envrLoc.setAngle(angle);
//update the spread
spread = envrLoc.clone();
spread.scale(0.5);
envr.emitterXVariance  = spread.y;
envr.emitterYVariance  = spread.x;
Step 14: Pump Up the Acceleration
Finally as the ship is accelerating, let's increase the magnitude of gravityX and gravityY, plus the exhaust, accordingly.
if (touch.phase == TouchPhase.MOVED) {
    var distX:Number = touch.globalX - flow1.emitterX;
    var distY:Number = touch.globalY - flow1.emitterY;
    angle = Math.atan2(distY, distX);

    //animate the exhaust
    t = new Tween(flow1, 1.5, Transitions.EASE_OUT_BACK);
    t.animate("emitAngle", angle + Math.PI);
    Starling.juggler.add(t);

    //control the exhaust
    flow1.speed = 350;
    flow1.endSize = 70;

    //orient the ship & parallax's angle
    lof.setAngle(angle);
    lof.setMagnitude(10);	//adjust the magnitude of acceleration
    envrLoc.setAngle(angle);
}
if (touch.phase == TouchPhase.ENDED) {

    //control the exhaust
    flow1.speed = 100;
    flow1.endSize = 10;

    lof.setMagnitude(5);	//adjust the magnitude of acceleration
}
Step 15: Ship Under Attack
As you progress in the game, you will definitely take hits and suffer damage. As damage becomes severe, you ship will burn up. Such an effect can be generated here; we can make use of the emissionXVariance and emissionYVariance to define the area of burn. I've highlighted them in the code below.
envr = new ParticleDesignerPS( XML(new InitValues()),
    Texture.fromBitmap(new Sample())
    );
addChildAt(envr,2);
envr.blendFactorSource = Context3DBlendFactor.ONE_MINUS_SOURCE_ALPHA
envr.blendFactorDestination = Context3DBlendFactor.ONE;
envr.emitterXVariance = theShip.width >> 2;
envr.emitterYVariance = theShip.height >> 2;
envr.emitAngle = 0;		envr.emitAngleVariance = Math.PI;
envr.speed = 0;
envr.startSize = 40;	envr.startSizeVariance = 0;
envr.endSize = 10;		envr.endSizeVariance = 0
envr.lifespan = 5.0;	envr.lifespanVariance = 3.0;
envr.emissionRate = 10;
envr.start(); Starling.juggler.add(envr);
Damage severity is indicated by the area and intensity of burn. Increase and decrease emissionRate to simulate this. I've added controls on keyboard "A" and "S" to emulate this.
private function controlBurn(e:KeyboardEvent):void {
    if (e.keyCode == Keyboard.A) {
        if(envr.emissionRate < 150)	envr.emissionRate += 10;
        if (envr.lifespan < 8)	envr.lifespan += 0.5;
    }
    if (e.keyCode == Keyboard.S) {
        if(envr.emissionRate > 10)	envr.emissionRate -= 10;
        if (envr.lifespan > 5)	envr.lifespan -= 0.5;
    }
}
Note that if you increase the lifespan of particles, the fire seems to burn more intensely. Well, it takes time to interpolate particles from its initial size to end size, so if you increase the lifespan, its longer to transition from the bigger start to smaller end size. As more big particles stay in the same spot longer, they blend together to give the impression of a more intense fire.
Step 16: Burning Ship
Press the "A" key to see the fire burn more intensely and the "S" key to slightly quench it. The exhaust's color has been change, to differentiate it from the burning:
Step 17: Ship Exploded
All good games must end at some point. Regardless of who's being eliminated, a good explosion for a finish should not be missed. So how about a nuclear mushroom cloud? Click on the demo below to see one.
Now, let's code it.
Step 18: Radial Particle Flow
This particle flow is a little different than the ones we have seen. Previously we have been using particle flow type 0 (gravity) and this is type 1 (radial). The particles are actually moving to the middle at a constant velocity.
I turned the emission angle variance to its highest so you can see all the generated particles form a circle. Then, by animating the maximum radius and the minimum radius these particles should live in over time, using a Tween, we achieve this result.
explosion = new ParticleDesignerPS(
        XML(new InitValues()),
        Texture.fromBitmap(new Sample())
    );
addChild(explosion);
explosion.emitterX = stage.stageWidth >> 1;
explosion.emitterY = stage.stageHeight >> 1;
explosion.emitterType = 1;
explosion.emitAngle = 0;	explosion.emitAngleVariance = Math.PI;
explosion.maxRadius = 10;	explosion.maxRadiusVariance = 0;
explosion.minRadius = 0;
Here's the code to perform the animation.
private function track(e:TouchEvent):void {
    var touch:Touch = e.getTouch(stage);
    if (touch.phase == TouchPhase.BEGAN) {
        explosion.emitterX = touch.globalX;
        explosion.emitterY = touch.globalY;
        explosion.start();
        t = new Tween(explosion, 1.0, Transitions.EASE_IN);
        t.animate("maxRadius", 150);
        t.animate("minRadius", 130);
        t.onStart = freeze
        t.onComplete = reset;
        Starling.juggler.add(t);
    }
}

private function freeze():void {
    stage.removeEventListener(TouchEvent.TOUCH, track);
}

private function reset():void {
    stage.addEventListener(TouchEvent.TOUCH, track);
    explosion.stop();
    explosion.maxRadius = 10;
    explosion.minRadius = 0;
}
Step 19: Recap
So this has been a lengthy tutorial. Let's do a little recap here. We've gone through:
- Setting up Starling and its particle extension
- Properties of the particle system
- Examples of property manipulations based on the scenario of a shooter game.
Conclusion
We have covered quite a bit here. However, one important aspect I haven't gone through is to extend from ParticleSystem. This will really give you the power to code your own particle trails instead of relying on ParticleDesignerPS. I'll have to postpone this to another tutorial.
Thanks for reading and see you in the next tutorial. Do leave comments on errors and this particle engine's use in your project if you choose to adopt it.

Comments