In this tutorial, you will learn the basics of P2P (peer-to-peer) communication and create an application to share large files, such as images and videos, from one device to another using NFC (near field communication) on Android.
1. Introduction
NFC or Near Field Communication is a set of short-range wireless technologies. It enables the exchange of data between an NFC tag and an NFC-enabled device, or between NFC-enabled devices within a distance of no more than 4 cm.
There are three modes of NFC operation:
- Reading and writing contactless tags: These tags are generally very small and do not require any battery power. They can be embedded in all sorts of objects, such as movie posters, products, stickers, and so on.
- Card emulation mode: Think smart credit cards. This allows an Android device to act like a smart card. The obvious benefit of this is that your device can act like one card and then act like a different one at the touch of a button. This is one way an Android device can replace your wallet. Whatever credit card, bus pass, or ticket you're using, your Android device could impersonate—securely, of course—that item. The reader on the other side of the transaction thinks that it's interacting with that item, when in fact, it's dealing with an Android device.
- Peer-to-peer communication: Each side recognizes that it's talking to another device and not just a tag. The protocol has been developed by Google and allows two devices to send messages back and forth.
The peer-to-peer (P2P) data exchange feature was added to Android in API level 14 (Android 4.0, Ice Cream Sandwich) and is called Android Beam. It enables rapid short-range exchange of data between two NFC-enabled Android devices.
2. P2P Communication With Android Beam
The Android Beam data exchange feature has two APIs, the NDEF transfer API and the file transfer API.
NDEF Transfer API
This API was introduced in API level 14 (Android 4.0, Ice Cream Sandwich) and enables the transfer of small amounts of data like URLs, contacts, etc. The data to be transferred must be formatted in NDEF (NFC Data Exchange Format) and is sent as an NDEF message.
File Transfer API
The file transfer API was introduced in API level 16 (Android 4.1, Jelly Bean) and enables the transfer of large files, such as images, videos, etc.
There are some caveats though. Android Beam only works when the application sending the data is running in the foreground and the device receiving the data is unlocked.
The Android Beam file transfer API has two additional requirements:
- The files that need to be transferred must be located in external storage.
- The files that need to be transferred must be world-readable.
In this tutorial, we will use the Android Beam file transfer API of the Android SDK to create an application that enables users to share files between devices.
3. Requirements
Due to the limitations of the emulator, the application needs to be tested with two physical NFC-enabled Android devices running Android 4.1 or higher.
4. Getting Started
Using Eclipse, create a new Android application project and name it NFCDemo.
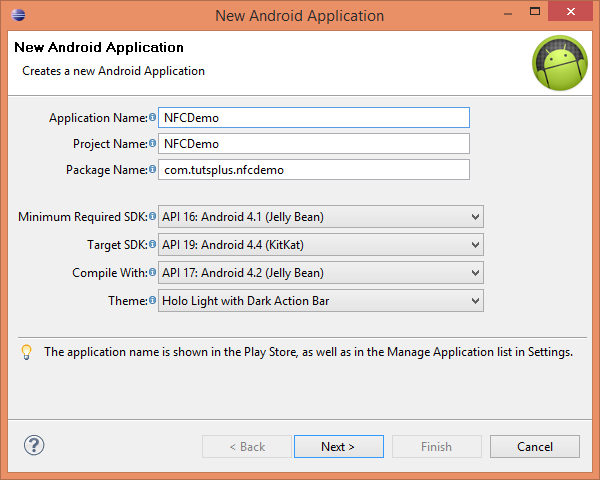
Since Android Beam file transfer is only available on devices running Android 4.1+, we need to set Minimum Required SDK to API 16: Android 4.1 (Jelly Bean).
5. Configuring Manifest File
To use NFC in an Android app, we have to declare the NFC permission in the manifest file as shown below.
<uses-permission
    android:name="android.permission.NFC" />
In addition, to read files from external storage, declare the READ_EXTERNAL_STORAGE permission as shown below.
<uses-permission
    android:name="android.permission.READ_EXTERNAL_STORAGE" />
Not every Android device supports NFC. To make sure that our app only shows up in Google Play for those devices that support NFC, add the <uses-feature> element to the manifest file.
<uses-feature
    android:name="android.hardware.nfc"
    android:required="true" />
If NFC is an optional feature of your app, then you can omit the <uses-feature> element from the manifest file and set the minimum SDK version to a lower API level. In that case, you need to check if the device supports NFC and the Android Beam API, and update the user interface accordingly.
6. Creating Layouts
Open the activity_main.xml layout file and add a Button as shown below. As you can see, we've added a Button that the user can tap to initiate the transfer of a file.
<RelativeLayout
    xmlns:android="http://schemas.android.com/apk/res/android"
    xmlns:tools="http://schemas.android.com/tools"
    android:layout_width="match_parent"
    android:layout_height="match_parent"
    android:padding="16dp" >

    <Button
        android:layout_width="fill_parent"
        android:layout_height="wrap_content"
        android:padding="8dp"
        android:text="Send File"
        android:onClick="sendFile" />

</RelativeLayout>
7. Implementing File Transfer
Open the MainActivity class and replace the current implementation with the one shown below. Don't worry about the implementation for now. I'll explain every step in a moment.
package com.tutsplus.nfcdemo;

import java.io.File;

import android.app.Activity;
import android.content.Intent;
import android.content.pm.PackageManager;
import android.net.Uri;
import android.nfc.NfcAdapter;
import android.os.Build;
import android.os.Bundle;
import android.os.Environment;
import android.provider.Settings;
import android.view.View;
import android.widget.Toast;

public class MainActivity extends Activity {

	private NfcAdapter nfcAdapter;

	@Override
	protected void onCreate(Bundle savedInstanceState) {
		super.onCreate(savedInstanceState);
		setContentView(R.layout.activity_main);

		PackageManager pm = this.getPackageManager();
		// Check whether NFC is available on device
        if (!pm.hasSystemFeature(PackageManager.FEATURE_NFC)) {
        	// NFC is not available on the device.
            Toast.makeText(this, "The device does not has NFC hardware.",
            				Toast.LENGTH_SHORT).show();
        }
        // Check whether device is running Android 4.1 or higher
        else if (Build.VERSION.SDK_INT < Build.VERSION_CODES.JELLY_BEAN) {
            // Android Beam feature is not supported.
        	Toast.makeText(this, "Android Beam is not supported.",
        					Toast.LENGTH_SHORT).show();
        }
        else {
        	// NFC and Android Beam file transfer is supported.
        	Toast.makeText(this, "Android Beam is supported on your device.",
        					Toast.LENGTH_SHORT).show();
        }
	}

	public void sendFile(View view) {
		nfcAdapter = NfcAdapter.getDefaultAdapter(this);

		// Check whether NFC is enabled on device
        if(!nfcAdapter.isEnabled()){
        	// NFC is disabled, show the settings UI
        	// to enable NFC
        	Toast.makeText(this, "Please enable NFC.",
                            Toast.LENGTH_SHORT).show();
        	startActivity(new Intent(Settings.ACTION_NFC_SETTINGS));
        }
        // Check whether Android Beam feature is enabled on device
        else if(!nfcAdapter.isNdefPushEnabled()) {
        	// Android Beam is disabled, show the settings UI
        	// to enable Android Beam
        	Toast.makeText(this, "Please enable Android Beam.",
        					Toast.LENGTH_SHORT).show();
        	startActivity(new Intent(Settings.ACTION_NFCSHARING_SETTINGS));
        }
        else {
        	// NFC and Android Beam both are enabled

        	// File to be transferred
        	// For the sake of this tutorial I've placed an image
        	// named 'wallpaper.png' in the 'Pictures' directory
        	String fileName = "wallpaper.png";

        	// Retrieve the path to the user's public pictures directory
        	File fileDirectory = Environment
                                    .getExternalStoragePublicDirectory(
                                            Environment.DIRECTORY_PICTURES);

        	// Create a new file using the specified directory and name
        	File fileToTransfer = new File(fileDirectory, fileName);
        	fileToTransfer.setReadable(true, false);

        	nfcAdapter.setBeamPushUris(
                            new Uri[]{Uri.fromFile(fileToTransfer)}, this);
        }
	}
}
8. Testing the App
Before we dive into the code, let's see what steps we need to take to transfer a file from one device to another.
Step 1
Connect one of the two Android devices to your development workstation via USB with USB debugging enabled. Let's refer to that device as the sender.
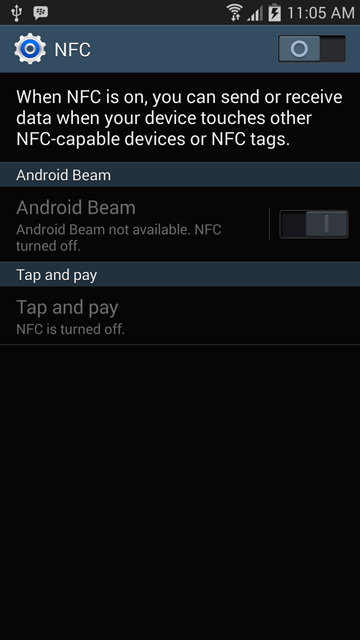
Step 2
Enable NFC and Android Beam on the sender. Press F11 to debug the application. This will install and launch NFCDemo on the sender.
Step 3
Enable NFC on the second device, the receiver.
Step 4
Tap the Send File button and position the devices close together to let NFC do its work. You should see a Touch to beam message appear on the sender. Tap the screen to initiate the transfer.

Step 5
The receiver should show a notification in the status bar to indicate the progress of the file transfer.
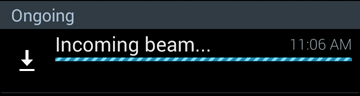
Step 6
If the file transfer is completed successfully, a Beam complete message is displayed to the user.

9. Decoding the Code
Let's take a look at the code that makes all this possible.
Determine Device Capabilities
As mentioned earlier, if NFC is an optional feature of our app we should check for NFC and Android Beam support. This check can be performed anywhere in our app. In this example, I've put the code in the onCreate method of the MainActivity class.
Step 1
Obtain a reference to the PackageManager.
PackageManager pm = this.getPackageManager();
The PackageManager class holds information about all the packages installed on the device.
Step 2
Call the hasSystemFeature method on the PackageManager object to determine if the device has NFC support. This method returns true if the desired feature is supported by the device.
if (!pm.hasSystemFeature(PackageManager.FEATURE_NFC)) {
  // NFC is not available on the device.
}
else {
  // NFC is available on the device.
}
Step 3
If the device has NFC support, then we have to check the device's Android version. The Android version (API level) running on a device is available via android.os.Build.VERSION.SDK_INT. If the version is greater than or equal to 16, Build.VERSION_CODES.JELLY_BEAN, then the device supports Android Beam file transfer.
if (!pm.hasSystemFeature(PackageManager.FEATURE_NFC)) {
  // NFC is not available on the device.
}
// Check whether device is running Android 4.1 or higher
else if (Build.VERSION.SDK_INT < Build.VERSION_CODES.JELLY_BEAN) {
    // Android Beam feature is not supported.
}
else {
  // NFC and Android Beam file transfer is supported.
}
Initiate File Transfer
Once we have determined that the device has the required capabilities, we can initiate the file transfer using Android Beam.
Step 1
Obtain a reference to the NfcAdapter.
nfcAdapter = NfcAdapter.getDefaultAdapter(this);
The job of the NfcAdapter is to manage the exchange of data between an NFC tag and a NFC-enabled device or between two NFC-enabled devices.
Step 2
The adapter can be enabled or disabled. To determine whether the adapter is enabled, call the isEnabled method on the NfcAdapter object.
// Check whether NFC is enabled on device
if (!nfcAdapter.isEnabled()) {
  // NFC is disabled, show the settings UI to enable NFC
}
else {
  // NFC is enabled
}
This method returns true if NFC is enabled on the device. If NFC is disabled, we prompt the user to enable it and show the NFC settings user interface.
startActivity(new Intent(Settings.ACTION_NFC_SETTINGS));
Step 3
Similarly, the Android Beam feature can also be enabled or disabled. To check its state, call the isNdefPushEnabled method on the NfcAdapter object.
// Check whether NFC is enabled on device
if (!nfcAdapter.isEnabled()) {
  // NFC is disabled, show the settings UI to enable NFC
}
// Check whether Android Beam feature is enabled on device
else if (!nfcAdapter.isNdefPushEnabled()) {
  // Android Beam is disabled, show the settings UI to enable Android Beam
}
else {
  // NFC and Android Beam both are enabled
}
If this method returns false, we prompt the user to enable it and show the Android Beam settings user interface.
startActivity(new Intent(Settings.ACTION_NFCSHARING_SETTINGS));
If both NFC and Android Beam are enabled, we can proceed with the file transfer.
Step 4
Create a new File using the directory where the file is located on the device and the name of the file. To test the file transfer, I've added an image named wallpaper.png in the Pictures directory in the external storage.
// Create a new file using the specified directory and name
File fileToTransfer = new File(fileDirectory, fileName);
Step 5
Call the setBeamPushUris method on the NfcAdapter object and pass the URI of the file to be transferred.
nfcAdapter.setBeamPushUris(new Uri[]{Uri.fromFile(fileToTransfer)},
                            this);
The setBeamPushUris method accepts an array of Uri objects. If you want to send more than one file, you can pass multiple URIs to the adapter.
The URIs passed to the setBeamPushUris method are queued by the adapter and are transferred to the receiving device as soon as it comes in close proximity of the sending device.
Conclusion
In this tutorial, you learned about the basics of NFC on Android. You've also learned how to restrict access to an app by unsupported devices using the manifest file and determine device capabilities at runtime. To send files using NFC, we made use of the NfcAdapter class.
While I've tried to cover the basics of working with the Android Beam file transfer API to help you get started, there is still more explore. If you like to learn more, then I encourage you to visit the Android developer portal for more information.

Comments