In the iOS developer community, fastlane is a very popular tool nowadays. It takes a very tedious task, interacting with iTunes Connect, and makes it almost painless by automating most of it. We take a look at the overall concept of fastlane and learn how to take screenshots for all devices in all languages with a single command.
Why fastlane
"Manual, repetitive work is not worth my time." Every programmer has thought this at least once in his career. Most of us, though, don't want to take the time to learn how to automate properly. Maybe it's because we only do those tasks infrequently or maybe it's because we don't think to have enough time to deal with it right now.
Especially if the task is the same every time, but doesn't come up that much, such as the release of a new version or the distribution of a build to beta testers. Nevertheless, it certainly is a good idea to automate such tasks. You might forget a step and have to start over or, when dealing with beta versions, it might be very tedious to add new devices to the Developer Portal and refresh the provisioning profiles before you distribute a new build.
This is where fastlane comes in. It automates your distribution pipelines and minimizes interaction with the Developer Portal and iTunes Connect, from the comfort of the command line or completely automated on your continuous integration server.
Suite of Tools
fastlane is not just a single tool. It is a collection of, at the time of writing, twelve tools that follow the Unix philosophy "Do One Thing and Do It Well". Of course, they depend on and interact with each other.
fastlane itself is a wrapper around those tools, enabling developers to define workflows, also known as lanes. Each workflow requires different tools to run. For instance, if you want to distribute a pre-release build to your testers, you won't need to create screenshots for the App Store.
Installation
Before you can start using fastlane, you need to make sure to have the Xcode Command Line Tools installed. From the command line, execute xcode-select --install to install them. If it is already installed, you will see an error.
fastlane itself is a Ruby gem. Depending on your system, you either have to run gem install fastlane or sudo gem install fastlane. The latter is necessary when you are using the Ruby version provided by OS X.
Project Setup
After installing the prerequisites, you have to initialize your project to use fastlane. In your project folder, run fastlane init from the command line to start an interactive setup wizard. The wizard asks you for your email address and probably your password if it isn't already in the keychain. The wizard also detects the attributes of your app, such as name and identifier, and checks the Developer Portal and iTunes Connect if it is already present there. If it isn't, then it offers to create it for you. Painless.
You can also set up deliver in the same step. This tool allows you to upload metadata, screenshots, and the binary to iTunes Connect for you. We will have a look at this in another tutorial.
During the setup process, a new folder, fastlane, is created in your project's directory. It contains configuration data, the most important being a file named Fastfile. The file describes the lanes fastlane has. Here is the default appstore lane.
desc "Deploy a new version to the App Store"
lane :appstore do
  match(type: "appstore")
  snapshot
  gym
  deliver(force: true)
  frameit
end
This workflow or lane does the following:
- fetch all signing certificates and provisioning profiles (match)
- create the screenshots for your app (snapshot)
- build your app for the app store (gym)
- upload screenshots, metadata, and the archive to iTunes Connect (deliver)
- create marketing images with device frames from your screenshots (frameit)
In this particular tutorial, we take a detailed look at the second step, snapshot.
Automating Screenshots With Snapshot
Why should you automate screenshots? They are easy to do in a simulator. That might be true when having only one device or one language. Let's do the math. If your app is available on iPhone and iPad, then you have six screen sizes (4.7", 5.5", 4", 3.5", iPad, and iPad Pro). Let's also assume your app is available in twenty languages and you take five screenshots.
6 (devices) × 20 (languages) x 5 (screenshots) = 600 screenshots
Now imagine that you have to take those manually. That is insane. Luckily, there is snapshot. It automates taking screenshots by using the Automation Tools provided by Apple. Even better, since Xcode 7, we no longer need to use JavaScript to automate this. We can use Swift and UI tests for this task.
When you install fastlane, snapshot is installed as well. However, it won't automatically initialize snapshot with it when setting up a new project. You need to run snapshot init in your project folder.
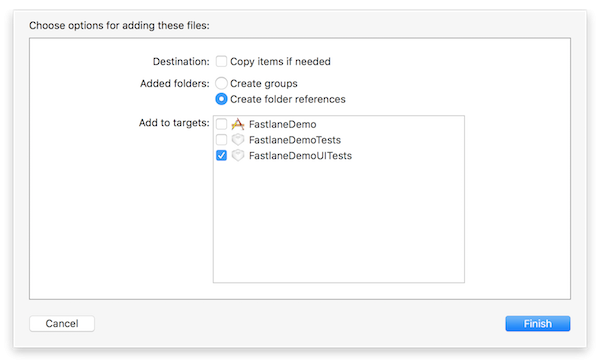
This creates two files in the fastlane folder, Snapfile and SnapshotHelper.swift. You have to add the Swift file to your project's UI test target.

After adding this file, you also need to use the code snippet snapshot provides to save screenshots. You can use the UI test file generated by Xcode or create a separate one just for screenshots.
In the setUp() function, replace XCUIApplication().launch() with the following code:
let app = XCUIApplication()
setupSnapshot(app)
app.launch()
For clarity, you can also rename testExample(), but make sure you don't remove the test prefix of the function name.
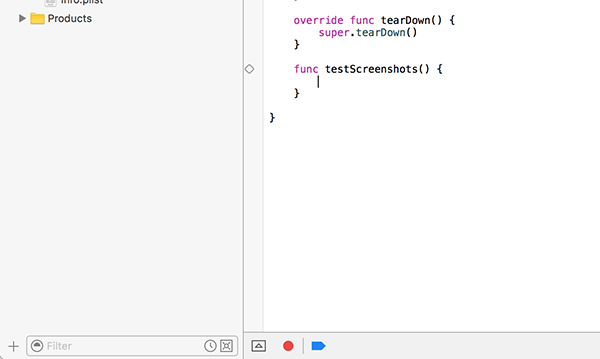
Now it is time to record the steps you take for generating each of the screenshots. You could also control the application programmatically, but it is far easier to use the recording functionality of Xcode and edit it later to fit your needs.

When you record a simple interaction, you end up with code that looks somewhat like the following:
func testScreenshots() {
    let app = XCUIApplication()
    let masterNavigationBar = app.navigationBars["Master"]
    let addButton = masterNavigationBar.buttons["Add"]
    addButton.tap()
    addButton.tap()

    let tablesQuery = app.tables
    tablesQuery.staticTexts["2016-04-12 08:43:40 +0000"].tap()
    app.navigationBars.matchingIdentifier("Detail").buttons["Master"].tap()
    masterNavigationBar.buttons["Edit"].tap()
    tablesQuery.buttons["Delete 2016-04-12 08:43:39 +0000"].tap()
    tablesQuery.buttons["Delete"].tap()
    masterNavigationBar.buttons["Done"].tap()
}
The example comes from the default Master-Detail Application template Xcode provides. Right away, you can see the problem with this code. It uses specific identifiers to interact with the app. If we would run the UI test again, it would fail because the timestamps are different.
In a first step, we can use a function provided by the UI Test framework, elementBoundByIndex(_:). This allows us to access the elements, such as buttons and table view cells, using an index. This leads to the following code:
func testScreenshots() {
    let app = XCUIApplication()
    let masterNavigationBar = app.navigationBars["Master"]
    let addButton = masterNavigationBar.buttons["Add"]
    addButton.tap()
    addButton.tap()

    let tablesQuery = app.tables
    tablesQuery.cells.elementBoundByIndex(0).tap()
    app.navigationBars.matchingIdentifier("Detail").buttons["Master"].tap()
    masterNavigationBar.buttons["Edit"].tap()
    tablesQuery.cells.elementBoundByIndex(0).buttons.elementBoundByIndex(0).tap()
    tablesQuery.buttons["Delete"].tap()
    masterNavigationBar.buttons["Done"].tap()
}
We have another problem when we try to run the code in multiple languages. It fails since Master, Add, etc. are named differently in each language. We can fix this problem too by using the elementBoundByIndex(_:) method. Note that the right bar button on the navigation bar actually has an index of 2, meaning it is the third element, because the navigation bar always has a hidden back button.
func testScreenshots() {
    let app = XCUIApplication()
    let masterNavigationBar = app.navigationBars.elementBoundByIndex(0)
    let addButton = masterNavigationBar.buttons.elementBoundByIndex(2)
    addButton.tap()
    addButton.tap()

    let tablesQuery = app.tables
    tablesQuery.cells.elementBoundByIndex(0).tap()
    app.navigationBars.elementBoundByIndex(0).buttons.elementBoundByIndex(0).tap()
    masterNavigationBar.buttons.elementBoundByIndex(0).tap()
    let cell = tablesQuery.cells.elementBoundByIndex(0)
    cell.buttons.elementBoundByIndex(0).tap()
    cell.buttons.elementBoundByIndex(1).tap()
    masterNavigationBar.buttons.elementBoundByIndex(0).tap()
}
There is another shortcut that makes it far easier for custom elements to be accessed by UI tests. It is a property, accessibilityIdentifier, defined by the UIAccessibilityIdentification protocol. You can use it to look for elements with this identifier, for example, app.buttons.matchingIdentifier("awesomeButton").element. The accessibility identifier isn't visible to the user, even when they have accessibility enabled, and it isn't localized.
After you have set up the user interface to work with the project's supported languages, it is time to configure snapshot to take some screenshots. This is done with the snapshot(_:) function in your UI test. You also need to specify a file name. I personally use a numbered prefix, such as snapshot("1MasterView") or snapshot("2DetailView") to make it easier to count how many screenshots I've already taken and to automatically sort them. If you need additional time before taking a screenshot use the sleep(_:) function.
Finally, you need to tell snapshot which devices and languages it should use. This is specified in the Snapfile.
devices(["iPhone 6", "iPhone 6 Plus", "iPhone 4s"])
languages(["en-US", "de-DE"])
In this example, I'm using iPhone 6, iPhone 6 Plus, and the iPad as devices and English and German as languages.
To run the tool, you execute snapshot from the command line. Depending on the size of your project and the number of devices and languages, it can take quite some time to take the screenshots. In the meantime, you can stretch your legs, get a cup of coffee, or just watch it work its magic.
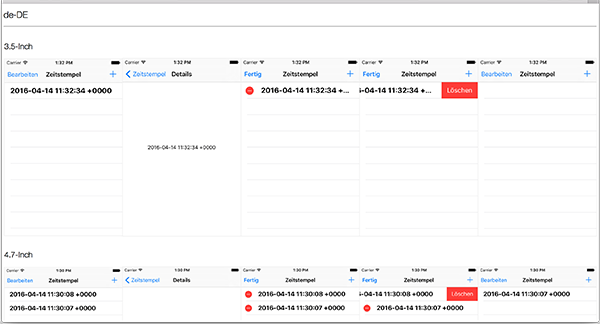
By default, the screenshots are stored in fastlane/screenshots, with each language having its own subfolder and file names prefixed with the device name. After snapshot is finished, it also generates an HTML file to easily preview the generated screenshots.

Conclusion
By using snapshot, you can reduce the time and effort needed to create screenshots for your app to a fraction of what it take if you do this task manually. Of course, the tool is much more customizable because we only scratched the surface of what snapshot can do. For more information, check out the documentation on GitHub. You can also check out my video course about fastlane if you'd like to learn more about this amazing tool.


Comments