OpenShift is a PaaS that allow you to run your own app for free with low resources. It offers 1GB storage and 512MB RAM, and has support for custom domains. It's faster than Heroku, PagodaBox, and AppFog giving you SSH access to your app server, running in a separate environment. It's just like a real server, but you get it for free.

OpenShift is a very good platform for running a WordPress site. PagodaBox and AppFog fair for hosting PHP applications for free; however, PagodaBox is quite slow, and has a hard limit of 10MB of MySQL for free plan. AppFog no longer supports custom domain on their free plan. You can also run PHP on Heroku, but it's a bit on the slow, as well.
OpenShift solve all of above problems: It's fast enough, offers a free custom domain, offers large disk space, and a significant amount of MySQL storage.
The free plan supports:
- 15 pages/second
- ~50k visitors per month
OpenShift is a next-generation cloud application platform that makes it easy to develop, deploy, and scale applications in the cloud – public or private.
Let's break it down.
- Ease of Development: Quickly create an app environment with many language and run time libraries from the website UI or command line. OpenShift supports a free, private Git repository meaning you don't even have to pay for your own Git server or a private plan on GitHub. You will use this repository for deployment (we will learn later), don't deploy via uploading file directly. This repository is important and you will use it throught development to deployment.
- Ease of Deployment: Whenever you push to your Git repository, OpenShift will pickup the changes and deploy it for you. By default, it deploys code from the master branch, but you can change to whatever branches/tags if you want. You no longer need to use an FTP client or to build your custom deployment method. All are done by OpenShift with a simple
git pushto the repository which OpenShift created for you.
- Scalable: When you have more traffic, you can easily add more gears, like you add more server to your app.
Your app, to OpenShift point of view contains:
- Your code
- Git repository
- Environment variables
- App environment
The git repository is created and maintained by OpenShift itself, too. You must push to it to trigger deployment.
Your app runs on a set of cartridges. A cartridge, by OpenShift's definition, are self-contained pieces of the application stack such as the web server and the database server. These cartridges are deployed and run on one or more secure containers call gears.
So, for a PHP application, you can have a MySQL server, a web server, a Memcache server, a logging server, and a Gearman worker. All of these are cartridges. Gears are what will run these cartridges. You can think of a gear like a separate virtual server, and cartridge is the technology stack; therefore, to scale your app, you can add more gears into it.
To expand your technology stack, you add more cartridges, like adding a RabbitMQ. Gears shared configuration information with your app via environment variables. For example, you won't directly write down a MySQL username or MySQL password in a config file. Instead, you would use getenv to load environment variables. If you hard code the configuration, when you deploy on new gear, it stops working.
define('DB_NAME', getenv('OPENSHIFT_APP_NAME'));

/** MySQL database username */
define('DB_USER', getenv('OPENSHIFT_MYSQL_DB_USERNAME'));

/** MySQL database password */
define('DB_PASSWORD', getenv('OPENSHIFT_MYSQL_DB_PASSWORD'));

/** MySQL hostname */
define('DB_HOST', getenv('OPENSHIFT_MYSQL_DB_HOST') . ':' . getenv('OPENSHIFT_MYSQL_DB_PORT'));
Sharing configuration via environment is the way multiple gears can know each others information. If you are convinced, let's continue.
Step 1: Sign Up for an Account
Go to here and sign up for an account. You only need to signup for a free account. Skip if you has already had an account there.
Step 2: Setup Your Publish Key
You will need a public key for connection between you and OpenShift later. A public key is a plain text file usually name id_rsa.pub that's located in ~/.ssh/.
So if you are on a Mac, it's in /Users/[your_username]/.ssh/id_rsa.pub or if you are on Linux it's in /home/[your_user_name]/.ssh/id_rsa.pub. You need to copy content of this file and update it with OpenShift so OpenShift is aware of your public key. When you make a connection to OpenShift from the terminal (that is, when you SSH to your box and are pushing code), OpenShift will identify and authorize you by based on your public/private key.
If you are not familiar with the public key concept, this tutorial will give you a solid background for it.
To check if you have had a public key before, run this command:
ls -la ~/.ssh | grep id_rsa.pub
If you get this result:
id_rsa.pub
then you already have a public key. If the above command returns nothing, then you don't have one.
Let's generate it with command:
$ ssh-keygen -t rsaYou can just use the default option when it asks you. Once you're done, you can confirm that you have that file by running
ls -la ~/.ssh | grep id_rsa.pub again. An according private key file are also generate under name ~/.ssh/id_rsa(not .pub extension) for you. We will use it later, too.Now, login to OpenShift, go to the Setting tab. You have to set up a name space for all your app. Later on OpenShift give you the sub domain in this format: http://applicationname–[your_name_space].rhcloud.com. For example, I use
tutsplus as name space here. Now, let's copy content of public key into clipboard.
If you are on Mac, you can use this command to copy content into a file quickly:
$ cat ~/.ssh/id_rsa.pub| pbcopy
If you are on Linux, just run this command:
cat ~/.ssh/id_rsa.pub, then manually copy the output. 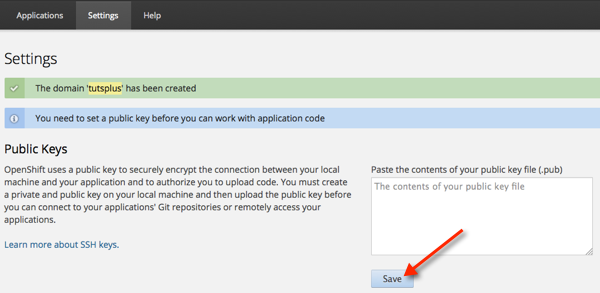
Step 2: Get Your WordPress Up
To get WordPress up and running, you can start from scratch with the OpenShift command line tools, or you can use the GUI to create it. Using a GUI can be easier for starting so let's use it. We will dive more into CLI mode later.
Step 2A: A Fresh Installation
Login to OpenShift and do the following:
- Select the tab "Application".
- Click "Create your first application now"
- Type "WordPress" into "Search by keyword or tag" input field to filter WordPress.
- Click on "WordPress 3.x". This will give us a WordPress 3.8.x version.
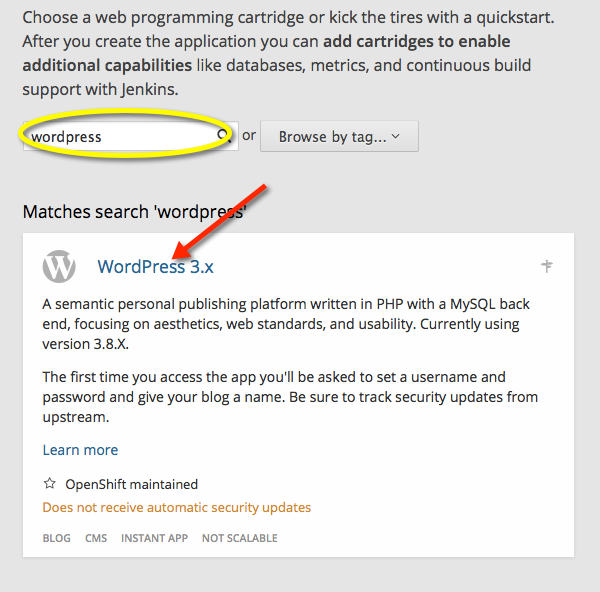
Now, you will be redirect to a screen for entering your blog information.
- Public URL: Set your blog URL. This is a sub domain under
rhcloud.com. You can select any name because we will change it with its own domain later anyway. In this tutorial I will use http://demo2-tutsplus.rhcloud.com.Tutsplusis my name space anddemo2is name of my app.
- Cartridge: Let's choose PHP5.4 and MySQL 5.5.
- Leave other field defaults.
- Click "Create application"
Wait for a few moments and your application will be created. Next, you will be presented with a page that contains:
- MySQL credential. Store it, you will need it later.
- Git repository address of your WordPress instance on OpenShift platform.
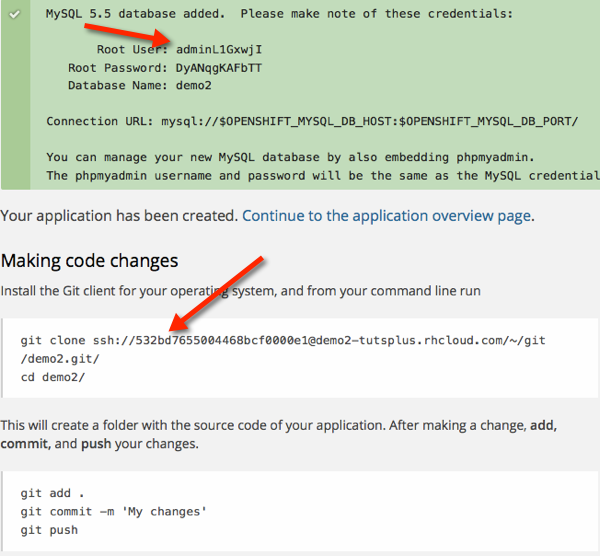
Let's clone this repository to our local machine. For example my own one look like this
git clone ssh://[email protected]/~/git/php.git/
We will come back this later. Click "Continue to the application overview page" and your app will be appear with the domain that you choose. Launch it on your browser and you can proceed with normal WordPress installation: Setting up the site name, admin username, and the admin password just as you're used to doing with WordPress.
The next step is for people who already have WordPress installed somewhere and want to move to OpenShift. If you are doing a fresh install, you can ignore this, but I suggest you to read it for some additional understanding of the OpenShift structure.
Step 2B: An Existing Installation
If you have existing WordPress code, it's not so hard to implement on top of OpenShift. You have several options:
- Export current data, create a new WordPress installation, on OpenShift and just import it.
- Check in your code to the repository we cloned in previous step and tweak
wp-config.phpto match OpenShift's requirements.
Here's some additional detail about the second step as the migration includes three things:
- Code integration such as your themes and/or plugins.
- Database Migration. In later step, you will learn to configure phpMyAdmin on OpenShift so you can backup current WordPress data with phpMyAdmin then import to OpenShift via its phpMyAdmin. Just make sure you use same phpMyAdmin version to minimize compatibility issues.
- Media Migration. In later step, you will learn about SSH/SFTP access. Once you have SSH you can simply copy all media files in
wp-content/uploadsto OpenShift.
In this step, I'm only covering code integration. In a previous step, we cloned WordPress repository with:
git clone ssh://[email protected]/~/git/php.git/You should have a layout like this inside the repository. Make sure to display hidden files, as well:
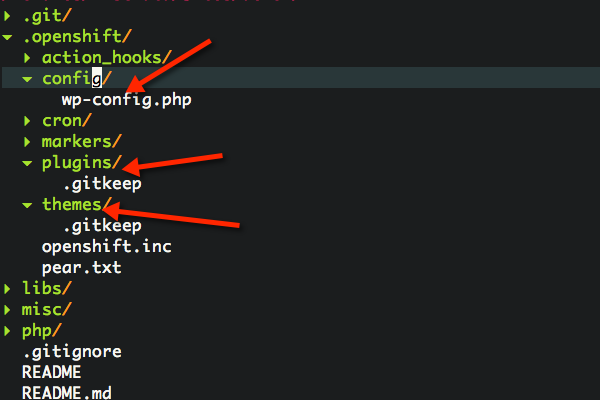
The beautiful thing about OpenShift is that it has a good structure for WordPress. When working on WordPress, you only worry about wp-config.php, plugins, and themes. That's it.
The other files, or WordPress core file (wp-admin, wp-includes, wp-content/uploads, index.php, wp-login.php...) are handled by OpenShift. OpenShift will automatically pull the files from WordPress and put it into the correct location for you.
.openshift folder is where most of your code will reside. plugins and themes are corresponding folders for WordPress. config/wp-config.php is your custom WordPress config file.
.openshift/action_hooks contains build and deploy related scripts. Those scripts are what will be run on OpenShift server to deploy your app. If you want to custom the build process, you have to configure those script files.
Here is a part of the deployment workflow whenever a push to the deploy branch (usually this is the master) is triggered from Git:
- OpenShift creates a folder which we'll call
install_dir. Next, download and extract the file http://wordpress.org/wordpress-${install_version}.tar.gz into this folder. The install_version is pre-defined in.openshift/action_hooks/build - OpenShift copies the file
.openshift/config/wp-config.phpto overwrite the file ininstall_dir/wp-config.php(the default wp-config.php from original package - OpenShift copy all content of
.openshift/pluginsand.openshift/themestoinstall_dir/wp-content/pluginsandinstall_dir/wp-content/themes
.openshift/plugins or .openshift/themes accordingly. Then commit your code and push everything back to OpenShift. git push to trigger deployment.$ git add plugins
$ git add themes
# If u update wp-config too
$ git add config/wp-config.php
$ git commit -m "Copy file from old WordPress"
$ git push origin master
Step 3: Use Your Own Domain
Most likely, you won't use the default domain that OpenShift created for you. You will want to use your own domain. In theory, to use your custom domain you have to do two things:
- Point your domain to the IP Address of OpenShift server that is powering your app.
- Tell OpenShift that you want to use that domain.
By doing that, you point your domain to the OpenShift server and OpenShift is aware of your domain and will begin serving your app when requested from that domain.
Depending on your domain registrar, you have different way to create a
CNAME or A record for your domain. Luckily, we have a very extensive document on how to do this.
If you use a subdomain for your WordPress site like blog.yourdomain.com you can add a CNAME record to your rhcloud.com subdomain.
Step 3A: Point Your Domain to the OpenShift Server
Case 1. Use Your Subdomain With CNAME Record
If you go with this, it's very easy. Just go to your domain control panel, add a CNAME record points to your OpenShift WordPress URL.
For example with name.com, I have this:

So, I configure the settings to have openshift.axcoto.com point to demo2-tutsplus.rhcloud.com
Case 2. Use Your Main Domain
In this case, some domain registrars still allow you to set a CNAME record on a naked domain (e.g., yourdomain.com). If so, just go ahead and create it just like you do for subdomains.
If it isn't, we have to find the IP address of our OpenShift domain, and point your naked domain to it:
ping demo2-tutsplus.rhcloud.com
PING ec2-54-242-75-238.compute-1.amazonaws.com (54.242.75.238): 56 data bytes
64 bytes from 54.242.75.238: icmp_seq=0 ttl=41 time=96.713 ms
64 bytes from 54.242.75.238: icmp_seq=1 ttl=41 time=90.054 ms
^C
--- ec2-54-242-75-238.compute-1.amazonaws.com ping statistics ---
2 packets transmitted, 2 packets received, 0.0% packet loss
round-trip min/avg/max/stddev = 90.054/93.383/96.713/3.329 ms
Then I created an A record and just pointed it to that IP address

Either way, the main point is to make sure the domain you're using is resolved to same IP address with your rhc-cloud domain.
Verify this by pinging both domains:
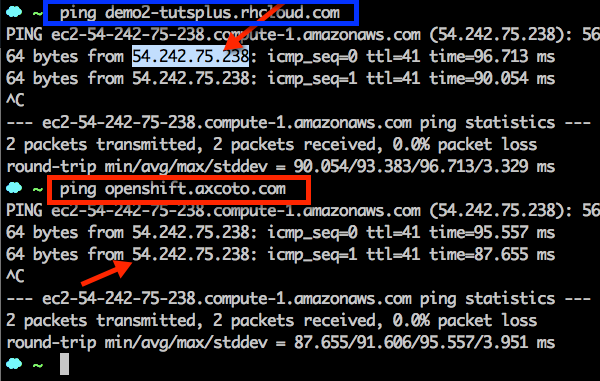
Now your domain is able to pointing to same server as the OpenShift subdomain. The next step is to configure the domain on WordPress side.
Step 3B: Update WordPress domain
For now, we are still using demo2-tutsplus.rhcloud.com to access WordPress. Let's go to the Dashboard, then click on Settings > General. Change both WordPress Address (URL) and Site Address (URL) your domain.
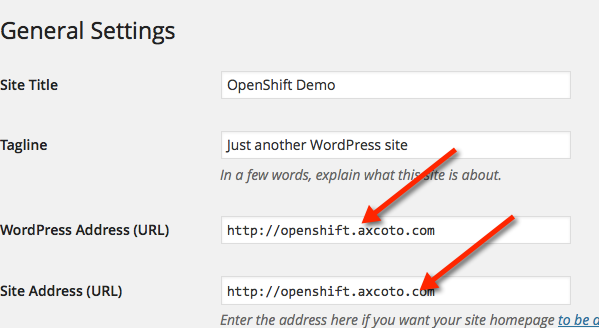
At this point, you can be locked out of your WordPress site. Don't worry. Go back to OpenShift dashboard, select your app, click on "Change" next to the domain name and update the OpenShift domain to your own domain. Then save it.

Now access your custom domain, openshift.axcoto.com, you will see your site. When accessing WordPress dashboard on your custom domain, you can get a SSL warning, just ignore it. This is caused by SSL certificate is based on domain, and we change to our custom domain, so we should give OpenShift our SSL certificate if we want to use SSL.
Step 4: Setup phpMyAdmin
It's very handy to have an access to MySQL database with phpMyAdmin. The de factor way to doing MySQL task in PHP.
On your applicaiton page, click "Add phpMyAdmin4.0". Waiting for awhile and phpMyAdmin will be ready for you. Once it's installed, launch it, you will be asked for MySQL username/password. We stored it in a previous step. If you forgot, you can always see the username and show the password in the MySQL5.5 cartridge.
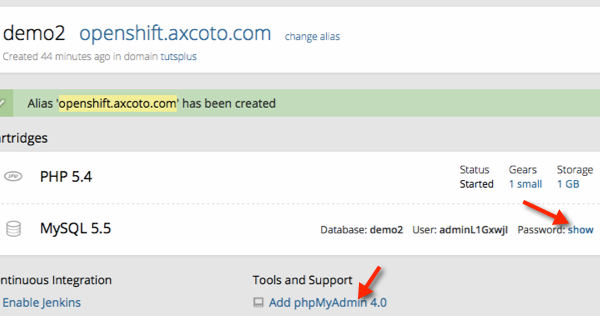
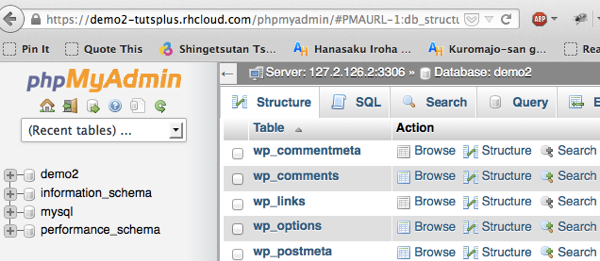
If you are migrating from an existing blog, you can use phpMyAdmin to import the database of old WordPress.
Step 5: Post Installation
At this point, we're done. You can go ahead and enjoy your WordPress installation. But let's dive into some other thing that you may need.
Keep Your App Up
The free plan come with a drawback: it's automatically shutdown if you have no visits in two days. Whenever a visitor hits your site, it's started automatically again so it's fine, in theory, but during that starting time, it's a little bit longer to see your site since it's taking sometime for starting.
To avoid this, you may want to use Pingdom. Pingdom will check the up time status of your site and send you an email notification when you website is down. In order to do that, Pingdom pings your website at every ten minutes or so. It's side effect is your app is having a visitor for every ten minutes so you can by pass OpenShift auto shutdown. Bonus point, we also have a great free monitoring service.
To that end, I suggest to setup a free account with Pingdom for monitoring purpose and to keep your app busy enough.
Remote SSH Access Into Your App
One great thing about OpenShift is that you can remote access into your app like a server. It isn't a black box to you. You can SSH into it and issue some shell command (of course some sensitive command are disabled by OpenShift or has no effect).
On your application page, on the right side you can see a post saying: "Remote access. Want to login to your application".
Click on it and you will have a sample command like:
$ ssh [email protected]
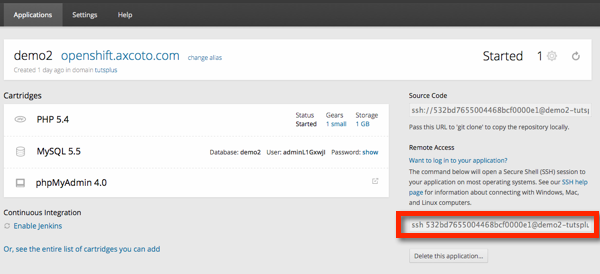
532bd7655004468bcf0000e1. The server name, of course is demo2-tutsplus.rhcloud.com.Just paste it into terminal and you will be in. Remember that we configured our public key in previous step. If it fails to connect, update your public key.
Once you are in, you can navigate around to see server folder structure. Here is a quick overview:
-
app-deploymentsholds the data during deployment process like temporary file, clone repository. The data in here will be copied to correct location later. There is more important directories located within it. -
app-deployments/current/repoholds exactly same clone of our Git repository. Whatever you have on your local machine will be same here.
-
app-root/runtime/repo/phpis your document root. It's symbolic link toapp-root/data/currentwhich is the the real location of your code, about which you can read more below -
app-root/datathis folder hold your code, your upload folder, theme and plugin. This is the real place where all of these are located and will be linked to from different locations. The data in this folder will be usuallly persistent between releases. If it's change, then then change is by your build scripts, not by OpenShift itself.
-
app-root/data/currentyour WordPress code of current release is located here. The data in this folder is usually persistent (except the content of some symbolic link inside it that could be change because it poitns to somewhere else). The WordPress files such as:wp-admin,wp-includes,index.php,.htaccesswill sit here. The content of this folder is created by build script the first time you install WordPress from OpenShift dashboard. Later on, during each deployment, some file can be copied into this by the deploy script. But OpenShift itself won't reset content of this folder.
-
app-root/data/uploadsthis is your uploads folder, but it's a symbolic link ofapp-root/data/current/wp-content/uploadsso you can have persistent uploaded data between multiple releases. -
app-root/data/themescontains theme. It's linked fromapp-root/data/current/wp-content/themes. Again, it's because you can upload theme from WordPress admin so it's linked to outside to have persistent data between releases. If you recall Step 2B, at each deployment, the content of./openshift/themeswill be copied into this folder too. -
app-root/data/pluginscontains plugin.It's symbolic link fromapp-root/data/current/wp-content/plugins. Again, it's because you can upload theme from WordPress admin so it's linked to outside to have persistent data between releases. If you recall Step 2B, at each deployment, the content of./openshift/pluginswill be copied into this folder too.
-
app-root/data/current/wp-content/uploadspoints toapp-root/data/current/wp-content/uploads -
gitis the folder hold your bare Git repository that OpenShift ceated for you -
mysqlholds your MySQL data and configuration information of mysql. -
app-deploymentsis the code snapshot during deployment. -
phpcontains PHP configuration, php extension...
app-root/data/current/wp-content/uploads with scp. For example:
$ cd your_current_wordpress
# We will recursive copy all file/folder under wp-content/uploads to
$ scp -r wp-content/uploads/* [email protected]:~/app-root/data/current/wp-content/uploads
Make sure to use correct username and server name. It's very important that you use correct username, otherwise you won't be able to connect.
SFTP Connecting to Your App
OpenShift doesn't support FTP but you can use SSH File Transfer Protocol to get access and browser the file system; however, don't use this method to upload and edit file directly.
Consider this as a way to help you view the file structure on your app quickly if you are not familiar with command line. We'll use FileZilla to connect. We won't use password authentication but public/private key authentication. We already setup the public key before. Now, let add a new server as in screen. Change it to your setting.
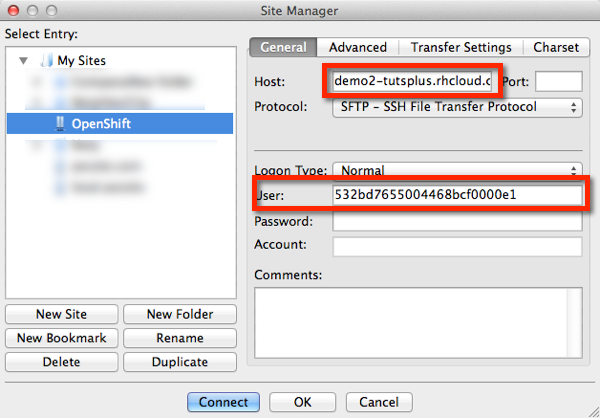
Save it. Next, we need to update our private key with FileZilla because we won't use password authentication on OpenShift. Open FileZilla Preference, Select SFTP->Add Key File then chose your private key that we generated together with public key in previous step. It should be in /Users/yourname/.ssh/id_rsa.
Note that since .ssh include a dot, Mac will hide it, so you can follow these tips to show hidden file in Mac.
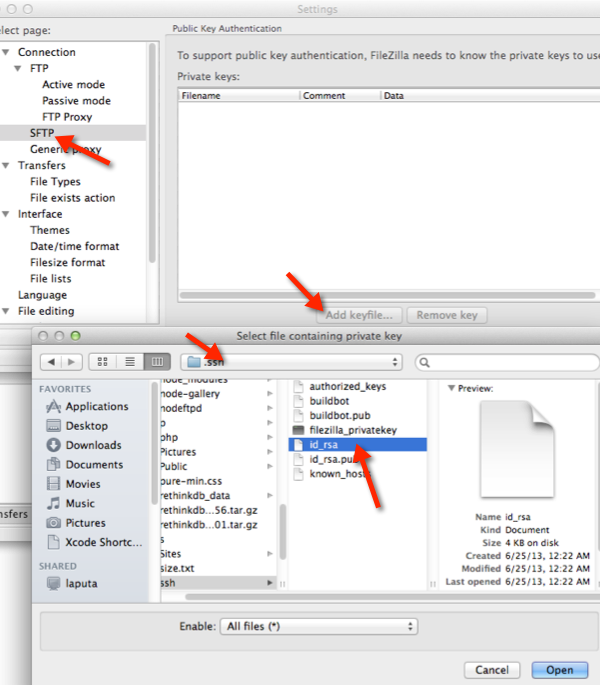
Answer yes when it asks for converting. Now, you can connect to the host we saved before.
Once you are in, you can navigate around and have a sense of folder layout. But make sure you don't manually remove delete WordPress code there a the right way for OpenShift deployment is to use its Git repository. You still can manually upload file, but you will lose other nice feature of OpenShift deployment.
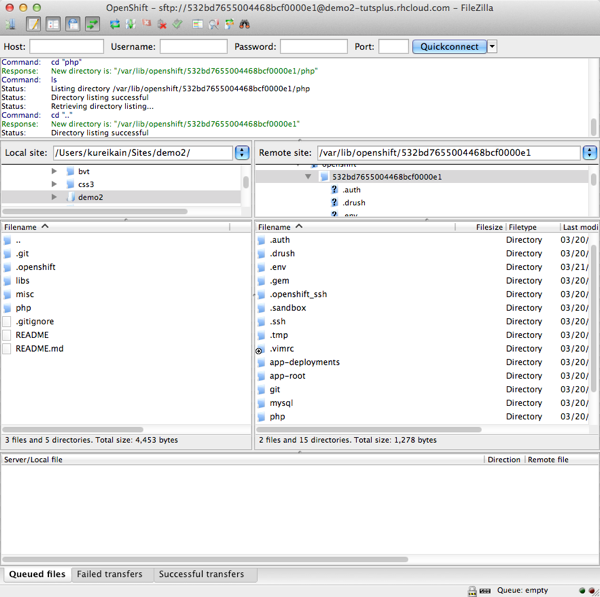
Using a GUI can be easy to see things comparing to use SSH on terminal but don't abuse this SFTP method, we should consider it as a quick way to verify if some files are there, not to use it for deployment. But you can use it to download (for backup purpose) media data in app-root/data/uploads.
If you are migrating from an existing WordPress installation, you can simply all file in your wp-content/uploads to app-root/data/current/wp-content/uploads
Theme and Plugin Installation and Customization
Themes and plugins can be uploaded and installed directly from the WordPress admin UI. They will be stored in app-root/data/plugin and app-root/data/theme. But since we used Git for deployment on OpenShift, we should check them in our Git repository and shouldn't upload directly from WordPress dashboard. You can put your theme, plugin in .openshift/themes and .openshift/plugin similarly to what is described in Step 2B.
To recap this post-installation section, I will say that if you are an end user who is not familiar with Git or terminal access, then you should use SFTP for uploading file, installing plugin/theme directly just like what you will do on a shared hosting.
If you are a WordPress developer, please use Git. In next part, we will learn more about the right way with OpenShift: deployment with Git push. And trust me, it's easier than it sounds.
Conclusion
At this point, you are able to run WordPress on OpenShift so you no longer require bills for hosting service. If your service start to get more traffic, you can add more gears to it.
In this tutorial, we almost did everything via the OpenShift dashboard, but the UI always has its limitations. OpenShift comes with a greater command line tool that we will learn in the next article. Specifically, we'll learn how to maintain and troubleshot our WordPress installation.
Leave comment to let us know how you are doing with OpenShift.


Comments