The WordPress Shortcode API was introduced to WordPress in Version 2.5. Since then, it has become a widely used method for allowing quick customisation of layout and inserting certain formatting snippets. But shortcodes can be equally useful when creating WordPress themes - here's how you can make full use of them!
Introduction
Shortcodes have many benefits if used properly in theme files. If you are familiar with preprocessor macros in C / C ++, then shortcodes can serve a somewhat similar function in WordPress. The basic purpose of using a shortcode is to replace the placeholder with your own custom piece of HTML code when the server sends the page to the client side. The steps involved in creation and implementation of shortcodes are as follows.
- Create a custom function for the shortcode. This function returns the HTML which will be replace the shortcode in the theme file.
- Add the shortcode to the system such that WordPress can recognize your shortcodes inserted in the theme files.
- Use the shortcodes in the theme file as needed.
In this Quick Tip, we are going to make use of shortcodes to display custom posts. I have given a detailed explanation about how to create custom post types and use blank themes at Nettuts+, but for this example, we will be modifying the default TwentyTen theme provided by WordPress.
Step 1.Writing the Shortcode Function
The function you create for your shortcode actually defines the purpose of the shortcode. A basic function can be defined in the following manner (you can add all the code at the bottom of your functions.php file):
// Defining the function used for displaying the Custom Project Post.
function project_shortcode( $atts ) {
	// Extracting the arguments for the shortcode.
	extract( shortcode_atts( array(
		'limit' => '10',
		'orderby' => 'date',
	), $atts ) );
	/* This is were we will write the code for fetching data
	 * and build the HTML structure to be returned in the $output variable
	 */
	$output = 'This will contain the final HTML output for your custom project loop.';
	return $output;
}
Just be sure not to leave any whitespace at the end of the functions.php file as it can cause a problem. Now let's add some code to fetch the custom post 'project' and build the HTML structure which will replace our shortcode.
function project_shortcode( $atts ) {
	extract( shortcode_atts( array(
		'limit' => '10',
		'orderby' => 'date',
	), $atts ) );
	// Creating custom query to fetch the project type custom post.
	$loop = new WP_Query(array('post_type' => 'project', 'posts_per_page' => $limit, 'orderby' => $orderby));
	// Looping through the posts and building the HTML structure.
	if($loop){
		while ($loop->have_posts()){
			 $loop->the_post();
			 $output .= '<div class="type-post hentry"><h2 class="entry-title"><a href="'.get_permalink().'">'.get_the_title().'</a></h2>';
			 $output .= '<div class="entry-content">'.get_the_excerpt().'</div></div>';
		}
	}
	else
		$output = 'Sorry, No projects yet. Come back Soon.';
	// Now we are returning the HTML code back to the place from where the shortcode was called.
	return $output;
}
The '$atts' are the attributes provided along with the shortcode. PHP's extract method is used to divide the array elements into variables so that they can be used directly within the function.
In this example, we are using the attributes passed in the function to create a custom query for fetching the "project" custom post data. Then we are looping through all the project posts returned.
Within the loop, we are fetching and appending the data to the output variable with the appropriate HTML tags. Once the loop is complete, the output variable contains the complete HTML code for our project list. This HTML code is returned and the shortcode used in the theme is replaced by this when the page loads.
Step 2. Adding the Shortcode to the Database
Now that we have created the function, we have to register it to the database along with the shortcode that will be used for it. We can do this with the
register_shortcode method provided by WordPress.
add_shortcode('projects','project_shortcode');
The first argument in this method is the name of the shortcode that we will use in the theme, and the second argument is the name of the function (which we defined above) relating to that shortcode. This is how WordPress will know what to do when that shortcode is parsed or encountered.
Step 3. Using the Registered Shortcode in the Theme
WordPress provides a shortcode parsing method which very few developers consider using all that often. The do_shortcode method can be used to insert shortcodes within theme files themselves.
The shortcode syntax is similar to what you would insert in the backend editor. In this case, we are passing the attributes for the limit of number of posts to be displayed, and how to order them. As we are displaying "project" custom posts, we will create a new dedicated page template and use the shortcode in that. Create a template named 'page-project.php' and use the following:
<?php
/*
Template Name: Project Page
*/
?>
<?php get_header(); ?>
		<div id="container">
			<div id="content" role="main">
				<?php echo do_shortcode('[projects limit=10 orderby=rand]'); ?>
			</div><!-- #content -->
		</div><!-- #container -->
<?php get_sidebar(); ?>
<?php get_footer(); ?>
Now to view the template you just created, create a page called 'Project'. Obviously create some demo "Project" posts as well!

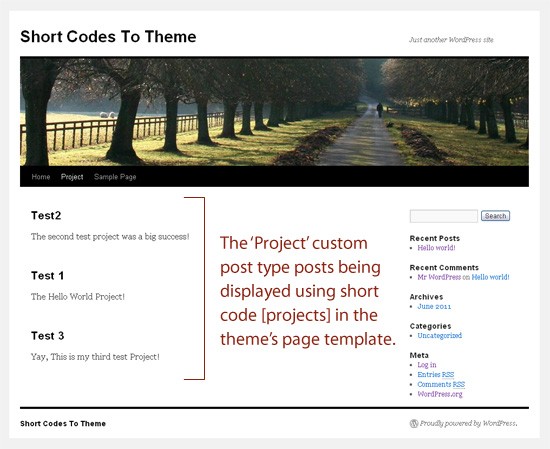
Voila! The short code is displaying the custom posts successfully.
Conclusion
As you can see, the above method of creating a shortcode for custom posts and using them in our theme helps us to keep the theme files manageable and clean. This also has an added benefit that anyone can insert the custom post loop from the WordPress backend editor as well.
The above example shows how we can use shortcodes during theme development in an efficient way. There are many innovative and productive ways to make use of shortcodes in WordPress themes - feel free to share your own ideas in the comments!


Comments