This tutorial will take a look at porting a Flash/Flex game to the Corona SDK. Specifically, we will be porting from ActionScript to Lua, with the end goal of playing formerly Flash-only games on the iPhone. In addition to demonstrating language and API differences, this tutorial series will also account for hardware restrictions such as screen size and lack of physical buttons on the iPhone.
This tutorial picks up where part one began.
Creating The Ship
Start out by porting the syntax from the source file "de/pixelate/flixelprimer/Ship.as" as described
in the day one post. Specifically, you'll need to:
- Get rid of package and class declarations.
- Remove type declarations.
- Add "local" to all variables.
- Replace the conditional brackets with "then" and "end".
- Delete all of the semicolons and comment everything out.
Now add the module declaration at the top of the file so we can import the file into PlayState.
Also, go ahead and wrap all of the code with a Ship() constructor function. Your code should now be arranged like this:
module(..., package.seeall)

function Ship()
	... all of the commented code goes here ...
end
We don't have flixel, so get rid of the import statement for it. Now look at the top lines of our
Ship() function:
function Ship()
	--[Embed(source="../../../../assets/png/Ship.png")] private var ImgShip:Class

	--[[
	function Ship() --:void
		super(50, 50, ImgShip)
	end
	--]]

	...
end
The first line loads the ship's image and stores it in the variable ImgShip. The next few lines are
the old constructor method. When the ship was created this function assigned it the image ImgShip and the coordinates (50, 50). We can do the same thing by creating a Ship variable that holds an image. We can load the image using the display module we used in lesson 1. Then we can set the variables x and y properties to 50. Replace the above lines to make the following:
function Ship()
	local Ship = display.newImage("Ship.png")

	Ship.x = 50
	Ship.y = 50

	... commented code ...
end
Now let's make our Ship() function return Ship so that our PlayState can use it.
function Ship()
	local Ship = display.newImage("Ship.png")

	Ship.x = 50
	Ship.y = 50

	... commented code ...

	return Ship
end
In our ActionScript source, a ship is created in PlayState by calling "new Ship()". While we're at
it, let's make a new() function that returns Ship().
function Ship()
	local Ship = display.newImage("Ship.png")

	Ship.x = 50
	Ship.y = 50

	... commented code ...

	return Ship
end

function new()
	return Ship()
end
Really, there is no technical need for this, but it does makes our code a little more readable.
Head back over to PlayState.lua, and require our Ship module at the top.
module(..., package.seeall)

local Ship = require("Ship")

function PlayState()
...
Now we can create a new ship. First, move all of the commented variable declarations from the top of the file to the create() function.
module(..., package.seeall)

local Ship = require("Ship")

function PlayState()
	local PlayState = {}

	... a whole bunch of commented code ...

	function create() --:void
		PlayState._inGame = true
		--local _ship
		--local _aliens
		--local _bullets
		--local _scoreText
		--local _gameOverText
		--local _spawnTimer
		--local _spawnInterval = 2.5

		PlayState._background = display.newRect(0, 0, display.contentWidth, display.contentHeight)
		PlayState._background:setFillColor(171, 204, 125)
		... commented create() logic ...
	end

	create()
end
Leaving them commented, make them properties of PlayState. Set the properties without a value to nil. While we are at it, we need to make a _background declaration.
...
PlayState._background = nil
--PlayState._ship = nil
--PlayState._aliens = nil
--PlayState._bullets = nil
--PlayState._scoreText = nil
--PlayState._gameOverText = nil
--PlayState._spawnTimer = nil
--PlayState._spawnInterval = 2.5
...
Uncomment the _ship variable's declaration and create a new ship like this:
function create() --:void
	-- variable declarations
	PlayState._inGame = true
	PlayState._background = nil
	PlayState._ship = nil
	--PlayState._aliens = nil
	--PlayState._bullets = nil
	--PlayState._scoreText = nil
	--PlayState._gameOverText = nil
	--PlayState._spawnTimer = nil
	--PlayState._spawnInterval = 2.5

	-- variable assignments
	PlayState._background = display.newRect(0, 0, display.contentWidth, display.contentHeight)
	PlayState._background:setFillColor(171, 204, 125)

	PlayState._ship = Ship.new()

	... commented create() logic ...
end
Note here that we assign _background first. This is because display objects in Corona are ordered
by when they are created. We wouldn't be able to see _ship if we created it before _background.
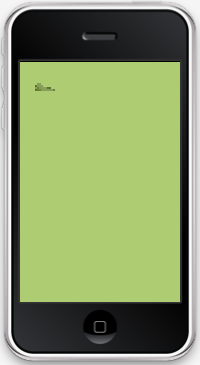
If you run the code, there is now a ship displayed at (50, 50).
A Look At Hardware Restrictions
We need to be able to move the ship in order to play, but how can we? The original game was made to be controlled by a keyboard. An iPhone does not have a keyboard. How can we get around this? This is one of the many factors that has to be taken into account when creating an app for a mobile device, whether you are porting existing code or creating an app from scratch. Another one that we are already dealing with is screen size. On a computer, programs come in many different sizes. Most of them are even resizable. On an iPhone, apps are all the same size.
Solving these problems can be challenging. Getting around these restrictions requires thinking
outside of the box. For example, we could control our ship with on-screen buttons. We could also tap the location on the screen that we want the ship to move to. We could even use the device's
accelerometer to control the ship based on the device's tilt. Maybe we change the gameplay a bit and make the ship control itself. Then the player would just be in charge of the shooting. As you can see, there are a lot of possibilites for new styles of gameplay on the iPhone.
Creating Virtual Buttons
As neat as many of those ideas were, we are going to create on-screen buttons to control the ship. This way, the game will be most in line with the original. I leave those other options for you to explore.
Ansca Mobile has created an open-source library for creating virtual buttons. Instead of
building the library into Corona, they have included it on their website as optional. I have
included the newest version as of this writing in the source code for this tutorial. Add the
"ui.lua" file to your project folder.
Head over to your Ship.lua file so we can do some setting up. Let's add a few properties to our Ship variable. Just below the code where we set the ship's coordinates to (50, 50) add this:
...
local Ship = display.newImage("Ship.png")

Ship.x = 50
Ship.y = 50

Ship._up = false
Ship._down = false
Ship._left = false
Ship._right = false
...
We are going to use these to tell the ship when to move. If the values change to true, it means that the respective buttons are being pressed.
Back in PlayState.lua, we need to create a new function to handle creating buttons. We are going to handle this outside of PlayState() because it is going to get a little messy. Before we move on,
make sure you have all of the button images from the source included with this tutorial. Now, create a buttonHandler() function below PlayState().
...
function PlayState()
...
end

function buttonHandler(PlayState)

end
Notice that buttonHandler() takes an argument: PlayState. This is because we are creating
buttonHandler() outside of the PlayState() function. If you recall from the first lesson, this means
that buttonHandler() has no idea what the PlayState variable is, because PlayState is local to the
PlayState() function. We will be calling buttonHandler() from inside PlayState(). By passing
PlayState to buttonHandler(), we are allowing buttonHandler() to see and modify all of PlayState and its properties. Since _ship is a property of PlayState, buttonHandler() will be able to set
_ship_up, _ship._down, etc.
We are going to import the ui.lua module into our buttonHandler function instead of at the top of
PlayState.lua. You will see why later.
...
function PlayState()
...
end

function buttonHandler(PlayState)
	local ui = require("ui")
end
Now it is going to get a little messy. We are going to create two functions for every button. One
for when the button is pressed, and one for when the button is released. When these are called, they will set the ship's properties to true or false.
function buttonHandler(PlayState)
	local ui = require("ui")

	function upPressed()
		PlayState._ship._up = true
	end

	function upReleased()
		PlayState._ship._up = false
	end

	function downPressed()
		PlayState._ship._down = true
	end

	function downReleased()
		PlayState._ship._down = false
	end

	function leftPressed()
		PlayState._ship._left = true
	end

	function leftReleased()
		PlayState._ship._left = false
	end

	function rightPressed()
		PlayState._ship._right = true
	end

	function rightReleased()
		PlayState._ship._right = false
	end
end
Because we are passing PlayState to buttonHandler(), and _ship and all of it's properties belong to
PlayState, we can change them from true to false and vice-versa. Now we need to create the actual buttons. With the ui module imported, we can use one of its methods: newButton. This has some interesting syntax, so hang tight.
PlayState._upButton = ui.newButton {
	defaultSrc = "up.png" , defaultX = "50" , defaultY = "50",
	overSrc = "up.png" , overX = "50" , overY = "50",
	onPress = upPressed,
	onRelease = upReleased,
	id = "_upButton"
}
This code calls newButton and assigns the result to _upButton (a property of PlayState). At first,
you may be wondering why there are brackets. This is not an exception to the rules of lua syntax.
Actually, the brackets are holding an array of parameters that are passed to the newButton method. There are a lot of parameters here, so let's go over them one at a time. The first, defaultSrc is the location of the image to use when the button is not pressed. defaultX and defaultY are the image's dimensions. overSrc is the location of the image to be displayed when the button is pressed. In this case, we are going to use the same image. overX and overY work just like defaultX and defaultY, but they are the dimensions for overSrc. onPress is the function to call when the button is pressed. This is one of the functions we made earlier. onRelease is the same as onPress, but it is called upon the button's release. id is a named string to tell this button apart from others. Each button has a x and a y property just like other display objects that can be adjusted at any time.
Now that we know how buttons work, let's make the rest of them. Add this to the bottom of
buttonHandler():
function buttonHandler()
...

	PlayState._upButton = ui.newButton {
		defaultSrc = "up.png" , defaultX = "50" , defaultY = "50",
		overSrc = "up.png" , overX = "50" , overY = "50",
		onPress = upPressed,
		onRelease = upReleased,
		id = "_upButton"
	}

	PlayState._upButton.x = display.contentWidth - 100
	PlayState._upButton.y = display.contentHeight - 100

	PlayState._downButton = ui.newButton {
		defaultSrc = "down.png" , defaultX = "50" , defaultY = "50",
		overSrc = "down.png" , overX = "50" , overY = "50",
		onPress = downPressed,
		onRelease = downReleased,
		id = "_downButton"
	}

	PlayState._downButton.x = display.contentWidth - 100
	PlayState._downButton.y = display.contentHeight - 50

	PlayState._leftButton = ui.newButton {
		defaultSrc = "left.png" , defaultX = "50" , defaultY = "50",
		overSrc = "left.png" , overX = "50" , overY = "50",
		onPress = leftPressed,
		onRelease = leftReleased,
		id = "_leftButton"
	}

	PlayState._leftButton.x = display.contentWidth - 150
	PlayState._leftButton.y = display.contentHeight - 75

	PlayState._rightButton = ui.newButton {
		defaultSrc = "right.png" , defaultX = "50" , defaultY = "50",
		overSrc = "right.png" , overX = "50" , overY = "50",
		onPress = rightPressed,
		onRelease = rightReleased,
		id = "_rightButton"
	}

	PlayState._rightButton.x = display.contentWidth - 50
	PlayState._rightButton.y = display.contentHeight - 75
end
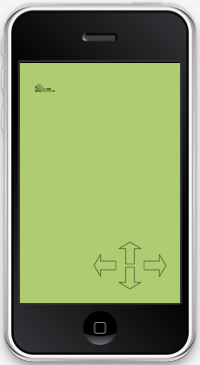
If we add a call to buttonHandler() in the create() function of PlayState(), we will have four
arrows positioned at the bottom right of the screen.
function PlayState()

...

	function create()
	...

	PlayState._ship = Ship.new()

	buttonHandler(PlayState)

	...
end
The Game Loop
Now we need to create a loop to handle the gameplay. In the original code, the update() function was used for this purpose. We will do the same with our code. Just like we did with the create() funciton, uncomment the update() function and put single line comments before all of the inside lines.
function update() --:void
	--FlxU.overlap(_aliens, _bullets, overlapAlienBullet)
	--FlxU.overlap(_aliens, _ship, overlapAlienShip)

	--if(FlxG.keys.justPressed("SPACE") and _ship.dead == false) then
	--	spawnBullet(_ship.getBulletSpawnPosition())
	--end

	--if(FlxG.keys.ENTER and _ship.dead) then
	--	FlxG.state = new PlayState();
	--end

	--_spawnTimer = _spawnTimer - FlxG.elapsed

	--if(_spawnTimer < 0) then
	--	spawnAlien()
	--	resetSpawnTimer()
	--end

	--super.update()
end
Listening For Events
In order to get the update() function called repeatedly like in flixel, we need to add an event
listener. This line of code will set update() to be called every new frame. Add it in the create()
function.
function create() --:void
	...

	buttonHandler(PlayState)

	Runtime:addEventListener( "enterFrame", update )

	...
end
Checking If The Game Is Over
Let's check if the game is still running before we let the game loop go. Remember this variable
"PlayState._inGame"? We are going to use it to check if the game is over. So surround the commented update() code with this statement.
function update() --:void
	if PlayState._inGame then

		... commented code ...

	end
end
Handling Ship Movement
In order to make the ship move, we need to get Ship.lua's update() function working. Like before, change the comments so that the function declaration is no longer commented, but everything else is. Add the same event listener right before the end of Ship().
function Ship()

	...

	Runtime:addEventListener( "enterFrame", update )

	return Ship
end
We also need to check that the variable "Ship" exists, and that it is not nil. Wrap the commented
code with this if statement.
function update()
	if Ship then
		... commented code ...
	end
end
Now, let's start working through the commented lines. The first two set the ship's velocity to 0.
Corona doesn't have velocity like flixel does, so we will end up working with the ship's x and y
directly. The next eight lines check if the left or right arrow keys are pushed on the keyboard. We
can replace this with checks for the variables _left, and _right. Since we do not have velocity to
work with, we will just set the ship's x value to plus or minus 5.
if(Ship._left) then
	Ship.x = Ship.x - 5
elseif(Ship._right) then
	Ship.x = Ship.x + 5
end
Same goes for up and down.
if(Ship._up) then
	Ship.y = Ship.y - 5
elseif(Ship._down) then
	Ship.y = Ship.y + 5
end
You can delete "super.update()"
Keeping The Game In A Boundary
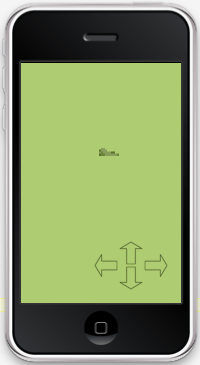
If you were to run the game now, the ship would move around properly. The problem is, it will fly
right off the screen or into the controls if we let it. The original game had this problem too. So,
the next lines of code in the update() function keep the ship from leaving a boundary. It
accomplishes this by checking if the ship is outside the boundary after all of it's x and y changes
are through. If the ship is outside, it gets moved back to the maximum value allowed. We will do the same thing, and we can use the same display.contentWidth and contentHeight as with the background to find the screen size.
if(Ship.x > display.contentWidth-Ship.contentWidth-16) then
	Ship.x = display.contentWidth-Ship.contentWidth-16
elseif(Ship.x < Ship.contentWidth+16) then
	Ship.x = Ship.contentWidth+16
end

if(Ship.y > display.contentHeight-Ship.contentHeight-150) then
	Ship.y = display.contentHeight-Ship.contentHeight-150
elseif(Ship.y < Ship.contentHeight+16) then
	Ship.y = Ship.contentHeight+16
end
I changed the numbers a little bit so the ship wouldn't overlap the buttons.
Bullets And Display Groups
Now we need to make our ship shoot. Let's have a look at "de/pixelate/flixelprimer/Bullet.as". Go
through the normal syntax converting process. Fortunately this one is really easy. Delete everything but the Bullet() constructor. Add the module declaration, and save it as Bullet.lua in your project folder.
We now have a Bullet() function that takes an X and a Y value. It creates a green rectangle at those
coordinates, and it sets its velocity to 1000.
Let's create the rectangle that acts as the bullet the same way we made the background in the first
lesson.
module(..., package.seeall)

function Bullet(x, y) --:void
	local Bullet = display.newRect(x, y, 16, 4)

	--super(x, y)
	--createGraphic(16, 4, 0xFF597137)
	--velocity.x = 1000
end
This code creates a 16 by 4 pixel square and sets its X and Y coordinates to the numbers passed to Bullet(x, y). Now let's change the bullet's fill color. #587137 converted to RGB is (89, 113, 55).
module(..., package.seeall)

function Bullet(x, y) --:void
	local Bullet = display.newRect(x, y, 16, 4)
	Bullet:setFillColor(89, 113, 55)

	--velocity.x = 1000
end
Let's add a new() function for convenience like we did with Ship.lua.
module(..., package.seeall)

function Bullet(x, y) --:void
	local Bullet = display.newRect(x, y, 16, 4)
	Bullet:setFillColor(89, 113, 55)

	--velocity.x = 1000

	return Bullet
end

function new(x, y)
	return Bullet(x, y)
end
That code just accepts an X and a Y value and returns a new bullet at that location. Make sure to
add "return Bullet" at the end of Bullet() so PlayState will be able to use it.
Now we need to recreate the velocity. Let's create an update() function like we did for the ship.
...
function Bullet(x, y) --:void
	local Bullet = display.newRect(x, y, 16, 4)
	Bullet:setFillColor(89, 113, 55)

	function update()
		if Bullet then
			Bullet.x = Bullet.x + 10
		end
	end

	Runtime:addEventListener( "enterFrame", update )

	return Bullet
end
...
Now the bullet will move ten pixels to the right every frame.
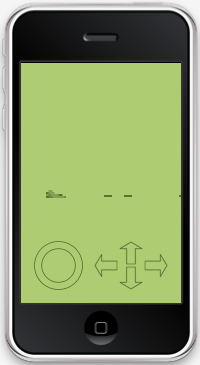
Refactoring Button Code: Adding A Fire Button
Now, we are going to need some method to fire the bullets. Let's add another button. First, we need a variable to keep track if the button is pressed or not. Instead of handling this in the Ship.lua file, lets make this variable in the create() function in PlayState.lua at the bottom of the
variable declarations.
...
function create() --:void
	-- variable declarations
	PlayState._inGame = true
	PlayState._background = nil
	PlayState._ship = nil
	--PlayState._aliens = nil
	--PlayState._bullets = nil
	--PlayState._scoreText = nil
	--PlayState._gameOverText = nil
	--PlayState._spawnTimer = nil
	--PlayState._spawnInterval = 2.5
	PlayState._shoot = nil

	...
end
...
Go ahead and set it to false below the new ship line in the variable assignments.
...
function create() --:void
	...

	-- variable assignments
	PlayState._background = display.newRect(0, 0, display.contentWidth, display.contentHeight)
	PlayState._background:setFillColor(171, 204, 125)

	PlayState._ship = Ship.new()

	PlayState._shoot = false

	...
end
...
Now we need to add a few lines to our buttonHandler() function. We need two more functions to handle pressing and releasing the new button. Add these two functions after rightPressed() and
rightReleased().
...
function buttonHandler(PlayState)
	...

	function leftPressed()
		PlayState._ship._left = true
	end

	function leftReleased()
		PlayState._ship._left = false
	end

	function rightPressed()
		PlayState._ship._right = true
	end

	function rightReleased()
		PlayState._ship._right = false
	end

	function shootPressed()
		PlayState._shoot = true
	end

	function shootReleased()
		PlayState._shoot = false
	end

	...
end
...
Now load the button like before.
...
function buttonHandler(PlayState)
	...

	PlayState._shootButton = ui.newButton {
		defaultSrc = "shoot.png" , defaultX = "100" , defaultY = "100",
		overSrc = "shoot.png" , overX = "100" , overY = "100",
		onRelease = shootReleased,
		onPress = shootPressed,
		id = "_shootButton"
	}

	PlayState._shootButton.x = 75
	PlayState._shootButton.y = display.contentHeight - 75
end
...
Our button code is getting a little messy. Let's move all of buttonHandler() to a new file called
Buttons.lua. Don't forget the module decleration.
Import the new Button module at the top of PlayState. While we're there let's import Bullet too.
module(..., package.seeall)

local Ship    = require("Ship")
local Bullet  = require("Bullet")
local Buttons = require("Buttons")

function PlayState()
...
Modify the buttonHandler() line in create() to call the module's function.
function create() --:void
	...

	PlayState._ship = Ship.new()

	PlayState._shoot = false

	Buttons.buttonHandler(PlayState)

	...
end
Placing Bullets Relative To Ship
Now we need recreate some of the bullet handling functions. Let's look at getBulletSpawnPosition()
in Ship.lua.
--[[
function getBulletSpawnPosition() --:FlxPoint
	local p = new FlxPoint(x + 36, y + 12)
	return p
end
--]]
The original function was an instance method of ship. It returned an X and a Y value to create a new bullet. Since it is supposed to be an instance method, we need to make it work like one. Let's make the Ship variable own it.
function Ship:getBulletSpawnPosition() --:FlxPoint
	local p = new FlxPoint(x + 36, y + 12)
	return p
end
Since FlxPoint is a type exclusive to Flixel, let's return an array instead.
function Ship:getBulletSpawnPosition()
	local p = {x=Ship.x + 36, y=Ship.y + 2}
	return p
end
This code adds 36 to the ship's X value and 2 (I used 2 instead of 12 to adjust the bullet's
position for Corona) to the ship's Y value. These are stored in an associative array. We now can
access each number with p.x and p.y.
In the original code, a variable in the PlayState named _bullets held all of the bullet instances.
We can do the same thing with a display group. A display group in Corona simply holds a bunch of display objects and displays them. This is useful to keep track of a bunch of the same kind of
object. When objects are added to display groups, they are displayed in the order that the display
groups are created. For example, if we have a bunch of bullets and a bunch of aliens, and we want all of the aliens to be on top, we could create a bullet display group and then an alien display group. If we add all of the bullet and alien instances to their groups, they will always display in the right order. This will happen even if, say, a bullet is created after an alien. The alien will be on top because the display group controls the display order.
Uncomment the line "--PlayState._bullets = nil" in the create() function in PlayState.lua.
function create() --:void
	-- variable declarations
	PlayState._inGame = true
	PlayState._background = nil
	PlayState._ship = nil
	--PlayState._aliens = nil
	PlayState._bullets = nil
	--PlayState._scoreText = nil
	--PlayState._gameOverText = nil
	--PlayState._spawnTimer = nil
	--PlayState._spawnInterval = 2.5
	PlayState._shoot = nil

	...
end
Make _bullets a new display group in the variable assignments.
function create() --:void
	...

	PlayState._ship = Ship.new()

	PlayState._shoot = false

	PlayState._bullets = display.newGroup()

	Buttons.buttonHandler(PlayState)

	...
end
Now take a look at spawnBullet().
--[[
function spawnBullet(p) --:void
	local bullet = new Bullet(p.x, p.y)
	_bullets.add(bullet)
	FlxG.play(SoundBullet)
end
--]]
This code is actually pretty close to what we want. Make it look like this:
function spawnBullet(p) --:void
	local _bullet = Bullet.new(p.x, p.y)
	PlayState._bullets:insert(_bullet)
	PlayState._shoot = false
	--FlxG.play(SoundBullet)
end
When the bullet is created, _shoot needs to be set back to false. That way, the user has to lift
their finger before they fire again.
Handling Basic Sounds
Corona has a basic API for playing short sound effects. In order to use it, we must use .caf sound
files. The converted version of the original MP3 sound effects is included in the source for this
tutorial.
First we need to create variables to hold the sounds. There are three lines at the top of PlayState.
Move them to the variable declarations in create().
function create() --:void
	-- variable declarations
	PlayState._inGame = true
	PlayState._background = nil
	PlayState._ship = nil
	--PlayState._aliens = nil
	PlayState._bullets = nil
	--PlayState._scoreText = nil
	--PlayState._gameOverText = nil
	--PlayState._spawnTimer = nil
	--PlayState._spawnInterval = 2.5
	PlayState._shoot = nil
	--[Embed(source="../../../../assets/mp3/ExplosionShip.mp3")] private var SoundExplosionShip:Class
	--[Embed(source="../../../../assets/mp3/ExplosionAlien.mp3")] private var SoundExplosionAlien:Class
	--[Embed(source="../../../../assets/mp3/Bullet.mp3")] private var SoundBullet:Class

	...
end
We just want the names to be the same. Make them properties of PlayState and set them to nil.
Uncomment the last line.
function create() --:void
	-- variable declarations
	PlayState._inGame = true
	PlayState._background = nil
	PlayState._ship = nil
	--PlayState._aliens = nil
	PlayState._bullets = nil
	--PlayState._scoreText = nil
	--PlayState._gameOverText = nil
	--PlayState._spawnTimer = nil
	--PlayState._spawnInterval = 2.5
	PlayState._shoot = nil
	--PlayState.SoundExplosionShip = nil
	--PlayState.SoundExplosionAlien:Class = nil
	PlayState.SoundBullet = nil

	...
end
Now we will use the media module to load a new sound. Put this at the bottom of the assignments:
function create() --:void
	...

	PlayState._ship = Ship.new()

	PlayState._shoot = false

	PlayState._bullets = display.newGroup()

	PlayState.SoundBullet = media.newEventSound( "Bullet.caf" )

	Buttons.buttonHandler(PlayState)

	...
end
Heading back to spawnBullet(). We can replace the last line to play our new sound.
function spawnBullet(p) --:void
	local _bullet = Bullet.new(p.x, p.y)
	PlayState._bullets:insert(_bullet)
	PlayState._shoot = false
	media.playEventSound( PlayState.SoundBullet )
end
Now we just have to modify our update() function to get some shooting bullets. Check if _shoot is
true and if _ship exists. If so, call our getBulletSpawnPosition() instance method for our ship
and spawnBullet() at that location.
function update()
	if PlayState._inGame then
		if PlayState._shoot == true and PlayState._ship then
			local p = PlayState._ship:getBulletSpawnPosition()
			spawnBullet(p)
		end

		...
	end
end
Basic Memory Management
In Flixel, memory was taken care of for us. In Corona, we are going to have to clean up objects we
are done with. Let's add a kill() instance method to each bullet to help us out. kill() is the
function that flixel automatically calls when an object is no longer needed. Add this to Bullet.lua:
function Bullet(x, y)
	...

	function update()
		...
	end

	function Bullet:kill()
		Bullet.parent:remove( Bullet )
		Bullet = nil
	end

	...
end
This is the proper way to clean up an object in Corona. First, we removed all ties to it by removing
it from the display group. Then we set Bullet variable to nil. Let's do the same thing for Ship.
Add this below getBulletSpawnPosition() in Ship.lua:
function Ship:kill()
	Ship:removeSelf()
	Ship = nil
	Runtime:removeEventListener( "enterFrame", update )
end
Notice that we stopped the update from being called every frame (since the ship doesn't exist
anymore).
Handling Off-Screen Bullets
Back in Bullet.lua, let's add a check every frame to see if the bullet is outside of the display.
Currently, our code continues to draw bullets even while they cannot be seen. This is a waste of the device's limited resources. Replace update() with this:
function update()
	if Bullet then
		if (Bullet.x < display.contentWidth) then
			Bullet.x = Bullet.x + 10
		else
			Bullet:kill()
		end
	end
end
Now, the bullet will only move to the right if it can be seen. Otherwise, it will call our handy
kill() function.
Garbage Collecting
Lua has a automatic garbage collecter that handles trash like unused variables, display objects that have been removed from the display, and anything else that is no longer needed. We can tell Lua to collect garbage by adding this line at the end of create in our PlayState:
function create()
	...

	collectgarbage("collect")
end
Conclusion
This is starting to look like a game now. Our ship can move around on screen and fire bullets. The
bullets take care of themselves when they are no longer needed. Now we just need some enemies.

Comments