In the last part of the tutorial we learned how to use the TGM Plugin Activation class to require the Envato WordPress Toolkit Plugin whenever our theme is in use. The plugin allows the user to install and update purchased themes within the admin.
This next part will teach you how to implement the Envato WordPress Toolkit Library so we can periodically check when our theme has an update available using the Envato Marketplace API.
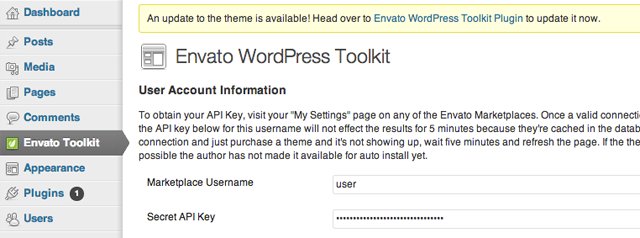
When an update becomes available, we'll display a notice in the admin and direct the user to the plugin for updating.
1. Including the Toolkit Library
We'll first need to include the Toolkit Library in our project. Download the Envato WordPress Toolkit Library ZIP file. Unzip it and copy the folder envato-wordpress-toolkit-library into the inc folder in your theme. You should end up with these paths:
- mytheme/inc/envato-wordpress-toolkit-library/class-envato-protected-api.php
- mytheme/inc/envato-wordpress-toolkit-library/class-envato-wordpress-theme-upgrader.php
Note: You can change the location of the files above to suit your needs. Alternatively, you can download the full source from the download link on the top of this article.
2. Admin Hook Function
Now we can start coding. We'll hook into the admin_init action. Add the following code into your functions.php:
/**
 * Load the Envato WordPress Toolkit Library check for updates
 * and direct the user to the Toolkit Plugin if there is one
 */
function envato_toolkit_admin_init() {

    // Include the Toolkit Library
    include_once( get_template_directory() . '/inc/envato-wordpress-toolkit-library/class-envato-wordpress-theme-upgrader.php' );

    // Add further code here

}
add_action( 'admin_init', 'envato_toolkit_admin_init' );
3. Using the Toolkit Plugin Info
The Toolkit Library needs an Envato username and API key for it to work. Since we've required the Toolkit Plugin in the previous tutorial, we can use the inputted values for the username and API key fields found in its settings. If these fields aren't filled up, we can display a notice asking the user to enter them in the Toolkit Plugin.
// Use credentials used in toolkit plugin so that we don't have to show our own forms anymore
$credentials = get_option( 'envato-wordpress-toolkit' );
if ( empty( $credentials['user_name'] ) || empty( $credentials['api_key'] ) ) {
    add_action( 'admin_notices', 'envato_toolkit_credentials_admin_notices' );
    return;
}
We'll need to add the corresponding hook function outside to display our admin notice:
/**
 * Display a notice in the admin to remind the user to enter their credentials
 */
function envato_toolkit_credentials_admin_notices() {
    $message = sprintf( __( "To enable theme update notifications, please enter your Envato Marketplace credentials in the %s", "default" ),
        "<a href='" . admin_url() . "admin.php?page=envato-wordpress-toolkit'>Envato WordPress Toolkit Plugin</a>" );
    echo "<div id='message' class='updated below-h2'><p>{$message}</p></div>";
}
4. Periodically Update Checking
The Toolkit Library always checks using the Envato Marketplace API for theme updates. This isn't good since performing it every time the user visits an admin page can slow down page loading times significantly. We only need to check for an update periodically.
Checking every 3 hours sounds like a good idea:
// Check updates only after a while
$lastCheck = get_option( 'toolkit-last-toolkit-check' );
if ( false === $lastCheck ) {
    update_option( 'toolkit-last-toolkit-check', time() );
    return;
}

// Check for an update every 3 hours
if ( 10800 < ( time() - $lastCheck ) ) {
    return;
}

// Update the time we last checked
update_option( 'toolkit-last-toolkit-check', time() );
5. Checking for Updates
Finally, we can check for updates using the library:
// Check for updates
$upgrader = new Envato_WordPress_Theme_Upgrader( $credentials['user_name'], $credentials['api_key'] );
$updates = $upgrader->check_for_theme_update();

// If $updates->updated_themes_count == true then we have an update!
6. Theme Update Notice
From this moment you can opt to automatically update the theme by using the Toolkit Library function $upgrader->upgrade_theme(); however, I believe that giving users a choice is often a good idea.
My suggestion is to just display a notice of a theme update, and allow the user to update using the Toolkit Plugin:
// Add update alert, to update the theme
if ( $updates->updated_themes_count ) {
    add_action( 'admin_notices', 'envato_toolkit_admin_notices' );
}
We'll need to display the function that displays the notice outside our current function:
/**
 * Display a notice in the admin that an update is available
 */
function envato_toolkit_admin_notices() {
    $message = sprintf( __( "An update to the theme is available! Head over to %s to update it now.", "default" ),
        "<a href='" . admin_url() . "admin.php?page=envato-wordpress-toolkit'>Envato WordPress Toolkit Plugin</a>" );
    echo "<div id='message' class='updated below-h2'><p>{$message}</p></div>";
}
Why Use the Plugin in the First Place?
You may be thinking that it is also possible to just use the Toolkit Library and not use the Toolkit Plugin at all, then maybe just display our own username and API key forms in our theme options instead.
While that is entirely possible to do, using the plugin gives us a few benefits:
- In fresh theme activations, our theme would automatically check for updates if the Toolkit Plugin was already previously installed.
- We don't need to include an additional set of forms for our users to fill up.
- The Toolkit Plugin can be updated by the users themselves, hence changes in the Marketplace API can be applied to the WordPress instance without any theme guidance.
Conclusion
That's it! We've integrated both the Envato WordPress Toolkit Plugin and Library for theme update checking. Now, once an update becomes available in the Marketplace, our customers would get an admin notification. The best thing with what we've done is that they can easily perform the update without leaving the admin.
You can go ahead and download the full source from the link above the article. The code also contains the covered topics in the previous part of this tutorial.
As this is my very first tutorial series, I highly appreciate any feedback, comments and suggestions. Let me know what you think!

Comments