We've previously covered how to set up New Relic for a Rails app, as well as spent a lot of time looking at how to use the New Relic UI. And while the UI is very similar regardless of the language and framework you're using, actually getting New Relic set up can be radically different. Today, we will look at how to monitor a PHP application using New Relic. More specifically, we will set up a basic WordPress installation and get some performance data about it, in the New Relic dashboards.
Getting New Relic set up for Ruby is very much environment agnostic. We simply add the agent gem to our application at which point no matter how we deploy our app (Passenger + Apache, Thin + Nginx etc.), the gem will do the rest of the work to ensure we get our performance metrics. With the PHP version of the agent, the environment is a lot more important, as the agent is installed and lives on the box where the application will be deployed, rather than being part of any particular app.
Let's set up a sandbox for us to play with (using an EC2 instance) and get a basic WordPress install up and running.
Setting Up Our Sandbox
We won't go into too much detail here as most of the things we need to do are well-documented elsewhere. But, here is a basic outline.
We need to launch an EC2 instance with Ubuntu Server 12.04 LTS on it. If you don't want to set up an EC2 instance, you can just create a virtual machine instead using VirtualBox (or your VM tool of choice). If you're setting up an EC2 instance, you need to remember to do the following:
- download your key (if you've created a new one during the set up process), so that you can SSH into your instance
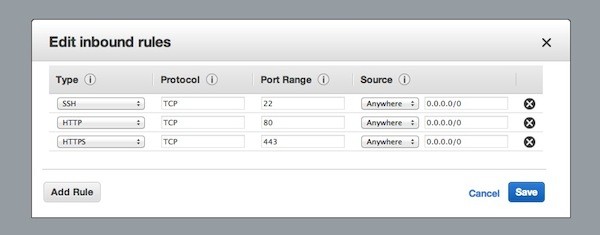
- add an extra rule to any security group you give to your instance to allow HTTP connections to the instance (so that we can actually access our WordPress blog via the browser later on)
Aside from that, everything else should be pretty straight forward and you should end up with a running instance (or virtual machine) that's ready for the next step.
We now need to install Apache, PHP and MySQL. With Ubuntu Server, it should be a simple matter of running the following commands:
sudo apt-get install tasksel
sudo tasksel install lamp-server
You will need to select LAMP in the UI and you will also need to enter your MySQL password when prompted to do so (I just leave it blank since we don't care about this box being secure in any way). Once the installation is complete, we can then run a few commands to make sure that everything installed without trouble.
First check that Apache is installed:
ubuntu@ip-10-145-246-196:~$ apache2 -V
Server version: Apache/2.2.22 (Ubuntu)
Server built:   Jul 12 2013 13:37:10
Server's Module Magic Number: 20051115:30
Server loaded:  APR 1.4.6, APR-Util 1.3.12
Compiled using: APR 1.4.6, APR-Util 1.3.12
Architecture:   64-bit
Server MPM:     Prefork
  threaded:     no
    forked:     yes (variable process count)
...
Secondly, check that we have PHP:
ubuntu@ip-10-145-246-196:~$ php -i
phpinfo()
PHP Version => 5.3.10-1ubuntu3.10

System => Linux ip-10-145-246-196 3.2.0-58-virtual #88-Ubuntu SMP Tue Dec 3 17:58:13 UTC 2013 x86_64
Build Date => Feb 28 2014 23:13:16
Server API => Command Line Interface
Virtual Directory Support => disabled
Configuration File (php.ini) Path => /etc/php5/cli
Loaded Configuration File => /etc/php5/cli/php.ini
...
And then check that we have MySQL:
ubuntu@ip-10-145-246-196:~$ mysql --version
mysql  Ver 14.14 Distrib 5.5.35, for debian-linux-gnu (x86_64) using readline 6.2
We may also need to check that PHP is actually enabled in our Apache config, but since we installed lamp-server using tasksel we can be pretty sure that it is (and we can always do a quick phpinfo() script if we really want to check).
We can now install WordPress. Before we actually download it, we need to set up a database for it so. We can just follow the instructions from the Codex:
ubuntu@ip-10-145-246-196:~$ mysql
Welcome to the MySQL monitor.  Commands end with ; or \g.
Your MySQL connection id is 103
Server version: 5.5.35-0ubuntu0.12.04.2 (Ubuntu)

Type 'help;' or '\h' for help. Type '\c' to clear the current input statement.

mysql> CREATE DATABASE myblog1;
Query OK, 1 row affected (0.00 sec)

mysql> GRANT ALL PRIVILEGES ON myblog1.* TO "myblog1_user"@"localhost" IDENTIFIED BY "abc123";
Query OK, 0 rows affected (0.00 sec)

mysql> FLUSH PRIVILEGES;
Query OK, 0 rows affected (0.01 sec)

mysql> EXIT
Bye
I am going to call our new installation myblog1 (so the database for it is also named myblog1). We now need to run the following commands to get our blog running (don't forget to sudo when necessary):
cd /var/www
wget http://wordpress.org/latest.tar.gz
tar -xzvf latest.tar.gz
mv wordpress myblog1
cd myblog1
mv wp-config-sample.php wp-config.php
Now fill in your database name, username and password into the config file (the hostname is localhost which is there by default). At this point you should be able to go to your browser, hit the right URL (in my case http://ec2-107-20-122-116.compute-1.amazonaws.com/myblog1) and WordPress will do its thing (it might not hurt to restart Apache before doing this sudo apache2 service restart).
Our sandbox is now complete and we can get started with installing New Relic.
Installing New Relic
As I mentioned previously, the PHP New Relic agent resides on the box, it therefore makes sense that you can install it using the operating system's package manager (apt-get since we're using Ubuntu). The first thing to do is to import the New Relic repository key:
wget -O - https://download.newrelic.com/548C16BF.gpg | sudo apt-key add -
Now we add the New Relic repository itself to the system:
sudo sh -c 'echo "deb http://apt.newrelic.com/debian/ newrelic non-free" > /etc/apt/sources.list.d/newrelic.list'
At this point, we can use standard apt commands to install the agent:
sudo apt-get update
sudo apt-get install newrelic-php5
This fetches the PHP agent package from the repository and puts the agent install script on the system. The script is called newrelic-install and it lives in /usr/bin, so you should be able to run in from anywhere. The script is also somewhat unfortunately named, as you can use it to both install and uninstall New Relic from your system. In order to install New Relic, we need to run:
newrelic-install install
The script is interactive and will ask you to input your license key. You can find this by pressing the big red button when you're setting up a new PHP application within the New Relic UI.

If you have more than one PHP installation on your system, it will also ask you to pick which installation New Relic should be installed for (you can pick any number of installations including all of them). If you only have the one PHP on your system, the script will just use that one. It's worth noting that if your version of PHP is older than 5.2, the script will bail out as older versions are not supported.
If everything goes well, you should see the following message:
New Relic is now installed on your system. Congratulations!
The script will then print out some extra information for you including the location of the log files:
/var/log/newrelic/newrelic-daemon.log
/var/log/newrelic/php_agent.log
As well as the fact that you need to restart your web server (and PHP-FPM if you're using it).
If you do restart your server and tail the daemon log, you should see something like this:
ubuntu@ip-10-145-246-196:/var/www/myblog1$ cat /var/log/newrelic/newrelic-daemon.log
2014-03-23 05:30:41.063 (2008/main) warning: current file limit of 1024 is too low - attempting to increase it
2014-03-23 05:30:41.064 (2008/main) info: increased file limit to 2048
2014-03-23 05:30:41.064 (2008/main) info: New Relic 4.6 (release build 40 - "quetzalcoatlus" - "e3d29c5a2e5dc1ee455e831d589ecf5e18c7d6f0") [workers=1 listen='/tmp/.newrelic.sock'  pid=2008 ppid=2007 uid=0 euid=0 gid=0 egid=0 backtrace=no os='Linux' rel='3.2.0-58-virtual' mach='x86_64' ver='#88-Ubuntu SMP Tue Dec 3 17' node='ip-10-145-246-196' startup=agent]
2014-03-23 05:30:41.069 (2008/main) info: RPM config: proto='https' collector='collector.newrelic.com' proxy='none' certfile='/etc/ssl/certs/ca-certificates.crt' certdir='/etc/ssl/certs'
2014-03-23 05:35:14.928 (2008/connector) info: ['PHP Application'] 'Reporting to: https://rpm.newrelic.com/accounts/232928/applications/3262356'
Something named PHP Application is reporting. This is somewhat generic and totally doesn't look like our WordPress blog, but it's a good start. What this means is that all applications on your web server run and report as the same application to New Relic. This application has a default name of PHP Application.
In our case, since we're only running one application (our WordPress install), we could actually jump into the New Relic UI and get reasonable stats for our blog. But, of course, we want to give our blog a better name and just in case, we want our server to serve more than one application. We also want to see how to separate apps from each other. We will look at how to do this shortly, but before we do, let's see what actually makes up a PHP agent.
What a Healthy Install Looks Like
There are two parts to the New Relic PHP agent. The first is a PHP extension, it's a shared object called newrelic.so. If we look at the agent configuration file:
/etc/php5/cli/conf.d/newrelic.ini
We can see it listed right at the top:
; This file contains the various settings for the New Relic PHP agent. There
; are many options, all of which are described in detail at the following URL:
; https://newrelic.com/docs/php/php-agent-phpini-settings
;

; If you use a full path to the extension you insulate yourself from the
; extension directory changing if you change PHP installations or versions.
; If you do not use an absolute path then the file must be installed in the
; active configuration's extension directory.
extension = "newrelic.so"
This is the thing that will actually collect the stats from your apps, but it will not send the stats to New Relic, this is the job of the proxy daemon.
The agent daemon is a proxy between the PHP extension and the New Relic servers. Essentially, the PHP extension will give the data it collects to the daemon and the daemon will do things like batch it up and figure out when to send it to the server. You need to always make sure that the daemon is running, otherwise no data will be sent to New Relic. Luckily, by default, whenever you restart your server, the PHP extension will try to detect if the daemon is running and will start it, if it isn't.
A running proxy daemon has two processes. One is a monitor process and the second is the worker. The worker actually does the job of communicating with the New Relic servers, the monitoring process simply watches the worker and if the worker dies, for whatever reason, it will spawn a new one. You can stop the daemon by running:
/etc/init.d/newrelic-daemon stop
Which will send a shutdown signal to the monitoring process. The monitoring process will then kill the worker process and then shut itself down. If you ever need to kill the daemon manually, make sure you terminate the monitoring process first before killing the worker (otherwise a new worker will get spawned - obviously).
Configuring the Agent (and the Proxy Daemon)
We've already seen the New Relic PHP agent configuration file /etc/php5/cli/conf.d/newrelic.ini. Both the agent and the daemon are configured using this file.
This file is very well documented with all the options and their default values listed. Let's talk about the format of this file. The New Relic Ruby agent can be configured via YAML, which is a well-known format. The PHP agent is simply a text file, but we need a little bit of structure. Each variable in the file has one of four types (String, Boolean, Number, Duration). String and number are self-explanatory, boolean values can be true, on or 1 to indicate truthiness and false, off or 0 to indicate falsiness. Durations are strings with a particular format, for example: "1w3d23h10m" indicates one week, three days, 23 hours and ten minutes. The values for durations can be as granular as microseconds.
All variables in the file also have a 'scope'. There are three possible scopes: SYSTEM, PERDIR and SCRIPT. Variables that have SYSTEM scope can only be set in the global configuration file. Variables with a PERDIR scope can be set in the global configuration file and can also be overridden on a per directory basis. Variables with script scope can be global, per directory and can also be overridden programmatically.
For example, the most common configuration variable is `newrelic.appname`. This variable is a String type, it has a default value of PHP Application (now we know why we saw that value in the log file after we installed the agent and restarted the server). The scope of this variable is PERDIR which gives us an idea about how to override the application name for our WordPress blog.
There are many other variables controlling things like the location of the log files, whether or not sql queries are recorded, the log level of the log output and so . I encourage you to study the newrelic.ini file to familiarise yourself with the options.
Configuring a Separate App for Our WordPress Blog
We want to see a separate app in the New Relic UI for our WordPress blog, so let's see how we can get that going. Your options for per directory configuration are different depending on your stack, if you're using PHP-FPM, the steps are different than if you're using Nginx. In our case, since we're running straight Apache, we have two options.
Firstly, if we have a virtual host for our app, we can insert an IfModule block into our virtual host block and modify the name of the app there:
...
<IfModule php5_module>
  php_value newrelic.appname "My Blog 1"
</IfModule>
...
But I don't have a special virtual host just for the blog, so the other option is to use a .htaccess file. Ensure that you actually allow .htaccess files, by dumping the following in to your main virtual host:
<Directory /var/www/myblog1>
  Options Indexes FollowSymLinks MultiViews
  AllowOverride All
  Order allow,deny
  allow from all
</Directory>
We can now put an .htaccess file in the top level directory of our blog and put the following in it:
php_value newrelic.appname "My Blog 1"
The format is exactly the same as if I was putting it into the IfModule block. Now we just need to bounce our server. If we tail the daemon logs when the server restarts, we will see the following:
ubuntu@ip-10-145-246-196:/var/www/myblog1$ cat /var/log/newrelic/newrelic-daemon.log
2014-03-23 05:30:41.063 (2008/main) warning: current file limit of 1024 is too low - attempting to increase it
2014-03-23 05:30:41.064 (2008/main) info: increased file limit to 2048
2014-03-23 05:30:41.064 (2008/main) info: New Relic 4.6 (release build 40 - "quetzalcoatlus" - "e3d29c5a2e5dc1ee455e831d589ecf5e18c7d6f0") [workers=1 listen='/tmp/.newrelic.sock'  pid=2008 ppid=2007 uid=0 euid=0 gid=0 egid=0 backtrace=no os='Linux' rel='3.2.0-58-virtual' mach='x86_64' ver='#88-Ubuntu SMP Tue Dec 3 17' node='ip-10-145-246-196' startup=agent]
2014-03-23 05:30:41.069 (2008/main) info: RPM config: proto='https' collector='collector.newrelic.com' proxy='none' certfile='/etc/ssl/certs/ca-certificates.crt' certdir='/etc/ssl/certs'
2014-03-23 05:35:14.928 (2008/connector) info: ['PHP Application'] 'Reporting to: https://rpm.newrelic.com/accounts/232928/applications/3262356'
2014-03-23 06:07:58.768 (2008/connector) info: ['My Blog 1'] 'Reporting to: https://rpm.newrelic.com/accounts/232928/applications/3262424'
The PHP Application is still there, but now it has a friend which is our WordPress blog. And here it is in the UI:

We will now receive metrics as we browse our blog, both for the front-end and the admin interface. Since New Relic supports WordPress out of the box, the metrics should be broken up sensibly (when a framework is unsupported, the metrics will tend to be lumped together).
Updating the Agent & Daemon
New Relic is a complex piece of software and it's good to keep it up to date as bugs are fixed regularly and new features are added. Since we installed everything using apt-get, keeping things up to date is easy. We simply do the same thing we did to install it:
apt-get update
apt-get install newrelic-php5
If we haven't installed another PHP on the system, we now simply need to restart our server and we'll be up to date. If there is a new PHP, we may need to re-run the newrelic-install script.
There is only one caveat to all of this. In certain situations, you may be running the New Relic proxy daemon separately from the agent, meaning that restarting the server does not automatically launch the daemon if one isn't running (this is called external daemon mode). There could be multiple reasons why you'd want to do this, for example, you might want a different user to own the daemon process so the logs are only visible to that user. In this situation, you have to remember to both restart the server and restart the proxy daemon. If you don't, you'll see 'protocol mismatch' errors in the logs.
Conclusion
As you can see, getting New Relic set up for a PHP application is very different from getting it set up for Ruby, your actual application doesn't even factor in the process, while the environment where you deploy is central. Luckily this means that if you're using any supported PHP framework, the process for setting up New Relic is exactly the same. Besides WordPress, most of the popular PHP frameworks are supported including Cake, Symphony and Laravel (version 4 and up). It is also possible to use New Relic with an unsupported framework, but you will have to put in some serious effort to get the metrics to make sense.

Comments