Android's Media Effects framework allows developers to easily apply lots of impressive visual effects to photos and videos. As the framework uses the GPU to perform all its image processing operations, it can only accept OpenGL textures as its input. In this tutorial, you are going to learn how to use OpenGL ES 2.0 to convert a drawable resource into a texture and then use the framework to apply various effects to it.
Prerequisites
To follow this tutorial, you need to have:
- an IDE that supports Android application development. If you don't have one, get the latest version of Android Studio from the Android Developer website.
- a device that runs Android 4.0+ and has a GPU that supports OpenGL ES 2.0.
- a basic understanding of OpenGL.
1. Setting Up the OpenGL ES Environment
Step 1: Create a GLSurfaceView
To display OpenGL graphics in your app, you have to use a GLSurfaceView object. Like any other View, you can add it to an Activity or Fragment by defining it in a layout XML file or by creating an instance of it in code.
In this tutorial, you are going to have a GLSurfaceView object as the only View in your Activity. Therefore, creating it in code is simpler. Once created, pass it to the setContentView method so that it fills the entire screen. Your Activity's onCreate method should look like this:
protected void onCreate(Bundle savedInstanceState) {
    super.onCreate(savedInstanceState);

    GLSurfaceView view = new GLSurfaceView(this);
    setContentView(view);
}
Because the Media Effects framework only supports OpenGL ES 2.0 or higher, pass the value 2 to the setEGLContextClientVersion method.
view.setEGLContextClientVersion(2);
To make sure that the GLSurfaceView renders its contents only when necessary, pass the value RENDERMODE_WHEN_DIRTY to the setRenderMode method.
view.setRenderMode(GLSurfaceView.RENDERMODE_WHEN_DIRTY);
Step 2: Create a Renderer
A GLSurfaceView.Renderer is responsible for drawing the contents of the GLSurfaceView.
Create a new class that implements the GLSurfaceView.Renderer interface. I am going to call this class EffectsRenderer. After adding a constructor and overriding all the methods of the interface, the class should look like this:
public class EffectsRenderer implements GLSurfaceView.Renderer {

    public EffectsRenderer(Context context){
		super();
	}

    @Override
    public void onSurfaceCreated(GL10 gl, EGLConfig config) {
    }

    @Override
    public void onSurfaceChanged(GL10 gl, int width, int height) {
	}

    @Override
    public void onDrawFrame(GL10 gl) {
	}
}
Go back to your Activity and call the setRenderer method so that the GLSurfaceView uses the custom renderer.
view.setRenderer(new EffectsRenderer(this));
Step 3: Edit the Manifest
If you plan to publish your app on Google Play, add the following to AndroidManifest.xml:
<uses-feature android:glEsVersion="0x00020000" android:required="true" />
This makes sure that your app can only be installed on devices that support OpenGL ES 2.0. The OpenGL environment is now ready.
2. Creating an OpenGL Plane
Step 1: Define Vertices
The GLSurfaceView cannot display a photo directly. The photo has to be converted into a texture and applied to an OpenGL shape first. In this tutorial, we will be creating a 2D plane that has four vertices. For the sake of simplicity, let's make it a square. Create a new class, Square, to represent the square.
public class Square {

}
The default OpenGL coordinate system has its origin at its center. As a result, the coordinates of the four corners of our square, whose sides are two units long, will be:
- bottom left corner at (-1, -1)
- bottom right corner at (1, -1)
- top right corner at (1, 1)
- top left corner at (-1, 1)
All the objects we draw using OpenGL should be made up of triangles. To draw the square, we need two triangles with a common edge. This means that the coordinates of the triangles will be:
triangle 1: (-1, -1), (1, -1), and (-1, 1)
triangle 2: (1, -1), (-1, 1), and (1, 1)
Create a float array to represent these vertices.
private float vertices[] = {
        -1f, -1f,
        1f, -1f,
        -1f, 1f,
        1f, 1f,
};
To map the texture onto the square, you need to specify the coordinates of the vertices of the texture. Textures follow a coordinate system in which the value of the y-coordinate increases as you go higher. Create another array to represent the vertices of the texture.
private float textureVertices[] = {
        0f,1f,
        1f,1f,
        0f,0f,
        1f,0f
};
Step 2: Create Buffer Objects
The arrays of coordinates need to be converted into byte buffers before OpenGL can use them. Let's declare these buffers first.
private FloatBuffer verticesBuffer;
private FloatBuffer textureBuffer;
Write the code to initialize these buffers in a new method called initializeBuffers. Use the ByteBuffer.allocateDirect method to create the buffer. Because a float uses 4 bytes, you need to multiply the size of the arrays with the value 4.
Next, use ByteBuffer.nativeOrder to determine the byte order of the underlying native platform, and set the order of the buffers to that value. Use the asFloatBuffer method to convert the ByteBuffer instance into a FloatBuffer. After the FloatBuffer is created, use the put method to load the array into the buffer. Finally, use the position method to make sure that the buffer is read from the beginning.
The contents of the initializeBuffers method should look like this:
private void initializeBuffers(){
    ByteBuffer buff = ByteBuffer.allocateDirect(vertices.length * 4);
    buff.order(ByteOrder.nativeOrder());
    verticesBuffer = buff.asFloatBuffer();
    verticesBuffer.put(vertices);
    verticesBuffer.position(0);

    buff = ByteBuffer.allocateDirect(textureVertices.length * 4);
    buff.order(ByteOrder.nativeOrder());
    textureBuffer = buff.asFloatBuffer();
    textureBuffer.put(textureVertices);
    textureBuffer.position(0);
}
Step 3: Create Shaders
It's time to write your own shaders. Shaders are nothing but simple C programs that are run by the GPU to process every individual vertex. For this tutorial, you have to create two shaders, a vertex shader and a fragment shader.
The C code for the vertex shader is:
attribute vec4 aPosition;
attribute vec2 aTexPosition;
varying vec2 vTexPosition;
void main() {
  gl_Position = aPosition;
  vTexPosition = aTexPosition;
};
The C code for the fragment shader is:
precision mediump float;
uniform sampler2D uTexture;
varying vec2 vTexPosition;
void main() {
  gl_FragColor = texture2D(uTexture, vTexPosition);
};
If you already know OpenGL, this code should be familiar to you because it is common across all platforms. If you don't, to understand these programs you must refer to the OpenGL documentation. Here's a brief explanation to get you started:
- The vertex shader is responsible for drawing the individual vertices.
aPositionis a variable that will be bound to theFloatBufferthat contains the coordinates of the vertices. Similarly,aTexPositionis a variable that will be be bound to theFloatBufferthat contains the coordinates of the texture.gl_Positionis a built-in OpenGL variable and represents the position of each vertex. ThevTexPositionis avaryingvariable, whose value is simply passed on to the fragment shader. - In this tutorial, the fragment shader is responsible for coloring the square. It picks up colors from the texture using the
texture2Dmethod and assigns them to the fragment using a built-in variable namedgl_FragColor.
The shader code needs to be represented as String objects in the class.
private final String vertexShaderCode =
        "attribute vec4 aPosition;" +
        "attribute vec2 aTexPosition;" +
        "varying vec2 vTexPosition;" +
        "void main() {" +
        "  gl_Position = aPosition;" +
        "  vTexPosition = aTexPosition;" +
        "}";

private final String fragmentShaderCode =
        "precision mediump float;" +
        "uniform sampler2D uTexture;" +
        "varying vec2 vTexPosition;" +
        "void main() {" +
        "  gl_FragColor = texture2D(uTexture, vTexPosition);" +
        "}";
Step 4: Create a Program
Create a new method called initializeProgram to create an OpenGL program after compiling and linking the shaders.
Use glCreateShader to create a shader object and return a reference to it in the form of an int. To create a vertex shader, pass the value GL_VERTEX_SHADER to it. Similarly, to create a fragment shader, pass the value GL_FRAGMENT_SHADER to it. Next use glShaderSource to associate the appropriate shader code with the shader. Use glCompileShader to compile the shader code.
After compiling both shaders, create a new program using glCreateProgram. Just like glCreateShader, this too returns an int as a reference to the program. Call glAttachShader to attach the shaders to the program. Finally, call glLinkProgram to link the program.
Your method and the associated variables should look like this:
private int vertexShader;
private int fragmentShader;
private int program;

private void initializeProgram(){
    vertexShader = GLES20.glCreateShader(GLES20.GL_VERTEX_SHADER);
    GLES20.glShaderSource(vertexShader, vertexShaderCode);
    GLES20.glCompileShader(vertexShader);

    fragmentShader = GLES20.glCreateShader(GLES20.GL_FRAGMENT_SHADER);
    GLES20.glShaderSource(fragmentShader, fragmentShaderCode);
    GLES20.glCompileShader(fragmentShader);

    program = GLES20.glCreateProgram();
    GLES20.glAttachShader(program, vertexShader);
    GLES20.glAttachShader(program, fragmentShader);

    GLES20.glLinkProgram(program);
}
You might have noticed that the OpenGL methods (the methods prefixed with gl) belong to the class GLES20. This is because we are using OpenGL ES 2.0. If you wish to use a higher version, then you will have to use the classes GLES30 or GLES31.
Step 5: Draw the Square
Create a new method called draw to actually draw the square using the vertices and shaders we defined earlier.
Here's what you need to do in this method:
- Use
glBindFramebufferto create a named frame buffer object (often called FBO).
- Use
glUseProgramto start using the program we just linked. - Pass the value
GL_BLENDtoglDisableto disable the blending of colors while rendering.
- Use
glGetAttribLocationto get a handle to the variablesaPositionandaTexPositionmentioned in the vertex shader code.
- Use
glGetUniformLocationto get a handle to the constantuTexturementioned in the fragment shader code.
- Use the
glVertexAttribPointerto associate theaPositionandaTexPositionhandles with theverticesBufferand thetextureBufferrespectively.
- Use
glBindTextureto bind the texture (passed as an argument to thedrawmethod) to the fragment shader.
- Clear the contents of the
GLSurfaceViewusingglClear.
- Finally, use the
glDrawArraysmethod to actually draw the two triangles (and thus the square).
The code for the draw method should look like this:
public void draw(int texture){
    GLES20.glBindFramebuffer(GLES20.GL_FRAMEBUFFER, 0);
    GLES20.glUseProgram(program);
    GLES20.glDisable(GLES20.GL_BLEND);

    int positionHandle = GLES20.glGetAttribLocation(program, "aPosition");
    int textureHandle = GLES20.glGetUniformLocation(program, "uTexture");
    int texturePositionHandle = GLES20.glGetAttribLocation(program, "aTexPosition");

    GLES20.glVertexAttribPointer(texturePositionHandle, 2, GLES20.GL_FLOAT, false, 0, textureBuffer);
    GLES20.glEnableVertexAttribArray(texturePositionHandle);

    GLES20.glActiveTexture(GLES20.GL_TEXTURE0);
    GLES20.glBindTexture(GLES20.GL_TEXTURE_2D, texture);
    GLES20.glUniform1i(textureHandle, 0);

    GLES20.glVertexAttribPointer(positionHandle, 2, GLES20.GL_FLOAT, false, 0, verticesBuffer);
    GLES20.glEnableVertexAttribArray(positionHandle);

    GLES20.glClear(GLES20.GL_COLOR_BUFFER_BIT);
    GLES20.glDrawArrays(GLES20.GL_TRIANGLE_STRIP, 0, 4);
}
Add a constructor to the class to initialize the buffers and the program at the time of object creation.
public Square(){
    initializeBuffers();
    initializeProgram();
}
3. Rendering the OpenGL Plane and Texture
Currently, our renderer does nothing. We need to change that so that it can render the plane we created in the previous steps.
But first, let us create a Bitmap. Add any photo to your project's res/drawable folder. The file I am using is called forest.jpg. Use the BitmapFactory to convert the photo into a Bitmap object. Also, store the dimensions of the Bitmap object in separate variables.
Change the constructor of the EffectsRenderer class so that it has the following contents:
private Bitmap photo;
private int photoWidth, photoHeight;
public EffectsRenderer(Context context){
    super();
    photo = BitmapFactory.decodeResource(context.getResources(), R.drawable.forest);
    photoWidth = photo.getWidth();
    photoHeight = photo.getHeight();
}
Create a new method called generateSquare to convert the bitmap into a texture and initialize a Square object. You will also need an array of integers to hold references to the OpenGL textures. Use glGenTextures to initialize the array and glBindTexture to activate the texture at index 0.
Next, use glTexParameteri to set various properties that decide how the texture is rendered:
- Set
GL_TEXTURE_MIN_FILTER(the minifying function) and theGL_TEXTURE_MAG_FILTER(the magnifying function) toGL_LINEARto make sure that the texture looks smooth, even when it's stretched or shrunk.
- Set
GL_TEXTURE_WRAP_SandGL_TEXTURE_WRAP_TtoGL_CLAMP_TO_EDGEso that the texture is never repeated.
Finally, use the texImage2D method to map the Bitmap to the texture. The implementation of the generateSquare method should look like this:
private int textures[] = new int[2];
private Square square;

private void generateSquare(){
    GLES20.glGenTextures(2, textures, 0);
    GLES20.glBindTexture(GLES20.GL_TEXTURE_2D, textures[0]);

    GLES20.glTexParameteri(GLES20.GL_TEXTURE_2D, GLES20.GL_TEXTURE_MIN_FILTER, GLES20.GL_LINEAR);
    GLES20.glTexParameteri(GLES20.GL_TEXTURE_2D, GLES20.GL_TEXTURE_MAG_FILTER, GLES20.GL_LINEAR);
    GLES20.glTexParameteri(GLES20.GL_TEXTURE_2D, GLES20.GL_TEXTURE_WRAP_S, GLES20.GL_CLAMP_TO_EDGE);
    GLES20.glTexParameteri(GLES20.GL_TEXTURE_2D, GLES20.GL_TEXTURE_WRAP_T, GLES20.GL_CLAMP_TO_EDGE);

    GLUtils.texImage2D(GLES20.GL_TEXTURE_2D, 0, photo, 0);
    square = new Square();
}
Whenever the dimensions of the GLSurfaceView change, the onSurfaceChanged method of the Renderer is called. Here's where you have to call glViewPort to specify the new dimensions of the viewport. Also, call glClearColor to paint the GLSurfaceView black. Next, call generateSquare to reinitialize the textures and the plane.
@Override
public void onSurfaceChanged(GL10 gl, int width, int height) {
    GLES20.glViewport(0,0,width, height);
    GLES20.glClearColor(0,0,0,1);
    generateSquare();
}
Finally, call the Square object's draw method inside the onDrawFrame method of the Renderer.
@Override
public void onDrawFrame(GL10 gl) {
    square.draw(textures[0]);
}
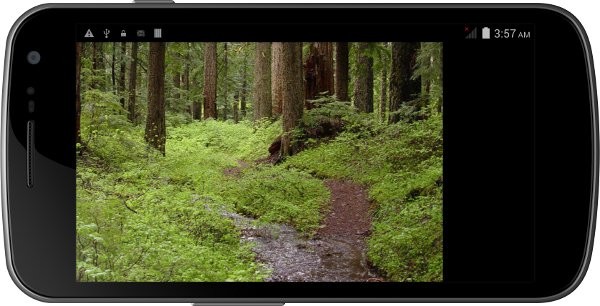
You can now run your app and see the photo you had chosen being rendered as an OpenGL texture on a plane.
4. Using the Media Effects Framework
The complex code we wrote until now was just a prerequisite to use the Media Effects framework. It's now time to start using the framework itself. Add the following fields to your Renderer class.
private EffectContext effectContext;
private Effect effect;
Initialize the effectContext field by using the EffectContext.createWithCurrentGlContext. It's responsible for managing the information about the visual effects inside an OpenGL context. To optimize performance, this should be called only once. Add the following code at the beginning of your onDrawFrame method.
if(effectContext==null) {
    effectContext = EffectContext.createWithCurrentGlContext();
}
Creating an effect is very simple. Use the effectContext to create an EffectFactory and use the EffectFactory to create an Effect object. Once an Effect object is available, you can call apply and pass a reference to the original texture to it, in our case it is textures[0], along with a reference to a blank texture object, in our case it is textures[1]. After the apply method is called, textures[1] will contain the result of the Effect.
For example, to create and apply the grayscale effect, here's the code you have to write:
private void grayScaleEffect(){
    EffectFactory factory = effectContext.getFactory();
    effect = factory.createEffect(EffectFactory.EFFECT_GRAYSCALE);
    effect.apply(textures[0], photoWidth, photoHeight, textures[1]);
}
Call this method in onDrawFrame and pass textures[1] to the Square object's draw method. Your onDrawFrame method should have the following code:
@Override
public void onDrawFrame(GL10 gl) {
    if(effectContext==null) {
        effectContext = EffectContext.createWithCurrentGlContext();
    }
    if(effect!=null){
        effect.release();
    }
    grayScaleEffect();
    square.draw(textures[1]);
}
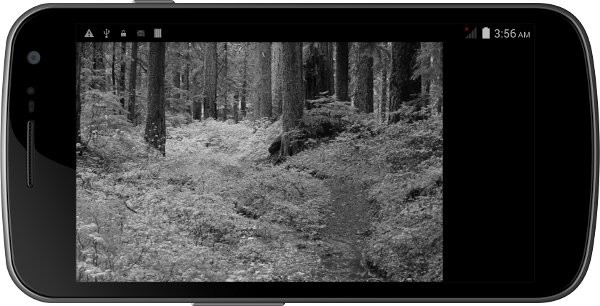
The release method is used to free up all resources held by an Effect. When you run the app, you should see the following result:
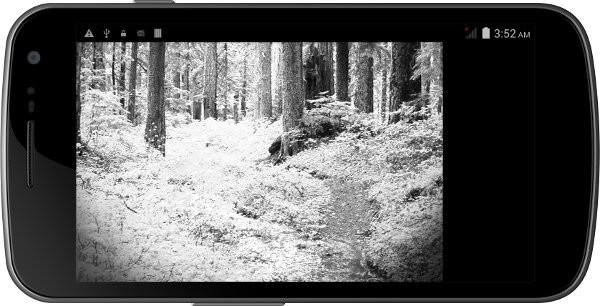
You can use the same code to apply other effects. For example, here's the code to apply the documentary effect:
private void documentaryEffect(){
    EffectFactory factory = effectContext.getFactory();
    effect = factory.createEffect(EffectFactory.EFFECT_DOCUMENTARY);
    effect.apply(textures[0], photoWidth, photoHeight, textures[1]);
}
The result looks like this:
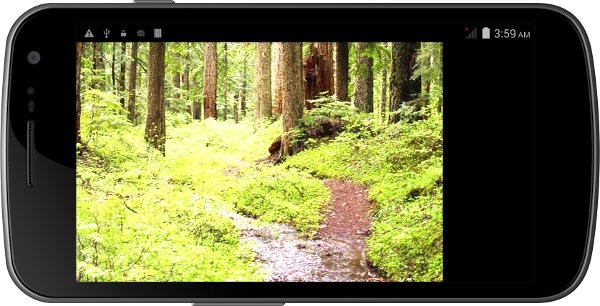
Some effects take parameters. For instance, the brightness adjustment effect has a brightness parameter which takes a float value. You can use setParameter to change the value of any parameter. The following code shows you how to use it:
private void brightnessEffect(){
    EffectFactory factory = effectContext.getFactory();
    effect = factory.createEffect(EffectFactory.EFFECT_BRIGHTNESS);
    effect.setParameter("brightness", 2f);
    effect.apply(textures[0], photoWidth, photoHeight, textures[1]);
}
The effect will make your app render the following result:
Conclusion
In this tutorial, you have learned how to use the Media Effects Framework to apply various effects to your photos. While doing so, you also learned how to draw a plane using OpenGL ES 2.0 and apply various textures to it.
The framework can be applied to both photos and videos. In case of videos, you simply have to apply the effect to the individual frames of the video in the onDrawFrame method.
You have already seen three effects in this tutorial and the framework has dozens more for you to experiment with. To know more about them, refer to the Android Developer's website.

Comments