One of the considerations that all WordPress plugin developers have to make is how to actually publish their work. Many premium plugins opt to run their own website, documentation, and purchase gateway, but if you're looking to publish a free plugin or perhaps a lite variation of a premium plugin then using the WordPress plugin repository is a great option.
WordPress.org offers source control, stats tracking, and automatically notifies users of updates all for free. It doesn't hurt that the site has solid ranking with search engines either especially since your plugin can benefit!
In this article, we'll look at how to setup a WordPress plugin repository and maintain your project through its development life-cycle. Note that this article assumes you have basic familiarity with Subversion.
Step 1 Requesting Access
Before requesting access for your project, you need to have an account with WordPress.org. They're free and easy to setup.
First, navigate to this page and provide the requested information. Once your account is setup and confirmed, you can setup the repository. Navigate to the WordPress Developer Center. From the WordPress.org homepage, click on Extend and Plugins. Next, click on "Add Your Plugin:"

On the next screen, you will be prompted to enter in your plugin name, a short description, and the URL to the project's homepage. This doesn't have to be in-depth, but here are a few tips that will serve you will in requesting access:
- Make sure the plugin name is final. Once you're granted access to the repository, you can't change the name. Think strategically about what you want to name the plugin, too. For best results, it's often best to name the plugin something simple that is related to what users will search on in a search engine.
- Don't spend to much time drafting a description of your plugin at this point. A concise, one sentence description is fine. The README file for the plugin will provide more detail once you've launched the project.
- The URL to your plugin's homepage doesn't necessarily have to be valid but make sure that whatever URL you specify is where the plugin's homepage will actually live.
Once you have provided the information, send the request. You will receive in an email with the credentials for your repository typically within 24 to 48 hours after which you can make your first commit.
Step 2 Setting Up The Repository
After you have received the repository URL, you can do your initial checkout. Using your favorite subversion client (I'm using TortoiseSVN in this tutorial), perform an checkout using the repository's URL:

This will create a directory with the plugin name that you specified in the first step of this tutorial. It will also initialize the branches, tags, and trunk directories:

A quick note on the directory structure:
- The trunk of the repository is your working directory. This is the directory in which you do all of your main development.
- Tags are versions, or snapshots, of the trunk at specific points in its development cycle. Often times, you can tag the trunk each time you want to perform a release.
- The branch directory is a copy of the trunk at a certain point in time that's used for heavy development. If you're going to do heavy development, it's best to branch - this way, you preserve the quality of the trunk.
You can read much more about the subversion directory structure here.
Step 4 Committing Changes
At this point, you can begin working out of the repository. If this is your first time working with it, your trunk directory should be empty. If you've been working on your plugin prior to initializing the directory, then go ahead and copy the files into the trunk now; otherwise, feel free to begin working on your plugin.
Once you have finished copying or have begun working on the plugin, you will need to add the files to source control. To do this, execute the add command:

This will instruct subversion to begin tracking these files. Next up, run the commit command:

This step will actually submit the plugin's codebase to the WordPress plugin repository.
Of course, you have not yet actually published your plugin until you tag it. Prior to doing that, make sure that you have properly setup your plugin's header and it's README file. You can also read up more on this in the Writing Maintainable WordPress Widgets series.
Step 3 Tagging and Releasing
Assuming that you have completed a working version of your plugin and setup the header and README, it's time to release a version of your plugin. To do so, execute the Branch/Tag [TODO] command on the trunk directory.
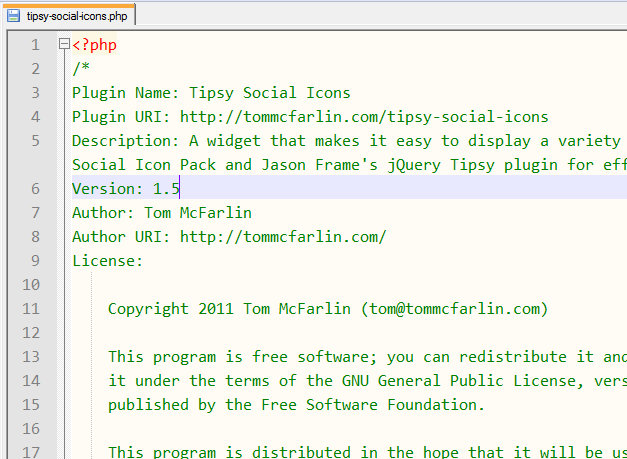
Before doing so, make sure that you update the version tag in the plugin's header:

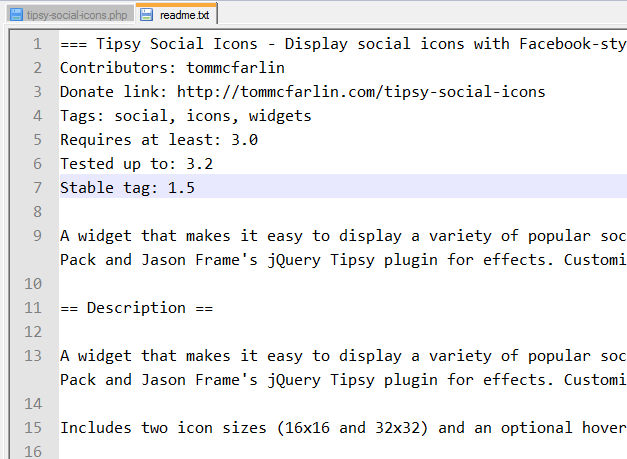
And update the stable tag of the README, too:

Next, commit the changes to the trunk.
After that, you're ready to tag:

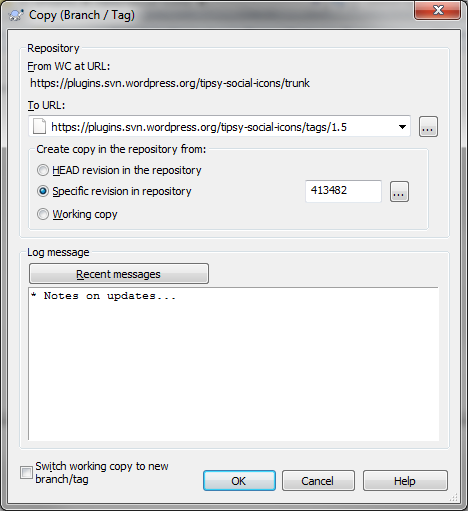
While doing so, Subversion will ask you which directory you want to tag the version. It's very important to make sure you update the path of the plugin to the tags path - most Subversion clients will populate the destination with the trunk direction. This is incorrect - instead, you will want to change the path to /tags/1.0 (but if you're tagging 1.5 or 2.0 then you'll change the number):

At this point, you're plugin has been checked into source control and been tagged as a specific version. Within 20 minutes, your plugin should show up in the WordPress Plugin repository at the URL that you specified when requesting the repository.
Checking in future versions of the plugin works the same as in the previous steps. Over time, you'll be able to continue developing the plugin and tracking download statistics from the project page.
Conclusion
That's it! Hopefully by now you've got a good understanding of what it takes to formally publish your plugin through the WordPress plugin repository. We recently looked at how to actually start creating plugins... so you should have a solid foundation to get out there and start creating your own custom plugins! The great thing about all of this is that it helps contribute to the already outstanding platform that is WordPress. The most talented developers and designers that we can get out there creating useful plugins, the better the platform will become!
Extra Resources
If you're interested in learning more about WordPress Plugin Development, then checkout our WordPress Plugin Services in Envato Studio for further resources and education on the topic!


Comments