In my last series of articles, we looked at the concepts of object-oriented programming from the perspective of the beginner. The goal of the series was to take those who were not familiar with object-oriented programming in PHP, and explore the foundational aspects of the paradigm within the context of WordPress.
If you didn't have a chance to read the series, you can read a brief summary (along with links to each article in the series) in the final post.
During the course of the series, one of the things that we did in order to help demonstrate the object-oriented principles as well as some of the features of the WordPress API was build a plugin.
Specifically, we built a plugin that allowed us to view all of the post meta data associated with a given post within the WordPress dashboard.
The plugin is available for download on GitHub where you can also browse the source code, view the code comments, and generally see everything that went into creating the plugin when we developed it.
Since that particular post was written, I've received a number of different questions one of which has been how do we take the data displayed in the dashboard - that is, the post meta data - and display it on the front end of the web site.
In this article, we're going to take a look at extending the plugin such that we can display the data on a single post page. We're going to talk about how to do this given our existing code, how to do this, and we're also going to talk about why this may not be a good idea.
So with that said, let's get started.
Ramifications of Extending the Plugin
Before we jump into planning out how we're going to actually expand the plugin, I think it's worth having a short discussion as to why displaying this kind of information on the frontend - while although possible - may not be a good idea.
That is to say that I think this makes a case for how, when dealing with certain types of data, it's important to consider the ramifications of what we opt to do when building products for others and how we manage the data.
In short, just because we can do something doesn't mean that we should do it.
A Look at the Data
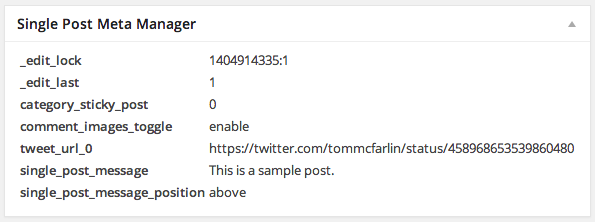
Think of it this way: The meta data that's associated with a given post is stored in the database - some by WordPress, some by themes, and some by plugins - all of which use use the information for their own specific needs.
If you take a look at the image above, you'll notice that some rows are identified by keys prefixed with an underscore. For example,, we have _edit_lock and _edit_last and then some numeric values. This is an example of data that WordPress uses to internally manage the state of the posts.
The other keys that you see have to do with plugins that I have installed in my local WordPress installation and are used to demonstrate how other utilities can save data to the meta data table and then relate it to the given post.
What's the Problem?
The problem with displaying all of this information on the front end is that you could be showing too much information to the user.
In the case above, there's nothing that's particularly dangerous or sensitive that may help to compromise the installation, but that doesn't mean that will always be the case. Even further, there's a significant chance that you may end up displaying information that's related to a plugin or theme that never wanted its information displayed.
Furthermore, for many - or even most - people who visit a blog, seeing the information displayed on the front end of the blog will look like noise. It's technical jargon that won't mean anything. This is why I think keeping this information relegated to the dashboard is the best place to do it.
But We're Going To Extend The Plugin?
In short, yes but not because I think displaying this kind of information to the user is a good idea, but because there is a practical application that comes with extending an existing plugin, the benefits of leveraging existing code, and seeing the negative ramifications of doing such.
So yes - sometimes, the best lessons can come from implementing ideas that may not be good in retrospect.
But that's okay. This is how we learn, right?
Plus, there are still some practical lessons that come with learning how to extend an existing code base.
Extending Single Post Meta Manager
As with all of the tutorials that I share, I try to plan out exactly what we're doing to do before we do it so that we're not coding through a lot of guess work, and so that we have a plan of action on how to architect our solution.
So, before going any further, if you've not reviewing the Single Post Meta Manager, then please do so now and we'll continue.
Once done, here's what we'll plan to do:
- We'll be using the default twentyfourteen theme as the basis for our example.
- We'll introduce a public directory that will be used to display the information on the
publicside of the blog specifically within the context of single posts. - We'll define hooks that will allow us to append information to the content of the post so that the post meta data can be displayed at the bottom of the content. We'll be using a rudimentary table for this that will inherit styles from the current theme. Note that in doing this, you may end up having some really clean styles, and you may end up having some really weak styles. These will be up for you to implement on your own.
- We'll then take advantage of template that we created in the initial version of the plugin to make sure to retrieve the post meta data for the given post in order to display it on the front end.
Nothing too complicated, right? We just need to be precise in our steps. So let's get started.
Introduce the Public Directory
Assuming that you have twentyfourteen already activated and the plugin installed, let's get to work on introducing our functionality. The first thing that we need to do is to
- introduce a
publicdirectory - add the
Single_Post_Meta_Manager_Publicclass - include the class in the core plugin file
After adding the files, the above can be done by the following lines of code to the load_dependencies function in includes/single-post-meta-manager.php.
private function load_dependencies() {

    require_once plugin_dir_path( dirname( __FILE__ ) ) . 'admin/class-single-post-meta-manager-admin.php';
    require_once plugin_dir_path( dirname( __FILE__ ) ) . 'public/class-single-post-meta-manager-public.php';

    require_once plugin_dir_path( __FILE__ ) . 'class-single-post-meta-manager-loader.php';
    $this->loader = new Single_Post_Meta_Manager_Loader();

}
Notice that the only new line is the second require_once statement which imports the class file.
After that, let's define the properties, constructor, and methods for the Single_Post_Meta_Manager_Public class:
<?php
/**
 * The Single Post Meta Manager Public defines all functionality for the public-facing
 * sides of the plugin
 *
 * @package SPMM
 */

/**
 * The Single Post Meta Manager Public defines all functionality for the public-facing
 * sides of the plugin.
 *
 * This class defines the meta box used to display the post meta data and registers
 * the style sheet responsible for styling the content of the meta box.
 *
 * @since    1.0.0
 */
class Single_Post_Meta_Manager_Public {

    /**
	 * A reference to the version of the plugin that is passed to this class from the caller.
	 *
	 * @access private
	 * @var    string    $version    The current version of the plugin.
	 */
	private $version;

	/**
	 * Initializes this class and stores the current version of this plugin.
	 *
	 * @param    string    $version    The current version of this plugin.
	 */
	public function __construct( $version ) {
		$this->version = $version;
	}

	/**
	 * Uses the partial located in the admin directory for rendering the
	 * post meta data the end of the post content.
	 *
	 * @param    string    $content    The post content.
	 * @return   string    $content    The post content including the given posts meta data.
	 */
	public function display_post_meta_data( $content ) {

		ob_start();

		require_once plugin_dir_path( dirname( __FILE__ ) ) . 'admin/partials/single-post-meta-manager.php';
		$template = ob_get_contents();
		$content .= $template;

		ob_end_clean();

		return $content;

	}

}
Next, we need to create the Single Post Meta Manager's define_public_hooks function. This should look like this:
<?php
/**
 * Defines the hooks and callback functions that are used for rendering information on the front
 * end of the site.
 *
 * This function relies on the Single Post Meta Manager Public class and the Single Post Meta Manager
 * Loader class property.
 *
 * @access    private
 */
private function define_public_hooks() {

    $public = new Single_Post_Meta_Manager_Public( $this->get_version() );
    $this->loader->add_action( 'the_content', $public, 'display_post_meta_data' );

}
Next, we need to define a call to this function within the constructor. That is, just below the $this->define_admin_hooks(); line, add $this->define_public_hooks(); call.
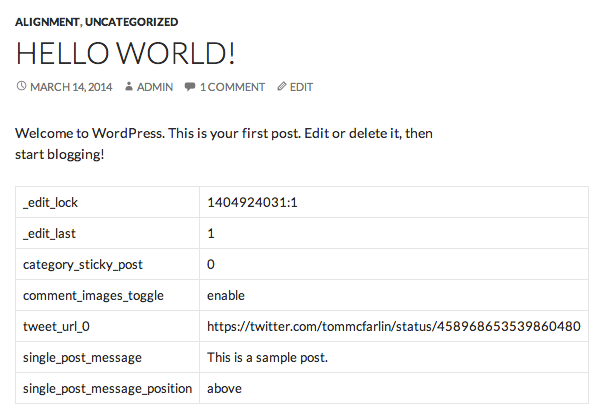
Assuming all has gone well, you should be able to activate the plugin, load up any post, and see the same meta data now displayed within the front of the post as well as in the dashboard of the post:
Summary
As mentioned earlier in this tutorial, displaying this kind of information on the front end of a post is not necessarily the best idea; however, learning how to practically add to an existing plugin will introduce entirely new functionality while also reusing some of the existing components.
Ultimately, the key takeaway is two fold:
- Leveraging existing code is a powerful thing
- Exposing data that is irrelevant to users is a dangerous idea
So after reading this particular tutorial, note that I'm not necessarily endorsing doing this in a production-level environment, but more as a learning tool. That is, use it at your own risk.
As usual, please leave all of your questions, comments, and more in the feed below!

Comments